JMGT 1/48 Pfalz E.1
|
KIT # |
|
|
PRICE: |
$59.95 |
|
DECALS: |
One aircraft |
|
REVIEW : |
|
|
NOTES: |
Limited run resin kit |
|
HISTORY |
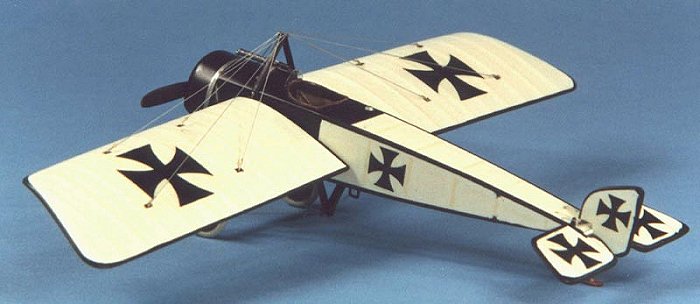
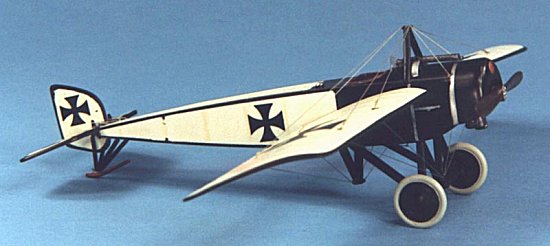
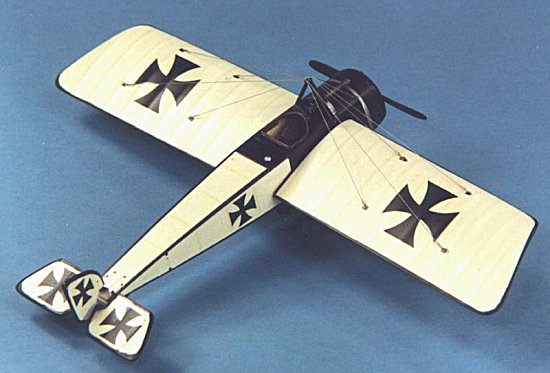
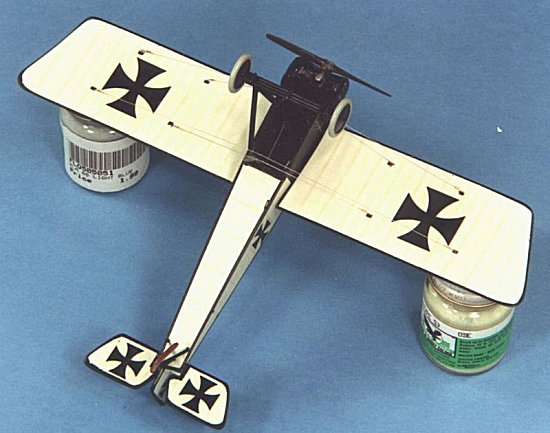
"Always the bridesmaid but never the bride" might be a good proverb to say when discussing the fortunes of the Pfalz Flugzeug Werke GmbH during WWI in that their aircraft always seemed to be less preferred than their competitors. Starting with their version of the famous "Eindekker" in 1915, continuing with the D.III series in 1917, and finishing with the D.XII series in 1918, Pfalz aircraft always seemed to be the bridesmaid to their famous sisters from Fokker and Albatros. However, this is not to say that Pfalz aircraft were indeed the "ugly sister", for they had a very good war record. However, as beauty is often in the eye of the beholder, several German aces such as Rudolph Berthold actually preferred the Pfalz aircraft to its rival, the Albatros.
This kit from JMGT represents an early variant of the E.I series that was flown by the Bavarian Air Service.
|
THE KIT |
 JMGT is a small French
manufacturer that specializes in relatively obscure French aircraft. Wait a
minute, this aircraft is German, so what’s up with that? As it turns out the
Pfalz E.I is a license built aircraft of the French Morane Saulnier Type H. The
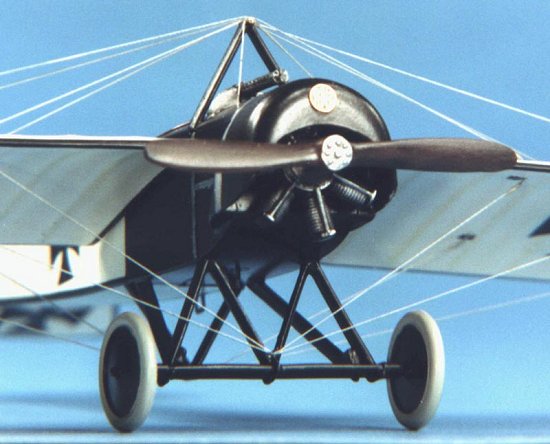
kit is multi-media and consists of resin parts (10 items), white metal parts
(seven items), a photo-etch (PE) fret (nine items), and a vac-u-form engine
cowl. The resin castings are very nicely done with no air bubbles and minimal
mold seam lines to clean up. The white metal castings are among the best I have
ever seen and require virtually no clean up. In fact, it took me less than an
hour to separate and clean up all the resin and white metal pieces which is a
world record for me!
JMGT is a small French
manufacturer that specializes in relatively obscure French aircraft. Wait a
minute, this aircraft is German, so what’s up with that? As it turns out the
Pfalz E.I is a license built aircraft of the French Morane Saulnier Type H. The
kit is multi-media and consists of resin parts (10 items), white metal parts
(seven items), a photo-etch (PE) fret (nine items), and a vac-u-form engine
cowl. The resin castings are very nicely done with no air bubbles and minimal
mold seam lines to clean up. The white metal castings are among the best I have
ever seen and require virtually no clean up. In fact, it took me less than an
hour to separate and clean up all the resin and white metal pieces which is a
world record for me!
The PE is done on a thick brass-type material that I have never seen before but is quite easy to use. The vac-u-formed cowl represents the only real challenge in the kit, as you must cut out and carefully sand to shape, but at least two cowls are provided (thank you JMGT!). This was my first vac piece and I even got it right on the first try! The only real disappointment in the kit is the decals, as they are printed on a very thick carrier film that is visible even after the clear coat. The decals provided are for a generic Bavarian aircraft so they can easily be replaced with Americal’s early style German crosses. At least I give JMGT credit for trying as they also included the rib tapes, however due to their thickness I chose not to use them and masked and painted all the rib tapes which I feel also makes for a better looking model. The instruction sheet is very brief, consisting of only a single page, but it does contain all the information you need to successfully build the model.
|
CONSTRUCTION |
 The first job up was
to separate and clean up the resin and white metal parts. However, this was very
easy as mentioned earlier. In addition, you must drill a large 4mm hole in the
engine firewall and this was done with a small drill bit and then expanded with
a diamond bit chucked in a motor tool (which made the job very simple!). After a
quick wash in warm soapy water, I then pre-painted all the parts as indicated in
the instructions. Since the fuselage is supplied as a single piece, the insides
were painted a linen color, with the side framing painted wood brown and the
wire bracing painted steel. Assembly of the fuselage components inside was
accomplished using super-thin superglue and presented no major problems. Cockpit
details are a little on the sparse side, however it is adequate (the cockpit on
the Pfalz was fairly sparse anyway!) and allows super-detailers room to add
extras.
The first job up was
to separate and clean up the resin and white metal parts. However, this was very
easy as mentioned earlier. In addition, you must drill a large 4mm hole in the
engine firewall and this was done with a small drill bit and then expanded with
a diamond bit chucked in a motor tool (which made the job very simple!). After a
quick wash in warm soapy water, I then pre-painted all the parts as indicated in
the instructions. Since the fuselage is supplied as a single piece, the insides
were painted a linen color, with the side framing painted wood brown and the
wire bracing painted steel. Assembly of the fuselage components inside was
accomplished using super-thin superglue and presented no major problems. Cockpit
details are a little on the sparse side, however it is adequate (the cockpit on
the Pfalz was fairly sparse anyway!) and allows super-detailers room to add
extras.
I super glued the forward top fuselage piece into place and the fit was pretty good but did require a small amount of putty. I cut out and cleaned up the vac cowl and installed it in place with gap filling superglue from the inside of the cowl. Again, fit was pretty good but it did require a small amount of putty. The engine does not need to be put in place until after painting, as it will easily slip under the cowl. Next I drilled and dry-fitted all of the rigging, strut, and landing gear mounting holes to assist in final assembly as nothing is more frustrating as trying to get these pieces together with a fragile model. I stuffed some tissue paper into the cockpit and then it was off to the paint shop.
|
PAINT & MARKINGS |
 The paint scheme is
very simple; a white doped linen with dark blue/black forward fuselage, metal
struts, and rib tapes. I used Gunze Sangyo (GS) Off White (H21) airbrushed on
for the linen color. After drying overnight, I masked the linen surfaces and rib
tapes and airbrushed a 50:50 mix of GS Navy Blue (H54) and Black (H2). After the
paint scheme cured for a day, I shot a light coat of Future to prepare the
surface for decaling.
The paint scheme is
very simple; a white doped linen with dark blue/black forward fuselage, metal
struts, and rib tapes. I used Gunze Sangyo (GS) Off White (H21) airbrushed on
for the linen color. After drying overnight, I masked the linen surfaces and rib
tapes and airbrushed a 50:50 mix of GS Navy Blue (H54) and Black (H2). After the
paint scheme cured for a day, I shot a light coat of Future to prepare the
surface for decaling.
As mentioned earlier, the decals are printed on a very thick carrier film, but went on without trouble. I was hoping decal solvent would help "melt" them into the surface, but they were unfazed by even Solvaset! After drying overnight, I wiped the decals off with a moist cloth with Pollys Plastic Prep to remove any residue and after drying I shot a light coat of Future over the decals to seal them.
Next, a light coat of Polly S Flat Finish was shot to provide a surface for pastels. I then used pastel pencils to lightly highlight the ribs and detail on the wings/tail surfaces and fuselage. I use Derwent pastel pencils and they are quite easy to use, just lightly draw on the surface to be highlighted and blend with artists blending stump. A very nice, subtle effect can be achieved with these pencils that is much easier for me than dry brushing. Finally, several coats of Polly S Satin Finish was shot to achieve the semi-gloss finish common to most WWI aircraft.
|
CONSTRUCTION CONTINUES |
 Now onto the fun
part, putting on the wing! The engineering of this kit leaves much to be desired
in that the wing is basically butt joined to the fuselage side, which would
create a very fragile model. I decided to use brass pins to strengthen this
join. I used epoxy on the pins and a small portion of the wing to join to the
fuselage and then followed this up with superglue to further strengthen the
join. The horizontal stabilizer was carefully butt joined to fuselage end with
epoxy also.
Now onto the fun
part, putting on the wing! The engineering of this kit leaves much to be desired
in that the wing is basically butt joined to the fuselage side, which would
create a very fragile model. I decided to use brass pins to strengthen this
join. I used epoxy on the pins and a small portion of the wing to join to the
fuselage and then followed this up with superglue to further strengthen the
join. The horizontal stabilizer was carefully butt joined to fuselage end with
epoxy also.
Assembly of the landing gear was also a problem in that butt joining all the parts together would create a very fragile model. I used .005 stainless wire to pin each joint into a corresponding drilled hole and then apply superglue. This technique worked extremely well and assembly of the landing gear was really easy and relatively strong. The rudder also created a challenge in that butt joining at one point would be fragile and also difficult to correctly mount the rudder. Again, .005 stainless wire and superglue to the rescue!
The machine gun is supplied in white metal and while well cast, it is definitely undersized. The PE tail skid is an abomination so I replaced it with a piece of flat strip sanded to shape and then lightly heated and bent into shape. All rigging was done using .006 diameter fishing line painted silver and was quite easily done with only a single long piece for the wings. I applied some small PE disks from the scrap box as pulleys on the supporting struts to help hold the fishing line in place and also to simulate the pulley structure. I then hand painted the turnbuckles on with white glue and then painted brass.
|
CONCLUSIONS |
Limited run productions bring their own special challenges and rewards to the modeling table. They are usually not as easy to build as most injected molded kits, but this kit was very simple to build and would be a great first resin model for someone looking for something "different" to build.
I would like to thank Robert Karr and Peter Leonard of the WWI Modeling List for supplying reference materials for this model. If you have an interest in WWI modeling I strongly urge you to look into this wonderful group of very helpful modelers.
|
REFERENCES |
Albatros Productions LTD, Windsock Datafile #59, Pfalz E.I-V, $13.00
Copyright ModelingMadness.com. All rights reserved. No reproduction in part or in whole without express permission from the editor.
If you would like your product reviewed fairly and fairly quickly, please contact the editor or see other details in the Note to Contributors.
Back to Reviews Page 2016