Eduard 1/48 Roland C.II 'Walfisch'
|
KIT # |
8040 |
|
PRICE: |
$25.00 |
|
DECALS: |
Two options |
|
REVIEW : |
|
|
NOTES: |
|
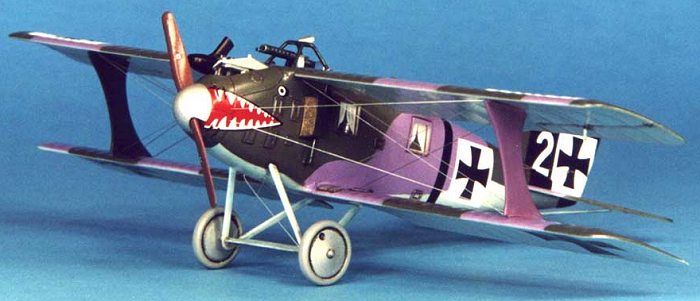
HISTORY |
The Roland C.II "Walfisch" was quite possibly an aircraft too far ahead of its time, being the first WWI aircraft to boast an advanced aerodynamic shape well before that nascent discipline was completely understood. Its beautiful, sleek lines provided an astonishingly low coefficient of drag compared to its rivals that enabled it to be approximately 30 KPH faster utilizing the same basic 160 HP Mercedes engine. It was just as fast as its early Nieuport and Sopwith enemies in the air, making it an opponent to be approached with caution and not the "easy meat" its much slower brethren were.
The design concept of this aircraft was brilliant, by taking a streamlined shape and mounting it to a pair of fuselage mounted wings that eliminated two significant contributors of drag, the interplane struts and their associated rigging wires. A side benefit of this layout would also be a superb field of view for its pilot and observer by eliminating the upper wing over their heads. Unfortunately this design concept also led to several major flaws in the aircraft that limited its operational effectiveness. The relatively short and round fuselage did not provide proper airflow to the tail control surfaces seriously limiting its maneuverability and the narrow wing gap contributed to a deadly tendency to stall. The excellent upward visibility was offset by limited downward visibility that made the aircraft difficult to land safely, and many Roland pilots survived the perils of combat only to wreck their aircraft in landing. Thus the Roland C.II was a plane of contrasts where its unique aerodynamic shape also proved to be its final undoing.
|
THE KIT |
 This kit represents
Eduard’s latest evolution from a small, limited run modeling company to a
major player in the business, and the only modern modeling company who places an
emphasis on my favorite subject; WW I aircraft. Those familiar with Eduard’s
earlier products remember poorly molded limited run injection molding with
little (if any) engraved detail and extremely poor fitting parts (better start
with a fresh tube of putty was my motto!). Well, not any more! This kit contains
three finely molded sprues of injected plastic (63 items) that rivals any
Japanese kit in quality and detail and one sprue of clear injected plastic (7
items) for the windscreen and windows. A nice touch is a set of "Express
Masks" for the windows, wheels, shark mouth, and tail trim, although to be
honest the mouth and tail trim should have been provided as appropriate colored
decals. A high quality decal sheet is also included that provides for two
different aircraft. The instruction sheet consists of 8 pages and clearly
indicates which parts and decals are needed for the specific aircraft you are
building. It includes a color selection chart with cross references for five
paint manufacturers and a parts map for the kit.
This kit represents
Eduard’s latest evolution from a small, limited run modeling company to a
major player in the business, and the only modern modeling company who places an
emphasis on my favorite subject; WW I aircraft. Those familiar with Eduard’s
earlier products remember poorly molded limited run injection molding with
little (if any) engraved detail and extremely poor fitting parts (better start
with a fresh tube of putty was my motto!). Well, not any more! This kit contains
three finely molded sprues of injected plastic (63 items) that rivals any
Japanese kit in quality and detail and one sprue of clear injected plastic (7
items) for the windscreen and windows. A nice touch is a set of "Express
Masks" for the windows, wheels, shark mouth, and tail trim, although to be
honest the mouth and tail trim should have been provided as appropriate colored
decals. A high quality decal sheet is also included that provides for two
different aircraft. The instruction sheet consists of 8 pages and clearly
indicates which parts and decals are needed for the specific aircraft you are
building. It includes a color selection chart with cross references for five
paint manufacturers and a parts map for the kit.
|
INITIAL CONSTRUCTION |
I started with my usual warm, dish soap water wash of the plastic components and followed with a cold-water rinse. Pat dry with a paper towel and let dry overnight. I then pre-painted all the parts as indicated in the instructions. The Roland fuselage was constructed in an unusual (for the time) manner in that wood veneer strips were wrapped around a mold and reinforced with fabric resulting in a semi-monocoque fuselage. There is some controversy as to whether the interior color would be from the wood strips or the fabric; the Eduard instructions indicate a wood finish. However, I chose fabric and painted the interior Polly Scale RLM 64, a light blue-gray based on some interior pictures in the Datafile. Bulkheads were painted in my version of a wood finish, which consists of a base color of Testors Wood, followed by dry brushing with a rake brush of Testors Raw Umber, Burnt Sienna, and Burnt Umber. The stringer detail on the fuselage sidewalls were then hand painted Testors Model Master (TMM) French Chestnut and given a light wash of burnt umber.
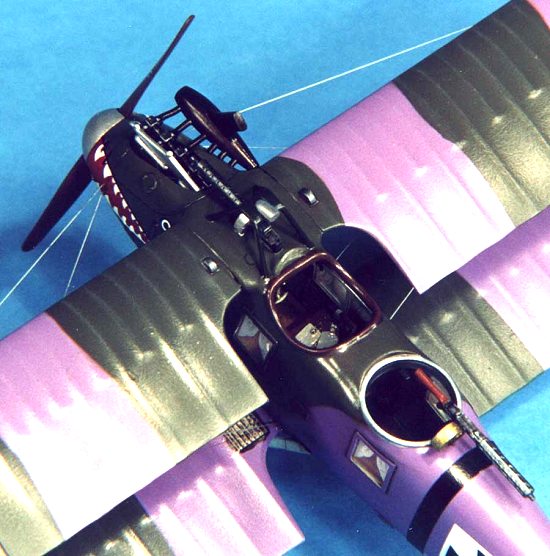 The interior
provided in this kit has got to be the most detailed I have seen provided in any
WWI kit. It has to be seen to be believed in its completeness. It builds up
beautifully with no problems. The engine is the standard Mercedes D.III provided
in most all their kits and also is fairly complete. After assembling the engine
with superglue, I wrapped it in Parafilm (to protect it from overspray during
painting) and installed it in place. I left off the coolant expansion tank for
later installation after painting. The fuselage halves were then glued together
with only minor touch-up work needed on the seams with Mr. Surfacer.
The interior
provided in this kit has got to be the most detailed I have seen provided in any
WWI kit. It has to be seen to be believed in its completeness. It builds up
beautifully with no problems. The engine is the standard Mercedes D.III provided
in most all their kits and also is fairly complete. After assembling the engine
with superglue, I wrapped it in Parafilm (to protect it from overspray during
painting) and installed it in place. I left off the coolant expansion tank for
later installation after painting. The fuselage halves were then glued together
with only minor touch-up work needed on the seams with Mr. Surfacer.
The next step was to install the lower wings to the fuselage and here I ran into some fit problems. Pictures of the Roland indicate that the lower wing is smoothly faired into the fuselage, but there are significant gaps and seams after this piece was glued into place. Extensive puttying and sculpting was needed to smooth out this join with a lot of filing and sanding. The observer’s cupola has the same fit problem and the same process was repeated. Unfortunately, these are the only pieces that don’t "fit like a glove" and change this kit from an extremely easy build to a slightly tougher challenge. I then installed the horizontal stabilizers and tail fin with no problems and prepared for a trip to the paint shop by placing the window masks on and stuffing tissue paper in the cockpit openings.
|
PAINT, DECALS, & WEATHERING |
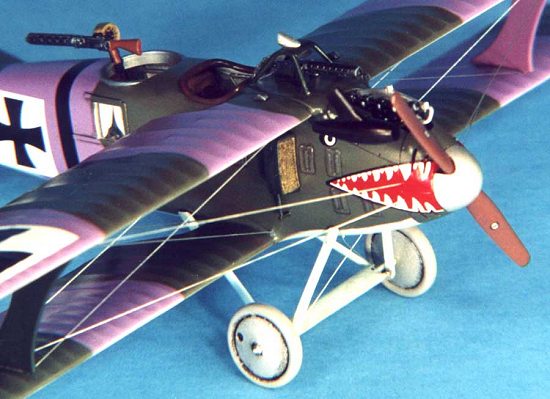
The paint scheme of this aircraft consisted of a dark green and violet camouflage over light blue/gray undersurfaces. Polly Scale RLM 64 was utilized for the undersides with TMM Napoleonic Violet and Xtracolor German WWI Topside Green for the upper surfaces. All paints were airbrushed using paper masks enlarged to the correct scale on my scanner and attached with Tombo Mono Multi liquid glue. This glue is perfect for temporary masking, as it is low tack when dry, but has enough tack to allow paper masks to be attached around circular objects (like the fuselage). The sharks mouth was also airbrushed Polly S RLM 23 Red using the supplied Express Masks. A word of caution applies when using these masks since they are a very pliable vinyl; make sure that the mask provides the correct coverage for the mouth decal. I had to use a caliper to set the correct dimensions of the mask in order for the decal to fit correctly. Lastly, the tail fin was masked using Tamiya masking tape (Express Masks are also provided) since it offers better adhesion and then TMM Flat Black was sprayed on the tail surfaces. After a day of drying time, I sprayed a light coat of Future in preparation for decaling.
 The kit decals are
fairly good, nice and thin, but care must be taken when applying as they do tear
easily. I added a few drops of liquid dish soap to the decal water and this
helped a great deal. I applied MicroSol setting solution and the decals
responded quite well and melted into the surface with no permanent wrinkling.
After drying overnight, I wiped the decals off with Polly S Plastic Prep to
remove any residue and after drying, I shot a light coat of Future over the
decals to seal them.
The kit decals are
fairly good, nice and thin, but care must be taken when applying as they do tear
easily. I added a few drops of liquid dish soap to the decal water and this
helped a great deal. I applied MicroSol setting solution and the decals
responded quite well and melted into the surface with no permanent wrinkling.
After drying overnight, I wiped the decals off with Polly S Plastic Prep to
remove any residue and after drying, I shot a light coat of Future over the
decals to seal them.
For weathering, I chose to accentuate the engraved panel lines and surface detail with a light burnt umber oil wash.
I then sealed everything with a light coat of PS Flat Finish to provide a surface for pastel application. I then used a pastel pencil to lightly highlight the rib detail on the wings/tail surfaces using a light gray pastel pencil on the undersides and an off-white pastel pencil on the upper surfaces. I use Derwent pastel pencils and they are quite easy to use, just lightly draw on the surface to be highlighted and blend with artists blending stump. A very nice, subtle effect can be achieved with these pencils that is much easier for me than dry brushing. I then randomly applied some ground up burnt umber pastels with a soft brush to simulate dirt staining on the lower surfaces. Lastly, I applied a heavy burnt umber oil wash to the wheels and control surface joins.
|
CONSTRUCTION CONTINUES |
Now that the painting and weathering is complete, it’s time to finish off the construction. The interplane struts were superglued in place to the lower wing and then the upper wings were attached with superglue. Usually, alignment of the upper and lower wings on a biplane is a bother, however on this kit everything just snapped into its correct place. The radiators and support arms were added and then it was on to the next challenge, installing the landing gear!
Installing landing gear on Eduard models is a challenge at best and extremely frustrating at worst. Many people install metal pins into the ends to help ease this task but I use a simpler method in that I build a simple jig. My jig is nothing but a small block of styrofoam packing material that comes in protective packaging of electronics goods. One TV and you are set for life! Take a small block of styrofoam and mark the width of the landing gear on it. Carefully measure all dimensions and mark them on the block to maintain the correct angles. Push the legs of the landing gear into the block and set the approximate width of the landing gear axle. Then place the axle into place on the legs and after carefully aligning everything glue it in place. Let the glue fully cure then paint the assembly, let dry, and remove it from the block. Glue one leg into place with superglue, let set, then glue the remaining legs into place. Lastly install the painted wheels into place on the axle with superglue, the tail fin brace, and the tailskid. I had a bit of fun with the wooden brake arm, promptly launching it into orbit when I cut it from its sprue. Of course it disappeared into the carpet, but how something as large as that could suddenly become invisible is beyond my comprehension!
 Nearing the home
stretch it was time to install all the remaining pieces to the topside of the
model. The expansion tank was fixed in place with superglue and the Spandau and
Parabellum machine guns were also glued in place. The rollover bar was added and
the exhaust stack, propeller, and propeller spinner were carefully installed
with superglue.
Nearing the home
stretch it was time to install all the remaining pieces to the topside of the
model. The expansion tank was fixed in place with superglue and the Spandau and
Parabellum machine guns were also glued in place. The rollover bar was added and
the exhaust stack, propeller, and propeller spinner were carefully installed
with superglue.
I painted the exhaust stacks Testors Metalizer Burnt Iron and then applied a heavy wash of Rustall. The propeller was painted by using a base coat of dark yellow, and successive light dry brushing using a rake brush of TMM raw sienna, raw umber, burnt sienna, and burnt umber to replicate the wood grain. The rake brush does a fairly good job of replicating wood grain without resorting to decals, which are a pain on a small part like a prop.
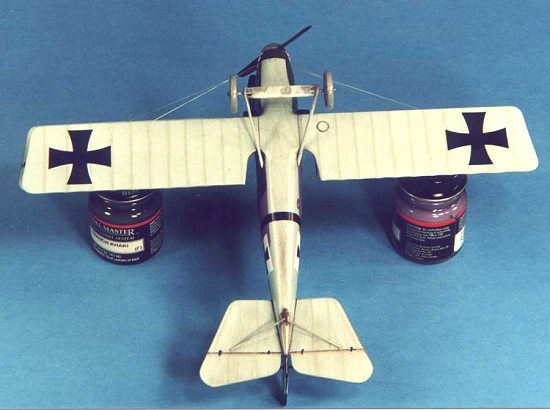
Now it was time to provide the final touch, to prepare for the next fun job of rigging a WWI biplane! Truthfully, rigging an airplane is not difficult. It is time consuming and tedious. First you need a plan. You should have a rigging plan in place before you even start construction of the model so you can pre-drill holes and plan for obstruction problems. Study the instructions carefully and figure out where every rigging wire needs to go. Each kit will be different and will have a different plan. Fortunately the Roland has a very simple rigging scheme that is quite easy.
I use .006-fishing line painted silver and use a "through-hole" rigging method. I basically drill a hole with an #80 bit (the smallest, about .0135) all the way through the wing at each of my rigging exit points. I try to minimize the number of exit points and run as many lines through them when possible. After securing one end to a partially drilled hole (not all the way through) with superglue, I then run the line out through the exit hole. I weight the end of the line with a pair of hemostats to pull tight by letting it hang down and apply a small drop of superglue to secure it. Let cure for about 30 seconds and then unhook the hemostats and proceed to the next wire. Repeat until done! After letting the entire rigging cure for at least an hour, I then take a brand new Exacto blade and trim flush with the wing surface. I then sand the exit holes flush and apply a spot of touch-up paint to cover. That's it, simple, cheap, and fast. In addition, it also provides a small amount of structural integrity. I can rig a whole airplane in under an hour! Can't do that with wire!
Finally, the model is almost done. The last step is to airbrush the final clear coat. I used Polly S Satin Finish as it provides an appropriate not too glossy, not too dull surface that photographs well.
|
CONCLUSIONS |
IMHO this is undoubtedly the best, out-of-the-box WWI model kit in 1/48 scale. I built this kit straight from the box and only added P/E seat belts for the pilot and observer seat; every thing else is provided in the kit. The detail provided in the kit is astounding, and it is also very accurate matching up quite well with the Datafile drawings with only a few nit-picky differences. This is a very suitable kit for a beginner or first time WWI modeler with the only significant difficulty being the lower wing and observer opening needing putty. Please go out and buy (and build) this kit as Eduard deserves nothing but praise for it; it is "simply the best". Eduard, please keep more kits like this coming in the future.

|
REFERENCES |
Grub Street, Under The Guns Of The German Aces
Albatros Productions LTD, Windsock Datafile #49, LFG Roland C.II
Copyright ModelingMadness.com. All rights reserved. No reproduction in any form without express permission from the editor.
If you would like your product reviewed fairly and fairly quickly, please contact the editor or see other details in the Note to Contributors.
Back to Reviews Page 2016