Dragon 1/48 Spad 13
|
KIT # |
5902 |
|
PRICE: |
$19.98 |
|
DECALS: |
See Review |
|
REVIEW : |
|
|
NOTES: |
Aftermarket decals used |
|
HISTORY |
Mention the word SPAD to a WW I aviation enthusiast and their first words you most likely hear, are rugged and very fast. Like a thoroughbred racehorse where the bloodline will tell you a lot about the horse’s speed, the SPAD also has a famous bloodline. The SPAD was born in the mind of Armand Deperdussin, a wealthy French aviation enthusiast and industrialist with an eye towards racing and a "need for speed". In 1910 he formed the Societe Provisoire des Aeroplanes Deperdussin (SPAD) to build racing planes. These first airplanes did not carry the SPAD moniker; they were referred to as Deperdussins. One of his first efforts, a monoplane with advanced streamlining set a speed record of 125 mph in 1913. Unfortunately, Deperdussin ran afoul of the law and was arrested on embezzlement charges in August 1914. Due to his status as a major industrialist vital to the war effort, a final judgment and sentencing was not done until March 1917. He was convicted of embezzlement and sentenced to five years in prison. Deperdussin never served his sentence due to his status and was released under the First Offenders Act.
Due to the criticality of his airplane business to the war effort, Deperdussin’s arrest required a change in leadership. French hero Louis Bleriot, who made the first flight across the English Channel, was selected to head a new company. The assets of Deperdussin’s aircraft company were acquired and a new company was set up in August 1914 named Societe Anonyme pour l’Aviation et ses Derives which kept the SPAD name intact. Not much changed in the operations of the new SPAD, and most of the staff was kept including chief engineer Louis Bechereau who had designed the Deperdussin racing airplanes.
 The first aircraft produced by the SPAD works was the SPAD
A-series two seater. A total of five variants were produced from this airframe.
This was an unusual looking aircraft with a tractor type biplane housing the
pilot and a removable nacelle mounted in front of the spinning propeller
containing the observer/gunner. On the most produced variant, the SPAD A.2, a
single Lewis machine gun was carried on a flexible mount that provided for an
arc of fire forward and to the rear, over the wing. This early SPAD had a
remarkable resemblance to the SPAD 13 with a similar interplane and H-shaped
strut arrangement and the distinctive bell crank aileron controls.
The first aircraft produced by the SPAD works was the SPAD
A-series two seater. A total of five variants were produced from this airframe.
This was an unusual looking aircraft with a tractor type biplane housing the
pilot and a removable nacelle mounted in front of the spinning propeller
containing the observer/gunner. On the most produced variant, the SPAD A.2, a
single Lewis machine gun was carried on a flexible mount that provided for an
arc of fire forward and to the rear, over the wing. This early SPAD had a
remarkable resemblance to the SPAD 13 with a similar interplane and H-shaped
strut arrangement and the distinctive bell crank aileron controls.
The next aircraft to be produced was the highly successful SPAD 7.C.1. Derived from a prototype aircraft designed to take advantage of the powerful 150 hp Hispano-Suiza V-8 engine (SPAD V), the SPAD 7 reached the front in limited numbers in August 1916. Problems with the engine and gun synchronization system kept the SPAD 7 from being deployed in great numbers until early 1917 when the aircraft reached front line units in large numbers. The first victory by the SPAD 7 was posted by French ace Armand Pinsard on 26 August 1916. Most French aces such as Fonck, Guynemer, Nungesser, Dorme, Madon, Deullin, and Hertaux flew the aircraft at some point in their careers. The SPAD 7 was a fast and sturdy aircraft that could out-dive and out-run the Albatros series of fighters it commonly faced. However, it was not very maneuverable and mounted only a single synchronized machine gun. With the more powerful 180 hp Hispano-Suiza engine found in later SPAD 7’s, the aircraft was capable of a top speed in level flight of 129 mph. Approximately 6,000 aircraft were produced including approximately 220 aircraft produced by the British for their use.
The SPAD 12.Ca.1 was the next major SPAD aircraft to be produced. This was basically a SPAD 7 upgraded with a 200-hp Hispano-Suiza engine with a 37-mm Hotchkiss cannon firing through the propeller hub. This cannon could reportedly down an aircraft with one shot! The SPAD 12 was not produced in great numbers, as only approximately 300 were produced. However, instructions were given that only the best pilots in a squadron were allowed to fly the aircraft and most of the French aces scored well in the aircraft.
The final SPAD aircraft to be produced during the war was the famed SPAD 13.C.1. This aircraft was equipped with a 220-hp Hispano-Suiza engine capable of a top speed in level flight of 131 mph. It was very similar in design to the SPAD 7 with the exception of mounting two synchronized machine guns, effectively doubling the firepower of the SPAD 7. The SPAD 13 first reached the front in spring 1917, but various problems kept the aircraft from being deployed in great numbers until late in 1917. Approximately 8,000 aircraft were produced and was flown by all of the French aces from late 1917 through 1918. The aircraft was also deployed with the US Air Service and flown by the 94th Aero Squadron, amongst others.
Other variants of the SPAD were produced but did not see service during the war, including the SPAD 14, 17, 21, 22 and 24.
|
THE KIT |
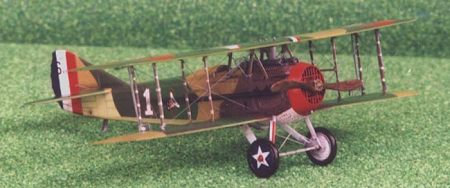
 The kit is Shanghai Dragon’s SPAD 13 kit (5902). It is a mixed media kit
and consists of injected molded plastic (34 parts), one fret of photo-etch
detail parts (33 items), and a decal sheet for building Reed Chambers colorful
SPAD 13 flown as part of the US occupation forces in Germany following the war
in 1919. The plastic parts have exceptional detail engraving and are of high
quality with only minor amounts of flash/mold lines that require clean up. The
instruction sheet is an eight-page diagram assembly with marked color painting
guidelines with a cross-reference to Gunze Sangyo and Italeri paints. The decals
provided in the kit were damaged during shipment and were unusable, so
Aeromaster decals sheet (48-075, SPADS) with seven aircraft options was
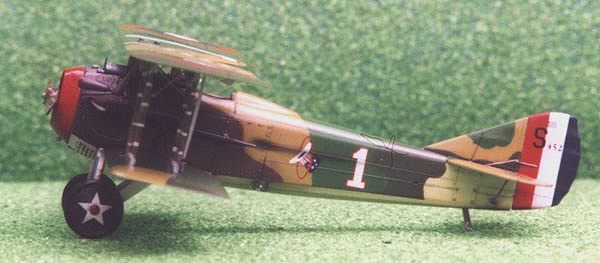
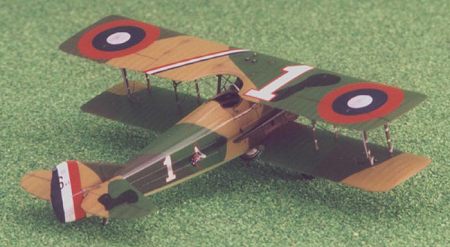
purchased. The decal option for Eddie Rickenbacker, 94th Aero
Squadron, US Air Service, 1918 was used.
The kit is Shanghai Dragon’s SPAD 13 kit (5902). It is a mixed media kit
and consists of injected molded plastic (34 parts), one fret of photo-etch
detail parts (33 items), and a decal sheet for building Reed Chambers colorful
SPAD 13 flown as part of the US occupation forces in Germany following the war
in 1919. The plastic parts have exceptional detail engraving and are of high
quality with only minor amounts of flash/mold lines that require clean up. The
instruction sheet is an eight-page diagram assembly with marked color painting
guidelines with a cross-reference to Gunze Sangyo and Italeri paints. The decals
provided in the kit were damaged during shipment and were unusable, so
Aeromaster decals sheet (48-075, SPADS) with seven aircraft options was
purchased. The decal option for Eddie Rickenbacker, 94th Aero
Squadron, US Air Service, 1918 was used.
|
CONSTRUCTION |
This was a straight out-of-the-box build (OOB) of the kit since it is highly accurate and no additional parts are really necessary to produce a quality model. I started with my usual warm, dish soap water wash of the plastic and photo-etch components and followed with a cold water rinse. Pat dry with a paper towel and let dry overnight. I then pre-painted all the parts as indicated in the instructions
 Assembly of the fuselage components was accomplished using super-thin
superglue. Assembly proceeded as described in the instructions, with no major
problems. Be careful with assembly, as some parts do fit into other parts (like
the gas tube B20 that has to go through an opening in the cockpit). A tip is to
anneal (heat in a flame until red-hot) the photo-etch parts that require bending
prior to painting. I then closed up the fuselage with liquid cement and glued on
the upper cowl (A8) to the fuselage. Next, I glued with liquid cement the tail
fin, the horizontal stabilizer, lower cowling (A9 & MA30), and lower wing to
the fuselage. Check your photo references to see what kind of engine cooling
covers are used on your particular aircraft and install them. I installed both
the louvered covered and the screen cover; some aircraft used one or the other.
Also included in the kit is a part to replace the engine louver cover (B8/9)
which is a nice touch if you are modeling that aircraft. All joins were then
sanded smooth. Fit was very good and no putty was needed. Next stop was the
paint shop after stuffing the cockpit opening with tissue paper to prevent
overspray.
Assembly of the fuselage components was accomplished using super-thin
superglue. Assembly proceeded as described in the instructions, with no major
problems. Be careful with assembly, as some parts do fit into other parts (like
the gas tube B20 that has to go through an opening in the cockpit). A tip is to
anneal (heat in a flame until red-hot) the photo-etch parts that require bending
prior to painting. I then closed up the fuselage with liquid cement and glued on
the upper cowl (A8) to the fuselage. Next, I glued with liquid cement the tail
fin, the horizontal stabilizer, lower cowling (A9 & MA30), and lower wing to
the fuselage. Check your photo references to see what kind of engine cooling
covers are used on your particular aircraft and install them. I installed both
the louvered covered and the screen cover; some aircraft used one or the other.
Also included in the kit is a part to replace the engine louver cover (B8/9)
which is a nice touch if you are modeling that aircraft. All joins were then
sanded smooth. Fit was very good and no putty was needed. Next stop was the
paint shop after stuffing the cockpit opening with tissue paper to prevent
overspray.
The model was painted, decaled, and weathered as described in the following subsections and then final assembly took place.
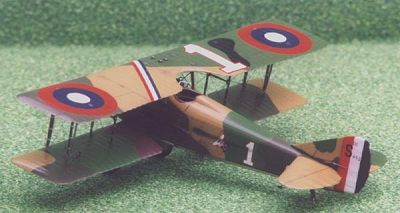
I then installed the photo-etch parts to the interplane and cabane struts. Be careful when mounting these as they are supposed to fit up into their respective openings in the upper wing. A tip is to file them so they have a slight angle point to fit cleanly into the openings. Dry fit to insure that they do fit or you will regret it later when you try to mount the upper wing. In addition, make sure you install them in the correct directions. I "mirror-imaged" one of the pieces and it is noticeable in the rigging. Of course I did not notice this until after the model was completed and I shot the pictures! Also, you do not get to see my mistake as the wonders of digital editing allowed me to crop the photo so you can’t see it!
I then glued all the struts in place on the fuselage and lower wing into place using relatively large amounts of super-thin superglue. This is done to insure a relatively fragile model does not explode in later life! The cabane struts were glued to the fuselage body in correct spacing for the upper wing using a caliper to exactly set the distance and the interplane struts were glued to the lower wing. Basically, by applying small drops of super-thin superglue carefully around the strut to form a small bead around the strut base you can make the model much stronger. Do not use an excessive amount, just enough for a thin bead. If carefully applied, you can form a perfect bead around the strut base. This will be later painted over in touch up and my "secret" hiding technique discussed later will help hide the superglue.
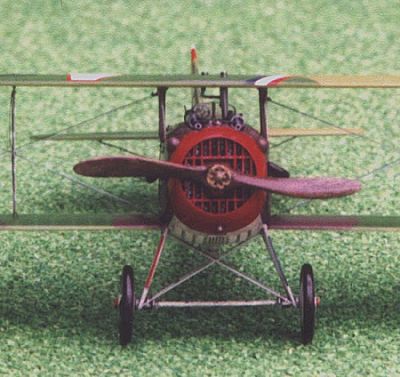
 Now it was time to work on the machine guns. Assemble the guns as shown in
the instructions. I drilled out the gun tubes for a better appearance. I painted
the machine guns in Testors Metalizer Gun Metal and dry brushed with Floquil Gun
Metal. Do not install the gun sight (B14), as Rickenbacker’s plane did not
carry it. Check photo references for your particular model; most SPAD’s did
not use it. Install the exhausts and their respective photo-etch parts along
with the horizontal stabilizer bracing
Now it was time to work on the machine guns. Assemble the guns as shown in
the instructions. I drilled out the gun tubes for a better appearance. I painted
the machine guns in Testors Metalizer Gun Metal and dry brushed with Floquil Gun
Metal. Do not install the gun sight (B14), as Rickenbacker’s plane did not
carry it. Check photo references for your particular model; most SPAD’s did
not use it. Install the exhausts and their respective photo-etch parts along
with the horizontal stabilizer bracing
Now it’s decision time! SPAD aircraft did have a shell ejector chute on the fuselage sides. Unfortunately, the supplied photo-etch part (MA29) protrudes from the aircraft about the same distance that it did on the real scale aircraft. Therefore it is about 48 times too large! My decision got made for me when I launched the part into orbit when I cut the part off the fret. I like easy decisions!
I then installed the landing gear and wheels as indicated and the front cowl and propeller. Install all the remaining fiddly bits and the rigging. I used the kit supplied stainless steel wire for the landing gear and rudder control rigging. I used invisible thread painted black for the strut rigging. Now get ready for the fun part, putting on the top wing!
With 12 holes that need to be aligned with their respective struts, this was a job that took a lot of patience. I placed the upper wing on the workbench and turned the fuselage upside down to mount it. First set the interplane struts into place in their correct holes, then flex the cabane struts into their respective holes and bingo, the wing is in place. However it wasn’t quite that easy and took a lot of fiddling to get the correct alignments. I used small rubber bands to help hold both wings in place and then checked alignment of the top to bottom wing. When all was to my liking, superglue the struts to wing using the bead technique described above. A word of caution, let the glue cure fully before moving the model and you will be rewarded with a relatively strong top wing join. I do not use an accelerant for the superglue as it discolors and sometimes pits the surface.
|
PAINT & DECALS |
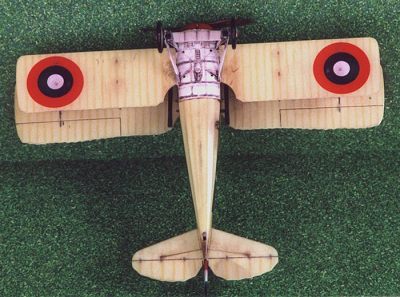
 The paint scheme is the standard French five-color camouflage of dark brown,
light green, dark green, beige, and black over a clear-doped linen undersides. I
painted the underside metal and the landing gear flat white and the cowl Gunze
Sangyo Red Madder (H86). I used Testor Model Master French Chestnut and Flat
Black, Aeromaster enamel RLM 83 Lichtgrun (9031) and Midstone (9115), and Polly
Scale acrylic French/Fokker Dark Green and Clear Doped Linen. I used masks cut
from 3M Painters Tape, which is a low tack tape available in 2" widths. I
didn’t have reliable information on the lower wing scheme or right hand
profile scheme so I estimated it based on B&W photographs I have of
Rickenbacker’s plane. After the paint scheme cured for a day, I shot a light
coat of Future to prepare the surface for decaling.
The paint scheme is the standard French five-color camouflage of dark brown,
light green, dark green, beige, and black over a clear-doped linen undersides. I
painted the underside metal and the landing gear flat white and the cowl Gunze
Sangyo Red Madder (H86). I used Testor Model Master French Chestnut and Flat
Black, Aeromaster enamel RLM 83 Lichtgrun (9031) and Midstone (9115), and Polly
Scale acrylic French/Fokker Dark Green and Clear Doped Linen. I used masks cut
from 3M Painters Tape, which is a low tack tape available in 2" widths. I
didn’t have reliable information on the lower wing scheme or right hand
profile scheme so I estimated it based on B&W photographs I have of
Rickenbacker’s plane. After the paint scheme cured for a day, I shot a light
coat of Future to prepare the surface for decaling.
I used the Aeromaster decals listed above. After a short drying period of about an hour, I applied MicroSol setting solution to get the decals to melt into the surface. I repeated with a second coat of setting solution to get all the decals fully down. They responded very well to the setting solution with no permanent wrinkling. However, the decals were fairly translucent, allowing some color bleed through. After drying overnight, I wiped the decals off with a moist cloth with a bit of soap to remove any residue and after drying I shot a very light coat of Future thinned with rubbing alcohol (50:50 mix) over the decals to seal them. For weathering, I chose to accentuate the engraved panel lines and surface detail with a light burnt umber oil wash.
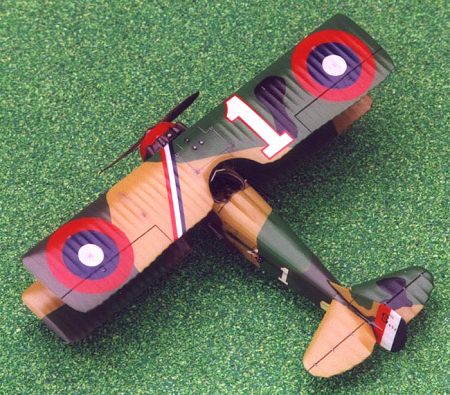 I then used a pastel pencil to lightly highlight the rib detail on the
wings/tail surfaces. I use Derwent pastel pencils and they are quite easy to
use, just lightly draw on the surface to be highlighted and blend with artists
blending stump. A very nice, subtle effect can be achieved with these pencils
that is much easier for me than dry brushing. I then randomly applied some
ground up burnt umber pastels with a soft brush to simulate dirt staining on the
lower surfaces. Lastly, I applied a heavy burnt umber oil wash to the wheels and
control surface joins.
I then used a pastel pencil to lightly highlight the rib detail on the
wings/tail surfaces. I use Derwent pastel pencils and they are quite easy to
use, just lightly draw on the surface to be highlighted and blend with artists
blending stump. A very nice, subtle effect can be achieved with these pencils
that is much easier for me than dry brushing. I then randomly applied some
ground up burnt umber pastels with a soft brush to simulate dirt staining on the
lower surfaces. Lastly, I applied a heavy burnt umber oil wash to the wheels and
control surface joins.
I then finished final assembly of the models as described above. Lastly, I lightly touched up by hand painting with the appropriate colored paints all flaws and the areas that were covered in superglue including strut/rigging attachment points. Next was a technique I learned that helps hide minor flaws in a model finish caused by superglue and painting successive coats. It is very simple, just spray the entire model with several coats of a mix of equal parts Future, Tamiya Flat Base (X21), and rubbing alcohol. This will hide almost all minor flaws in the finish, but will not cover major flaws so it is not a substitute for poor modeling technique. Finally, several coats of straight Future was shot to achieve the final glossy finish common to most WWI aircraft.
|
CONCLUSIONS |
I have built many models of Shanghai Dragon WW II aircraft and have been generally disappointed in their accuracy and quality of fit. However, the WW I Knights of the Sky Series are in my opinion, the best detailed WW I model kits available today without the fit problems experienced in their WW 2 series. They represent a very good value for approximately $20 and build up into an impressive model with their highly detailed engraving and photo-etch parts. A minor drawback is that they are currently difficult to find; a situation that will hopefully become better with an announcement by Shanghai Dragon to commit to production of this series during 2000.
This is an excellent model of an important WW I aircraft. The accuracy and level of detail engraved in the kit is outstanding and no after-market sets are really needed for a beautiful build. I highly recommend this kit for all levels of builders including beginners and I enjoyed the building of this model. The kit is easy to build and the only difficult tasks are the strut assembly and mounting the top wing due to the large number of struts involved.
|
REFERENCES |
Squadron/Signal Publications, SPAD Fighters In Action, SS1093, $8.95
Flying Machines Press, French Aircraft of the First World War, $90.00
Copyright ModelingMadness.com. All rights reserved. No reproduction in any form without express permission from the editor.
Back to Reviews Page 2017