| KIT: | Eduard 1/48 Fokker D.VII (OAW) |
| KIT #: | ? |
| PRICE: | $34.95 |
| DECALS: | Four options |
| REVIEWER: | Tom Cleaver |
| NOTES: |
| HISTORY |
Once Anthony Fokker won the First Fighter Competition in 1918 and the Fokker D.VII was ordered into mass production, the demand was so great to replace the obsolescent Albatros D.Vs, Pfalz D.IIIs and the Fokker Dr.I with this excellent new fighter that he was directed by the Fliegerabteilung to license production of the airplane by Albatros. For Fokker, whose products had been so often beaten by Albatros over the two previous years, such an arrangement was the best kind of revenge, the kind that makes money.
 Albatros obtained a license in February 1918 for both the original factory
and the Ostdeutsche Albatros Werke (OAW)factory in Schneidenmuehl in the
state of Silesia. OAW had established a strong reputation for production
quality going back to the Albatros D.II, and this was maintained with their
production of the D.VII. In fact, Fokker’s reputation for shoddy
workmanship -which was undeserved with regard to D.VII production - led
pilots to prefer the Albatros and most particularly the OAW-built D.VII
aircraft, which were considered the best of all D.VIIs. While Fokker
distinguished the BMW-powered D.VII from the Mercedes-powered airplanes as
the D.VIIf, neither Albatros nor OAW had a particular distinguishing
designation for the different powerplants.
Albatros obtained a license in February 1918 for both the original factory
and the Ostdeutsche Albatros Werke (OAW)factory in Schneidenmuehl in the
state of Silesia. OAW had established a strong reputation for production
quality going back to the Albatros D.II, and this was maintained with their
production of the D.VII. In fact, Fokker’s reputation for shoddy
workmanship -which was undeserved with regard to D.VII production - led
pilots to prefer the Albatros and most particularly the OAW-built D.VII
aircraft, which were considered the best of all D.VIIs. While Fokker
distinguished the BMW-powered D.VII from the Mercedes-powered airplanes as
the D.VIIf, neither Albatros nor OAW had a particular distinguishing
designation for the different powerplants.
Over half of all production of the D.VII between March 1918 and the end of the war came from the Albatros and OAW factories.
The OAW-built D.VIIs came in four different versions from the four different production runs. The first run was indistinguishable from the early Fokker-built Mercedes-powered D.VIIs. Early on, it was recognized that additional cooling was necessary for the engine, to prevent in-flight fires when the gas tank immediately behind the firewall was overheated or explosion of the ammunition tanks immediately to the rear of the gas tank from overheating. OAW instituted the production of cowling panels with differing patterns of louvers in them for cooling. The most common were those of the third production run, distinguished by numerous small louvers, and the fourth and final run, which used a very effective system of larger louvers developed by the main Albatros factory for their final production aircraft.
| THE KIT |
The most-common version of the Fokker D.VII produced in model form has been the BMW-powered D.VIIf - modelers who wanted to do the other versions were forced to either modify the cowls of the Monogram or DML kits themselves, or use some cottage-industry resin replacements. It was only with the introduction of the Roden D.VIIs in both 1/72 and 1/48 scale that an effort was made to create these different versions. Roden’s choice was to make the engine cowling separate from the fuselage, breaking it at the firewall.
 Eduard announced at the outset that their 1/48 series of D.VIIs would
include the different cowlings as integral to the fuselage halves. This
actually makes for a more expensive kit, since the fuselage sprues differ
from kit to kit. This particular kit has fuselage halves that depict both
the third and fourth production runs, with different cowlings.
Eduard announced at the outset that their 1/48 series of D.VIIs would
include the different cowlings as integral to the fuselage halves. This
actually makes for a more expensive kit, since the fuselage sprues differ
from kit to kit. This particular kit has fuselage halves that depict both
the third and fourth production runs, with different cowlings.
Where Roden’s kit has a complete interior, including parts like the gas tank and the forward gun boxes which cannot be seen when the model is completed regardless of whether it is assembled with an open or closed cowling, this Eduard kit only supplies those parts that can be seen when the model is completely assembled. The Eduard kit does not provide the modeler with the opportunity of assembling the model with the engine compartment open, as the Roden kit does.
 Where the Roden kit provides the wings and tail surfaces with a restrained
fabric effect that is the closest to accurate of any World War I model, the
Eduard kit has a heavier surface detail with overdone rib tapes, much like
has appeared on their Sopwith Camel and Bristol Fighter kits. However, the
Eduard kit has a less “fiddly” construction method for the wings, without
the separate wingtip caps that the Roden kit has.
Where the Roden kit provides the wings and tail surfaces with a restrained
fabric effect that is the closest to accurate of any World War I model, the
Eduard kit has a heavier surface detail with overdone rib tapes, much like
has appeared on their Sopwith Camel and Bristol Fighter kits. However, the
Eduard kit has a less “fiddly” construction method for the wings, without
the separate wingtip caps that the Roden kit has.
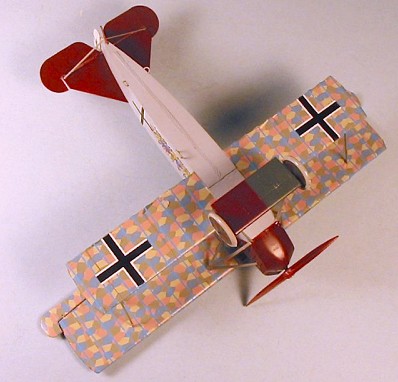
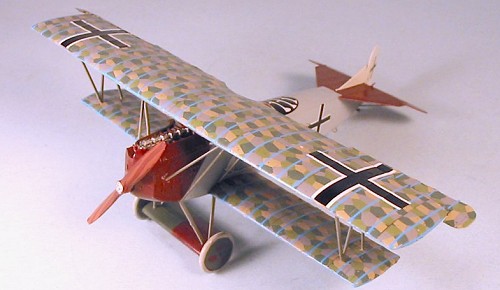
The Eduard kit supplies sufficient lozenge decal to completely cover the model, with the various pieces pre-cut to the proper size for their location. While the colors are suspect and the printing is not as sharp as other lozenge decals provided by other companies, this pre-cut sheet will be much easier to use for the modeler making a first venture into a World War I model with lozenge fabric.
In comparison with the Roden kit, the wings of the Eduard kit are not as thick and the profile taper is not as pronounced. It is in fact almost flat. After studying lots of photos of D.VIIs, I am unable to state definitively which kit has the more accurate wings, though both are better than either the Monogram (completely inaccurate) or DML kits.
| CONSTRUCTION |
 In
terms of kit design, the Eduard D.VII is as close to a Tamiya “shake ‘n’
bake” kit as a World War I model can be. All the parts are crisply molded
and flash-free, and there is no problem with fit anywhere in the
construction process. The control surfaces are all separate, allowing the
modeler to pose them in a realistic fashion. I will remind you that if you
do that, it is important to pose the controls in the cockpit in such a
position that would result with the way the external control surfaces are
posed.
In
terms of kit design, the Eduard D.VII is as close to a Tamiya “shake ‘n’
bake” kit as a World War I model can be. All the parts are crisply molded
and flash-free, and there is no problem with fit anywhere in the
construction process. The control surfaces are all separate, allowing the
modeler to pose them in a realistic fashion. I will remind you that if you
do that, it is important to pose the controls in the cockpit in such a
position that would result with the way the external control surfaces are
posed.
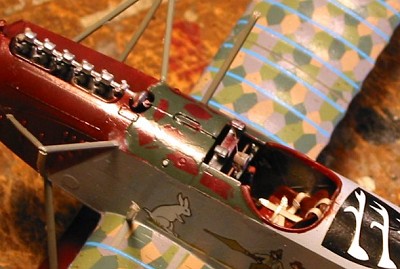
Construction of the model starts with the fuselage. I chose to use the Mercedes D.III engine, since there is no information as to which engine was used on the particular D.VII I was going to model, the uniquely-mysterious “Seven Swabians.” Where assembling the cowling and positioning the engine is fiddly with the Roden kit, it was simple with the Eduard model. The same was true with the cockpit interior, though I personally believe the Roden cockpit looks more accurate in the end. However, it is virtually impossible to mis-assemble anything here, and the provision of a photo-etch instrument panel with pre-painted instrument faces and an accurate seat belt is nice.
 Also, the lozenge decal sheet includes “reversed” pieces to use inside the
cockpit. Whether one is making a D.VII with a lozenge fuselage or one that
has been over-painted another color, all D.VIIs have the interior in
lozenge. This is the first time anyone has ever provided this kind of
decal.
Also, the lozenge decal sheet includes “reversed” pieces to use inside the
cockpit. Whether one is making a D.VII with a lozenge fuselage or one that
has been over-painted another color, all D.VIIs have the interior in
lozenge. This is the first time anyone has ever provided this kind of
decal.
Assembly of the wings is easy, and attachment of the lower wing to the fuselage does not include the fiddling necessary with the Roden kit to insure that the profile taper is correct (tapering up on the lower surface and horizontal on the upper surface). I also particularly liked the separate lace part for the lower fuselage, which solves the usual problem of hiding the centerline seam. Fit overall was good enough that no Mr. Surfacer or any other filler was used in construction.
Once the fuselage is attached to the lower wing, it is time to proceed with painting and application of decals before going on to final assembly of the model.
| COLORS & MARKINGS |
Painting:
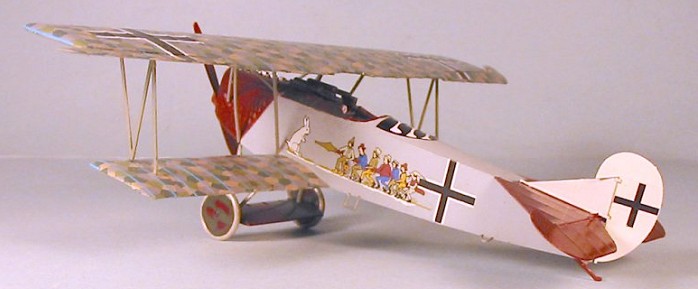
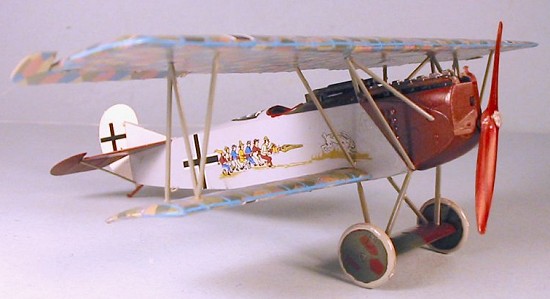
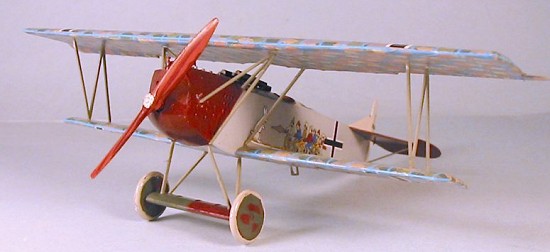
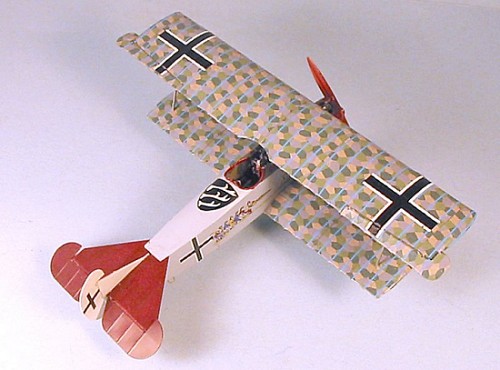
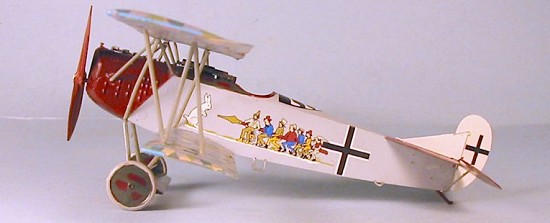
Following the instructions in the Aeromaster decal sheet for The Seven
Swabians, the engine cowling and horizontal stabilizers were painted
a”chocolate” brown with Gunze-Sangyo paint, withe the upper fuselage
decking done in the Mauve and Dark Green OAW “giraffe” pattern, as was also
done with the wheels. The axle wing was painted mauve and green in the OAW
pattern of dividing that on the centerline. The blue-grey fuselage was
done using Gunze-Sangyo “Blueish Grey” lightened with some Gunze
“Off-White.” The interplane and landing gear struts were
 painted with Xtracrylix “RLM02,” which is likely the “greenish-grey” color referred to
since it has been used by the German military for close to 200 years now..
The wings were unpainted until I gave the model an overall coat of
Xtracrylix Gloss Varnish.
painted with Xtracrylix “RLM02,” which is likely the “greenish-grey” color referred to
since it has been used by the German military for close to 200 years now..
The wings were unpainted until I gave the model an overall coat of
Xtracrylix Gloss Varnish.
Decals:
Doing lozenge decals is complicated and time consuming. Here, the fact that the various pieces of lozenge were already the right size and the rib tapes - provided in both mauve and light blue - were the right lengths made things much easier.
I applied the bottom color first, then when it was fully set overnight, the upper color, which also set overnight. I then applied the light blue rib tape. The process is time-consuming even when made as easy as Eduard has done here, but the result is excellent.
I then applied the kit decals for various stenciling, and the national insignia, while using the Aeromaster decal for the distinctive Seven Swabians markings. The national markings from the Aeromaster sheet are designed for the DML kit, which is slightly undersize overall, and do not completely fit the correct-size Eduard kit. The Eduard decals presented no problem with application.
When all the decals were done, the model was given an overall coat of Xtracrylix Satin Varnish.
| FINAL CONSTRUCTION |
 I
attached the control horns to the various control surfaces and then
attached ailerons, elevators and rudder to the wings, horizontal stabilizer
and vertical fin. I also attached the machine guns - I must add here that
the Roden guns are superior in look.
I
attached the control horns to the various control surfaces and then
attached ailerons, elevators and rudder to the wings, horizontal stabilizer
and vertical fin. I also attached the machine guns - I must add here that
the Roden guns are superior in look.
The tripod cabane struts are nice because they are molded in such a way that they will only fit right when they are “right,” which makes assembly easy. Once the cabane struts had set up, I attached the upper wing and then attached the interplane “N” struts. Eduard provides a lot of very small photo-etched parts to do the various attachment plates of struts to wings. I managed to lose a few of these when dropped them onto the carpet, and decided not to worry further about that. A modeler who takes the time to use all these will end up with a very good-looking model in terms of small detail. I then attached the landing gear sub-assembly and proceeded to attach the tail surfaces, lift handles and stirrup step.
I used thin wire for the brace wires and control wires. When that was done, I attached the prop - Eduard provides all four different props used by the D.VII.
| CONCLUSIONS |
This is easily the best-designed D.VII kit ever, and is so easy to assemble - and so difficult to assemble wrong (but never say “never”) - that I unhesitatingly recommend it to those who have never built a World War I model before. The original D.VII was said to “make the average pilot good and the good pilot great,” and this kit will do the same for the modeler who builds it. The lozenge decals may not be accurate color-wise, but are a good introduction to doing this kind of decal work.
 That said, the Eduard kit in no way replaces the Roden kit on any terms
other than ease of assembly. Given that the Roden kit is less than half
the cost of this kit, anyone who plans to do more than one D.VII (they’re
like Bf-109s when it comes to a wide variety of interesting and available
markings on aftermarket sheets) will likely consider trading the additional
time spent assembling the cheaper Roden kit against the increased cost of
the Eduard.
That said, the Eduard kit in no way replaces the Roden kit on any terms
other than ease of assembly. Given that the Roden kit is less than half
the cost of this kit, anyone who plans to do more than one D.VII (they’re
like Bf-109s when it comes to a wide variety of interesting and available
markings on aftermarket sheets) will likely consider trading the additional
time spent assembling the cheaper Roden kit against the increased cost of
the Eduard.
Some modelers have wondered if the second fuselage could be used with a Roden kit to get rid of that “fiddly” fuselage. I in fact did this with one of my Roden kits and can report that the time spent getting the two kits to fit together makes the overall project more “fiddly” than merely assembling the Roden kit - all of which is designed to come together - and I don’t recommend it. I would however recommend using the ”extra” fuselage with any DML kit you have, since this one is the right size.
With this kit and the earlier Camels and Bristol Fighters, Eduard definitely is now the “Tamiya” and “Hasegawa” of World War I models.
September 2005
Thanks to Eduard for the review kit.
If you would like your product reviewed fairly and quickly by a site that has around 300,000 visitors a month, please contact me or see other details in the Note to Contributors.