Eduard 1/48 Airco DeHavilland DH.2
| KIT #: | 8094 |
| PRICE: | $34.98 MSRP |
| DECALS: | Four options |
| REVIEWER: | Tom Cleaver |
| NOTES: | Profipack version |
| HISTORY |
The de Havilland D.H.2 was the first designed-for-the-purpose single-seat fighter to fly in combat. First designed in 1915 and entering combat over the Somme Front in the Spring of 1916, it ended the “Fokker Scourge” and is important historically for those two reasons.
 The pusher design, forced on the designer due to the lack of any device for
synchronizing the firing of a machine gun through the propeller, resulted
in an awkward, delicate-looking airplane. While it was prone to spinning
and the “trick” of getting out of a spin (the counterintuitive move of
pushing the nose down to unstall the wing) was not widely-known at the time
of its operational debut, pilots did find that the D.H.2 was more robust
than it appeared, and that it was more maneuverable than its opponents.
Unfortunately, even when it was fitted with the 110 h.p. Clerget instead of
the 100 h.p. Gnome rotary, its top speed of only 94 mph doomed it when the
Germans introduced their Halberstadt D.II and Albatros D.I fighters in the
fall of 1916. Completely outclassed by these fighters, the D.H.2 was
forced to soldier on until the Spring of 1917 before it could be replaced
on the Western Front, though it was used in the Middle East until 1918.
The pusher design, forced on the designer due to the lack of any device for
synchronizing the firing of a machine gun through the propeller, resulted
in an awkward, delicate-looking airplane. While it was prone to spinning
and the “trick” of getting out of a spin (the counterintuitive move of
pushing the nose down to unstall the wing) was not widely-known at the time
of its operational debut, pilots did find that the D.H.2 was more robust
than it appeared, and that it was more maneuverable than its opponents.
Unfortunately, even when it was fitted with the 110 h.p. Clerget instead of
the 100 h.p. Gnome rotary, its top speed of only 94 mph doomed it when the
Germans introduced their Halberstadt D.II and Albatros D.I fighters in the
fall of 1916. Completely outclassed by these fighters, the D.H.2 was
forced to soldier on until the Spring of 1917 before it could be replaced
on the Western Front, though it was used in the Middle East until 1918.
| THE KIT |
The D.H.2 has interested World War I modelers for a very long time. The first kit in1/48 was by Merit, some 40 years ago. This kit is still available through SMER. Blue Max released a limited-run kit of the D.H.2 back in 1995-96, which was vastly superior to the ancient Merit kit; though a very difficult kit for all but experienced modelers, it made into a very good model. This kit has long been out of production.
 The Eduard kit - which is released in a “standard” version and this
“Profipack” version which has double the number of markings possibilities
as well as an excellent photo-etch fret that (among other things) allows
you to create a very realistic-looking wicker seat for the cockpit - goes a
long way to resolving the problems presented by both the Merit/SMER and
Blue Max kits. Most importantly it provides a rear empennage that has both
upper and lower longerons and bracing struts molded in one piece for each
side. The Merit kit did this too, but nowhere near as delicately as Eduard
has done - this is far better than the Blue Max kit with all these parts
separate, which resulted in a very fragile model. The wings are thin, but
while they are not as thin as those in the Blue Max kit, they are quite
acceptable with muted “hills and valleys.”
The Eduard kit - which is released in a “standard” version and this
“Profipack” version which has double the number of markings possibilities
as well as an excellent photo-etch fret that (among other things) allows
you to create a very realistic-looking wicker seat for the cockpit - goes a
long way to resolving the problems presented by both the Merit/SMER and
Blue Max kits. Most importantly it provides a rear empennage that has both
upper and lower longerons and bracing struts molded in one piece for each
side. The Merit kit did this too, but nowhere near as delicately as Eduard
has done - this is far better than the Blue Max kit with all these parts
separate, which resulted in a very fragile model. The wings are thin, but
while they are not as thin as those in the Blue Max kit, they are quite
acceptable with muted “hills and valleys.”
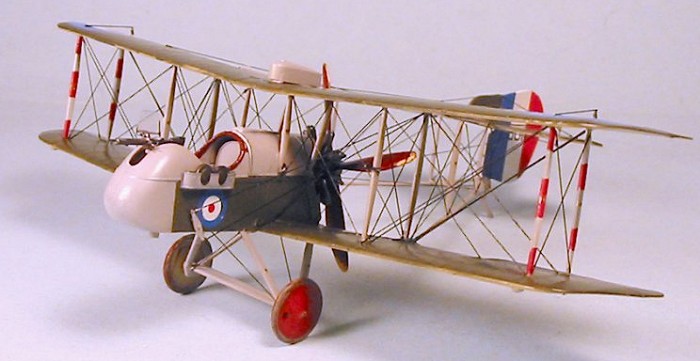
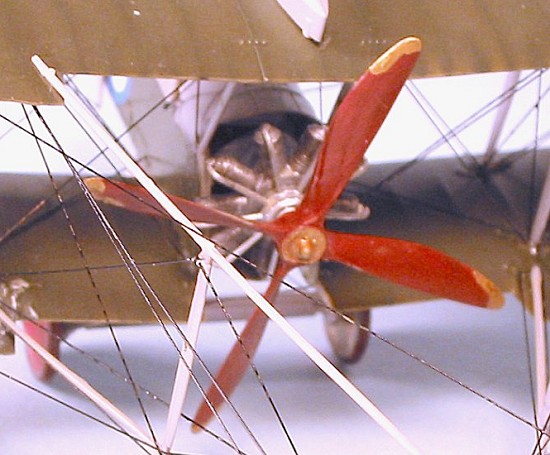
The kit provides the various detail parts to make an early-production or late-production version, so long as the modeler is willing to do it with the Gnome Monosoupape engine, which is very accurately reproduced. The kit provides both the early 2-bladed prop and the definitive 4-bladed prop. The gun mount is the most accurate anyone has done for a D.H.2 ever.
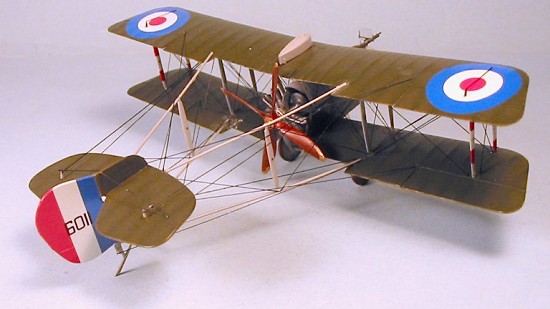
Decals are provided for one D.H.2 from 32 Squadron and three from 24 Squadron, the main user of the type on the Western Front. Markings are not provided for the D.H.2 Major Lanoe Hawker flew in his famous duel to the death with Manfred von Richtofen, but an enterprising modeler would have no problem piecing together the serial number from those provided on the sheet.
| CONSTRUCTION |
 For a World War I “birdcage,” this kit assembles remarkably easily. More
and more, Eduard is becoming the “Tamiya” of World War I kits as regards
kit design for ease of assembly.
For a World War I “birdcage,” this kit assembles remarkably easily. More
and more, Eduard is becoming the “Tamiya” of World War I kits as regards
kit design for ease of assembly.
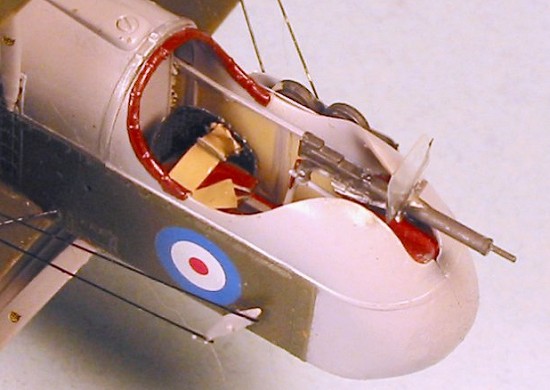
The majority of time was spent on the cockpit, since the photo-etch fret
allows a modeler to really detail this area, which is very obvious in the
finished model. I went for a late-production version, following the very
clear kit instructions, using the photo-etch to create the distinctive
wicker
 seat, and to provide the thin-walled ammo containers to either side
of the cockpit. There is nothing to this construction that would be
difficult for any modeler familiar with using photo-etch parts for detail.
seat, and to provide the thin-walled ammo containers to either side
of the cockpit. There is nothing to this construction that would be
difficult for any modeler familiar with using photo-etch parts for detail.
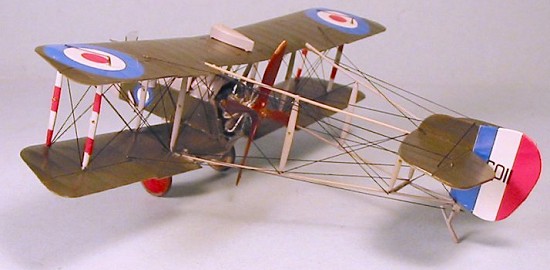
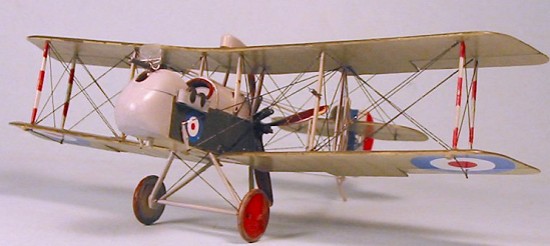
I separated the control surfaces of the wings and horizontal stabilizer, gluing them in a “dynamic” position. When doing this, a modeler should always ensure that the controls in the cockpit are also positioned correctly.
When the nacelle and lower wing had been assembled, it was time to paint the model before proceeding further with construction.
| COLORS & MARKINGS |
Painting:
After preshading the model with flat black, I used Gunze-Sangyo “Sail
Color” for the clear doped linen lower surfaces, and Gunze-Sangyo RAF Dark
Green for the upper surfaces, which were painted P.C.10 - a co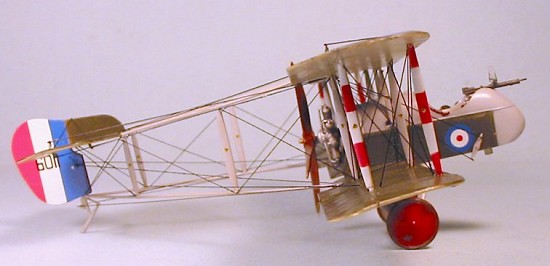 lor
that ranged everywhere from a chocolate brown to olive green, depending on
the source of the paint. The nose and upper fuselage, as well as the
struts and rear braces were all painted with Tamiya “Sky Grey”. When
this was all dry, the model was given a coat of Future.
lor
that ranged everywhere from a chocolate brown to olive green, depending on
the source of the paint. The nose and upper fuselage, as well as the
struts and rear braces were all painted with Tamiya “Sky Grey”. When
this was all dry, the model was given a coat of Future.
Decals:
I used the kit decals to do the airplane on the box art, an otherwise-anonymous D.H.2 flown by 24 Squadron - the first unit to operate the D.H.2 - on the Somme Front in the fall of 1916. These went on with no difficulty. When everything had set up, I washed the model to get rid of decal solvent residue and then gave everything a coat of Xtracrylix Satin Varnish.
| FINAL CONSTRUCTION |
 I
attached the wing struts and then the upper wing. When this had thoroughly
set up, I attached engine and prop and then the tail booms - the
single-piece design for each side greatly eased this phase of assembly, in
comparison with the Blue Max kit. I then attached the rudder and horizontal
stabilizer, and finished off by attaching the landing gear.
I
attached the wing struts and then the upper wing. When this had thoroughly
set up, I attached engine and prop and then the tail booms - the
single-piece design for each side greatly eased this phase of assembly, in
comparison with the Blue Max kit. I then attached the rudder and horizontal
stabilizer, and finished off by attaching the landing gear.
Rigging:
The D.H.2 has probably the most complex rigging of any World War I model other than the F.E.2b. It is truly the definition of the term “bird cage.” I used .008 wire, painted gloss black, for the rigging, which took the better part of two days to complete. The secret here is to take your time. In the case of this model, which was very fragile and “wiggly” when first completely assembled, due to the thinness of the struts and booms, the bracing wire contributed to structural solidity, since I attached the wires with cyanoacrylate glue. When this was finished, the model had the solidity of a more normal World War I model.
| CONCLUSIONS |
This new kit by Eduard is the kit to get for anyone interested in building a model of this historically-significant airplane. The airplane is historically significant as the first designed-for-the-purpose fighter, and when completely rigged will definitely command notice from those who see it. Highly recommended.
August 2005
Thanks to Eduard for the review kit.
If you would like your product reviewed fairly and fairly quickly, please contact the editor or see other details in the Note to Contributors.