Roden 1/32 Fokker Dr.I
| KIT #: | 601 |
| PRICE: | $37.98 MSRP |
| DECALS: | Four options |
| REVIEWER: | Tom Cleaver |
| NOTES: | Decal sheet - Cutting Edge 32-066 'The Baron's Tripes' |
| HISTORY |
There is likely no fighter airplane better known in the world than that flown by “The Bloody Red Baron of Germany,” as the song “Snoopy and the Red Baron” has it. People who know nothing about airplanes know the all-red Fokker Triplane flown by Rittmeister Manfred von Richtofen. The overwhelming number of homebuilt triplane replicas for the past 50 years Have been painted red when finished.
Manfred Albrecht, Freiherr von Richthofen, was born on May 2, 1892 in the eastern German city of Breslau. His father, Major Albrecht von Richthofen, a minor a Prussian nobleman, was retired from the Army. At age 11, Manfred was sent to the military school at Wahlstatt, and then to the Royal Military Academy at Lichterfelde. At graduation in April 1911, he was commissioned in the 1st Regiment of Uhlans, Kaiser Alexander III, and was promoted to Leutnant in 1912.
After brief service in the trenches following the outbreak of a war in which cavalry had no role, von Richtofen became an aerial observer, flying on the Eastern Front. He met the famous Oswald Boelcke, who advised him to become a pilot. Surprisingly, the future Ace of Aces was not a natural pilot, taking a then-unheard-of 24 hours of dual instruction before he was judged capable of solo on October 10, 1915 - this at a time when a pilot might solo with as few as 3-4 hours of dual training. He returned to the Eastern Front and flew observation airplanes until the summer of 1916, when Boelcke - then traveling throughout the Army to recruit pilots for the squadron he had been appointed to lead - stopped by. Boelcke remembered the young ex-Uhlan and brought him along to form the original pilot contingent of Jasta 2.
Boelcke gave his pilots strict instruction in his theories of air fighting before taking them to the Somme Front in the fall of 1916. The Royal Flying Corps had ended the “Fokker Scourge” in the Spring of 1916 with the introduction of the deHavilland D.H.2 and the Royal Aircraft Factory’s F.E.2 series, and had established air superiority over the Somme Front by the time the great battle broke out on July 1, 1916.
Boelcke’s unit, the first to be completely equipped with the then-advanced Albatros D.I and D.II biplanes armed with two machine guns synchronized to fire through the prop, and armed with his knowledge of how a fighting unit should operate in the air, was about to change the air war. Entering combat in mid-September, the unit made its presence felt immediately. Richthofen scored on their first mission and within a month he had six victories, when the leader was killed in a mid-air collision with one of his own men. A month later, Richtofen entered the history books with the epic fight that ended with him shooting down Major Lanoe Hawker, V.C., the leading British ace.
 Richtofen soon rose
to command Jasta 2 and demonstrated himself Boelcke’s star pupil. He came
into his own as the leading ace of the German air force when he bettered
his teacher’s score during the fighting of “Bloody April,” in 1917. By
this time he was painting his airplanes red, and he was known as “der Rote
Kampfflieger” by the Germans, “Le Petit Rouge” by the French, and “The Red
Baron” by the British.
Richtofen soon rose
to command Jasta 2 and demonstrated himself Boelcke’s star pupil. He came
into his own as the leading ace of the German air force when he bettered
his teacher’s score during the fighting of “Bloody April,” in 1917. By
this time he was painting his airplanes red, and he was known as “der Rote
Kampfflieger” by the Germans, “Le Petit Rouge” by the French, and “The Red
Baron” by the British.
In June 1917, Richthofen was named commander of Jagdgeschwader 1, which brought together four fighter squadrons under a single fighting command. The unit became known as “The Flying Circus” due to the fact that they were able to transfer from airfield to airfield across the German front opposing the British forces as needed, in the manner of a traveling circus. The RFC and RNAS called them “the circus” when the pilots followed their leader in painting their airplanes in bright colors, unlike the drab appearance of the Pups, Tripehounds, and Camels flown by the RFC and RNAS on the Flanders front. “JaGe Ein” achieved immediate success over Ypres during July, August and September 1917.
Richtofen himself was shot down and nearly killed in combat with an F.E.2d of 25 Squadron on August 21, 1917. His deep head wound never fully healed and was still seeping on occasion by the time he met his fate eight months later. The wound caused pain and long-lasting headaches, making him more morose and pensive.
Many who have looked at von Richtofen’s career have written him off as a heartless Prussian killing machine, a view that was strengthened by his collection of silver victory cups for each of his aerial victories, which were displayed in his bedroom at home along with the Lewis gun taken from Hawker’s crashed D.H.2.
In truth, Richtofen was a serious student of war and tactics, who applied what he had learned as a hunter in the German forests as a youth to the aerial battles over the Somme. He took advantage of the weather, with the prevailing winds working against his enemies as they followed their offensive philosophy and took the war over the German lines. As with most successful aerial fighters from his day to the present, he learned to avoid the mythological “dog fight,” attacking opponents whose first inkling he was there was his bullets stitching their airplane. His realistic view of war is shown in his statement, “I think of this war as it really is, not as the people at home imagine, with a hoorah! and a roar. It is very serious, very grim.”
 By 1918, von
Richtofen’s fame was such that the German leadership feared a crisis of
morale among the armed forces if he were to be killed. When asked to join
the General Staff, he declined, saying, “I do not want to be a
high-decorated officer in a safe place and my men are in the dirty field
and dying.”
By 1918, von
Richtofen’s fame was such that the German leadership feared a crisis of
morale among the armed forces if he were to be killed. When asked to join
the General Staff, he declined, saying, “I do not want to be a
high-decorated officer in a safe place and my men are in the dirty field
and dying.”
March 21, 1918 saw the commencement of Operation Michael, the German offensive designed to knock the British and French out of the war before the Americans could make their presence felt. JaGe I, in company with the other two Jagdgeschwaders made an all-out attempt to overcome their British and French opponents, despite the fact that the 1918 Spring was rainy. In fact, during his final month of combat, the air forces were only able to fly on about half the days due to the weather. On April 20, von Richtofen, flying Fokker Dr.I 425/17, scored his final two victories, both Sopwith Camels. In two weeks, he was scheduled to go home on leave, and was exhausted enough to be looking forward to it.
Like Boelcke, von Richtofen was superstitious, and did not want to be photographed before a mission. Fifteen minutes before takeoff on April 21, 1918, he was photographed as he pulled on his new one-piece flying suit, just as Boelcke had been photographed before his final flight.
Thirty minutes before von Richtofen led five Fokker Triplanes of Jastas 2 and 4, along with a flight of Albatros D.Vs from Jasta 5, the “Green Tail Jasta” who had been temporarily assigned to the Baron’s command, eight Sopwith Camels of 208 Squadron RAF - formerly No. 8 Naval Squadron prior to the founding of the Royal Air Force on April 1 - took off from Bertangles for patrol. At the same time, two R.E.8s also left Bertangles for a photo mission over the German lines.
After patrolling the lines for 30 minutes, Richtofen’s formation was near Hamel when he spotted the two R.E.8s as they turned away from their photo runs to head for home. Four Triplanes - including one flown by newcomer Leutnant Wolfram von Richtofen, the Baron’s nephew - attacked the “‘Arry Tate’s”, whose gunners gave as good as they got, forcing the Germans to break off their attack.
At this moment, 208 Squadron’s flight, led by Captain Arthur Roy Brown, arrived above the fight. Seeing the R.E.8s under attack, Brown led his flight - minus the “new boy,” Wilfred “Wop” May, a school friend of Brown’s back in Canada, who had been ordered to steer clear of any fights on this, his first mission.
 Seeing the Camels
attack his Triplanes, von Richtofen led the Jasta 5 Green Tails into the
fight. The wind that day favored the British on this part of the front,
and in the swirling fight the Germans were blown toward the enemy lines.
Seeing the Camels
attack his Triplanes, von Richtofen led the Jasta 5 Green Tails into the
fight. The wind that day favored the British on this part of the front,
and in the swirling fight the Germans were blown toward the enemy lines.
May was attacked by Wolfram von Richtofen, and broke away, diving toward home. Manfred von Richtofen spotted the fleeing Camel and gave chase. This violated every rule of combat he had laid down as he descended to low altitude where he could be fired at from the ground, and chased his would-be 81st victim toward the British lines.
May saw the approaching nemesis and began darting from side to side as he dropped low over the lines, heading along the road from the village of Corbie to Bray. The Triplane’s one big failing was its relative lack of speed, and von Richtofen was drawn into an extended chase as he slowly gained on May.
Roy Brown broke away from a fight with two Albatroses, saw the all-red triplane chasing his friend and dove to save him. The Australian troops below saw the Camel, chased by the red triplane, chased by a second Camel, as the airplanes roared over the Somme Valley, a few hundred feet overhead.
Ten years later, in “My Fight with Richthofen,” published in the Chicago Tribune on April 22, 1928, Brown was quoted as having said:
“I was in a perfect position above and behind. ... neither plane, (Richthofen or May) was aware of me ... I had dived until the red snout of my Camel pointed fair at his tail. My thumbs pressed the triggers. Bullets ripped into his elevator and tail planes. The flaming tracers showed me where they hit. A little short! Gently I pulled back on the stick. The nose of the Camel rose ever so slightly. Easy now, easy. The stream of bullets tore along the body of the all-red tripe. Its occupant turned and looked back. I had a flash of his eyes behind the goggles. Then he crumpled - sagged in the cockpit ... Richthofen was dead. The triplane staggered, wobbled, stalled, flung over on its nose and went down. The reserve trenches of the Australian infantry was (sic) not more than 200 feet below. It was a quick descent. May saw it. I saw it as I swung over. And Mellersh saw it."
Brown turned away while May escaped. Lieutenant Mellersh, who was flying with Brown, was a witness to the crash of the triplane but he did not see Brown engage the Fokker. His account was that he had engine problems. “...I was forced to spindive to the ground and return to our lines at about 50 feet. Whilst so returning a bright red triplane crashed quite close to me and in looking up I saw Captain Brown’s machine.”
Brown turned away, and an 80-year controversy began.
 Despite Brown’s statement that the triplane had crashed after he fired at
it, Richthofen continued to follow May down the Somme valley at a low
altitude, completely absorbed in his chase.
Despite Brown’s statement that the triplane had crashed after he fired at
it, Richthofen continued to follow May down the Somme valley at a low
altitude, completely absorbed in his chase.
As the flight approached the lines, Australian anti-aircraft machine guns opened up. One, a Vickers heavy machine gun, was commanded by Sergeant Cedric Popkin. Popkin was situated 1,000 yards west of the village of Vaux on the northern bank of the Somme River, with the 53rd and 54th Batteries of Lewis guns on the eastern slope of a shallow hill 1,000 yards east of Bonnay.
May, hugging the ground, rose to clear the hill and flew on in a straight line after passing it. Von Richtofen, still following May, rose to clear the hill and came under fire from the 53rd and 54th Batteries. He performed an Immelman to head back to the German lines. Gunner George Ridgway, who was on top of the Heilly brick stack near the Bray-Corbie road - which today is the only landmark still in existence - had a clear view of what happened next:
“The first plane passed to the right and rapidly began to climb. As soon as it was out of danger the machine gunners opened out on the German...he came within 200 feet of the ground and to save himself he swerved to the left and immediately banked at an angle of 75 degrees. He was sitting upright in the cabin and could be seen plainly at the controls. The German plane provided an excellent target for the machine guns who were in a circle around him at Vaux-sur-Somme, Bonney (sic) and Corbee (sic) and thousands of rounds were fired at him. A rain of death bespattered him. The plane seeking frantically to escape only rose about 500 feet when it turned over to its left, and crashed to the ground.”
Sergeant Popkin wrote in 1935:
“The planes would be travelling in a North East direction straight towards my gun position. I opened fire immediately the British plane left my gun sights and followed the Fritz around. He would be perhaps 100 to 120 yards in front of me when I opened fire and about 200 to 400 feet in the air. He would be below the top of the ridge which is about 500 to 600 feet high. I opened fire the second time at the peak of his turn. I don’t think that I was firing so long the second time as the first. I would be firing at him the second time...I would be firing about half to three-quarters a minute each time.”
Sergeant Popkin’s commanding officer, Captain F.R. Watts, wrote in November 1929:
 “Sergeant Popkin
allowed the British plane to pass and then fired at Richthofen, who made a
right swing and then came back to the gun and this time at a lower height
when Popkin fired about 200 rounds at him and Richthofen swung round to the
right and just managed to clear the ridge and crashed. I can assure you
that there was no-one else had a chance to bring him down because there was
no other guns close enough except mine.”
“Sergeant Popkin
allowed the British plane to pass and then fired at Richthofen, who made a
right swing and then came back to the gun and this time at a lower height
when Popkin fired about 200 rounds at him and Richthofen swung round to the
right and just managed to clear the ridge and crashed. I can assure you
that there was no-one else had a chance to bring him down because there was
no other guns close enough except mine.”
The class war being what it was in 1918, neither the German Air Force nor the officers of the Royal Air Force could accept the idea that the war’s greatest pilot had fallen victim to the poor bloody infantry, and Roy Brown was officially credited with having shot down Manfred von Richtofen. Brown himself never made this claim.
In the years after, the Australians pressed their claim to having gotten von Richtofen, but it would not be until 1998, when
Dr. M. Geoffrey Miller published his masterful study, “The Death of Manfred von Richthofen: Who Fired the Fatal Shot?” in “Sabretache", the Journal and Proceedings of the Military History Society of Australia (which you can read in full HERE <http://www.lib.byu.edu/~rdh/wwi/comment/richt.htm>). Dr. Miller concluded:
“All that we can be sure of is that the entry and exit wounds on von Richthofen’s body meant that the bullet passed through the heart, or great vessels, and he could not have remained conscious for more than about thirty seconds after being hit. The fatal bullet had therefore to have been fired at von Richthofen at the end of the pursuit and this is likely to have been at the time when the triplane was observed to turn away from the hill where the Lewis gun batteries were situated.”
The RAF sent a pilot to the German field at Cappy the next day, where he dropped a wreath that announced the death of von Richtofen. His death did indeed have a major effect on the morale of German pilots. The British buried him with full military honors in the cemetery in Bertangles. In 1925, the body was disinterred and taken to Berlin, where he was buried as a national hero.
During the Second World War, more than a hundred German fighter pilots scored more than the 80 victories scored by Manfred von Richtofen. In 1984 I asked Adolf Galland - who was one of those pilots - who was “the ace of aces.” He replied, “Von Richtofen. The world knows him.”
| THE KIT |
For a look at what’s in the box, please visit the preview
| CONSTRUCTION |
Scott Van Aken did an excellent review (URL HERE) of what it takes to turn Roden’s collection of parts into a good-looking model. I found nothing to add to this, and in fact referred to it in building my kit.
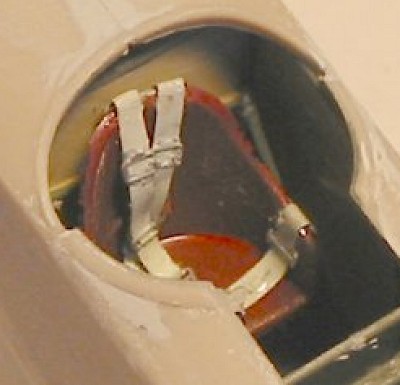 The one thing I did different from Scott was to use some photo-etch seat
belts on the seat.
The one thing I did different from Scott was to use some photo-etch seat
belts on the seat.
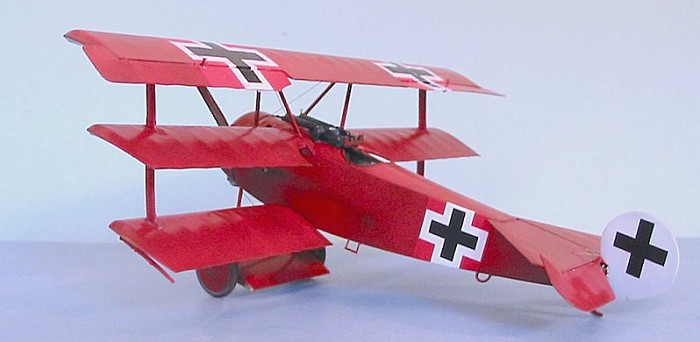
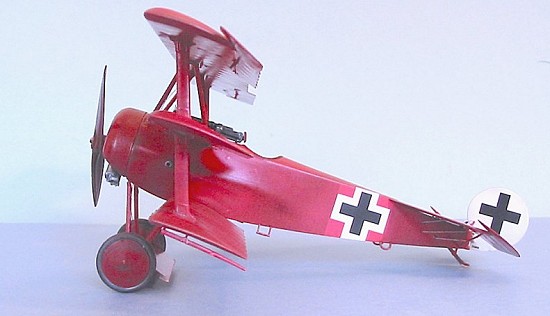
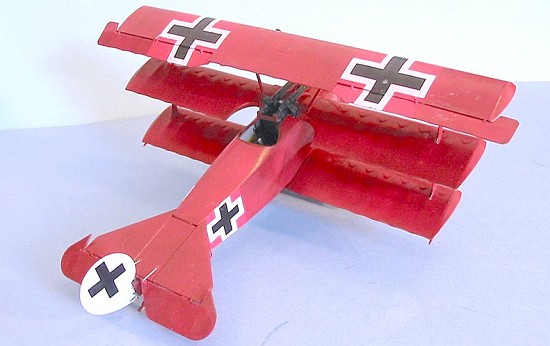
Additionally, I assembled the fuselage and attached the center wing and the forward fuselage fairing, with the wings and tail as separate sub-assemblies, at which point I stopped assembly and started painting the model. Since this review is primarily directed on how to obtain an accurate model of Manfred von Richtofen’s famous Dr.I, 425/17 - the airplane he was killed in - I will proceed here to describe the work in detail.
| COLORS & MARKINGS |
Painting:
As everyone knows, the Fokker Triplane Manfred von Richtofen was shot down
in was painted overall red, with a white rudder. For a very long time,
that has been the one thing everyone could agree on. Speculation about
this airplane has abounded, with serious researchers claiming that the
airplane was delivered by Tony Fokker from the factory either painted
overall red, or delivered with a red silk covering, and other
equally-ridiculous claims. The one thing anyone has known about
 what color of red was
used was the report after von Richtofen’s death that the airplane was
“blood red.” About the most that can be drawn from that is that it more
than likely was a darker red and not the bright scarlet red that many
models and full-scale replicas have been painted over the years.
what color of red was
used was the report after von Richtofen’s death that the airplane was
“blood red.” About the most that can be drawn from that is that it more
than likely was a darker red and not the bright scarlet red that many
models and full-scale replicas have been painted over the years.
When Cutting Edge went to do the research for their decal sheet “The Baron’s Tripes,” they contacted researchers who have put a great deal of effort into figuring out this mystery. It turns out - as do many mysteries - to not be all that mysterious, and certainly nowhere near as complicated as “Tony Fokker covered it with special fabric.”
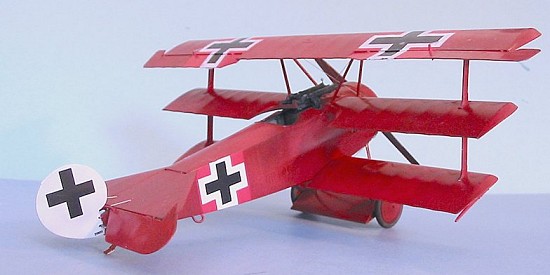
425/17 came out of the factory looking like every other Fokker Dr.I - it was a”turquoise blue” on the lower surfaces, and had a streaky olive green camouflage over the clear doped linen of the upper surfaces and on the fabric covering over the wheel hubs, with a solid olive green cowling and the upper surface of the “axle wing,” while the struts were the underside blue and the. The markings used the Patee (“Iron”) Cross on a white background and the rudder was white.
The red paint was applied over this factory finish. Because red paint was not easy to get hold of at the front, it was thinned before application, with the result that the red color was darker over the camouflaged upper surfaces, lighter over the underside color, and very light over the white bands for the national insignia. It was in fact possible to “see” the underlying camouflage to varying degrees through the red paint, which was not uniformly applied overall.
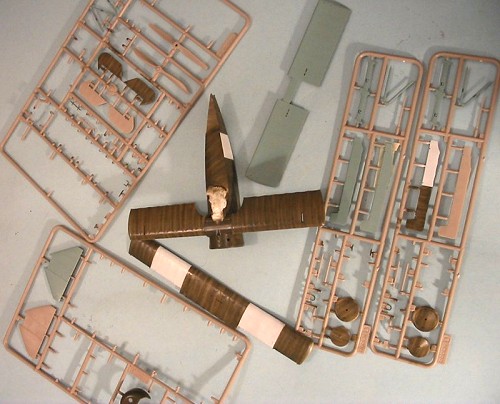 To do my model, I first painted the “factory finish.” After airbrushing
white and masking off the areas for the national insignia, I used Tamiya
“Light Blue” (which is RLM65)for the lower surfaces, Tamiya “Buff” for the
upper clear doped linen color, and Tamiya “Khaki” for the Olive Green
color, and airbrushed the “streaks,” since the scheme would only peek
through the final red color. In doing this I made the discovery that with
the airbrush tightened down to give a fine spray, I could give a very
realistic-looking “streaky camo” finish. In smaller scales it is necessary
to hand-brush the streaky camo after applying it with an airbrush, but I
think there is a possibility the original scheme might have been applied
with spray guns, since what I ended up with looked very close to
photographs of the real item.
To do my model, I first painted the “factory finish.” After airbrushing
white and masking off the areas for the national insignia, I used Tamiya
“Light Blue” (which is RLM65)for the lower surfaces, Tamiya “Buff” for the
upper clear doped linen color, and Tamiya “Khaki” for the Olive Green
color, and airbrushed the “streaks,” since the scheme would only peek
through the final red color. In doing this I made the discovery that with
the airbrush tightened down to give a fine spray, I could give a very
realistic-looking “streaky camo” finish. In smaller scales it is necessary
to hand-brush the streaky camo after applying it with an airbrush, but I
think there is a possibility the original scheme might have been applied
with spray guns, since what I ended up with looked very close to
photographs of the real item.
Once this was done, I gave the model an overall coat of Xtracrylix Satin varnish and applied all the stencil markings and the serial numbers. When this was dry, I started applying the red paint.
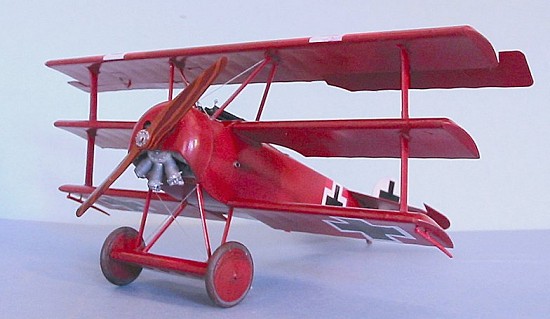
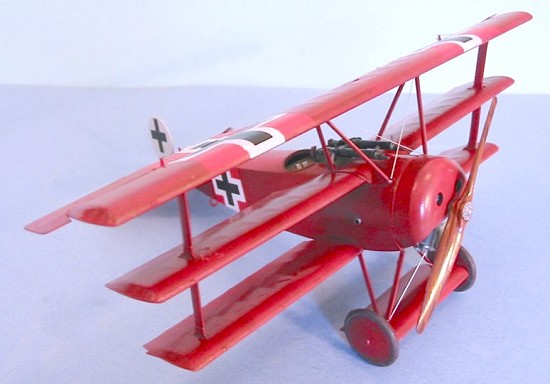
I used Xtracrylix Red RLM23, thinned 60-40 with the Xtracrylix thinner (60% thinner, 40% paint). I applied this in thin coats, going back over it until I had a finish where the model was red overall, but the underlying camo could be “seen” through the red color, and the upper and lower surface red colors differed. I am not sure how clearly this is visible for internet photography, but it is definitely there in person, and you can easily see the lighter red over the white bands.
When finished, this came out “blood red” overall, in varying tones. I am convinced from this experience that the researchers Cutting Edge worked with to create this decal sheet were right.
When this dry, I gave the model an overall coat of Xtracrylix Gloss Varnish and it was time to proceed with further construction.
| FINAL CONSTRUCTION |
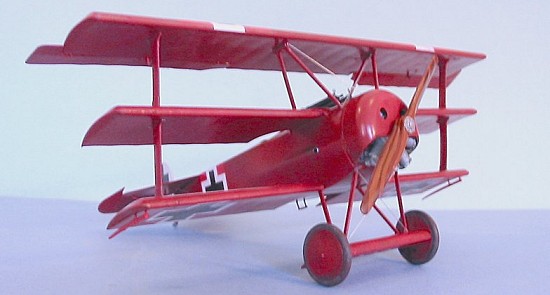
 I now assembled the
model, attaching engine, cowling, lower wings, struts, landing gear, tail
surfaces, the ailerons and the elevator, as well as well as the smaller
“fiddly bits.” I had test-fitted the one-piece wing struts during
construction and they were a difficult fit, so I cut them in half and
mounted them separately to the middle wing, which worked without problems.
I left off the upper wing until I had installed the machine guns following
the application of the national markings and the final coat of Gloss
varnish.
I now assembled the
model, attaching engine, cowling, lower wings, struts, landing gear, tail
surfaces, the ailerons and the elevator, as well as well as the smaller
“fiddly bits.” I had test-fitted the one-piece wing struts during
construction and they were a difficult fit, so I cut them in half and
mounted them separately to the middle wing, which worked without problems.
I left off the upper wing until I had installed the machine guns following
the application of the national markings and the final coat of Gloss
varnish.
When the varnish was dry, I attached machine guns and then the upper wing. I then attached the bracing wires on the cabane struts and landing gear, and the control wires. These were all done with .008 wire.
December 2005
Review kit courtesy of Roden
If you would like your product reviewed fairly and fairly quickly, please contact the editor or see other details in the Note to Contributors.