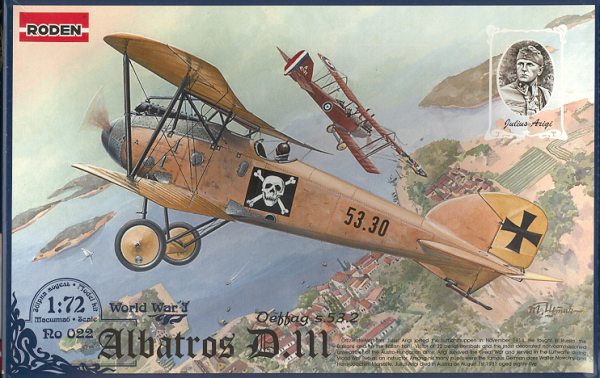
Roden 1/72 Albatros D.III (Oeffag) S.53.2
|
KIT # |
022 |
|
PRICE: |
$9.98 |
|
DECALS: |
Six Aircraft |
|
REVIEWER: |
Clarence Wentzel |
|
NOTES: |
Five of the decal
selections are for Austro-Hungarian Aces |
|
HISTORY |
Early in World War One, the Austro-Hungarian company Oesterreichische Daimler Motoren AG was given permission to establish a modern aircraft factory and on March 3, 1915, the Oesterreichische Flugzeugfabrik AG (Oeffag) was established. In August 1916 Oeffag became impressed with the performance of the German Albatros fighters and obtained the license to produce them starting with the D.II model.
As Albatros improved their D.II to incorporate new
“sesquiplane or Nieuport” style wings, Oeffag remained in step. Oeffag
maintained common fuselage, undercarriage and tail
 surfaces with the D.II but
were not content with the German wing design and developed a much stronger wing
and airframe. In the process, they created a strong, beautifully crafted
airplane that could take an engine of increasing power without extensive
modification. The initial Oeffag D.III utilized the Daimler 185 hp engine in
place of the 160 hp Mercedes of the German version. This provided greater top
speed, and rate of climb. The design remained in production until the end of
the war in three different series. The first series, series 53 is the subject
of this Roden kit.
surfaces with the D.II but
were not content with the German wing design and developed a much stronger wing
and airframe. In the process, they created a strong, beautifully crafted
airplane that could take an engine of increasing power without extensive
modification. The initial Oeffag D.III utilized the Daimler 185 hp engine in
place of the 160 hp Mercedes of the German version. This provided greater top
speed, and rate of climb. The design remained in production until the end of
the war in three different series. The first series, series 53 is the subject
of this Roden kit.
|
THE KIT |
This kit was previewed by Scott Van Aken and can be easily accessed so I will not spend any time in this area. It is noted that a number of extra parts are included in the kit. I am sure that Roden will use many of the same sprues to build other versions of the Oeffag D.II and D.III.
|
CONSTRUCTION |
Construction starts with the engine. It is well detailed and assembles easily. Note-the instructions call for parts 11F, the gun barrels, to be assembled with the engine. I found it easier to hold off and install these parts after the engine is mounted into the fuselage. Also, I waited until final assembly to install the exhaust system, part 9F.
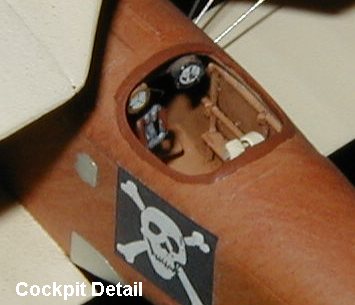 The fuselage is detailed on the inside and contains a
basic seat and control stick. I added lead foil seat belts and accentuated some
of the interior stringers. I also added a couple of instruments to the
underside of the top deck similar to photos. Finally, a vent on each side of
the fuselage needs to be removed on this version. The plans show this clearly.
The plans seem to show that the control stick and rudder pedals are installed
into one fuselage side before assembly of the fuselage. This does not work
well. I ended up gluing the fuselage together and then trimming the control
column and rudder pedals to fit. The joint at the front of the fuselage where
the fuselage sides, the top deck and the nose cone come together is tricky. It
is best to make sure that the top deck is lined up with the front of the
fuselage so that the nose cone will come close to fitting. The joint at the
rear of the top deck can be easily filled and sanded if needed.
The fuselage is detailed on the inside and contains a
basic seat and control stick. I added lead foil seat belts and accentuated some
of the interior stringers. I also added a couple of instruments to the
underside of the top deck similar to photos. Finally, a vent on each side of
the fuselage needs to be removed on this version. The plans show this clearly.
The plans seem to show that the control stick and rudder pedals are installed
into one fuselage side before assembly of the fuselage. This does not work
well. I ended up gluing the fuselage together and then trimming the control
column and rudder pedals to fit. The joint at the front of the fuselage where
the fuselage sides, the top deck and the nose cone come together is tricky. It
is best to make sure that the top deck is lined up with the front of the
fuselage so that the nose cone will come close to fitting. The joint at the
rear of the top deck can be easily filled and sanded if needed.
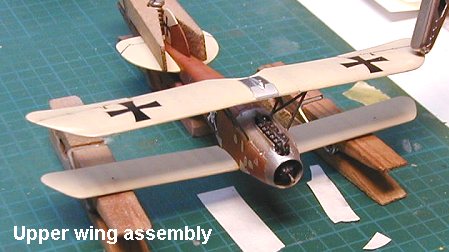 Wing assembly is reasonably easy. The first item is to
check all of the strut mounting locations. There should be mounting holes at
each location although some of the locations seem to have the mold pin broken
and thus have a small pimple sticking above the wing surface. Trim this off and
drill a mounting hole at all locations. The bottom wings are keyed into the
fuselage and pose no problems. Simply make sure that the joint is cleaned up
and double-check the wing dihedral while making sure that the leading edge is
straight. The top wing is composed of three parts. Again, clean up the joints
and make sure that the wing is flat and the leading edge is straight when gluing
the wing together. I mounted the top wing as follows. First I glued the cabane
struts to the top wing and canted them inward so that the space between the
strut ends was equal to the width of the fuselage at the mounting point. When
this was dry, I placed spots of glue at the four fuselage mounting points and
slid the wing in place from the top. The mounting points line up well so it is
simply a matter of making sure that the wing is straight and level. After it
had set up, I added some more CA cement to fix the joints. When the wing-to-cabane
strut joints were dry, I installed the interplane struts. These easily snap
into the mounting holes.
Wing assembly is reasonably easy. The first item is to
check all of the strut mounting locations. There should be mounting holes at
each location although some of the locations seem to have the mold pin broken
and thus have a small pimple sticking above the wing surface. Trim this off and
drill a mounting hole at all locations. The bottom wings are keyed into the
fuselage and pose no problems. Simply make sure that the joint is cleaned up
and double-check the wing dihedral while making sure that the leading edge is
straight. The top wing is composed of three parts. Again, clean up the joints
and make sure that the wing is flat and the leading edge is straight when gluing
the wing together. I mounted the top wing as follows. First I glued the cabane
struts to the top wing and canted them inward so that the space between the
strut ends was equal to the width of the fuselage at the mounting point. When
this was dry, I placed spots of glue at the four fuselage mounting points and
slid the wing in place from the top. The mounting points line up well so it is
simply a matter of making sure that the wing is straight and level. After it
had set up, I added some more CA cement to fix the joints. When the wing-to-cabane
strut joints were dry, I installed the interplane struts. These easily snap
into the mounting holes.
|
FINAL ITEMS |
 The landing gear goes together easily. I used the same
trick as the top wing and glued it in place. I installed the radiator hoses
next. The front one, part 14F, fit ok but the rear part seemed too short. I
used a piece of stretched sprue as a substitute. The exhaust pipe was glued in
place at this time. The plans show to use part 9F although some photos and
plans seem to show individual pipes. The photo of the actual airplane in
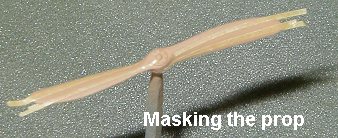
inconclusive so I followed the kit directions. Regarding the prop and spinner,
I choose to paint the propeller first and then fit it into the spinner. I
simulated the multi layered prop by painted the prop wood color, applied thin
strips of masking tape and then painted it leather. I found the prop too big
and had to trim some plastic off the hub and the inside of the spinner in order
for the spinner to meet the back plate. Even then, it resulted in a bad
joint. It would have been better for Roden to design the back plate to fit
inside the spinner. As it was, I should have glued the spinner together, filled
and sanded the joint and then painted the prop and spinner. Next time.
The landing gear goes together easily. I used the same
trick as the top wing and glued it in place. I installed the radiator hoses
next. The front one, part 14F, fit ok but the rear part seemed too short. I
used a piece of stretched sprue as a substitute. The exhaust pipe was glued in
place at this time. The plans show to use part 9F although some photos and
plans seem to show individual pipes. The photo of the actual airplane in
inconclusive so I followed the kit directions. Regarding the prop and spinner,
I choose to paint the propeller first and then fit it into the spinner. I
simulated the multi layered prop by painted the prop wood color, applied thin
strips of masking tape and then painted it leather. I found the prop too big
and had to trim some plastic off the hub and the inside of the spinner in order
for the spinner to meet the back plate. Even then, it resulted in a bad
joint. It would have been better for Roden to design the back plate to fit
inside the spinner. As it was, I should have glued the spinner together, filled
and sanded the joint and then painted the prop and spinner. Next time.
 The
last major item was the rigging. I use stainless steel wire for rigging.
Measure the length of wire needed and cut it a little long. Then test-fit and
trim off small amounts until it is the correct length. I then dipped both ends
in super glue and carefully put the wire in place. I should have pre-drilled
some locating holes before wing assembly but I was too eager.
The
last major item was the rigging. I use stainless steel wire for rigging.
Measure the length of wire needed and cut it a little long. Then test-fit and
trim off small amounts until it is the correct length. I then dipped both ends
in super glue and carefully put the wire in place. I should have pre-drilled
some locating holes before wing assembly but I was too eager.
|
CAMOUFLAGE & MARKINGS |
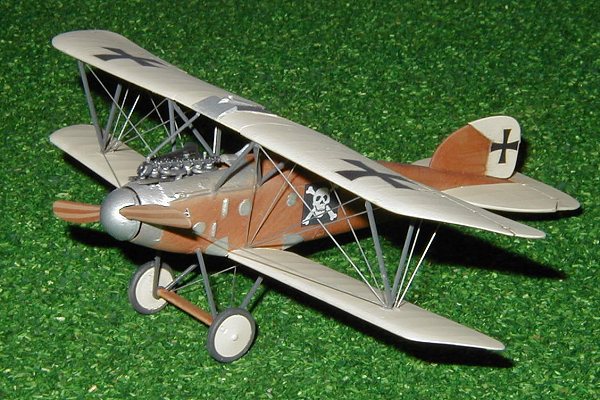
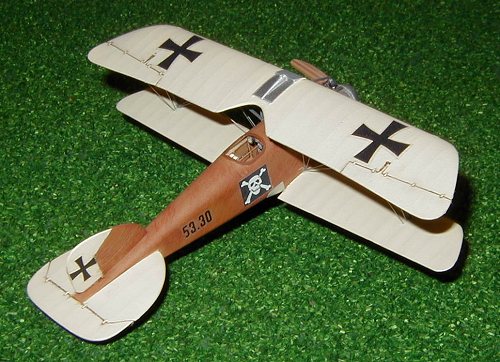
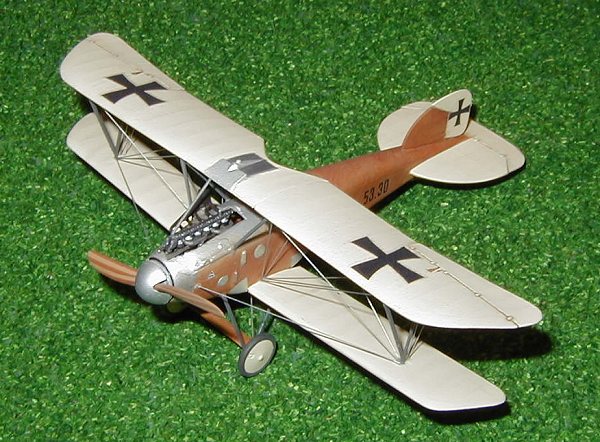
I chose to make the version on the box cover. It was flown by Austro-Hungarian ace Julius Arigi. It has doped linen wings and tail surfaces and plywood fuselage. After checking all of the paints that I had, I chose Model Masters Light Ivory, no. 2709. For the fuselage, I used Model Masters Wood, no. 1735, applied a coat of future and then took some Burnt Sienna oil color and used a wide, stiff brush to dry brush an indication of wood grain. It looks good but the final result is a little darker than I would have liked. Three of the schemes included with the kit are these same colors while the other three utilize the Brumowski scheme of dark green with yellow sworls on the upper surfaces. I will probably build another one of these kits so that I can use those neat Americal/Gryphon decals.
The sequence of painting is as follows. I painted the
engine before mounting it into the fuselage. Then I completed the fuselage and
wood grained it. I next painted the wings and horizontal stabilizers. The
lower wing and stab was then
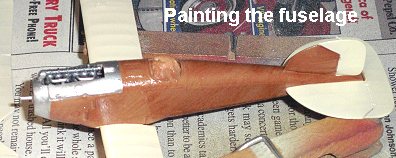 mounted. The rudder and fin were next painted and
installed. I applied the decals at this time. I painted all of the struts
before assembly and then mounted the top wing and wheels. Following final
assembly, I added a light coat of clear flat to clean up shiny areas where I had
handled the model during final assembly and wiring. This also reduced the
shininess of the wires. The flat coat also covers up the areas where super glue
was slopped on the wing while doing the wiring. This always happens.
mounted. The rudder and fin were next painted and
installed. I applied the decals at this time. I painted all of the struts
before assembly and then mounted the top wing and wheels. Following final
assembly, I added a light coat of clear flat to clean up shiny areas where I had
handled the model during final assembly and wiring. This also reduced the
shininess of the wires. The flat coat also covers up the areas where super glue
was slopped on the wing while doing the wiring. This always happens.
|
CONCLUSIONS |
A big thanks to Scott for letting me build this model. I have been pleased with the recent offerings from Roden and Toko, which have added a number of interesting World War One subjects. This kit was one of the easiest to assemble and I am pleased with the final result.
|
REFERENCES |
Windsock Datafile 19 – Albatros D.III (Oef) – Most of the details that you need regarding the Austro-Hungarian models.
Austro-Hungarian Army Aircraft of World War One – Pricey but lots of good information including a photo of 53-30.
Profile Publications No. 127 – Albatros D.I-D.III – Covers mostly the German versions.
Copyright ModelingMadness.com
If you would like your product reviewed fairly and fairly quickly, please contact the editor or see other details in the Note to Contributors.