|
KIT # |
A 040 |
|
PRICE: |
$39.00 MSRP |
|
DECALS: |
Two aircraft |
|
REVIEWER: |
|
|
NOTES: |
Multimedia kit with some resin bits |
|
BACKGROUND |
Please visit the Preview for more information on the aircraft and a look at what comes in the box.
|
CONSTRUCTION |
Having not built a D.520 since I put together the 1/72 Frog
kit back in 1977, I thought that this one might not be a bad one to try.
I've been generally pleased with the way that MPM/Azur/Condor/Special
Hobby, etc have been improving over the last couple of years and this kit
looked like they are getting oh so close to being right up there with the
big boys. To me, one way of doing this is to slowly wean themselves from
having to rely on resin, etched metal and vacuformed canopies. This kit has
only a smattering of resin and none of the others. Now if they'd only stop
doing the individual prop blades........ The kit still has
some of the traits of a short run operation with ejector pin towers in some
of the larger parts such as the fuselage and by not having alignment pins.
However, I don't find those as any kind of impediment at all for often
alignment pins are more like mis-alignment pins and not having them also
keeps down the possibility of sink areas opposite them.
The wings have inserts for the landing gear attachment and
for the flaps that need to be glued in first. I also noted that the lower
wing had a bit of a downward warp in it which was taken out by some
judicial bending under hot water. The interior has some resin in it,
specifically the control stick, flap handle, rudder pedals, seat side
supports, trim wheel, and the bits for the gun sight. Nothing major
compared to earlier Azur kits. Of course, I had to use filler on a number
of these subassemblies, but for me, this is very much the norm, regardless
of whose kit I'm building. One thing did impress me and that was that
everything seems to fit quite well with minimal fuss. I also
glued in the radiator elements and cut out the radiator coolant door. The
replacement bit was glued in place in the down position, which was how it
was in every ground photo I saw of the D.520.
Interior assembly was completed by gluing the side panels and the back
piece. This rear piece did not fit perfectly well so before the glue dried
on these parts, I installed the interior into a fuselage half to make sure
that all fit. It seemed to fit well once tacked in place. I also glued the
back of the one side panels to the fuselage side, and left the other panel
off until I joined the fuselage halves.
With this done,
the fuselage halves were glued together. Fit was fair. I'd do a touch of
trimming on the interior aft bulkhead as it seemed to keep the halves from
easily fitting. As mentioned earlier, the resin intake was a touch too
wide. I had to use clamps to keep things together and used a combination of
super glue and regular Ambroid ProWeld. As you might expect from one of my
kits, putty was used.
With that drying, the horizontal stabilizers were glued on and fit here was
again, fairly good, though I did need filler. Returning to the wings, I
tried to install the flaps. They did not fit at all well in the up
position. I fear that this is a case of
After the first round of major sanding/filling, I glued on the front wing
insert, which fit quite well, and the lower radiator bath. Naturally, with
the step at the back of the wing, there's a gap that needs filled on both
sides of the rear of the radiator section. Thinking I was ready to apply
paint, I noticed I'd forgotten the side intakes. These have small
semi-circular inserts that you are to shape to fit the contours of the
nose. I noticed that these are handed in that they fit into one of the
intakes better than the other, so make sure you test fit these. Even after
a bit of carving, I had to use the 'let the glue melt the plastic a bit'
method for final fitting. Naturally, filler was used. The gunsight was also
glued into the interior and painted at this time. Next step was the
installation of the canopy bits. Fit here is very good indeed. I did use a
touch of filler on the back section and on the very front of the windscreen
where it had torn free from its sprue during shipping. I also took this
opportunity to drill out the wing gun recesses. CAMOUFLAGE
The upper surface was then painted using Aeromaster enamels and the paints called for in the
instructions. I started with Dark Blue (which isn't that dark), followed by
Dark Brown and then Khaki (which is really green). Needed a bit of back and
forth spraying to get things looking nice. This allowed me to check for seam glitches as well. I must
confess that I'd thought about doing the pre-shading that is so popular
nowadays, but decided against it. ATTACHING MORE BITS
Once the main colors were on, I brought the kit back to the bench to add
some additional bits before heading back to the paint shop. This consisted
with attaching the landing gear (which had been painted RLM 02 as a green
grey was called for) as well as gluing in place the upper and lower
antennas. On French fighters, they used a higher frequency radio which
eliminated the need for the usual long wire. What was needed to get
the proper RF coupling, was a lower a
On the main gear, there are two small resin bits for the retraction
mechanism. The lower one needs to be glued in place prior to gluing
in the main gear. The larger, upper one should be left off until the gear
is in place or you'll have a great deal of trouble getting the gear to fit.
I should also mention that during all this handling, I broke off the tip of
the pitot tube, and knocked the upper antenna off at least three times. I
left it off until the final bits. My suggestion for Azur is to provide a
mounting stub for this antenna as butt joins don't always hold well.
I mentioned that I wasn't going to pre-shade this kit, but I did decide to
post-shade it using pastels. The plane just looked too clean, and using a
dark grey, I went over all the panel lines and then used a clean rag to
wipe the majority of the pastels from the surface. The end was a
semi-grungy looking aircraft. I d DECALS
With the model properly grunged, I then lightly sprayed several coats of
Future clear gloss acrylic over it to seal in the pastels. It also provides
a smooth base for the decals. Not having much (as in none) in the way of
aftermarket decals, I had
Fortunately, the decals are
really excellent, though quite thin and with most of them being somewhat
large, care is needed when applying them. I had problems with tearing and
with the ends folding under, where they were a real bi**ch to straighten
out. I gave them all a touch of Solvaset to make sure they conformed. It
also seems to me that they were a tad oversize. At least the rudder stripes
are. You do have the option of painting on these stripes, so those who are
concerned about this can do so. Because of the oversize rudder stripes, I
had to cut the second one along the trailing edge of the rudder so that
there would be no overlap. Care and a sharp scalpel are needed. Any tears
can be mended using the other set of stripes.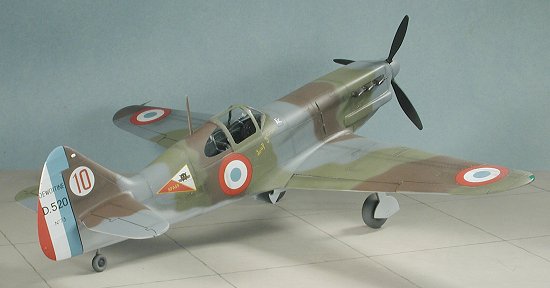 I started this kit as I do 99% of everything I do by first
looking over the instructions very carefully and then starting to build
subassemblies. The reason for this is that I can putty or paint a lot of
pieces at the same time and it allows me to maximize what is becoming less
and less time that I have to build a kit. Just to rattle off some of the
bits glued together at this time is much of the interior, the wheel halves,
the flaps (which are two part, for some reason), the wings, and the tail
planes. I should mention that I had to clamp the upper and lower wing
halves to ensure a good join, but no sanding or other adjustment to the
wheel wells was needed, which pleased me to no end.
I started this kit as I do 99% of everything I do by first
looking over the instructions very carefully and then starting to build
subassemblies. The reason for this is that I can putty or paint a lot of
pieces at the same time and it allows me to maximize what is becoming less
and less time that I have to build a kit. Just to rattle off some of the
bits glued together at this time is much of the interior, the wheel halves,
the flaps (which are two part, for some reason), the wings, and the tail
planes. I should mention that I had to clamp the upper and lower wing
halves to ensure a good join, but no sanding or other adjustment to the
wheel wells was needed, which pleased me to no end.
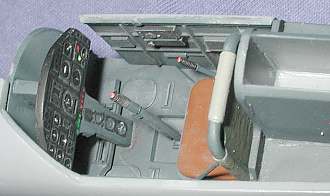 Interior bits were painted
French Interior Dark Blue using some of my remaining Aeromaster paints. The
seat cushion was painted in leather with the backing in a grey green
(actually Testors RLM 02). Handles and radio boxes in flat black, map pouch
in leather and the little buttons on the top of the handles and some lights
on the dash in red. I painted the instrument panel in flat black even
though the instructions list it as French Interior Dark Blue. The interior
bits were given a black wash and then dry-brushed with RLM 02.
Interior bits were painted
French Interior Dark Blue using some of my remaining Aeromaster paints. The
seat cushion was painted in leather with the backing in a grey green
(actually Testors RLM 02). Handles and radio boxes in flat black, map pouch
in leather and the little buttons on the top of the handles and some lights
on the dash in red. I painted the instrument panel in flat black even
though the instructions list it as French Interior Dark Blue. The interior
bits were given a black wash and then dry-brushed with RLM 02. 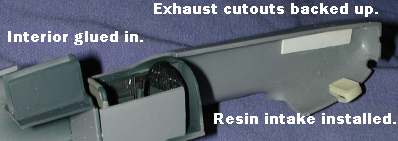 At this time, I removed the
resin exhaust from their backings and test fit them into the openings. They
are designed to fit from the outside, and I was worried that they may be a
bit too small and fall into the fuselage. My planning showed that this
would probably happen, so I cut some strips of styrene and backed up the
exhaust cut-outs. I also installed the small nose intake and made sure that
it fit properly. Hindsight shows that I needed to trim the sides down a
touch as there was a gap that needed filled.
At this time, I removed the
resin exhaust from their backings and test fit them into the openings. They
are designed to fit from the outside, and I was worried that they may be a
bit too small and fall into the fuselage. My planning showed that this
would probably happen, so I cut some strips of styrene and backed up the
exhaust cut-outs. I also installed the small nose intake and made sure that
it fit properly. Hindsight shows that I needed to trim the sides down a
touch as there was a gap that needed filled.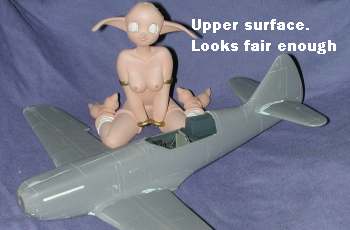 Next was probably the worst
of the fit situations; installation of the wing. There were two areas of
concern. One is that either the fuselage was too wide at the wing root, or
the wings a bit too narrow. A bit of sanding on both the roots and the
inner wing area, got a fair fit, but it wasn't pretty. The rear section of
the wing also ended up with a rather noticeable step in it that I couldn't
get out. There was also a gap that I filled with sheet stock. Now I'm not
really sure just where the problem lies, but I'm leaning toward the flap
insert that fits in the back of the wing. I was unable to get the upper
wing to fit flush with it and that may well have contributed to problems.
Next was probably the worst
of the fit situations; installation of the wing. There were two areas of
concern. One is that either the fuselage was too wide at the wing root, or
the wings a bit too narrow. A bit of sanding on both the roots and the
inner wing area, got a fair fit, but it wasn't pretty. The rear section of
the wing also ended up with a rather noticeable step in it that I couldn't
get out. There was also a gap that I filled with sheet stock. Now I'm not
really sure just where the problem lies, but I'm leaning toward the flap
insert that fits in the back of the wing. I was unable to get the upper
wing to fit flush with it and that may well have contributed to problems. 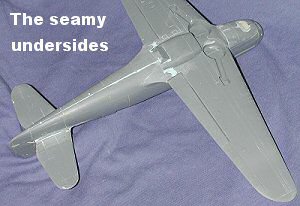 where the kit is designed for flaps
down (which is not prototypical according to most of the pictures I saw),
and the flaps ended up being too tall for the openings. I'd go so far as to
suggest that if you decided to do your model with flaps up, that you leave
out the flap insert that goes on the aft wings. Not installing this part
will give you much greater leeway. I eventually had to take files, grinding
wheels and other implements of destruction to hack away at the flaps until
I got a semi-acceptable fit. It isn't pretty, I can tell you that!
where the kit is designed for flaps
down (which is not prototypical according to most of the pictures I saw),
and the flaps ended up being too tall for the openings. I'd go so far as to
suggest that if you decided to do your model with flaps up, that you leave
out the flap insert that goes on the aft wings. Not installing this part
will give you much greater leeway. I eventually had to take files, grinding
wheels and other implements of destruction to hack away at the flaps until
I got a semi-acceptable fit. It isn't pretty, I can tell you that!
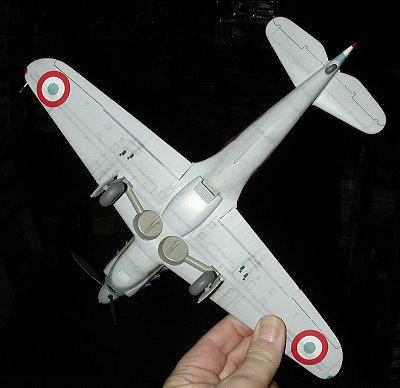
 Now for a bit of color. To my horror, I discovered that I'd run out of
Aeromaster French Underside Light Blue-Grey! My good friend Drew Nix came to
the rescue with some ModelMaster paint of the same shade and the underside
of the airframe was painted. As often happens when an area is painted, it
showed up some seam lines that needed some attention. A bit of superglue/accelerator
followed by a touch of Mr. Surfacer took care of those problems.
Now for a bit of color. To my horror, I discovered that I'd run out of
Aeromaster French Underside Light Blue-Grey! My good friend Drew Nix came to
the rescue with some ModelMaster paint of the same shade and the underside
of the airframe was painted. As often happens when an area is painted, it
showed up some seam lines that needed some attention. A bit of superglue/accelerator
followed by a touch of Mr. Surfacer took care of those problems.
 ntenna that was often hinged so
it could be retracted while the plane was on the ground.
ntenna that was often hinged so
it could be retracted while the plane was on the ground.
 no choice but to use those provided by the kit.
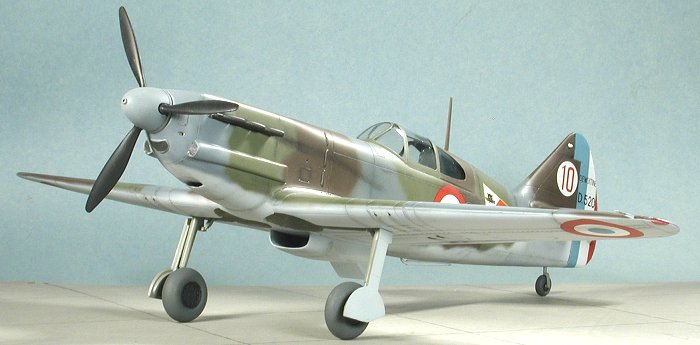
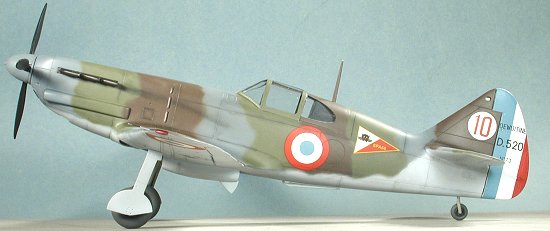
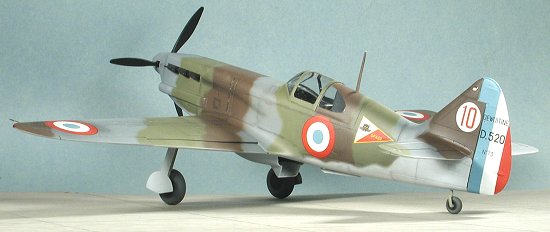
Naturally, since I didn't do the Vichy stripes, the only other choice was
the GC 1/3 plane as shown on the box art.
no choice but to use those provided by the kit.
Naturally, since I didn't do the Vichy stripes, the only other choice was
the GC 1/3 plane as shown on the box art.
|
FINAL CONSTRUCTION |
 With the decals well on,
it was time to finish things up. First, the wheels were glued onto the
struts. I had to enlarge the holes to get these to fit properly. Then it
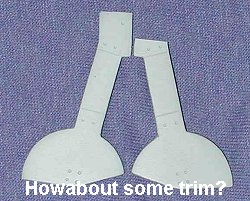
was time for the gear doors. I must have missed something as these were a
bit longer than they needed to be. The result was that I had to clip a bit
from the top sections to have them fit properly. BTW, I found it interesting
that these gear have no oleo scissors. I should mention that this is
apparently normal.
With the decals well on,
it was time to finish things up. First, the wheels were glued onto the
struts. I had to enlarge the holes to get these to fit properly. Then it
was time for the gear doors. I must have missed something as these were a
bit longer than they needed to be. The result was that I had to clip a bit
from the top sections to have them fit properly. BTW, I found it interesting
that these gear have no oleo scissors. I should mention that this is
apparently normal.
I found a color period photo of the plane on the box art and discovered
a few glitches, including that I should have painted all the wheels
aluminum instead of black, and that the landing gear doors are two piece.
It also appears that the upper radio mast is a light colo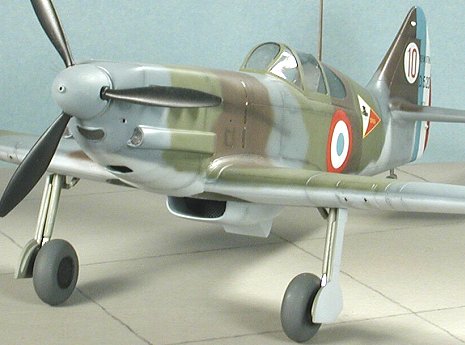 r such as white
and that the spinner is black and not dark blue. Prop blades do not seem to
have the yellow tips, either. I can fix the spinner and prop blades thing
at this point as it isn't glued on. It also seems as if the lower of three
small exhaust louvers behind the engine should be much larger in depth than
the upper two. Don't know why I discover these things when the model is
nearly done!
r such as white
and that the spinner is black and not dark blue. Prop blades do not seem to
have the yellow tips, either. I can fix the spinner and prop blades thing
at this point as it isn't glued on. It also seems as if the lower of three
small exhaust louvers behind the engine should be much larger in depth than
the upper two. Don't know why I discover these things when the model is
nearly done!
Well, I did repaint the blades, though I left the spinner in dark blue. Actually, I wanted to use the shorter spinner, but I couldn't get it to fit properly without hacking at it, while the longer one fit with no problems. I drilled out the broken off pitot tube and inserted a section of wire to replace that which had gone away. The radio mast was glued on for the umpteenth time and the formation lights painted in their appropriate colors. A bit of pastel was applied over the decals where needed and the plane given a coat of matte flat acrylic clear. The formation lights were painted with clear gloss and the masking taken off the canopy to complete the project.
|
CONCLUSIONS |
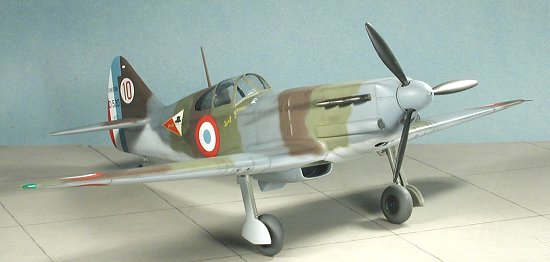
 Well I
can't tell you how pleased I am with the results. Though not a trouble-free
build, it was certainly no more difficult than an old Monogram kit and
actually easier than many of them. Total build time from start to finish
was about two weeks, which for me is really speedy. It would be really
great if some aftermarket unit decals were available for it and only time
will tell if someone will be willing to make that commitment. Rarely does
one see aftermarket bits for a short run kit from other than the original
manufacturer, but it could happen.
Well I
can't tell you how pleased I am with the results. Though not a trouble-free
build, it was certainly no more difficult than an old Monogram kit and
actually easier than many of them. Total build time from start to finish
was about two weeks, which for me is really speedy. It would be really
great if some aftermarket unit decals were available for it and only time
will tell if someone will be willing to make that commitment. Rarely does
one see aftermarket bits for a short run kit from other than the original
manufacturer, but it could happen.
If your tastes are into 1/32 and you want something that will look good when you are done, then I can easily recommend this one.
August 2003
#1277 in a series
Copyright ModelingMadness.com. All rights reserved.
Kit courtesy of my credit card (for which Capital One is quite happy).
If you would like your product reviewed fairly and quickly, please contact me or see other details in the Note to Contributors.