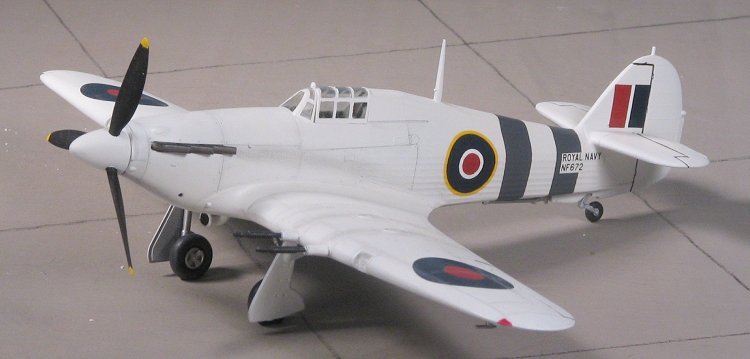
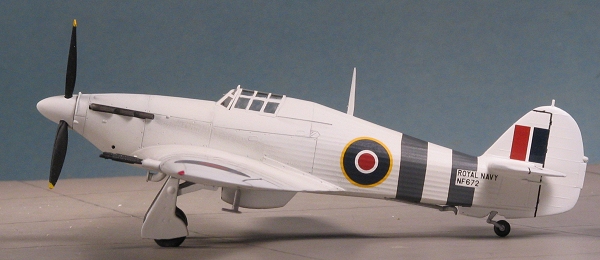
Revell of Germany 1/72 Sea Hurricane IIc
| KIT #: | 04139 |
| PRICE: | $4.75 - but the price has doubled since I bought it a couple of years ago. |
| DECALS: | Two options |
| REVIEWER: | Scott Van Aken |
| NOTES: |
| BACKGROUND |
For those of you who don't visit the
Reader's Forum, we have been engaged in a group build using the Revell of
Germany 1/72 Hurricane as the aircraft in question. This has been boxed at
least four times: once as a IIb, once as a IIc , once as a IIc with a
FW-190A-8, and this one as a Sea H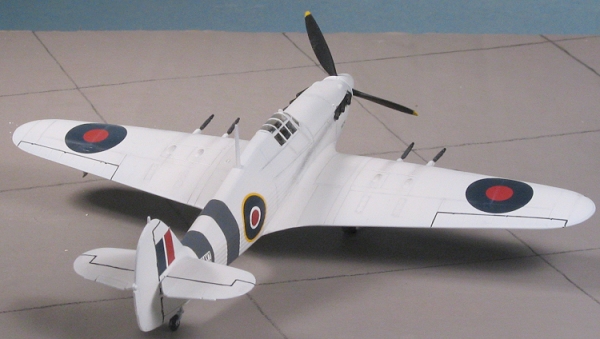 urricane IIc. The neat thing about this
particular boxing is that it seems as if all the optional sprues are
included. Downside is that it can only be built as a IIc with the cannon as
the wings are for that version, the panels being different for the IIb.
urricane IIc. The neat thing about this
particular boxing is that it seems as if all the optional sprues are
included. Downside is that it can only be built as a IIc with the cannon as
the wings are for that version, the panels being different for the IIb.
The kit is well done but suffers from known glitches. One is that the prop is like nothing that has been used on any Hurricane. For those who want a bit more accuracy, a new one will have to come from another kit or aftermarket source. Secondly, the wheels are poorly done, having almost no relief. The Hurricane wheels are deeply spoked. True Details has a wheel set for the Hurricane. Third, the lower radiator bath has the opening the wrong shape. It should be oval, yet the kit version is squared off at the top. I know no fix for this in terms of aftermarket replacement bits.
We are also fortunate in that there are aftermarket decals for the Sea Hurricane, though they are not as widespread as other versions. From my understanding, Sky Decals does some and there are options on some Aeromaster sheets done a few years back.
| THE KIT |
Please visit the preview to see what comes in the box and for a brief history of the type.
| CONSTRUCTION |
 Though a rather basic kit, I put this
one on slow build as I concentrated on other kits. The first thing I did
with this one was to assemble the wings. My last RoG
Hurricane had some gaps that I didn't want to deal with this time.
Assembly went smoothly and no gaps. I then assembled the interior bits. Not
much here, really. Just a seat with rear bulkhead and control stick glued
to a floor with built in rudder pedals. The instrument panel was painted
flat black, drybrushed with some dark gull grey and a few colors picked out
in red and yellow to keep it from being too boring. There is a nice
instrument panel decal for those who'd rather go that route. The interior
was then painted RAF interior green.
Though a rather basic kit, I put this
one on slow build as I concentrated on other kits. The first thing I did
with this one was to assemble the wings. My last RoG
Hurricane had some gaps that I didn't want to deal with this time.
Assembly went smoothly and no gaps. I then assembled the interior bits. Not
much here, really. Just a seat with rear bulkhead and control stick glued
to a floor with built in rudder pedals. The instrument panel was painted
flat black, drybrushed with some dark gull grey and a few colors picked out
in red and yellow to keep it from being too boring. There is a nice
instrument panel decal for those who'd rather go that route. The interior
was then painted RAF interior green.
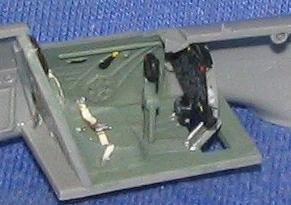 I
also did the inside of the fuselage in RAF interior green, highlighting a
few of the built in details there as well. I got set to glue the interior
in place and it just didn't look right. It was those rather pathetic molded
in belts. I bought a set of etched RAF seat belts from ExtraTech (cheap,
only $3.25 for two), and installed those instead. I heated the end of a
hobby knife and made a hole at the top of the seat for the shoulder harness
to fit through since the seat was molded to the back bulkhead. I had
thought of getting a whole etched set for the kit, but decided to go with
just the belts.
I
also did the inside of the fuselage in RAF interior green, highlighting a
few of the built in details there as well. I got set to glue the interior
in place and it just didn't look right. It was those rather pathetic molded
in belts. I bought a set of etched RAF seat belts from ExtraTech (cheap,
only $3.25 for two), and installed those instead. I heated the end of a
hobby knife and made a hole at the top of the seat for the shoulder harness
to fit through since the seat was molded to the back bulkhead. I had
thought of getting a whole etched set for the kit, but decided to go with
just the belts.
I then glued the fuselage halves together after gluing in the interior and the instrument panel. The insert for the lower rear fuselage fit in rather well, though a touch loose on the sides. I clamped the sides to be sure the gap closed while the glue was drying.
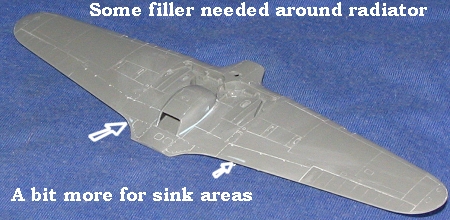 Back
at the wings, the radiator, which needed filler on the sides of the join
between the forward and aft sections, had the rather substantial flash on
the rear removed and was then glued to the lower wing. There are gaps on
the side as the radiator should be sort of rounded on the sides and the one
in the kit is a bit too straight. Filler took care of that as well as some
small sink areas on the trailing edge of the wing.
Back
at the wings, the radiator, which needed filler on the sides of the join
between the forward and aft sections, had the rather substantial flash on
the rear removed and was then glued to the lower wing. There are gaps on
the side as the radiator should be sort of rounded on the sides and the one
in the kit is a bit too straight. Filler took care of that as well as some
small sink areas on the trailing edge of the wing.
 While that was drying, I started
scouting around for some decent prop blades. I thought the Hasegawa 1/72
Hurricane came with optional blades, but I couldn't find anything in the
spares box. Then I started opening some unbuilt Hurricane kits. The Sword
Hurricane I has a two blade, three blade Rotol and three blade deHavilland
prop option. The blades are separate, but what the hey so I scarfed the
deHavilland blades (at least I think they are) as I was told by a reader that these were generally used
on Sea Hurricanes. They should fit into the spinner with minimal fuss.
While that was drying, I started
scouting around for some decent prop blades. I thought the Hasegawa 1/72
Hurricane came with optional blades, but I couldn't find anything in the
spares box. Then I started opening some unbuilt Hurricane kits. The Sword
Hurricane I has a two blade, three blade Rotol and three blade deHavilland
prop option. The blades are separate, but what the hey so I scarfed the
deHavilland blades (at least I think they are) as I was told by a reader that these were generally used
on Sea Hurricanes. They should fit into the spinner with minimal fuss.
I then sanded the fuselage and insert seams. Still a few gaps, especially around the insert so I applied some Mr. Surfacer 500 for the initial go around. I also glued the wing to the fuselage. A perfect fit and very tight as well. A very pleasant surprise. This was set aside a bit to let the glue and filler dry. After sanding that down, I applied standard putty and sanded that down. It took care of what few gaps were left, though much of the detail on the lower aft fuselage was sanded down in the process.
 Moving back to the front of the wing,
the carb intake halves were glued. The front section has a sink mark in it
that you won't be able to remove without a lot of fussing so I left it
alone. I also glued the horizontal stabilizers in place after removing some
flash that was on these parts. The prop spinner was also glued together at
this time. It will have the seam filled and sanded as well.
Moving back to the front of the wing,
the carb intake halves were glued. The front section has a sink mark in it
that you won't be able to remove without a lot of fussing so I left it
alone. I also glued the horizontal stabilizers in place after removing some
flash that was on these parts. The prop spinner was also glued together at
this time. It will have the seam filled and sanded as well.
The canopy and windscreen were glued in as it was obvious that I wouldn't be able to pose the canopy open. These were then masked as I prepped the kit for painting.
| COLORS & MARKINGS |
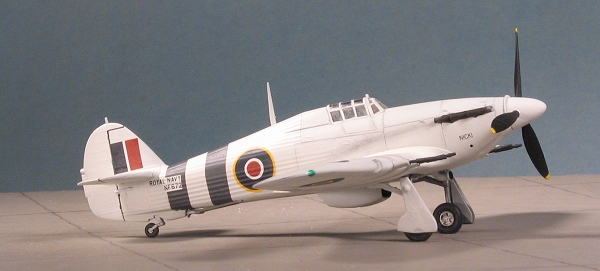
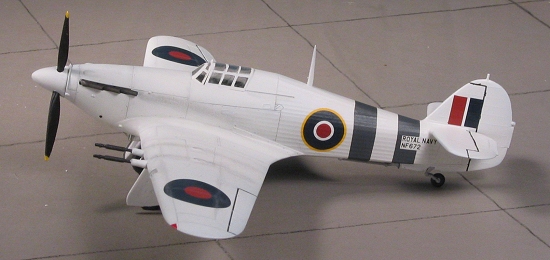
 As nice as the kit markings are, I
like to use aftermarket sheets whenever I can.
Aeromaster 72-193; Fleet Air Arm pt
II, a sheet produced in 2002, has a nice Hurricane IIc. It is
similar to what is in the kit but a different aircraft. This 835 Sq
aircraft shot down a Ju-290 in May of 1944. Best of all, it is overall
white and that makes painting a lot easier! Once the aircraft was painted
with Floquil Reefer White, I put several coats of clear gloss on it .
As nice as the kit markings are, I
like to use aftermarket sheets whenever I can.
Aeromaster 72-193; Fleet Air Arm pt
II, a sheet produced in 2002, has a nice Hurricane IIc. It is
similar to what is in the kit but a different aircraft. This 835 Sq
aircraft shot down a Ju-290 in May of 1944. Best of all, it is overall
white and that makes painting a lot easier! Once the aircraft was painted
with Floquil Reefer White, I put several coats of clear gloss on it .
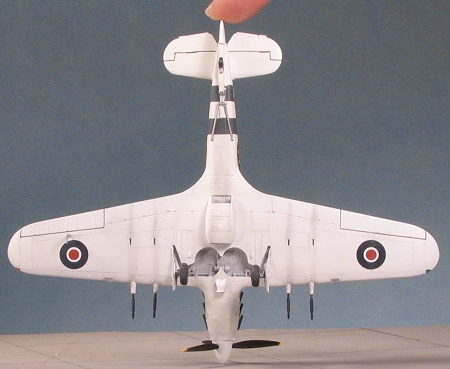
Back at the bench, I glued in the landing gear and the small outer gear doors. The inside of the wells and doors was painted aluminum, though they could just as easily been done in white or British interior green. I also glued on the gun barrels at this time. Be sure to not get things crossed up as these barrels are different lengths!
The decals are 'Printed in the USA', which means Microscale, so they worked just fine with standard setting solutions. The fuselage bands fit well and the whole decaling session was otherwise pretty normal other than my screwing up one of the nose names by grabbing the kit by the nose before the decal had dried.
| FINAL CONSTRUCTION |
Final work on the kit really isn't
that involved. I used True Details resin wheels as the kit ones are just
too shallow. To my delight, the TD wheels are a nice press fit onto the
axles. No drilling needed, though I did put a dab of super glue on the hub
to keep them from falling off. I also glued in the arrestor hook. This part
is designed to be installed when the insert is to be put in, however, by
cutting off the pins, it can be glued in afterwards. Naturally, I broke one
of the arms off it. The pitot had to
 have a hole drilled for it. The
instructions show a location, but no where is there a hole or information
about drilling one out before gluing the wings together.
have a hole drilled for it. The
instructions show a location, but no where is there a hole or information
about drilling one out before gluing the wings together.
Gear doors went on without a problem, covering an ejector pin mark. The exhaust had been painted Alclad II Jet Exhaust and the ends filed flat. Leaving the mold seam on exhaust like this is OK as these were welded parts, but the ends should be filed flat. I glued the already painted Sword prop blades into the already painted Revell spinner and they fit very well indeed. That took care of the prop problem. The landing lights were then glued in place and the masking removed from the windscreen and canopy. I then used a light grey and a fine brush to apply pastels to the panel lines. This effectively broke up the large areas of white and made it a bit scruffy. Addition of gun stains and exhaust stains helped even more. The prop was glued in place, the formation lights painted on and the kit was now a model. I didn't put on a long wire as I usually break those soon after the kit is built. As I thought, once the masking was removed from the canopy, you really couldn't see the seat belts that well. But I know they are there!
| CONCLUSIONS |
A thoroughly fun build. Not as accurate as the Hasegawa kit, thanks to the shallow wheels and that horrible prop, but otherwise, not a bad build. Certainly less expensive and the nice thing is that you can do a Sea Hurricane, which Hasegawa doesn't offer. I'll be looking for more Sea Hurricane kits as I'd like to do a IIb version with the machine gun armament. That will require some kit bashing, but should be easy. I'll also have to find a replacement prop as the Sword kit has already been robbed. Oh yeah, I also noticed that I bent one of the gun barrels when photographing the model. If it isn't one thing, it's another!
April 2005
# 1358 in a series
Copyright ModelingMadness.com. All rights reserved. No reproduction in any form without express permission from the editor.
Review kit courtesy of me.
If you would like your product reviewed fairly and fairly quickly, please contact the editor or see other details in the Note to Contributors.