JACH 1/72 Baynes Bat
|
KIT # |
72101 |
|
PRICE: |
$21.98 |
|
DECALS: |
One option |
|
REVIEWER: |
Scott Van Aken |
|
NOTES: |
Includes etched fret |
|
BACKGROUND |
For a look at what comes in the box and a short
history, please visit the preview.
|
CONSTRUCTION |
To repeat a cliché, I started with the interior. Not much there other than a floor, seat, stick and instrument panel. There is also a rear bulkhead. Interestingly, the floor is thicker at the front than the rear; a bit opposite of the way the fuselage is shaped so I had to do some trimming as the forward section was too wide. I also discovered that you can't have the instrument panel and the control stick in there at the same time as there isn't room. The cockpit also sits up a bit too high, but it won't fit any lower and the aft bulkhead doesn't reach down that far. I chose to leave off the control stick and glue in the instrument panel.
 I
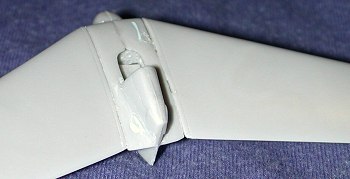
then glue the fuselage halves together. No real problems here. There are
sink holes on the upper wing stubs that need filler and that was done. I
then glued on the wings. The left one wasn't any real problem though a
little bit thicker than the wing root. The right one was even thicker
than the left and the attachment tongue was such that it fit way too high
on the top. I ended up cutting off the tongue and butt joining the right
wing. As you can see from the image, it isn't a filler-free kit. You can
also see the poor fit of the instrument panel and its odd location in the
cockpit. Anyway, I applied a goodly amount of filler and after it dried,
started sanding. It took another coat and more sanding but once that was
done, it was nice a smooth.
I
then glue the fuselage halves together. No real problems here. There are
sink holes on the upper wing stubs that need filler and that was done. I
then glued on the wings. The left one wasn't any real problem though a
little bit thicker than the wing root. The right one was even thicker
than the left and the attachment tongue was such that it fit way too high
on the top. I ended up cutting off the tongue and butt joining the right
wing. As you can see from the image, it isn't a filler-free kit. You can
also see the poor fit of the instrument panel and its odd location in the
cockpit. Anyway, I applied a goodly amount of filler and after it dried,
started sanding. It took another coat and more sanding but once that was
done, it was nice a smooth.
I then glued the fins onto the wing tips. Then I painted the cockpit British Interior Green using the Testors ModelMaster enamels. I did no detail work at all as the cockpit is a bit too thick to actually see anything in there. I masked the canopy and glued it in place. Then it was time to paint.
|
COLORS AND MARKINGS |
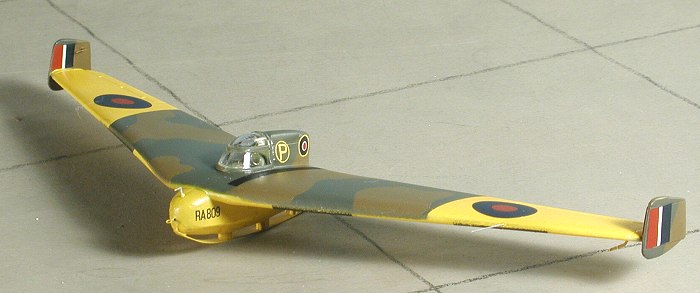
This is a rather colorful aircraft with lots of
yellow. I first sprayed the entire underside and the outer upper wings in
white using Floquil Reefer White lacquer paints. This provides a nice
base for the yellow. Going over to the Xtracolor line, I used
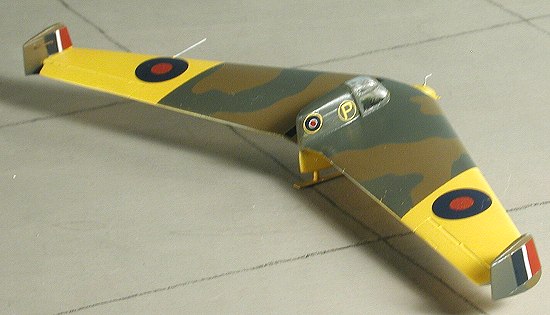 RAF Trainer Yellow over
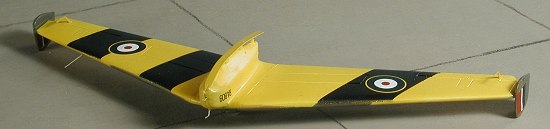
all the places that had been painted white. Once that had dried, I masked
off the underside and sprayed the wide black bands with Floquil Engine
Black lacquer. On the upper side, the yellow was masked and the remaining
upper surface and fins were painted RAF Dark Green using Testors
ModelMaster enamels. Then the Dark Green was masked and Testors paint was
again used for the Dark Earth. All of this took several days. I removed
the masking from all but the canopy and sprayed on some Future clear
gloss acrylic.
RAF Trainer Yellow over
all the places that had been painted white. Once that had dried, I masked
off the underside and sprayed the wide black bands with Floquil Engine
Black lacquer. On the upper side, the yellow was masked and the remaining
upper surface and fins were painted RAF Dark Green using Testors
ModelMaster enamels. Then the Dark Green was masked and Testors paint was
again used for the Dark Earth. All of this took several days. I removed
the masking from all but the canopy and sprayed on some Future clear
gloss acrylic.
Then it was time to attach all the etched pieces. This includes the landing skid, elevator and rudder balances, tow line attachment, pitot tube and a second tube sensor in the nose. For all the parts other than the skid, I drilled depressions so that it would be much easier to attach the P.E. parts. It may not be standard procedure, but it definitely helps. Then I made my one big screw-up. I tried to touchup the yellow on the nose that had gotten some overspray and made a huge mess of things. With all the PE already in place and time running low, I tossed up my hands in resignation and continued on.
 The
kit decals were used for all but the upper wing insignia, which had
become damaged during shipment. I used Modeldecal insignia in its place.
The kit decals are thin, well printed and impervious to setting
solutions. I went through the whole gamut from Microscale to Solvaset and
then Champ with no luck at all. Fortunately most of the decals are on
flat areas of the kit, but those that have to conform to any depressions
or ridges stubbornly refused to cooperate.
The
kit decals were used for all but the upper wing insignia, which had
become damaged during shipment. I used Modeldecal insignia in its place.
The kit decals are thin, well printed and impervious to setting
solutions. I went through the whole gamut from Microscale to Solvaset and
then Champ with no luck at all. Fortunately most of the decals are on
flat areas of the kit, but those that have to conform to any depressions
or ridges stubbornly refused to cooperate.
I then sprayed semi-gloss clear onto it, removed the masking from the canopy, touch-up painted the etched bits and I was done.
|
CONCLUSIONS |
March 2004
Copyright ModelingMadness.com. All rights reserved. Though not a weekend
project (actually, I've not had one of those in about 20 years), it isn't
that fussy a build. The fit of the parts is not great, but then again, it
isn't that bad and for a short run kit, that is usually about the best
one can hope for. Most of your time will be spent painting (as in many
days) and attaching the photo-etched parts. It does make for a most
interesting addition to one's collection. I'll leave the decision to pay
out that kind of money on a kit like this to you.
Though not a weekend
project (actually, I've not had one of those in about 20 years), it isn't
that fussy a build. The fit of the parts is not great, but then again, it
isn't that bad and for a short run kit, that is usually about the best
one can hope for. Most of your time will be spent painting (as in many
days) and attaching the photo-etched parts. It does make for a most
interesting addition to one's collection. I'll leave the decision to pay
out that kind of money on a kit like this to you.
# 1309 in a series
If you would like your product reviewed fairly and fairly quickly, please contact the editor or see other details in the Note to Contributors.