Airfix 1/72 Typhoon IB
| KIT #: | A02041 |
| PRICE: | $8.99 SRP |
| DECALS: | Two options |
| REVIEWER: | Scott Van Aken |
| NOTES: | New tool kit |
| HISTORY |
The Hawker Typhoon (Tiffy in RAF slang), was a British single-seat fighter-bomber, produced by Hawker Aircraft. It was designed to be a medium-high altitude interceptor, as a direct replacement for the Hawker Hurricane, but several design problems were encountered, and it never completely satisfied this requirement.
Its service introduction in mid-1941 was plagued with
problems, and for several months the aircraft faced a doubtful future. However,
when the Luft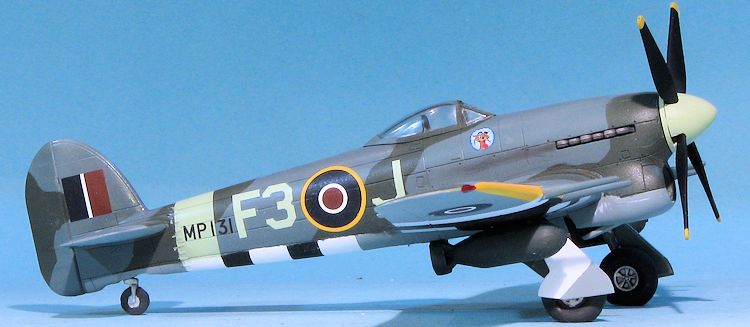 waffe
brought the formidable Focke-Wulf Fw 190 into service in 1941 the Typhoon was
the only RAF fighter capable of catching it at low altitudes; as a result it
secured a new role as a low-altitude interceptor.
waffe
brought the formidable Focke-Wulf Fw 190 into service in 1941 the Typhoon was
the only RAF fighter capable of catching it at low altitudes; as a result it
secured a new role as a low-altitude interceptor.
Through the support of pilots such as Roland Beamont it also established itself in roles such as night-time intruder and a long-range fighter.
From late 1942 the Typhoon was equipped with bombs, and from late 1943 RP-3 ground attack rockets were added to its armoury. Using these two weapons, the Typhoon became one of the Second World War's most successful ground-attack aircraft. With the end of the war, the Typhoon quickly disappeared from RAF units.
So quickly was the plane scrapped after the war that only one complete Typhoon currently exists and was presented to the RAF by the National Air and Space Museum in the US in 1968 and is now on display at the RAF Museum.
| THE KIT |
I
believe that this subject was part of Airfix's original offerings and so it part
of Hornby's plans to update older subjects to newer standards, something that
has been working quite well for Airfix. This one is as
 nicely done as earlier
releases and while the engraved detail may be a bit much for some, most of us do
not find it objectionable.
nicely done as earlier
releases and while the engraved detail may be a bit much for some, most of us do
not find it objectionable.
The interior is well done with nicely done sidewall detail and a decal for the instrument panel. A well done seat with armor plating is provided and the control stick with rudder pedals is attached to the separate wheel well piece. Also attached to this piece is the large radiator. This fits into one fuselage half when the two sections are closed. It cannot be fitted later as there are tabs that must properly fit into the halves. Exhaust are separate and can be added after painting. A pilot figure is included.
Like all Airfix kits, this one has optional gear doors to
portray the plane in flight, though the stand is extra. Holes for the rockets
must be opened up prior to assembling the wings. Both wings offer cannon bays
that can be displayed once the access doors are cut from the upper wings. Most
of us will not do this and unfortunately, it means that the gun barrels cannot
be put on near the end of the build as they are part of the bay assembly. The
rockets and rails are separate, which is the best way to do this. As an
 option,
one can install a pair of bomb racks and bombs. If one wishes to use the bombs
instead of rockets, there are holes just for these that will need to be opened
prior to assembling the wings. The entire prop assembly can be installed once
the airframe is built. A separate canopy and windscreen are provided in case you
wish to pose the canopy open.
option,
one can install a pair of bomb racks and bombs. If one wishes to use the bombs
instead of rockets, there are holes just for these that will need to be opened
prior to assembling the wings. The entire prop assembly can be installed once
the airframe is built. A separate canopy and windscreen are provided in case you
wish to pose the canopy open.
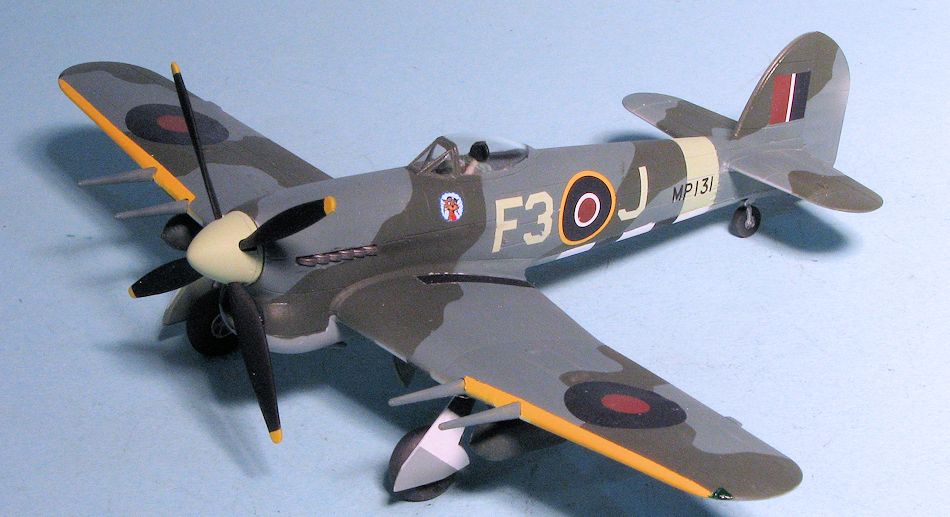
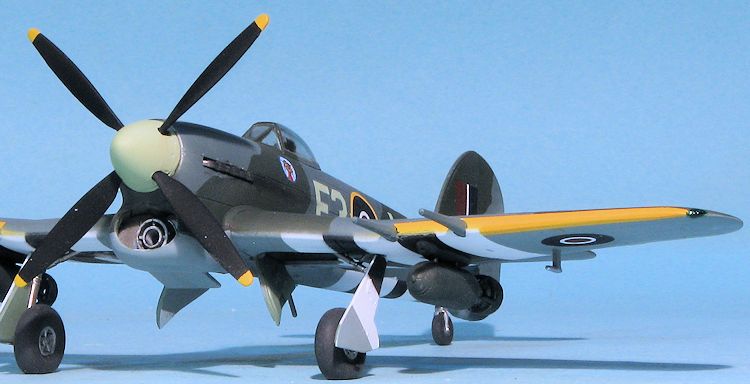
British fighters of this period are pretty lack-luster and are basically dark green/ocean grey over medium sea grey with yellow leading edge wing ID bands. Two markings options are provided with one being the box art plane from 247 Squadron in December 1944. This one has a red spinner and invasion stripes. These stripes are included as decals. The other is from 439 Squadron in February 1945 and has the standard black spinner without the stripes. The decals are nicely printed and include not only wing walk areas but also the yellow leading edge bands. I have had good success with modern Airfix kit decals and so these should work quite well. There are aftermarket decals in case the kit options are not to your liking. I fully anticipate Pavla making resin upgrade bits for this one.
| CONSTRUCTION |
It often happens that the main motivation for a kit build is a set of decals. So it was with this one. I've never found the Typhoon to be a particularly desirable airplane for which to base a model. In all my modeling years, the only one I've ever built was the Monogram kit, which was also inspired by decals, in this case an IPMS Canada sheet. It was modified with a three blade prop, but I left the rest as was, which probably makes it most inaccurate!
I've a real fondness for current tool Airfix kits. They are generally well
engineered, build without much fuss and thanks to the relatively soft plastic,
are easy to trim and sand. For this one I pretty much
 followed the instructions
by building up the cockpit bits. In this case, the seat and instrument panel go
into the fuselage halves and the control stick along with the rudder pedals are
attached the upper side of the wheel well piece. This assembly then gets the
radiator attached to it and is then installed into a fuselage half. I decided to
leave it out until the halves were assembled, a mistake as I then couldn't get
the control stick to fit. This eventually was removed to allow fitting the
interior.
followed the instructions
by building up the cockpit bits. In this case, the seat and instrument panel go
into the fuselage halves and the control stick along with the rudder pedals are
attached the upper side of the wheel well piece. This assembly then gets the
radiator attached to it and is then installed into a fuselage half. I decided to
leave it out until the halves were assembled, a mistake as I then couldn't get
the control stick to fit. This eventually was removed to allow fitting the
interior.
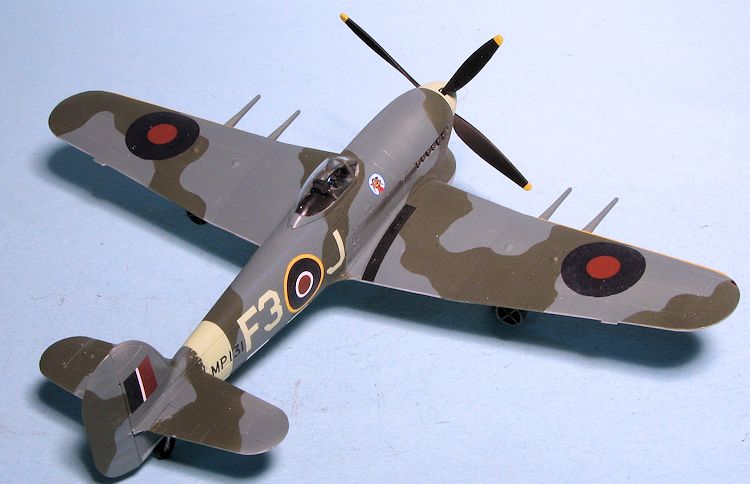
After trapping the radiator exhaust door in the fuselage halves, the area was cemented. I then attached the rudder and tailplanes before gluing on the lower wing. There is a light that fits in the lower wing so don't forget that feature. The kit can be built to either carry rockets or bombs. You could probably do both, but you'd have to forego the inner two rocket rails in order to clear the bomb. I chose the bomb version as that is what the decal sheet indicated.
 A nice feature is the ability to model the plane with the upper gun bays
open. You simply cut away the openings in the upper wing and use the kit
supplied open bay doors. Either way, you must use the gun bay assembly as the
barrels are attached to it. This does make cleaning up the seam between the two
guns a bit more difficult. I would also recommend attaching the lower wing, gun
bays and upper wings at the same time as you'll need to do a bit of fiddling to
get a snug fit. I did not and wish I did. The kit also includes a sand/dirt
filter, but doesn't say anything about drilling a hole to mount it.
A nice feature is the ability to model the plane with the upper gun bays
open. You simply cut away the openings in the upper wing and use the kit
supplied open bay doors. Either way, you must use the gun bay assembly as the
barrels are attached to it. This does make cleaning up the seam between the two
guns a bit more difficult. I would also recommend attaching the lower wing, gun
bays and upper wings at the same time as you'll need to do a bit of fiddling to
get a snug fit. I did not and wish I did. The kit also includes a sand/dirt
filter, but doesn't say anything about drilling a hole to mount it.
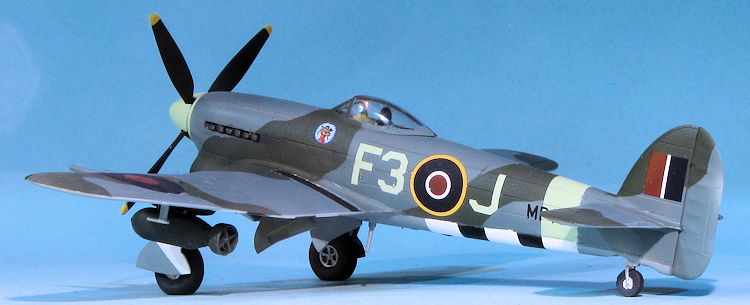
Prior to painting the kit, I glued on the windscreen and canopy in the closed position and then masked it. I also installed the bomb racks and built up the bombs. Tissue filled the openings and it was off to spray some paint.
| COLORS & MARKINGS |
All of the paints used were Model Master enamels thinned with lacquer
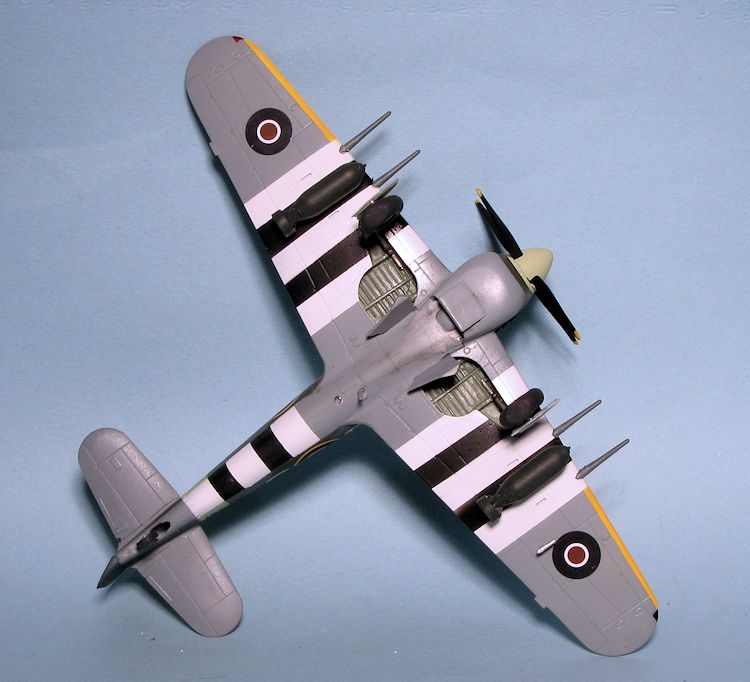
thinner. Typhoons were used a great deal with the 2nd TAF. This means invasion
stripes on the lower surface to some extent or another. This simply adds to the
complexity of painting the kit. I first sprayed all the stripe areas white,
masked 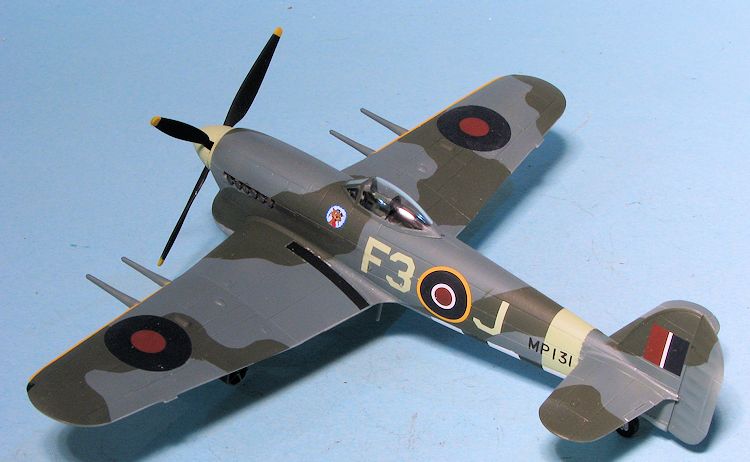 the white and then painted them black. The stripes need to be about 7mm
wide. As usual, I did not get them even. These areas were then masked. During
the white painting, the wing leading edges had to be painted as well. These were
painted yellow and then masked. Now I should point out that Airfix does provide
these two kinds of markings as decals, but I've found out over the years that
paint works best.
the white and then painted them black. The stripes need to be about 7mm
wide. As usual, I did not get them even. These areas were then masked. During
the white painting, the wing leading edges had to be painted as well. These were
painted yellow and then masked. Now I should point out that Airfix does provide
these two kinds of markings as decals, but I've found out over the years that
paint works best.
The undersurfaces were then painted medium sea grey. More masking then the upper surfaces got a coat of ocean grey followed by more masking and the dark green. Very much a case of two hours of masking for two minutes of painting. Freehand camo in this scale would have looked weird and my brush painting sucks when it comes to smooth coats.
Once dry, I removed all the masking and installed the main landing gear. It was then I realized I'd forgotten the sky fuselage band. Back to more masking and a bit more spraying. A clear coat then followed and it was time for decals.
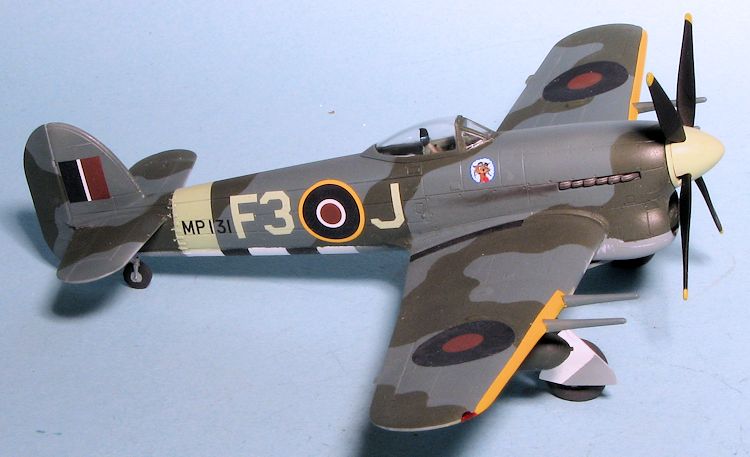
For this kit, I wanted to use the new Aviaeology sheet on 143 Wing (RCAF)
Typhoons. In particular, one of the 438 squadron planes with the 'Fritz the
Wildcat' markings. Unfortunately, all the information on those planes is
speculative. It is known that the markings were used, but not precisely which
aircraft had them. The folks at Aviaeology have done a lot of sleuthing and
provided several probable planes. Some had to be discarded as
 they planes had
three blade props and the Airfix kit did not include that option. I chose F3*J
as the most likely candidate to match the kit and applied the markings. The
decals are superlative. Nice and thin and without setting solution, most
snuggled right into the recesses. I used some kit markings for wing walks and
data. I noticed that the kit decals had a brighter red in the roundels that what
Aviaeology supplies.
they planes had
three blade props and the Airfix kit did not include that option. I chose F3*J
as the most likely candidate to match the kit and applied the markings. The
decals are superlative. Nice and thin and without setting solution, most
snuggled right into the recesses. I used some kit markings for wing walks and
data. I noticed that the kit decals had a brighter red in the roundels that what
Aviaeology supplies.
With the decals in place, the rest of the bits were attached. The main gear legs are not a snug fit and one has to hope that they are at the right angle as Airfix provided flattened wheels and the hubs are keyed. It looks like they took lessons from True Details in the wheel department as they are really bulged a bit more than I'd have thought they would be. The gear doors were glued on as was the pitot tube and rod antenna under the fuselage. There is no dedicated opening for the step and many photos show this feature retracted so I left it off. Exhaust were glued in and I did some detail painting. As a note, the covers for the cannon are a solid cover; the upper surface grey. A clear matte coat was then applied. I then added pastels exhaust stains, glued on the bombs (which I painted bronze green) removed the masking from the canopy and installed the prop. Another note in that none of the photos with the decals showed stripes on the bombs so I left them off.
| CONCLUSIONS |
Despite my general ambivalence towards the aircraft, this was a nice kit with few issues in the building. I'm not a huge fan of aircraft that require invasion stripes as it takes another couple of days to paint them on, but I have to confess that it does add some interest to an otherwise mundane scheme. In all, it is very much a kit worth building and I'd have to say is the current pinnacle of the type in this scale. I found it odd that there is no landing light, but I have come to expect omissions of this type on Airfix kits. Overall it is a very nice kit, at a reasonable price that goes together better than most. These kits have become a bit of a favorite and I'm sure you will like them as well. While I'm not bankrolled by Airfix for saying that, I'm open to the opportunity!
October 2015 Thanks to your suffering editor (cold) for
picking this one up. Copyright ModelingMadness.com. All rights reserved. No reproduction in any form without express permission from the editor. If you would like your product reviewed fairly and fairly quickly, please
contact
the editor or see other details in the
Note to
Contributors.