Italeri 1/48 Spitfire XVIe
| KIT #: | 2646 |
| PRICE: | $31.50 |
| DECALS: | Four options |
| REVIEWER: | Scott Van Aken |
| NOTES: | Ocidental kit reboxed |
| BACKGROUND |
Please take a look at the preview for more information on the kit and the aircraft.
| CONSTRUCTION |
As is my norm, I looked for
subassemblies. Really, there aren't many so I turned back to the
instructions and went from there. Well, almost. I did look to see if I
needed to install the optional gun access panels and for this aircraft, I
do. I started to 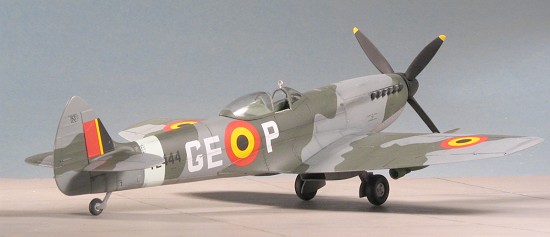 cut them from the bottom and realized that the opening
would be too large if I did so. I then moved to the top of the wing and,
using a sharp knife, cut out the two existing access panels along the
engraved lines. The new ones have small tabs on the ends to keep them in
place. I suggest reinforcing the sides with strip plastic as the new panels
are just a tad too small for the openings. I did not do this and was
constantly having the sides of these panels break free when I flexed the
wing.
cut them from the bottom and realized that the opening
would be too large if I did so. I then moved to the top of the wing and,
using a sharp knife, cut out the two existing access panels along the
engraved lines. The new ones have small tabs on the ends to keep them in
place. I suggest reinforcing the sides with strip plastic as the new panels
are just a tad too small for the openings. I did not do this and was
constantly having the sides of these panels break free when I flexed the
wing.
I then turned to the interior and started gluing together bits that were to be painted RAF Interior Green. I thought I'd be clever and not install the instrument panel part at this time as I wanted to paint it black prior to installation. Don't do this as you'll have to trim the heck out of the panel part to get it to fit later. Install the instrument panel as the instructions show.
Meanwhile, I glued the fuselage
halves together (the interior inserts from the underside), and also glued
on the rather odd engine/exhaust combo. Personally, I think it would have
been just a good to have the exhaust attach from the outside as on 'normal'
kits, but this does eliminate the seam across the top of the cowling. The
exhaust are also a bit odd looking as
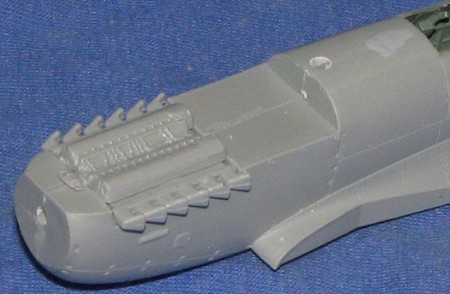 they
come out and then turn 90 degrees. You may want to consider an aftermarket
replacement for these. Mine had a short shot stack on one side which you
can barely make out as the second from the right on the near set.
they
come out and then turn 90 degrees. You may want to consider an aftermarket
replacement for these. Mine had a short shot stack on one side which you
can barely make out as the second from the right on the near set.
 I did the usual filler on a few spots
on the fuselage seam, but not nearly as much on many kits that I do. The
interior was then inserted from below and took a bit of fiddling to get to
fit properly. Once snugly in place, I then attached the upper cowl section.
This is a tad oversize and needed some sanding down. The little filler cap
was glued in and sanded down a lot as it really sticks up.
I did the usual filler on a few spots
on the fuselage seam, but not nearly as much on many kits that I do. The
interior was then inserted from below and took a bit of fiddling to get to
fit properly. Once snugly in place, I then attached the upper cowl section.
This is a tad oversize and needed some sanding down. The little filler cap
was glued in and sanded down a lot as it really sticks up.
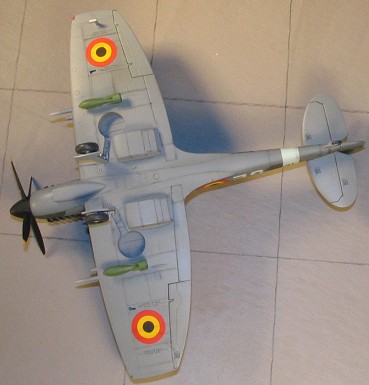
Back at the wings, I opened the holes for the outer bomb racks and the carb intake. I decided that the centerline rack was ugly and so am going to leave it off. I then glued in the guns and then glued the wings together. The tips were attached at the same time and are a bit larger than the surrounding wing. These were leveled at the bottom (as I couldn't get the top to do so) and then the upper section was sanded down until it matched the upper surface of the wing.
With that done, I glued the wing to the fuselage. Fit is not bad, at least, not at the upper wing roots. The rear section does not completely match and so you'll have a step that will need filler. Same for the front part and I was less than pleased with the upper/lower aft wing root section as it was difficult to properly mate. Once on and properly blended in, it looks fine and has some gull to it as well so it isn't flat. I should mention that though the camo markings diagram shows wheel bumps on the upper wing, the wing itself is missing these. Not sure if this is an issue or not. The tail planes fit in place just fine after a bit of trimming on the tabs as mine were a bit too wide.
 I now had a pretty complete airframe,
so I flipped things over and went to work on the bits that attach to the
underside. These consist of the radiators, outer bomb racks, and the carb
intake. To make a longish story short, the bottom of these parts did not
correspond to the curvature of the piece on which they were to fit.
Thankfully, the plastic used is soft so I flooded the join area with glue
and clamped the bits in place. The plastic that oozed out filled most of
the problem. This left only a tiny bit of filler to take care of a few
spots. The carb intake was the worst of the lot.
I now had a pretty complete airframe,
so I flipped things over and went to work on the bits that attach to the
underside. These consist of the radiators, outer bomb racks, and the carb
intake. To make a longish story short, the bottom of these parts did not
correspond to the curvature of the piece on which they were to fit.
Thankfully, the plastic used is soft so I flooded the join area with glue
and clamped the bits in place. The plastic that oozed out filled most of
the problem. This left only a tiny bit of filler to take care of a few
spots. The carb intake was the worst of the lot.
I then attached the gun sight, the windscreen and the little brace behind the pilot's seat. The tail wheel was also glued on. This is a bit fragile and I broke it off several times during the remainder of the construction. I also assembled the prop and the blades as they will all be painted the same color. The windscreen and canopy were then masked. The canopy was tacked in place for painting. I painted the area under the canopy with British Interior Green. I'm sure that I'll be getting e-mails telling me it should be the upper camo color. No worries as I can easily paint over it if this is the case.
| COLORS & MARKINGS |
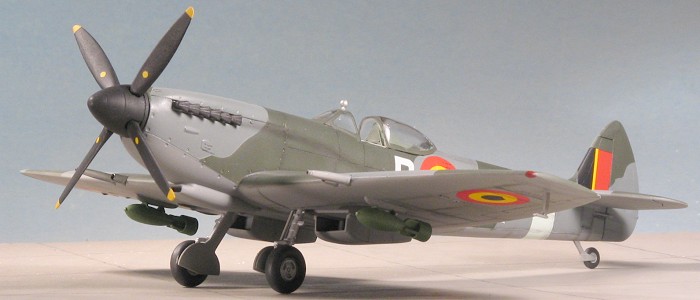
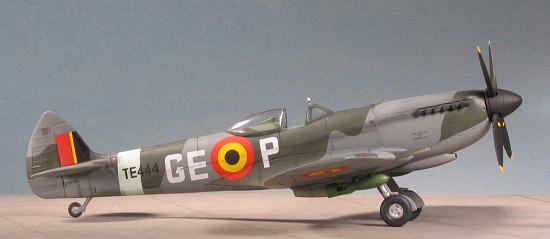
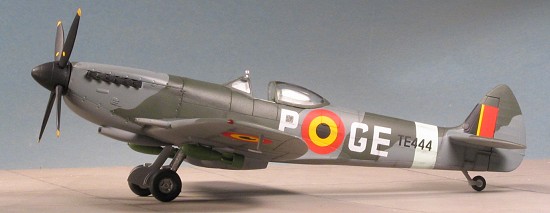
 I didn't like the look of the overall
black option so went with one of the others. I picked the 349 Sq Belgian AF
version as I didn't want to paint the yellow leading edge ID stripes and
like the Belgian roundels. Starting with the underside, I picked out some
Testors Medium Sea Grey enamel and sprayed that on. I hit the doors with it
as well; on both sides as it was common to do so. That was masked when dry
and I then sprayed Xtracolor Ocean Grey; this because I didn't have any
ModelMaster on hand in that shade. This paint is very good, dries glossy,
but requires a clean surface as it doesn't seem to stick quite as well as
some other paints. When that dried, I decided to mask the upper surface for
the camo pattern as these planes were painted using rubber masks and the
overspray is quite small. RAF Dark Green was then applied, also from the
ModelMaster enamel line. When all that was done, a coat of clear gloss was
applied to get it ready for decals.
I didn't like the look of the overall
black option so went with one of the others. I picked the 349 Sq Belgian AF
version as I didn't want to paint the yellow leading edge ID stripes and
like the Belgian roundels. Starting with the underside, I picked out some
Testors Medium Sea Grey enamel and sprayed that on. I hit the doors with it
as well; on both sides as it was common to do so. That was masked when dry
and I then sprayed Xtracolor Ocean Grey; this because I didn't have any
ModelMaster on hand in that shade. This paint is very good, dries glossy,
but requires a clean surface as it doesn't seem to stick quite as well as
some other paints. When that dried, I decided to mask the upper surface for
the camo pattern as these planes were painted using rubber masks and the
overspray is quite small. RAF Dark Green was then applied, also from the
ModelMaster enamel line. When all that was done, a coat of clear gloss was
applied to get it ready for decals.
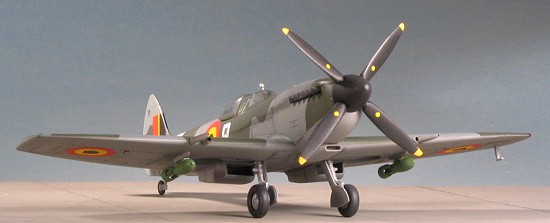
But first, I had to have it on all its gear. The main landing gear sprue had been misaligned, resulting in all the bits like the landing gear needing a lot of clean-up to get them back to some semblance of round. Once that was done, they were painted Aluminum using Humbrol enamels. Then the oleos were wrapped with Chrome Bare Metal Foil. The oleo scissors are separate and a single piece that has to be bent. This would be easy if the plastic was about a quarter of its thickness and I'd highly recommend either sanding the heck out of these parts to reduce the thickness or replacing them with etched bits. Mine broke in two the moment I started to bend them. Now I may be wrong about this, but they sure look odd on the forward part of the gear leg. Perhaps that is the norm for Spits that had these, but I don't know so I went with the instructions. Even though I looked at a lot of photos, this feature was hidden in all of them.
 Struts in place, I attached
the wheels after shortening the axles a bit. Then put in the outer wheel
sections. The gear doors glue directly to the gear legs. No attachment
points or guides are given. The pitot tube was glued in as well. It is also
about twice as thick as it needs to be.
Struts in place, I attached
the wheels after shortening the axles a bit. Then put in the outer wheel
sections. The gear doors glue directly to the gear legs. No attachment
points or guides are given. The pitot tube was glued in as well. It is also
about twice as thick as it needs to be.
Then I went with the decals. These are well printed and matte. They also need some help to try to conform to the panel lines. Even though I used a strong setting solution, they refused to fully cooperate. I also had some silvering problems with the smaller decals. Again, I used Champ setting solution without full success. I will say that the rear fuselage band went on well and that the white decals are slightly transparent as I can see the difference in the shades when put across two colors. I should also point out that while the sheet provides both of the long wing walk decals, only one of the shorter fore and aft ones is provided, a rather odd omission. The serial number given is also larger than what is shown in the placement drawings. With the markings on and dry, I wiped off the excess setting solution and glue.
| FINAL CONSTRUCTION |
 Then the model was given a
matte clear coat using Future with a flat base added to it. I also drilled
out the guns at this time. The inner guns are really blast tubes for the
.50 cals, so those had to be drilled out quite a bit. The masking was taken
from the clear bits, the rear view mirror installed, and then I gave the
panel lines and exhaust some pastel work. Final part was to glue on the
prop and the bombs. I painted the bombs using Testors enamel in the small
square-based bottles. The instructions would have you use a bright green
and I think that may be a bit too bright. Then, I hurriedly photographed it
before I broke something!
Then the model was given a
matte clear coat using Future with a flat base added to it. I also drilled
out the guns at this time. The inner guns are really blast tubes for the
.50 cals, so those had to be drilled out quite a bit. The masking was taken
from the clear bits, the rear view mirror installed, and then I gave the
panel lines and exhaust some pastel work. Final part was to glue on the
prop and the bombs. I painted the bombs using Testors enamel in the small
square-based bottles. The instructions would have you use a bright green
and I think that may be a bit too bright. Then, I hurriedly photographed it
before I broke something!
| CONCLUSIONS |
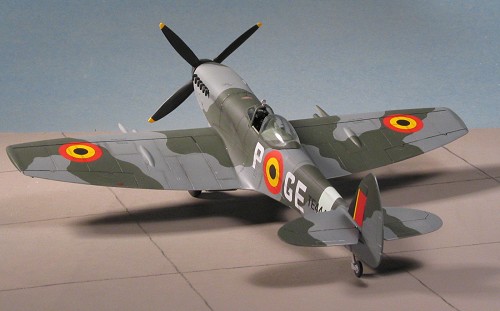
Like the vast majority of Spitfire kits, this one is not a difficult build. The general fit of the kit is good and I really didn't have any major fit issues with it. Though the nose looks a bit off, it is still a good looking model when finished. Italeri offers a nice selection of markings and that is good as I don't think there is much available for this variant in the aftermarket world. What's best is that it allows us to include a bubble topped Spit XVI to our 1/48 Spitfire collections.
August 2005
#1376 in a series
Copyright ModelingMadness.com. All rights reserved. No reproduction in any form without express permission from the editor.
If you would like your product reviewed fairly and fairly quickly, please contact the editor or see other details in the Note to Contributors.