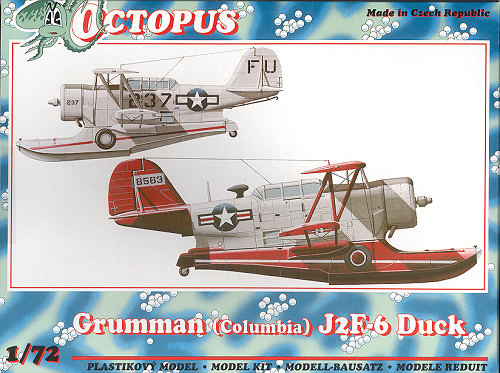
| KIT: | Octopus 1/72 Grumman J2F-5/6 Duck |
| KIT #: | 72056 |
| PRICE: | $ |
| DECALS: | Five options |
| REVIEWER: | Scott Van Aken |
| NOTES: | Short run with resin and vacuformed parts. |
| HISTORY |
The original prototype JF-1 first flew in May of 1933. It was to replace the Loening OL-9 in the Navy inventory and as such, was designed in very much the same way. The long central float was part of the fuselage, making it in reality, a flying boat and not a float-plane. It had two equal length wings of fabric covered aluminum frame while the fuselage was all aluminum. The aircraft also had retractable landing gear, allowing it to operate from ships or shore bases without need for additional beaching gear.
The variant officially called the 'Duck' was the J2F-5, which was powered by a Wright 1820-50, and this was the last Grumman built version. The J2F-6, built by Colombia Aircraft as Grumman did not have sufficient plant space, had a more powerful Wright 1820-54 engine. 330 of these were built and differed in the way the engine and cowling section appeared. The J2F-5 variant had a carb intake atop the cowling while the J2F-6 did not. There were also canopy sections with more frames in them, but this does not seem to have been used on any particular variant. Most -5/-6 Ducks used the versions with fewer frames.
The Duck saw service throughout the war in second line and utility services, lasting with air-sea rescue and reserve units until the early 1950s.
| THE KIT |
 When
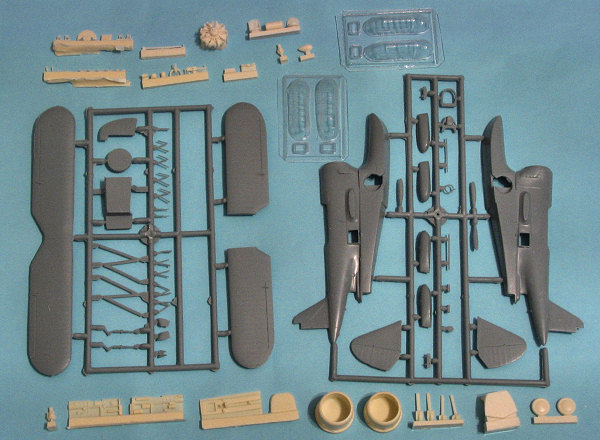
you open the box, you'll find an inner bag which contains two sprues of grey
plastic, a bag of resin bits, another bag which is too short for the large decal
sheet, and another small bag with two sets of vacuformed canopies. Pavla is one
of the few companies that actually supplies spares of vac canopies and should be
congratulated for doing this for us.
When
you open the box, you'll find an inner bag which contains two sprues of grey
plastic, a bag of resin bits, another bag which is too short for the large decal
sheet, and another small bag with two sets of vacuformed canopies. Pavla is one
of the few companies that actually supplies spares of vac canopies and should be
congratulated for doing this for us.
The plastic bits are well molded with some small amounts of flash on a few of the parts. Actually, more like oversize mold seams than actual flash. I did notice a long, shallow sink line on one fuselage halve's float. Fortunately, there is no detail to be lost in filling it. All the main airframe parts are in styrene and have very good surface detail. The wings have small dimples to help with aligning the outer struts. The inner ones have location marks on the underside of the upper wing to help in this regard. The inner struts are resin and have large 'feet' to mate to the underside of the top wing. This is greatly appreciated and should make what is often a rather difficult task that much easier.
As you might imagine, all of the interior save for the lower floor is molded in very nicely done resin. Wisely, Pavla have decided not to make the main landing gear legs in resin so these should prove to be quite sturdy. The resin seats already have belts molded in place. There is the option of installing the rear gun, though most aircraft did not carry one as they rarely operated in the war zone.
A bit of cutting will be needed to install a few of the
bits, but Pavla provides excellent instructions on how to do this. They also
continue with the resin hub and plastic blades deal that I personally do not
like. The blades are butt joined so one has to be very careful on installing
these. I'll put forward my usual plea to have the entire prop in one piece,
preferably in resin. If that can't be done, then perhaps guide pins on the
blades and hollows on the hub as I've seen in some other kits would be a real
help. I should also point out that Pavla provides two different cowlings, one
for the -5 and one fo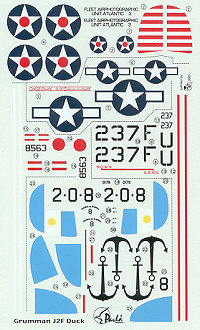 r the -6
version. The vacuformed canopies are fairly well done with easy to follow frame
lines, something that I appreciate. Having two of them means that you could
build the kit with a panel or two slid away to show off the interior.
r the -6
version. The vacuformed canopies are fairly well done with easy to follow frame
lines, something that I appreciate. Having two of them means that you could
build the kit with a panel or two slid away to show off the interior.
Instructions consist of 27 construction steps, all well drawn and all showing any colors or modifications needed. Paint references are in generic, Humbrol and Agama paints with FS 595 colors given when applicable. One does have to decide fairly early which of the five markings options are to be built so as to get the colors correct.
Markings are provided for five aircraft. Thanks to the Octopus boxing, four of these are shown, two on each side, so that will be a help. Over half of the instruction booklet is colors and markings. First option is a -5 of the Fleet Air Photographic Unit Atlantic in 1941 with the red and white rudder stripes and blue-grey over light grey scheme. Second is another -5 of the Argentine Navy in 1950. This is in overall light grey. Decals are provided for the blue on the elevators; the modeler will need to paint the white. This aircraft also has a yellow upper wing. Next is an aluminum painted -6 of a reserve unit. In aluminum with large insignia red sections is a USAF OA-12 operating with the 10th Rescue Squadron in Alaska during 1947. The final scheme is a tri-color painted -6 operating from the US Coast Guard Cutter 'Hamilton' during WWII. The decals are quite thin and well printed except for the pre-war roundels, which have the red center out of alignment. It is quite noticeable on the smaller ones.
| CONCLUSIONS |
Until now, we have only had the rather elderly Airfix kit to use for doing our J2F-6. This Octopus kit will put that one to pasture.
| REFERENCES |
Kit instructions
February 2007 Thanks to
Pavla Models If you would like your product reviewed fairly and quickly by a
site that has nearly 350,000 visitors a month, please
contact
me or see other details in the
Note to
Contributors.![]() .
for the review kit. You can get yours direct or from your local hobby store.
.
for the review kit. You can get yours direct or from your local hobby store.