Italeri 1/72 P-47N Thunderbolt
| KIT #: | 1240 |
| PRICE: | $18.98 MSRP |
| DECALS: | Two options |
| REVIEWER: | Scott Van Aken |
| NOTES: | Not all that it seems. |
| HISTORY |
One of the major problems with the
P-47 Thunderbolt was that it was relatively short-legged. Though a very
large plane by most standards, much of that room was taken up by ducting
for the turbocharger. The only way to really improve things would be to
enlarge the plane for more fuel storage. This was done by stretching the
wings at the root to allow for the
 additional fuel. Though it also
increased the weight of the plane, a more powerful R-2800 was installed.
Besides, when the aircraft got to the target area, it would have used up
the additional fuel so would be down to a good fighting weight.
additional fuel. Though it also
increased the weight of the plane, a more powerful R-2800 was installed.
Besides, when the aircraft got to the target area, it would have used up
the additional fuel so would be down to a good fighting weight.
Where this version was really destined was the Pacific where the extra range was really a must. The P-47N entered combat in the last year of the war, initially being used to escort B-29s from their bases in the Marianas. The P-47N was one of the few aircraft around that was able to be with the Superfortresses for the entire mission and still have fuel for combat over the Japanese home islands.
Needless to say, there were few units that actually were able to get into combat with the P-47N, most of the aircraft built were used post war and served with the Air National Guard. A goodly number of them are still extant in museums. The type was not exported as was the P-47D.
| THE KIT |
What you have when you open the box are two sprues of light grey plastic. Detailing is engraved panel lines and not only are these panel lines huge, they are also not very crisp. The clear bits are a windscreen and canopy so you can display the interior with the canopy open. The interior is fair for a 1/72 kit, though it seems a bit oversized to me. A decal is provided for the instrument panel. An interesting way of doing the wing on this T-bolt is that the lower wing includes a section of lower fuselage. Most P-47 kits have separate right and left wing pieces. There is a separate rudder, though I really don't know why that is.
 A huge selection of things to put
under the wings is provided. In addition to the standard wing pylons, there
are rocket stubs and you can mount bazookas under the wings as well. Not
sure how many P-47Ns actually used these bazookas. There are three sized of
under wing drop tank; the normal large P-38 looking ones (without the rear
tank brace), a set of paper ones and some smaller metal tanks as used on
P-51s. There are also bombs if you wish to use them, including a neat set
that I've not seen kitted before that has what looks to be a 500 lb bomb
with some very small anti-personnel bombs strapped to it.
A huge selection of things to put
under the wings is provided. In addition to the standard wing pylons, there
are rocket stubs and you can mount bazookas under the wings as well. Not
sure how many P-47Ns actually used these bazookas. There are three sized of
under wing drop tank; the normal large P-38 looking ones (without the rear
tank brace), a set of paper ones and some smaller metal tanks as used on
P-51s. There are also bombs if you wish to use them, including a neat set
that I've not seen kitted before that has what looks to be a 500 lb bomb
with some very small anti-personnel bombs strapped to it.
Instructions are well done, providing good construction drawings and color information using Modelmaster and FS 595 paint references. Markings are provided for three aircraft. First is a yellow and black checker tailed aircraft from the 414 FG. Next up is '2Big and 2Heavy' from the 333FS/318 FG in their early scheme. The other is from the 507 FG with its all yellow tail section. Decals are nicely printed and should work OK.
| CONSTRUCTION |
I began construction by assembling
the wings. I chose not to open any of the holes for the rocket rails or for
the bazookas. My P-47N will have just the long range fuel tanks. Looking at
the cockpit, I wasn't that thrilled with the level of detail. Though
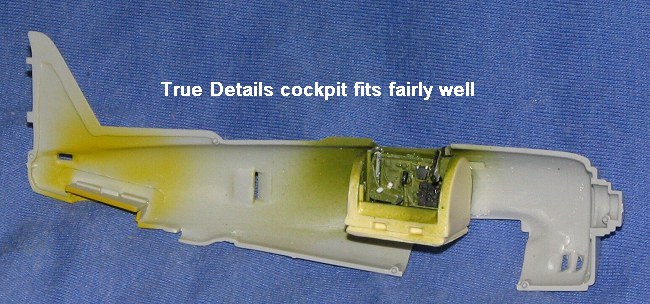 not
designed for this kit, I used a True Details set (72457 MSRP $5.98). These
sets are about the easiest resin cockpit sets around. Thanks to the huge
size of the P-47, I didn't have to cut off the resin block from the cockpit
tub and a quick sawing was all that was needed to remove the rest of the
bits. Since there are not any positive attachment points for the TD set, I
basically just superglued it to the interior of the fuselage and hope it
will stay connected!
not
designed for this kit, I used a True Details set (72457 MSRP $5.98). These
sets are about the easiest resin cockpit sets around. Thanks to the huge
size of the P-47, I didn't have to cut off the resin block from the cockpit
tub and a quick sawing was all that was needed to remove the rest of the
bits. Since there are not any positive attachment points for the TD set, I
basically just superglued it to the interior of the fuselage and hope it
will stay connected!
With the cockpit in place, I glued
the fuselage halves together. A few glitches were noted at this time.
One is that on the right side, the vents on the lower forward fuselage are
short shot. On the right side, they were closed over with flash and needed
opened. The rudder, which has a lower part on one side (and I can't for the
life of me see why that was done) had the seam filled and then was glued in
place.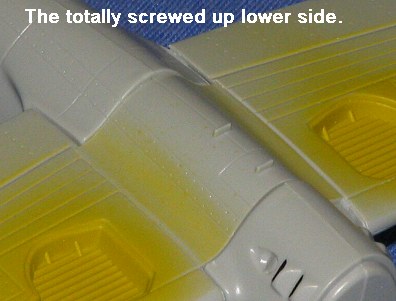
At this time I started to glue on the wing. Man, talk about a really lousy fit! I drug out the heavy sanding sticks and whaled away on the wing roots until it was possible to get the fuselage to fit. Even then, I glued only the upper wing roots, flooded them with glue, and taped the wings with an exaggerated dihedral in hopes they would dry in some position other than flat. I was rewarded with a semi decent dihedral, but the lower section was really hosed up. Once again, I broke out the big guns, inserting pieces of card in the larger gaps and slathering a mass of filler in the rest.
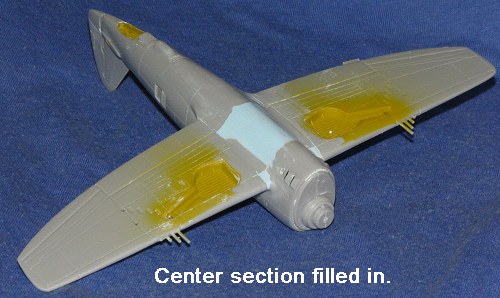 After
several applications, I managed to get the center section smoothed out,
though the detail was hidden. I am not really sure where I went wrong in
this regard and in hindsight, perhaps I should have glued on the upper
wings to the fuselage and then the lower wing assembly. Regardless, it was
not a pleasant exercise. I then glued on the horizontal stabilizers. These
are actually a bit wider than the roots to which they attach. By this time,
I'd grown weary of doing major fill jobs so left things as they were. I
then attached the windscreen. There is no positive locator for this part
and the area where it goes provides very little in the way of attachment
space. I did line it up with the canopy when gluing it in place so that
helped somewhat, but not much. It was masked as was the canopy. The canopy
was temporarily attached with white glue. I then glued on the pitot tube,
one rear mast (according to the decal instructions, it didn't have the IFF
antennas installed), and the wing pylons. These pylons need to have the
attachment surfaces sanded down as they are more curved than the lower wing
where they attach.
After
several applications, I managed to get the center section smoothed out,
though the detail was hidden. I am not really sure where I went wrong in
this regard and in hindsight, perhaps I should have glued on the upper
wings to the fuselage and then the lower wing assembly. Regardless, it was
not a pleasant exercise. I then glued on the horizontal stabilizers. These
are actually a bit wider than the roots to which they attach. By this time,
I'd grown weary of doing major fill jobs so left things as they were. I
then attached the windscreen. There is no positive locator for this part
and the area where it goes provides very little in the way of attachment
space. I did line it up with the canopy when gluing it in place so that
helped somewhat, but not much. It was masked as was the canopy. The canopy
was temporarily attached with white glue. I then glued on the pitot tube,
one rear mast (according to the decal instructions, it didn't have the IFF
antennas installed), and the wing pylons. These pylons need to have the
attachment surfaces sanded down as they are more curved than the lower wing
where they attach.
| COLORS & MARKINGS |
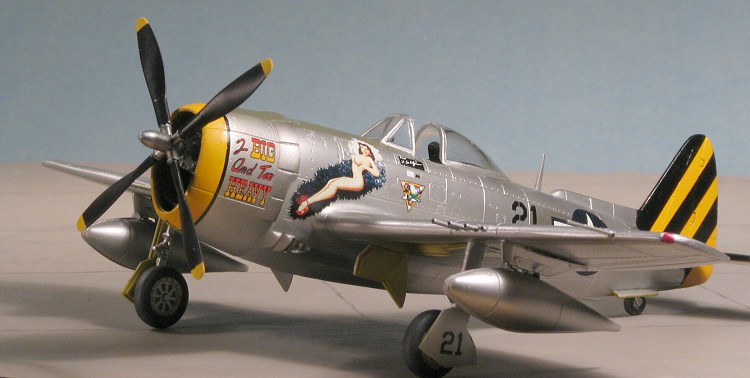
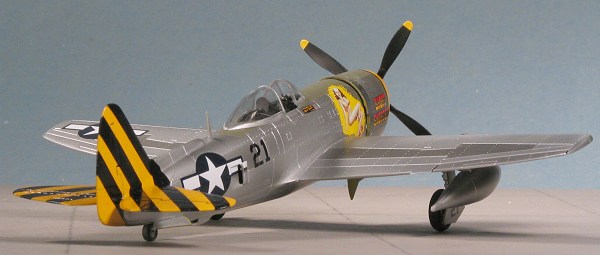
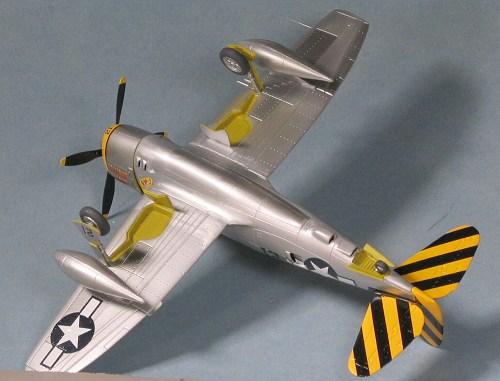 To my knowledge, all P-47Ns were in
overall bare metal with OD or Black anti-glare panels and whatever unit
markings were to be applied. For this one, I was doing a 318 FG aircraft in
the last months of the war. That meant a yellow cowl front and yellow
tail planes. I started with the cowl by painting it white with Floquil
Reefer White and then with a yellow acrylic that I already had mixed up.
When all that dried, the yellow portion was masked off and the rest of the
cowling and airframe were given a coat of Alclad II Aluminum. I used no
undercoat, spraying directly on the plastic or filler. I gave the Aluminum
an hour to dry then masked off a few panels to be painted Dark Aluminum.
Another hour to dry and I sprayed some panels with Duraluminum. One more
hour and Steel was sprayed on a few spots. One more hour and I masked off
the tail section and gave it a coat of Floquil Reefer white. When it was
dry, I sprayed on the Yellow acrylic.
To my knowledge, all P-47Ns were in
overall bare metal with OD or Black anti-glare panels and whatever unit
markings were to be applied. For this one, I was doing a 318 FG aircraft in
the last months of the war. That meant a yellow cowl front and yellow
tail planes. I started with the cowl by painting it white with Floquil
Reefer White and then with a yellow acrylic that I already had mixed up.
When all that dried, the yellow portion was masked off and the rest of the
cowling and airframe were given a coat of Alclad II Aluminum. I used no
undercoat, spraying directly on the plastic or filler. I gave the Aluminum
an hour to dry then masked off a few panels to be painted Dark Aluminum.
Another hour to dry and I sprayed some panels with Duraluminum. One more
hour and Steel was sprayed on a few spots. One more hour and I masked off
the tail section and gave it a coat of Floquil Reefer white. When it was
dry, I sprayed on the Yellow acrylic.
After an overnight curing, the landing gear were glued in place to make it easier to handle. Then the tail and nose were given a coat of Future in preparation for the decals. Of course, before applying the decals, there was still a bit more work to do. This was basically masking and painting on the OD anti-glare panel. I used Aeromaster Acrylics for this and used a faded shade.
I then started applying the decals.
The sheet is designed for either the Italeri or High Planes kit and the
instructions state that the tail stripes (which are individual) are made a
bit long to be sure they will fit both kits. Well, while they went on well
and are quite thin, they do need to be a tad longer. However, this is not a
problem as o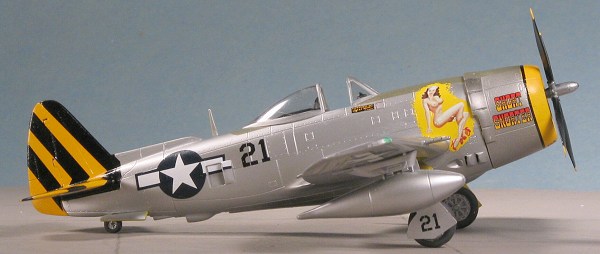 nce the tail
stripes were on, I simply broke out the gloss black (using Vallejo
acrylics) and painted in any gaps. You can't tell where decal ends and
paint begins. For those who notice, yes, I did get one of the stripes on
crooked. The decals went on beautifully using the Microscale system and I
was especially impressed by the fact that the black cowling stripe actually
fit! Now the real reason I built this kit was so that I could try out the
beautiful Pyn-Up 72-010 which
included the superb '2 big and too heavy' with two gorgeous pin ups on it.
This aircraft was from the 333FS/318 FG and in the markings used by this
wing in the last couple of months of the war. Once the backing decals
were on and had dried, I carefully cut out the artwork to go atop them.
These decals are extremely thin and must be handled with great care as
tearing will occur if treated too harshly. That is why you are given a
back-up. Fortunately I didn't need them and the end result is truly
stunning. Some may balk at the cost of these decals, but once they see the
result then they'll be converted. They are that good. I did not use any
clear coat over them as that would dull the metallic sheen.
nce the tail
stripes were on, I simply broke out the gloss black (using Vallejo
acrylics) and painted in any gaps. You can't tell where decal ends and
paint begins. For those who notice, yes, I did get one of the stripes on
crooked. The decals went on beautifully using the Microscale system and I
was especially impressed by the fact that the black cowling stripe actually
fit! Now the real reason I built this kit was so that I could try out the
beautiful Pyn-Up 72-010 which
included the superb '2 big and too heavy' with two gorgeous pin ups on it.
This aircraft was from the 333FS/318 FG and in the markings used by this
wing in the last couple of months of the war. Once the backing decals
were on and had dried, I carefully cut out the artwork to go atop them.
These decals are extremely thin and must be handled with great care as
tearing will occur if treated too harshly. That is why you are given a
back-up. Fortunately I didn't need them and the end result is truly
stunning. Some may balk at the cost of these decals, but once they see the
result then they'll be converted. They are that good. I did not use any
clear coat over them as that would dull the metallic sheen.
| FINAL CONSTRUCTION |
With the decals on and dry, I
realized that I'd made a major screw-up in the paint and carried the OD
over the yellow nose section. Nothing really to do but to carefully mask
over the stripe and repaint it. That was done and of course, I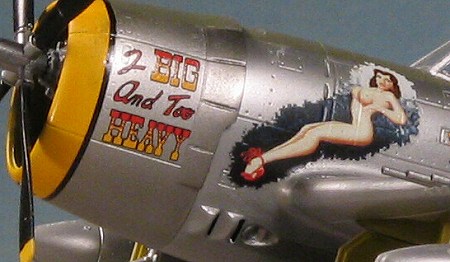 tore the nose stripe decal when I pulled up the tape. It was then a simple
matter of taking some black decal paper and carefully cutting a replacement
section.
tore the nose stripe decal when I pulled up the tape. It was then a simple
matter of taking some black decal paper and carefully cutting a replacement
section.
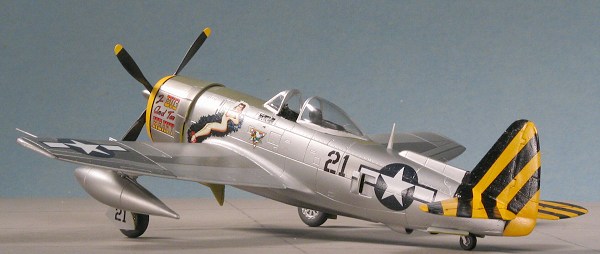
Next, I attached the gear doors. There is no positive attachment location for the main gear doors at all. One has to butt join them as best as one can. The tail wheel doors do have a slot to fit into. A real oddity in this area is that the two doors are the same length, but not the same width, with one of them easily being 50% again larger in width! I don't think that is prototypical.
With the gear doors in place, I started to attach the drop tanks. Well, someone goofed here as well. There are two stubs on the drop tank that theoretically should dovetail with similar stubs on the pylons. Well, both sets of stubs are in exactly the same place. The result is that you can't get the tanks to attach to the pylon as they should. One set of stubs has to go and while the preferred one would be on the pylon, that would be the more difficult to remove since they were glued in place. Thus I cut the ones from the tanks then glued them in place. The canopy and windscreen had the masking removed and the canopy was glued in place. I did the usual touch up painting and the last step was to attach the prop and reattach the radio mast that I broke off.
| CONCLUSIONS |
 Well, as you can see, this
was a bit of a trial. I know that I was pretty psyched when I initially
heard of a new mold P-47N being produced, but based on my experiences with
this one, we are still waiting for a really decent kit. Interestingly, had
this been a short run kit, I'd not have thought it to be that bad, but the
fact is that it isn't. It is a mainstream injected kit from an established
company. Not only that, but they are asking a premium price for the kit.
Now I've not built the High Planes kit, but I can't imagine it to be that
much more difficult to build than this one turned out to be. When one
considers the additional $6 I put into it with the resin cockpit (which
really adds a lot to the kit), then this would be a $25 kit at retail
prices. Unless you have already bought this kit or are willing to overlook
its somewhat iffy engineering, then my experiences would lead me to suggest
looking elsewhere for your 1/72 P-47N.
Well, as you can see, this
was a bit of a trial. I know that I was pretty psyched when I initially
heard of a new mold P-47N being produced, but based on my experiences with
this one, we are still waiting for a really decent kit. Interestingly, had
this been a short run kit, I'd not have thought it to be that bad, but the
fact is that it isn't. It is a mainstream injected kit from an established
company. Not only that, but they are asking a premium price for the kit.
Now I've not built the High Planes kit, but I can't imagine it to be that
much more difficult to build than this one turned out to be. When one
considers the additional $6 I put into it with the resin cockpit (which
really adds a lot to the kit), then this would be a $25 kit at retail
prices. Unless you have already bought this kit or are willing to overlook
its somewhat iffy engineering, then my experiences would lead me to suggest
looking elsewhere for your 1/72 P-47N.
December 2004
# 1341 in a series
Copyright ModelingMadness.com. All rights reserved. No reproduction in part or in whole without express permission from the editor.
Review kit courtesy of your editor.
If you would like your product reviewed fairly and fairly quickly, please contact the editor or see other details in the Note to Contributors.