Academy 1/72 F6F Hellcat
|
KIT # |
2121 |
|
PRICE: |
$8.00 MSRP |
|
DECALS: |
two options |
|
REVIEWER: |
Scott Van Aken |
|
NOTES: |
|
BACKGROUND |
|
THE KIT |
This particular kit was one that I bought at a swap meet in a bag. It had no box and no decals. I also think it is missing a gear door but will have to wait until that particular construction step is reached. Fortunately, there are quite a few aftermarket decals for the F6F, even in 1/72 so finding a set of markings won't be difficult.
|
CONSTRUCTION |
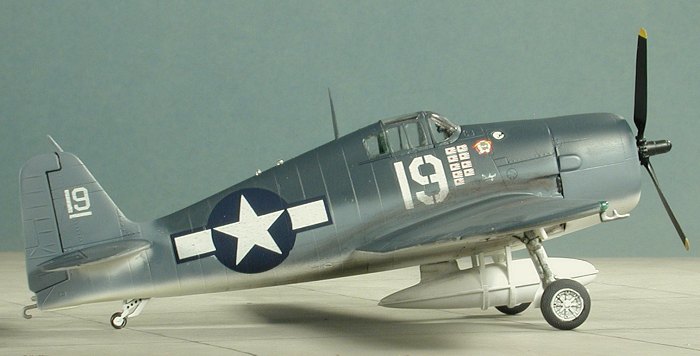
 First thing one has to do is to determine if an F6F-3 or -5
will be built. I chose the -3 as I like the tri-color camo scheme. To do a
-3 the kit has to have some extra work done to it. First of all, the small
quarter windows will have to be opened up behind the cockpit. A brief
amount of time with a sharp hobby knife will handle that task. Next, all of
the mounting holes under the wing for the bombs and rockets will have to be
filled. While later -3s were capable of handling the bomb racks, only the
-5s had capabilities for rockets. I wanted mine to be without either as it
would have been when on CAP.
First thing one has to do is to determine if an F6F-3 or -5
will be built. I chose the -3 as I like the tri-color camo scheme. To do a
-3 the kit has to have some extra work done to it. First of all, the small
quarter windows will have to be opened up behind the cockpit. A brief
amount of time with a sharp hobby knife will handle that task. Next, all of
the mounting holes under the wing for the bombs and rockets will have to be
filled. While later -3s were capable of handling the bomb racks, only the
-5s had capabilities for rockets. I wanted mine to be without either as it
would have been when on CAP.
Next, I assembled the cockpit bits and painted them all a bronze green using Humbrol #88 enamel. Probably the wrong color, but what the heck, it's my model. I then painted various radio boxes, the control grip, instrument panel, and the head padding matte black using Floquil's Engine Black.
While all that was drying, the wings were assembled and the leading edges cleaned up. I then opened up the gun barrels with a #75 drill bit after first making a starting hole with the tip of a sharp X-acto knife. With the instrument panel dry, I used a decal from the decal sheet on the panel. Doesn't look too bad. The interior was then installed in the fuselage and the fuselage halves were joined. Before things completely dried, I glued on the wings. I had to do a bit of trimming on the left side aft to get them to fit properly. There was a small seam at the wing root and this was filled with putty.
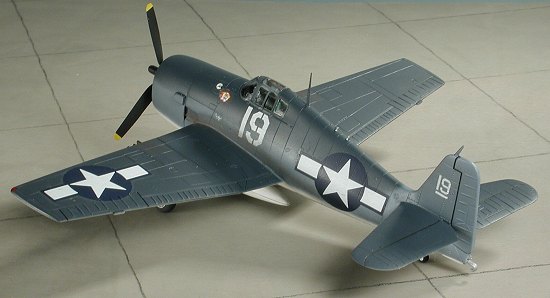
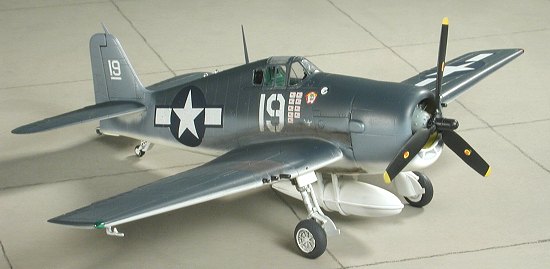
Meanwhile, I glued the drop tank halves together. Oddly, Academy split this part vertically which means there is a large seam that needs filled. It would have been much easier to split it horizontally and no seam would have been visible. It is probably part of their 15% change to overcome violating copyright laws. This was then sanded smooth and the strap pieces then glued in place. These leave some seams that most will want to fill. I should also mention that it just doesn't look right to me for some reason. I think it is too tall and too skinny.
 The tail planes were then glued in place and fit quite
well. I then installed the clear bits. The small quarter windows were a
touch loose, even though I opened the fuselage bits to the area noted. I'd
suggest not opening this area up as much and doing some test fitting while
putting in these bits. Then the windscreen and canopy were cut from the
sprues and installed. The sprue attachment points are rather large and I
ended up not doing such a neat job of removing these bits. I suggest a fine
razor saw for removing the clear parts.
The tail planes were then glued in place and fit quite
well. I then installed the clear bits. The small quarter windows were a
touch loose, even though I opened the fuselage bits to the area noted. I'd
suggest not opening this area up as much and doing some test fitting while
putting in these bits. Then the windscreen and canopy were cut from the
sprues and installed. The sprue attachment points are rather large and I
ended up not doing such a neat job of removing these bits. I suggest a fine
razor saw for removing the clear parts.
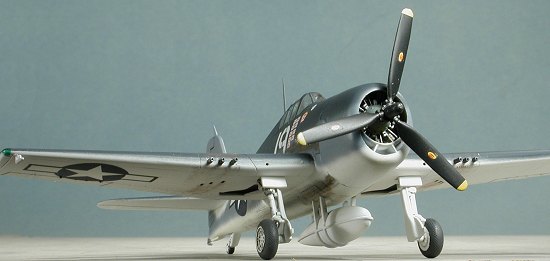
With the canopy in place, it was masked and I then turned my attention to the engine. This had been painted aluminum and given several thin, black washes. The crankcase was painted a medium grey and the engine glued into the cowling. The cowling was then glued onto the fuselage. It doesn't fit very well and almost seems too small. This produced a bit of a step from the upper fuselage to the cowling. I sanded that area as much as I could and while it improved the looks, it still just doesn't seem right. The engine was plugged with tissue, the tail wheel and radio mast glued on and then the kit was taken to be painted.
|
CAMOUFLAGE & MARKINGS |
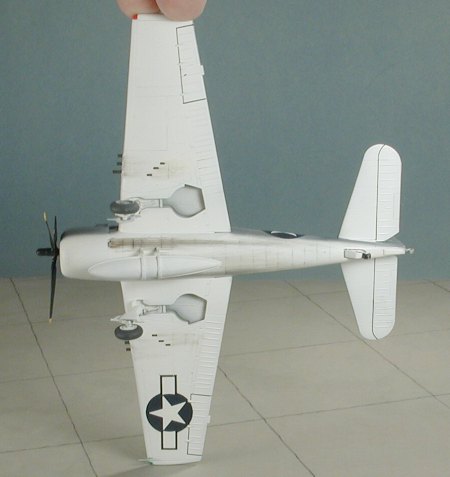
 Since I am doing a tricolor
scheme, it means that the wheels, wheel wells, struts and all get painted
the underside color, which in this case means white. I used Floquil
Reefer White for this and also painted the prop black while I was at it.
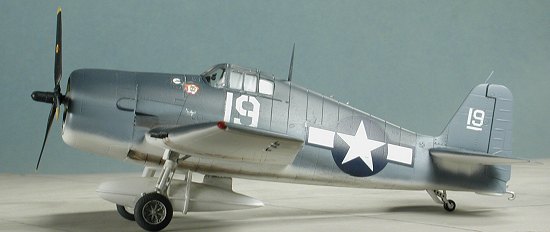
The prop blades must have been warped from being in the bag so long as
they tend to stick out to the front a bit much for my tastes. When it was
dry, the prop was masked leaving only the tips. These were then painted
white and then yellow.
Since I am doing a tricolor
scheme, it means that the wheels, wheel wells, struts and all get painted
the underside color, which in this case means white. I used Floquil
Reefer White for this and also painted the prop black while I was at it.
The prop blades must have been warped from being in the bag so long as
they tend to stick out to the front a bit much for my tastes. When it was
dry, the prop was masked leaving only the tips. These were then painted
white and then yellow.
The upper blues were from White Ensign's latest range. I thinned them with lacquer thinner to help speed drying. The sea blue was the second color done and when dry, the upper wings and both sides of the horizontal stab were masked. Intermediate blue on this scheme runs over the top of the wing and covers a lot of the side and fin than with later variants of this scheme. I did the usual back and forth painting, especially the white as I had to get the 'shadow shading' under the horizontal stabs to look proper. Once all the colors were on. I took the kit back to the work bench and had the landing gear installed. It just makes it easier to do the clear coat with the gear in place. The landing gear, wheel wells and main gear doors are all painted the underside color; in this case white. I used Chrome Bare Metal Foil for the oleos.
Once the Future was on, it was time for decals. I should mention that I apply the Future in very thing coats. With coats being quite light, it is possible to apply several coats almost one after another. I then leave it sit for several hours for the Future to completely cure.
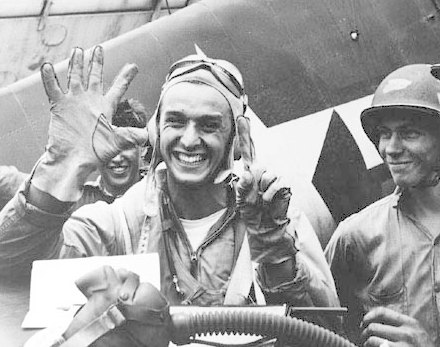 I decided to use the
markings of Alexander Vraciu, a well known Navy Ace. Here is a bit of a
biography and a photo of then Lt. Vraciu after his most famous flight: Commander Alex Vraciu, USN (Ret.) is best known for his
involvement in the now famed June 1944 Marianas Turkey Shoot in which
U.S. Navy fighter pilots and anti-aircraft guns accounted for the
destruction of 402 Japanese planes during the battle for the Marianas
Islands. Then Lieutenant Vraciu shot down six Japanese aircraft in less
than eight minutes. One aircraft was destroyed as it tried to crash into
an American destroyer. In all, Commander Vraciu's squadron accounted for
41 of the 402 aircraft destroyed during the battle. Later in the war,
Commander Vraciu was shot down and joined a band of guerrilla fighters in
Luzon. Under his leadership, they helped the invasion troops led by
General MacArthur successfully retake this portion of the Philippine
Islands.
I decided to use the
markings of Alexander Vraciu, a well known Navy Ace. Here is a bit of a
biography and a photo of then Lt. Vraciu after his most famous flight: Commander Alex Vraciu, USN (Ret.) is best known for his
involvement in the now famed June 1944 Marianas Turkey Shoot in which
U.S. Navy fighter pilots and anti-aircraft guns accounted for the
destruction of 402 Japanese planes during the battle for the Marianas
Islands. Then Lieutenant Vraciu shot down six Japanese aircraft in less
than eight minutes. One aircraft was destroyed as it tried to crash into
an American destroyer. In all, Commander Vraciu's squadron accounted for
41 of the 402 aircraft destroyed during the battle. Later in the war,
Commander Vraciu was shot down and joined a band of guerrilla fighters in
Luzon. Under his leadership, they helped the invasion troops led by
General MacArthur successfully retake this portion of the Philippine
Islands.
When he was interviewed many years after the war,
Cdr Vraciu's comments on the battle of the Philippine Sea were quite
telling. The Japanese carrier fleet wasn't discovered until late in the
day. That meant that the planes would be returning after dark, something
that the vast majority of pilots were not trained for. Knowing that they
were probably taking off on a one-way trip, the air wings left for the
Japanese. They effectively decimated what was left of the Japanese
carrier air arm, thus the term 'Turkey Shoot'. Though most Japanese
pilots were poorly trained, they tried their best, but the final results
were a given. Then the American pilots started back to the ships. It was
well past dark by the time they were near where the ships were
 supposed
to be, but without the nav aids modern pilots take for granted, and
unable to see anything in the blackness, they were sure that they'd fly
around until they ran out of fuel. This meant crashing in the dark
Pacific where they doubted they'd be rescued.
supposed
to be, but without the nav aids modern pilots take for granted, and
unable to see anything in the blackness, they were sure that they'd fly
around until they ran out of fuel. This meant crashing in the dark
Pacific where they doubted they'd be rescued.
Against all good tactical sense, the fleet commander ordered his carriers to turn on all their lights and to aim searchlights into the air so that pilots could find their ships. This was a very dangerous move, for any Japanese submarines in the area would home in on those lights and since the carriers had to sail in a straight line to retrieve planes, it would have meant they'd be sitting ducks. Lt. Vraciu's comments were that someone was definitely looking out for him as he and his squadron found the ships and landed with but a few gallons of fuel remaining. Though several planes did crash from lack of fuel, the carriers kept their lights on until all aircraft still in the air were recovered. Fortunately, there were no Japanese submarines in the area.
Digging out my very old Microscale sheet on the F6F (72-298), I used the markings for Vraciu's plane. The decals were not in the best shape and a few of them started to break up. Fortunately, I started with insignia so was able to coat the others with Microscale's Superfilm to keep the remaining ones together. The end result is that I wasn't able to use the very small (and illegible) data markings, but the rest of the plane looks good. Once the decals were on and dry, the entire plane was wiped down with warm water to remove the decal glue and setting solution excess.
|
FINAL CONSTRUCTION |
With the decals in place, the rest of the kit was pretty well finished
up. This meant the pitot on the wing tip, the main gear doors and wheels
and the tail hook. The tail hook is designed to be either extended or
r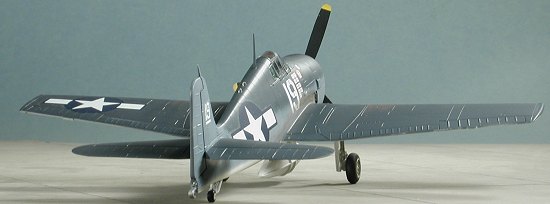 etracted. For the retracted position, you have to cut the hook shank.
Now the hook itself is nearly invisible in the retracted position, but
thanks to the design of it, it won't go all the way in so I cut it as
short as I could. I also had to make another smaller gear door from card
stock as one of them had disappeared prior to construction starting.
etracted. For the retracted position, you have to cut the hook shank.
Now the hook itself is nearly invisible in the retracted position, but
thanks to the design of it, it won't go all the way in so I cut it as
short as I could. I also had to make another smaller gear door from card
stock as one of them had disappeared prior to construction starting.
The kit was then given a coat of clear matte to seal the decals and give the pastels something to 'bite' into. I also did some touch up painting which included the wingtip lights, the gun barrels (which had been drilled out) and a few other bits. The upper fuselage lights were then glued in place and the prop pressed onto the engine. Some exhaust stains were added, the masking taken off the canopy and the drop tank blue in place. That was it. You may want to add a radio aerial, but for me, I usually break those off rather soon after construction so left it off.
|
CONCLUSIONS |
It is a tough call as to which Hellcat in 1/72 is
the best. One can probably eliminate the Matchbox, Frog and Airfix
versions just due to age, though they all look like a Hellcat
 when done.
The Academy has more optional bits and a better cockpit than the Hasegawa
version, but it also has oddly shaped wheels and cowling. The prop on the
Academy version (at least mine) has blades that are bent forward and look
a bit odd. It also has a prop hub that is either too long or too skinny
or both.
when done.
The Academy has more optional bits and a better cockpit than the Hasegawa
version, but it also has oddly shaped wheels and cowling. The prop on the
Academy version (at least mine) has blades that are bent forward and look
a bit odd. It also has a prop hub that is either too long or too skinny
or both.
It is true that the Academy kit has bombs and rockets that are not on the Hasegawa kit, but this is somewhat overcome by the rockets being British versions with the bulbous tips. The Academy kit is now around $10 while the latest Hasegawa release is near the $16 mark. Personally, I find the Hasegawa kit to be the best shaped kit and it looks more the part. However, the Academy kit does have a lot to offer and if you can get around some of the shape issues, it may be the more preferable to you.
November 2003
#1293 in a series
If you would like your product reviewed fairly and fairly quickly, please contact the editor or see other details in the Note to Contributors.