Airfix 1/72 P-40E Warhawk
|
KIT: |
Airfix 1/72 P-40E Warhawk |
|
KIT # |
01038 |
|
PRICE: |
$4.98 MSRP |
|
DECALS: |
Two options |
|
REVIEWER: |
Scott Van Aken |
|
NOTES: |
|
BACKGROUND |
For a look at what comes in the box, please visit the preview.
|
CONSTRUCTION |
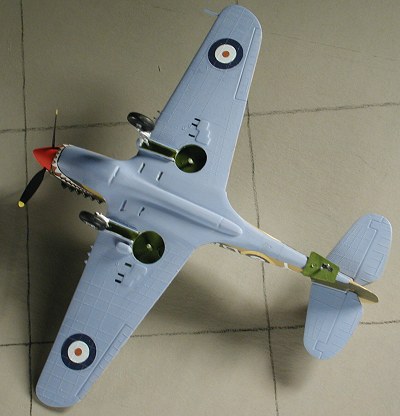
This particular kit was being built for a group build on the Forum. The requirement was that it be a pre-1980 Airfix kit (which takes care of most of their catalogue), and that it be brush painted. It had been a while since I'd built a classic Airfix kit and this one is very much in that mold. It is festooned with rivets for the majority of the detail. It has no real interior and there are several inaccuracies in detail. However, in the 1960s, most of that was not a concern to us and we gleefully slathered tube glue on the mating surfaces, slopped paint on it and then tossed the decals onto the wet paint. Of course, we dunked the entire sheet into water at the same time so the last markings were always a bit touch and go as to whether they'd make it off the backing before they dried!
 With a bit of experience behind me, I decided to
build this one using some of my hard-earned skills, but other than that,
it is right from the box all the way. First thing I did was to paint the
interior and the seat a nice Interior Green. By putting the paint on a
bit thick, I got good coverage, and besides, there is nothing to see in
there. No instrument panel, no floor! Even the glare shield is the wrong
shape and a total fiction. I also painted the wheel wells at this time
with the same color.
With a bit of experience behind me, I decided to
build this one using some of my hard-earned skills, but other than that,
it is right from the box all the way. First thing I did was to paint the
interior and the seat a nice Interior Green. By putting the paint on a
bit thick, I got good coverage, and besides, there is nothing to see in
there. No instrument panel, no floor! Even the glare shield is the wrong
shape and a total fiction. I also painted the wheel wells at this time
with the same color.
Then I glued the wing and fuselage halves together. Fit on both was dodgy at best with the fuselage needing clamped to get things together. Looking at the wings, I'd thought about drilling out the gun barrels, but they would have to be tiny at best for the things must be made for BB's and not bullets! I left well enough alone. Back at the fuselage, I broke out the filler and started using it just about all the way around as there were sink areas and gaps galore. Of course this meant destroying some of that fine rivet detail but those are the breaks!
With everything sanded down, I attached the wings.
Expecting a poor fit I wasn't too badly disappointed. Only the left side
had a really bad step in it so out came the filler once again. I also had
to do a lot of fiddling around before the glue fully dried
 to get some
semblance of dihedral in the wings. Last of the major airframe parts were
the tail planes. These fit quite well and are also very thin.
to get some
semblance of dihedral in the wings. Last of the major airframe parts were
the tail planes. These fit quite well and are also very thin.
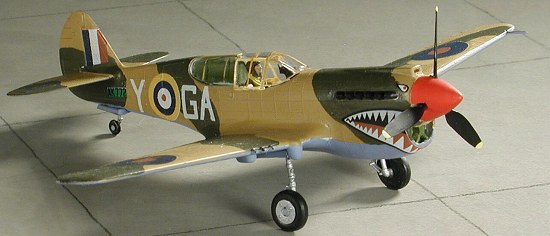
While all that was setting up, I did a bit of work on some of the other bits. First, I painted the prop black and put on yellow tips. Then I painted the spinner white and when dry did a coat of red over it. I used Vallejo acrylics for these items and am quite pleased with the results. The wheels were also painted black. The gear doors required quite a bit of clean-up as they had a lot of flash on them. As most of you know, the P-40 does not have two largeish gear doors, but Airfix thinks it does so you get them! These were also painted Interior Green (from Testors) to match the wheel wells. Then it was time to get on the paint.
|
COLORS & MARKINGS |
 I decided on the desert scheme, mainly because I
like the colors used, despite knowing that light colors can be a pain to
brush paint. Starting with the underside, I used some of my Aeromaster
Azure Blue Acrylic to do that. It went on smoothly and left no brush
marks. When that dried, I used Vallejo Desert Yellow as a good
replacement for Midstone and painted the entire upper surfaces with this
color. When that had dried, I painted on the Dark Earth, for which I used
Vallejo Brown Violet as a good match. This color didn't turn out as
smoothly as I'd hoped, but wasn't bad. It was then on to the decals.
I decided on the desert scheme, mainly because I
like the colors used, despite knowing that light colors can be a pain to
brush paint. Starting with the underside, I used some of my Aeromaster
Azure Blue Acrylic to do that. It went on smoothly and left no brush
marks. When that dried, I used Vallejo Desert Yellow as a good
replacement for Midstone and painted the entire upper surfaces with this
color. When that had dried, I painted on the Dark Earth, for which I used
Vallejo Brown Violet as a good match. This color didn't turn out as
smoothly as I'd hoped, but wasn't bad. It was then on to the decals.
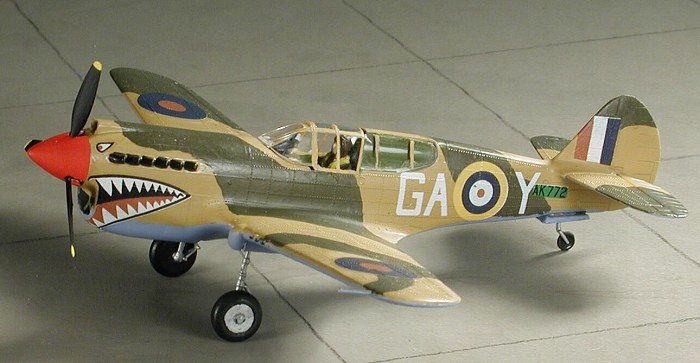
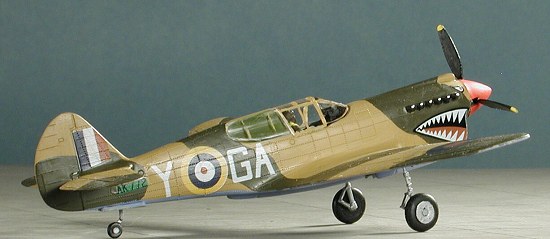
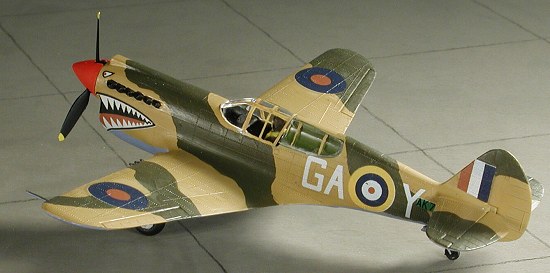
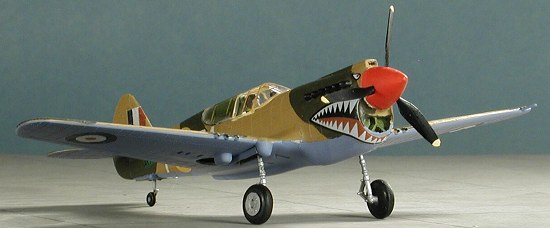
I used the 112 Sq sharkmouth decals for this one. Though they looked fine on the sheet, once off and onto the plane, it was obvious that they were off register as there were white bits peeking out of the roundels and fin flash. I did not apply a gloss to the model first, putting the decal directly onto the paint. In order to assure that they'd snuggle down, I used Solvaset on them. When it was obvious that it wasn't helping that much, I switched to Champ which seemed to work just fine. With the decals on, it was back to the bench for the rest of the build.
|
FINAL CONSTRUCTION |
 At this
stage, I glued in the rear gear door assembly and the landing gear. These
are fragile to the max so one has to be very careful not to break them
while gluing them in place. Once in and dry, the wheels were glued on,
followed by the gear doors. Then I painted the canopy frames and let them
dry. The gun sight and painted pilot were glued in place. Then the clear
bits. These do not fit at all well. The side parts are too narrow and too
long for the openings. The canopy itself is too wide and the lower part is
too short for the opening. However, they were all glued in place and that
was that.
At this
stage, I glued in the rear gear door assembly and the landing gear. These
are fragile to the max so one has to be very careful not to break them
while gluing them in place. Once in and dry, the wheels were glued on,
followed by the gear doors. Then I painted the canopy frames and let them
dry. The gun sight and painted pilot were glued in place. Then the clear
bits. These do not fit at all well. The side parts are too narrow and too
long for the openings. The canopy itself is too wide and the lower part is
too short for the opening. However, they were all glued in place and that
was that.
The final bits were the attachment of the pitot tube and the prop/spinner. I chose not to use the drop tank as it was just too awful to install. Not only is it horribly misshaped, but it is too small and I felt the model would look better without it. A bit of touch-up painting and I was done. No pastels, no pre or post shading on this one.
|
CONCLUSIONS |
Well, it is pretty obvious that any modeler who wants a really nice P-40 will go with Hasegawa or Academy in this scale. Still, for a youngster who cares little about the niceties of shape and accuracy, this one will do well. It will help teach him or her about the small frustrations that comes with model building and since they will undoubtedly break the landing gear early in the life of the model, it will give them something to zoom around the room!
 As to why I
would bother building such a kit? Well, currently in the Reader's Forum we
are having a group build. The theme is Airfix before 1980 and the only
requirements are no aftermarket and the kit must be brush painted. In all a
pretty relaxing way to build a model as one doesn't have to obsess over the
proper shape of parts, or weathering or any of the other things that, at
times, can be an impediment to actually getting something done!
As to why I
would bother building such a kit? Well, currently in the Reader's Forum we
are having a group build. The theme is Airfix before 1980 and the only
requirements are no aftermarket and the kit must be brush painted. In all a
pretty relaxing way to build a model as one doesn't have to obsess over the
proper shape of parts, or weathering or any of the other things that, at
times, can be an impediment to actually getting something done!
June 2004
# 1318 in a series
If you would like your product reviewed fairly and quickly, please contact me or see other details in the Note to Contributors.