Airfix 1/72 TBM Avenger
|
KIT # |
? |
|
PRICE: |
Not much |
|
DECALS: |
It had 'em |
|
REVIEWER: |
|
|
NOTES: |
Like rivets? You'll like this one! |
|
HISTORY |
The TBF/TBM Avenger was in the war from nearly the beginning. It had its initial combat at the Battle of Midway in June of 1942 and continued to serve with the USN into the early 1950s. It was also widely used by other countries and was one of the first planes of the new Japanese Naval Self Defense Force when it was activated in the mid-50s. It was transformed into an effective 'fire bomber', serving in that capacity into the 1980s. Many of those planes were rescued and restored, continuing to thrill air show audiences today.
|
THE KIT |
 This particular kit is an Airfix
product that comes from the late 1960 or perhaps the very early 1970s. It has
all the traits that endeared us to Airfix kits at the time. First of all it was
very 'accurate', having a plethora of rivets festooning the airframe. It also
had separate ailerons that, with careful building, could be made to 'operate'.
In addition, it had a moveable turret and gun. My particular kit was molded in
dark blue, undoubtedly to save me from unnecessary painting. It also suffered
from a short shot prop blade. Underewing rockets were offered to enhance
offensive armament and there were stubs for the radar antennas, but no real
antennas themselves as the molding of the time was unable to do items that
petite. Include was an interior with a seat for the pilot and little else. The
gunner was only an upper section figure since you'd not be able to see into the
plane itself anyway. Decals were included for a non-descript aircraft of some
sort, but I don't remember much else about them. I'm sure they'd have worked
just fine if used. Just an FYI, the kit makes a TBM-3 so you are pretty well
limited to mid-late war usage.
This particular kit is an Airfix
product that comes from the late 1960 or perhaps the very early 1970s. It has
all the traits that endeared us to Airfix kits at the time. First of all it was
very 'accurate', having a plethora of rivets festooning the airframe. It also
had separate ailerons that, with careful building, could be made to 'operate'.
In addition, it had a moveable turret and gun. My particular kit was molded in
dark blue, undoubtedly to save me from unnecessary painting. It also suffered
from a short shot prop blade. Underewing rockets were offered to enhance
offensive armament and there were stubs for the radar antennas, but no real
antennas themselves as the molding of the time was unable to do items that
petite. Include was an interior with a seat for the pilot and little else. The
gunner was only an upper section figure since you'd not be able to see into the
plane itself anyway. Decals were included for a non-descript aircraft of some
sort, but I don't remember much else about them. I'm sure they'd have worked
just fine if used. Just an FYI, the kit makes a TBM-3 so you are pretty well
limited to mid-late war usage.
|
CONSTRUCTION |
Now I have to confess something. This review is one of many that I have pre-written for those Fridays when I don't have something completed for Editor's day. As such, I have to rely on memory of a build that may have been as long as 15-20 years ago. This isn't the disaster that it seems, for not only do I have a good memory for trivial stuff like decades old model builds, but having the beastie in front of me helps a lot too!
Anyway, I started
with the interior. The seat and control stick were glued into the forward part
of the interior. Then all the interior parts, the inside of the fuselage, and
the interior turret parts were brush painted with that lovely apple green
Testors green chromate primer. I made no attempt to remove any of the many
ejector pin marks that were present, nor
 did I pick out any detail in the
radio compartment. Modeling back then was much simpler than it is today! I
should also mention that in October of 1985 when this kit was completed, I also
completed ten other kits!
did I pick out any detail in the
radio compartment. Modeling back then was much simpler than it is today! I
should also mention that in October of 1985 when this kit was completed, I also
completed ten other kits!
With the interior bits nice a green, the turret clear bits were glued onto the turret base. This and the tail wheel and interior were then installed into the fuselage. There are smaller rear side windows, but I didn't like the way they fit and left them off. These areas were later filled with white glue, which made things look much better. Now I'll need some help from someone who has this kit as I don't remember the next part. I did glue the wings together (making sure the ailerons were able to move) but forget if they were a one-piece that slides through the fuselage or if they tacked on to the side. If the latter, then the fit is excellent. No filler of any kind was used at the wing/fuselage join. The fuselage halves also got very little in the way of filler. Only some on the top and on the underside where the stand would have gone. I can tell where I used filler as I didn't replace the rivet or panel line detail! Like I said, at that time of my modeling progression, quantity was paramount! It is undoubtedly no surprise that the turret refused to rotate after the fuselage was glued. Not only that, but the gun came adrift at this time and still flops around in there.
With the fuselage glued in place, the tail planes were attached as was the cowling. Actually, the cowling was just tacked in place so I could put in the prop and engine in it after painting. The canopy was then attached (using standard liquid cement as I can see where I slopped a bit) and the canopy masked. I basically covered the turret with tape and later hand painted the frame lines on it. Time to break out the airbrush and paint!
|
PAINT & DECALS |
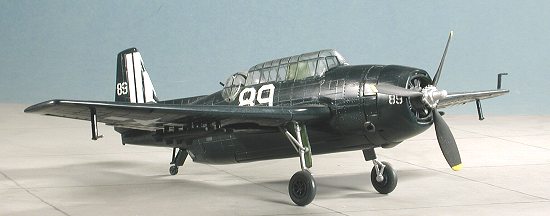 I'd already decided that I didn't
want to use the kit decals. Too boring. I also knew that I'd go for the overall
gloss sea blue scheme as it was easy to paint. Dragging out the Testors Model
Master, I proceeded to spray everything in sight a lovely glossy dark blue. The
wheels and gear doors were also painted this color. Once it had dried, the
difficult part came to me. What markings would I use?
I'd already decided that I didn't
want to use the kit decals. Too boring. I also knew that I'd go for the overall
gloss sea blue scheme as it was easy to paint. Dragging out the Testors Model
Master, I proceeded to spray everything in sight a lovely glossy dark blue. The
wheels and gear doors were also painted this color. Once it had dried, the
difficult part came to me. What markings would I use?
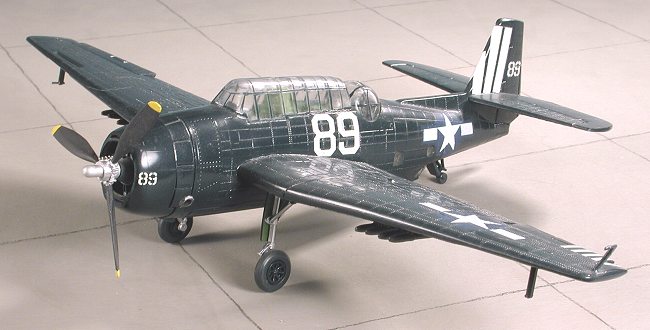
Now I'd always liked the geometric patterns on late war USN planes. There was
darn little else to distinguish them as they had no colorful squadron markings
to use. I decided on a plane from the USS Antietam, CV-36. This was picked
because the markings were interesting and easy to make. I found a photo of a
very similar plane in a book somewhere that verified the position of the tail
markings and that the wing markings were only on the port side, both above and
below the wing. The markings were made using ScaleMaster white stripes and
Microscale aftermarket insignia and white letters.
|
CONSTRUCTION CONTINUES |
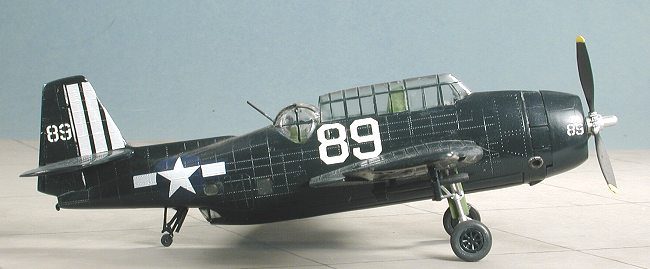
Now that I had a painted and decaled airframe, I painted the landing gear
aluminum, the rockets black and also painted and drybrushed the engine. The prop
was painted black with an aluminum hub and yellow blade tips. If you recall, the
prop had one slightly short shot blade. I trimmed the others to match. Frankly
the prop looks a bit too 'paddle-bladed' to me, but I didn't care back then. I
then dutifully painted the wheel wells (such as they are) as well as the inside
of the gear doors and 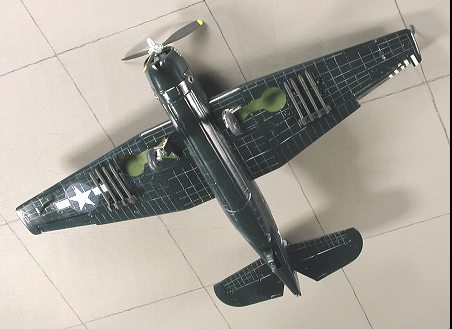 the inside of the engine cowling green chromate. Nowadays,
I'd NEVER do such a blunder, but in 1985, I was blissfully unaware of such
niceties. All aircraft had green chromate primer in the wheel wells and
interior. That included German ones.....
the inside of the engine cowling green chromate. Nowadays,
I'd NEVER do such a blunder, but in 1985, I was blissfully unaware of such
niceties. All aircraft had green chromate primer in the wheel wells and
interior. That included German ones.....
Anyway, the aluminum gear legs (which should have been gloss sea blue) were glued to the gear doors and then glued to the (incorrectly painted) chromate green wheel wells. I was doing the panzer grey tires thing so painted the tires with that color. The prop was threaded through the engine and the engine glued into the cowling. The cowling was then glued to the front of the fuselage. All of the rockets were glued in place as were the various antenna and pitot tubes. The one atop the canopy eventually disappeared as these things tend to do. The canopy was unmasked and any touch-up painting done. The exhaust pipes were painted and I was done. I did nothing to remove the ejector pin marks from the ailerons, tail planes or any other part of the kit. Heck, doing so would have wiped out generations of rivets!
|
CONCLUSIONS |
Despite the age of the kit and rapidity with which it was built, it still holds up rather well. I've not built the Hasegawa or Academy version, but I'm sure it is MUCH nicer in detail and probably has real wheel wells and cockpit, too. However, the old Airfix kit is still viable and can be easily found.
Published February 2003
#546 in a series
Copyright ModelingMadness.com. All rights reserved. No reproduction in any form without express permission from the editor.
If you would like your product reviewed fairly and fairly quickly, please contact the editor or see other details in the Note to Contributors.