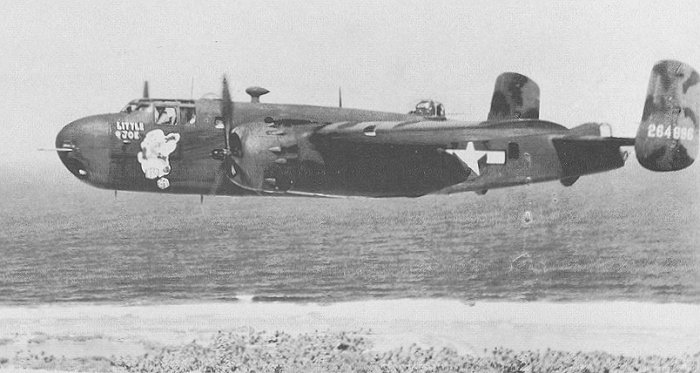
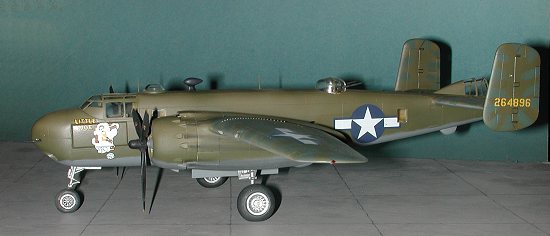
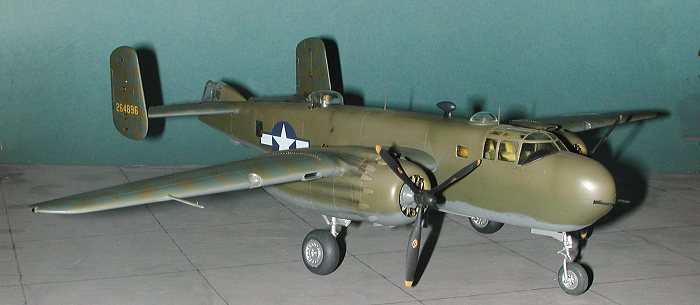
'Little Joe', B-25G-1-NA, 42-64896, of the 820 BS/45 BG flying over Maloelap in the Marshall Islands, December 1944
Accurate Miniatures 1/48 B-25G Mitchell
|
KIT # |
|
|
PRICE: |
$49.95 for the kit and $19.50 for the conversion set |
|
DECALS: |
See review |
|
REVIEW : |
|
|
NOTES: |
This is a 'factory' conversion |
'Little Joe', B-25G-1-NA, 42-64896,
of the 820 BS/45 BG flying over Maloelap in the Marshall Islands, December 1944
|
HISTORY |
Basically, the B-25G was a developed after an experiment by Capt. 'Pappy' Gunn and North American tech representative Jack Fox to install a 20mm cannon in the nose of one of Gunn's B-25C strafers. The installation was a lash-up, but the results were quite promising. This encouraged NAA President 'Dutch' Kindelberger to do a production version with a 75mm cannon. This adaptation of the standard 9 1/2 foot M4 75mm field gun was first tried out on a B-18 'Bolo'. Upon successful completion of trials, it was put into a B-25C (41-13296), which became the first B-25G-NA. Eventually 306 B-25Gs were built, with B-25G-10-NA (42-65128) being the last one built.
Many B-25Gs were modified in various ways. Though designed for two .50 calibre machine guns in the nose, many had four mounted. Also not always used was the belly turret. In fact, other than the one used by at Eglin for trials (42-64758) and painted in the sea search scheme of white undersides, the author could not find a photo of another B-25G with the belly turret. Interestingly, the particular plane, which is one of the two decal options in the Accurate Miniatures conversion set, does not have the serial number of a B-25G, but of a B-25C-25 NA! Another option that was installed in some G models was an enclosed tail gun position with twin .50 cal machine guns. Later G models also had modified beam gun installations as seen on the B-25J. A cannon nosed version of the B-25J, the B-25H, was also developed.
|
THE KIT |
I'll direct you to Tom Cleaver's fine preview of the B-25B as that is what constitutes most of this kit.
|
CONSTRUCTION |
It is weird to think that as much as I like Accurate Miniatures kits, this is actually only the third one I have built, the previous kits being the P-51 and the Yak-1b. Both were quite nice kits. Not Tamiya nice, but still quite nice. Somehow, I got more B-25Bs than I really wanted, and it was with much relief when I heard that AM was doing the G version as a conversion set. You can see the review of the conversion set to get an idea of what is in it.
 Accurate Miniatures
recommends slavishly following the directions when assembling this kit. AM kits
have been known for their tight construction, and the Mitchell appears to fall
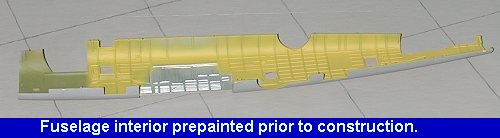
into that vein. The first things that I did were to glue as many of the parts
that were going to be the same color as I could onto the various interior
subassemblies. Once this was done, I set them into the two fuselage halves and
used them as masks. Then I spray painted the various large areas. Sure beats
using tape to mask and it worked quite well as you can see from the image.
Accurate Miniatures
recommends slavishly following the directions when assembling this kit. AM kits
have been known for their tight construction, and the Mitchell appears to fall
into that vein. The first things that I did were to glue as many of the parts
that were going to be the same color as I could onto the various interior
subassemblies. Once this was done, I set them into the two fuselage halves and
used them as masks. Then I spray painted the various large areas. Sure beats
using tape to mask and it worked quite well as you can see from the image.
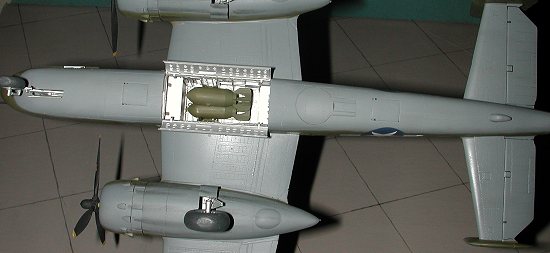
Next, I started attaching the various bits and pieces to the cockpit and bomb bay section, as directed by the instructions. AM provides instrument decals for placing on the rear of the clear instrument panel. A nice idea and one that works rather well. They also provide seat belt decals. It seems like these bombers must not have had shoulder harnesses; either that or they were not included as decals. There are also a plethora of items that need to be attached to the inside of the fuselage, including a chemical toilet! Since I was doing a G with twin 50s in the tail, I added the gun mount. There are no other pieces for the tail gun set-up and an e-mail to Accurate Miniatures about it brought the response that it was a mod done at local or depot levels and they had no information on what it looked like. Fair enough.
 Once the
interior bits and pieces were added, the fuselage and inserts were given a wash
with oils. Then they were drybrushed with aluminum. Just a reminder at this
point to make sure that the holes for the pilots armor plating are opened before
the cockpit is installed. During all this, the upper turret was constructed.
Photo information on the lower turret for the B-25G is inconclusive. If doing
the 'sea search' scheme, put the turret in as there are photos of it being
there. If doing the version that I am building, leave it out. From what I can
tell, there was no lower turret in this aircraft. Regarding the upper turret, I
was unable to cleanly get the guns to 'snap' into place. Instead, the bar
between the two guns is what snapped and I had to glue the guns to the sides of
the shell chute. Not a very pretty sight! The turret canopy must be glued to the
turret when it is installed. The turret assembly cannot be inserted after the
fuselage is glued together and it is the canopy that seems to hold it in place.
Once the
interior bits and pieces were added, the fuselage and inserts were given a wash
with oils. Then they were drybrushed with aluminum. Just a reminder at this
point to make sure that the holes for the pilots armor plating are opened before
the cockpit is installed. During all this, the upper turret was constructed.
Photo information on the lower turret for the B-25G is inconclusive. If doing
the 'sea search' scheme, put the turret in as there are photos of it being
there. If doing the version that I am building, leave it out. From what I can
tell, there was no lower turret in this aircraft. Regarding the upper turret, I
was unable to cleanly get the guns to 'snap' into place. Instead, the bar
between the two guns is what snapped and I had to glue the guns to the sides of
the shell chute. Not a very pretty sight! The turret canopy must be glued to the
turret when it is installed. The turret assembly cannot be inserted after the
fuselage is glued together and it is the canopy that seems to hold it in place.
 While all that washing and drybrushing
was drying, I turned to the wings and tail. These assemblies were glued together
with very little trauma. I then glued the engine nacelles together and fit them
to the wings. The fit here is not perfect so you will need to use some filler on
the join and the nacelles. I used some on the wings themselves as well, but not
much. AM has taken to following R-M's practice of having their initials on the
underside of the wing. They are easy to remove.
While all that washing and drybrushing
was drying, I turned to the wings and tail. These assemblies were glued together
with very little trauma. I then glued the engine nacelles together and fit them
to the wings. The fit here is not perfect so you will need to use some filler on
the join and the nacelles. I used some on the wings themselves as well, but not
much. AM has taken to following R-M's practice of having their initials on the
underside of the wing. They are easy to remove.
At this time, one should start putting in the fuselage transparencies. They all fit very well; the best I have seen . As a side note, the windows behind the cockpit should be flat. There are others that are bulged, but I have seen no photos of B-25Gs that have these bulged windows. Now I'm sure that I will be flooded by letters and images showing the bulged windows!
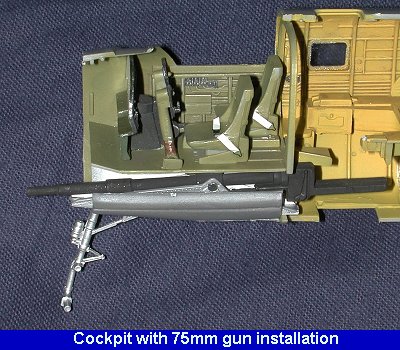
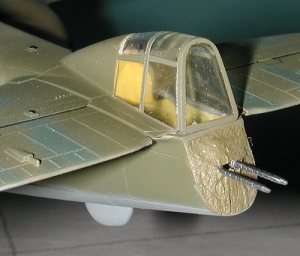
I then returned to the interior. It seems like I have all the bits ready to go and so I started gluing in assemblies. The instructions state that the bomb bay section must go in first to allow the cockpit to fit properly. I did so. Then the cockpit section was glued in place. It just didn't want to fit well. The 75mm gun kept getting in the way. It was to my embarrassment that I realized that I had installed the gun upside down. A bit of cursing and prying finally got the gun turned around and everything fit well. You will also have to glue the nose gear in at this time. There is just no way to install it after the fuselage halves are glued together. AM provides a paper painting mask for the nose gear which is quite thoughtful.
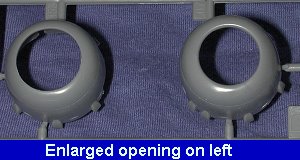
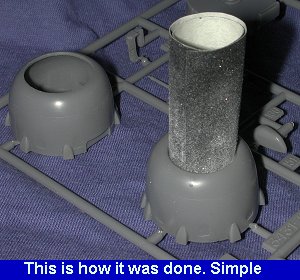 About this time I read a number of articles and comments from
newsgroups concerning the kit. Amongst the more lengthy lists of what was wrong
with it (it seems some people will complain about every little detail), it seems
that there were rather vociferous damning of the engine cowlings. Frankly, they
look a bit small to me as well. Apparently AM got the opening diameter wrong and
they should be larger. Rather than spend the money on an expensive resin
replacement, I just got a nice piece of 180 sand paper, rolled it up, stuck it
in the cowling and twisted it around a few times. In no time at all, larger
cowling openings! Really couldn't be simpler and a much preferable option than
spending more money on what is already a rather expensive undertaking. Just to
add to all this, it seems that the G model had armor plating around the seats as
well as in the back. You will need to add that yourself if you so desire.
About this time I read a number of articles and comments from
newsgroups concerning the kit. Amongst the more lengthy lists of what was wrong
with it (it seems some people will complain about every little detail), it seems
that there were rather vociferous damning of the engine cowlings. Frankly, they
look a bit small to me as well. Apparently AM got the opening diameter wrong and
they should be larger. Rather than spend the money on an expensive resin
replacement, I just got a nice piece of 180 sand paper, rolled it up, stuck it
in the cowling and twisted it around a few times. In no time at all, larger
cowling openings! Really couldn't be simpler and a much preferable option than
spending more money on what is already a rather expensive undertaking. Just to
add to all this, it seems that the G model had armor plating around the seats as
well as in the back. You will need to add that yourself if you so desire.
Returning back to the fuselage, the nose compartment was painted as were the various bits. One interesting note is that a lot of photos of the B-25G show that there are four 50 cal machine guns. Yet there are others that show only two as is given in the kit. I would imagine that one of these options is a field modification of some sort.
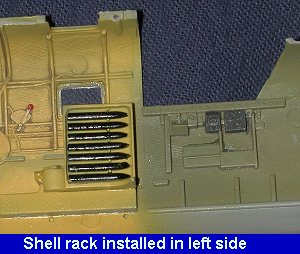 Anyway,
construction had gone far enough to start to dry fit the bits and pieces into
the fuselage and then see how things fit. Another modification for the G is to
install a rack for the 75mm shells. The gun itself is hand loaded so there needs
to be a place to fit the shells. This goes on the left side of the fuselage.
When fitting the fuselage halves with the various interior assemblies in it, I found they wouldn't
fit. The problem is the shell rack. It juts out into a space already taken up by
some other 'stuff' in the interior that is mounted on the bomb bay assembly. The
instructions don't seem to mention this. There are two possibilities. One that I
have the rack mounted in the wrong place, but it doesn't seem to want to fit
anywhere else. Two is that I have to remove a piece and that isn't mentioned in
the instructions. What I ended up doing was removing a small section from the
bomb bay assembly in order to have it clear the shell rack. Took about a minute.
Hope it wasn't anything too important!
Anyway,
construction had gone far enough to start to dry fit the bits and pieces into
the fuselage and then see how things fit. Another modification for the G is to
install a rack for the 75mm shells. The gun itself is hand loaded so there needs
to be a place to fit the shells. This goes on the left side of the fuselage.
When fitting the fuselage halves with the various interior assemblies in it, I found they wouldn't
fit. The problem is the shell rack. It juts out into a space already taken up by
some other 'stuff' in the interior that is mounted on the bomb bay assembly. The
instructions don't seem to mention this. There are two possibilities. One that I
have the rack mounted in the wrong place, but it doesn't seem to want to fit
anywhere else. Two is that I have to remove a piece and that isn't mentioned in
the instructions. What I ended up doing was removing a small section from the
bomb bay assembly in order to have it clear the shell rack. Took about a minute.
Hope it wasn't anything too important!
Test fitting continued and it looks as if all will fit just ok, though it may require some additional fiddling and probably some filler. One thing that I don't see is where to put the nose weight. AM went through great lengths to provide nice brass weights for the B model, but those fit in the B nose and there isn't room in the G for them.
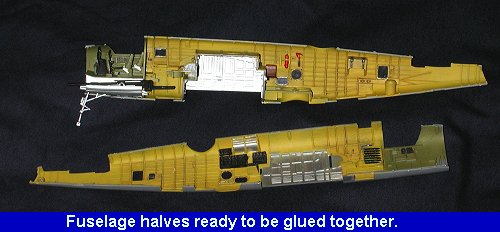 Once the
interior is complete, there is nothing left but to say goodbye to most of the
interior detailing as you won't see it again, and to glue the fuselage halves
together. The fit of the fuselage halves wasn't the best and I needed some
filler on the fuselage seam. There are also a few sink marks near the alignment
pins.
Once the
interior is complete, there is nothing left but to say goodbye to most of the
interior detailing as you won't see it again, and to glue the fuselage halves
together. The fit of the fuselage halves wasn't the best and I needed some
filler on the fuselage seam. There are also a few sink marks near the alignment
pins.
I tried to put in the upper turret before gluing the halves together, but had problems with the turret. I just couldn't get the clear part to fit properly and the guns kept breaking loose from their mount (remember, they broke during installation and so had to be glued). I ended up leaving the turret off and will deal with it later in the final construction steps.
 Once the fuselage was glued together and
puttied fairly well, I attached the horizontal stabilizer. This fit very well.
Then it was on to the nose. Here I had problems. First of all, the brass weights
are for the longer nose and so most of them are unusable for the G model. I was
able to use the ones behind the instrument panel without any trouble so that was
helpful.
Once the fuselage was glued together and
puttied fairly well, I attached the horizontal stabilizer. This fit very well.
Then it was on to the nose. Here I had problems. First of all, the brass weights
are for the longer nose and so most of them are unusable for the G model. I was
able to use the ones behind the instrument panel without any trouble so that was
helpful.
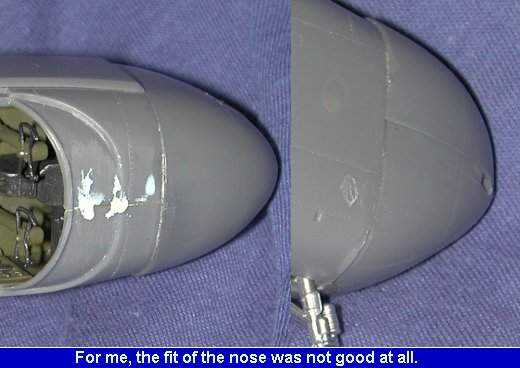
Then it was time to fit the new nose. Bad news here, folks as it just wasn't a good fit. In fact, I ended up aligning everything to the left fuselage side so I wouldn't have to do any filler work around the add on armor plating. This left a lot of stuff sticking out on the top and right side that will have to be filed smooth and then filled. Story of my life, I guess. There was also the problem of nose weight. Since it was obvious that I wouldn't be able to have the upper gun bay open, I removed the nose guns and filled that space with lead weight. Then the upper nose section was glued on. As you can see from the image, I have my work cut out for me on this one.
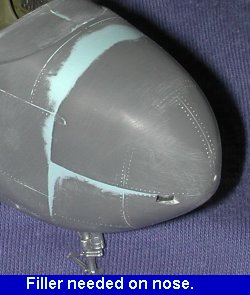 Biting
the bullet on this one, I grabbed my files and filler and went to it. It took
several coats of filler to finally get things smoothed out. Of course, in the
process, I wiped out most of the nice detail in that area. This was looking more
and more like, 'one of those kits', where I have tons of trouble, end up with a
nice looking model and then put it in with the collection where it never sees
the light of day!
Biting
the bullet on this one, I grabbed my files and filler and went to it. It took
several coats of filler to finally get things smoothed out. Of course, in the
process, I wiped out most of the nice detail in that area. This was looking more
and more like, 'one of those kits', where I have tons of trouble, end up with a
nice looking model and then put it in with the collection where it never sees
the light of day!
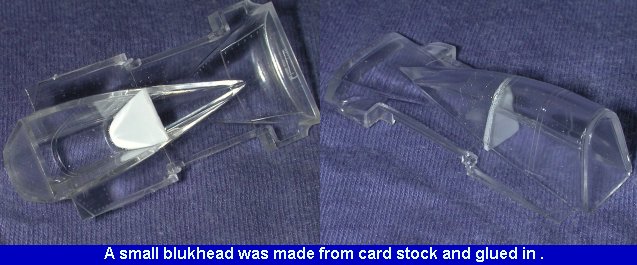
While
all that stuff was drying on the nose, I went to the other end of the kit. The
lack of info on the rear gunners position had me stymied. One thing was certain,
I had to do something about the rear transparency. Even with the back of it
painted, one would easily be able to see the bare, naked glue attachment join
for the horizontal stabilizer. Something had to be done. What was done was that
I made a small bulkhead out of plastic card and glued it just where the windows
stop. This will effectively hide that nasty mess back there! Took about five
minutes.
Once all the hatches
were secured, it was time to do some work on the front of the plane. This was
involving the engines and cowlings. The engine cylinders were glued onto the
mounting points minus the crankcases. Then the individual exhaust stacks were
cut from the sprues and glued onto the engine cowlings. This really was a no
brainer and pretty easy to do. The result looks quite good. Then the cowlings
were tacked on using white glue.
Once the clear bits were
masked, the bomb bay and other holes were stuffed with tissue. This included the
engine cowlings. By leaving off the crankcase part, it is much easier to fill
with tissue. It was now time to head to the paint shop for the first coat of
paint.
 Next, the wings were attached. These fit very well
indeed with no hassles at all. I did them one at a time and gave them plenty of
time to dry. Once the wings were dry and the nose smoothed out, I paid attention to the engines. These were painted black and given a silver dry
brushing. The block and gear housing was painted a dark grey and the wiring
harness painted according to the kit instructions.
Next, the wings were attached. These fit very well
indeed with no hassles at all. I did them one at a time and gave them plenty of
time to dry. Once the wings were dry and the nose smoothed out, I paid attention to the engines. These were painted black and given a silver dry
brushing. The block and gear housing was painted a dark grey and the wiring
harness painted according to the kit instructions.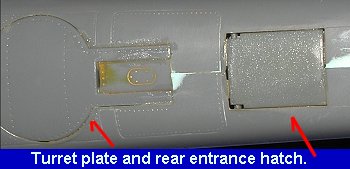 Meanwhile, back at the rest of the kit,
the engine intakes and cowl flaps (which are what the engines are glued onto)
were attached to the nacelles. The fit was fair, but needed filler with the
intake bits not fitting as well as I would have hoped. At this time, the
decision was made to have the fore and aft access ladders in the up position.
This was mainly because of the ejector pin marks that would be impossible to
remove and because it looked a bit cleaner. The turret blanking plate was also
installed at this time. Fit is not bad. If you are going to install the turret
plate and the hatches in the closed position, it needs to be done before the
area is totally sealed off. I had to insert the hatches from the inside in order
to get them to fit properly. I also needed to hold them in place with a paint
brush handle while I glued them in.
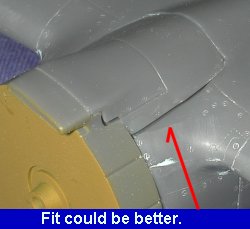
Meanwhile, back at the rest of the kit,
the engine intakes and cowl flaps (which are what the engines are glued onto)
were attached to the nacelles. The fit was fair, but needed filler with the
intake bits not fitting as well as I would have hoped. At this time, the
decision was made to have the fore and aft access ladders in the up position.
This was mainly because of the ejector pin marks that would be impossible to
remove and because it looked a bit cleaner. The turret blanking plate was also
installed at this time. Fit is not bad. If you are going to install the turret
plate and the hatches in the closed position, it needs to be done before the
area is totally sealed off. I had to insert the hatches from the inside in order
to get them to fit properly. I also needed to hold them in place with a paint
brush handle while I glued them in. 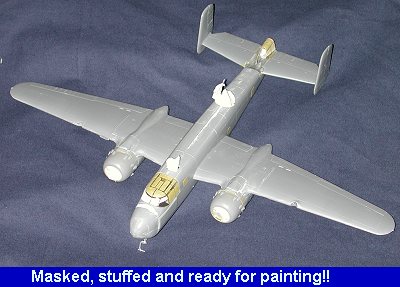 Things were coming
together well and the final major airframe bits to be added were the tails and
tail plane. Fit here was very good. The next step was to do a bunch of masking.
The kit includes some precut masks but they are really too large. Since I was
going to have to trim the masks anyway, I resorted to Tamiya tape to do most of
the masking. A bit of a note on the cockpit canopy. You need to use the one that
includes the armor plating on the pilot's windscreen. This means that you don't
use the one for the B-25B. Take a look at the canopies on the sprues and you'll
see which one I mean. It is part #108.
Things were coming
together well and the final major airframe bits to be added were the tails and
tail plane. Fit here was very good. The next step was to do a bunch of masking.
The kit includes some precut masks but they are really too large. Since I was
going to have to trim the masks anyway, I resorted to Tamiya tape to do most of
the masking. A bit of a note on the cockpit canopy. You need to use the one that
includes the armor plating on the pilot's windscreen. This means that you don't
use the one for the B-25B. Take a look at the canopies on the sprues and you'll
see which one I mean. It is part #108.
|
PAINT & DECALS |
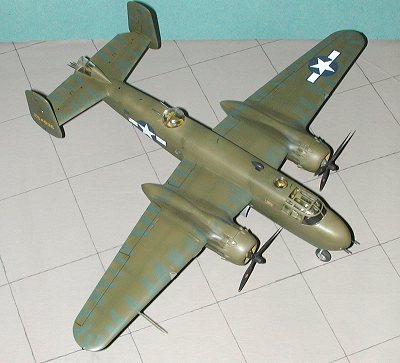 Well, painting was a rather non-event. The first thing done was to paint the
underside in Neutral Grey. This was done using Aeromaster enamels. When dry, the
upper surfaces were painted with Olive Drab, also an Aeromaster enamel. Next the
demarkation lines between the two colors were masked and given a hard edge. Once
dry, I used the Neutral Grey and lightly went over the hard demarcation lines to
give it a more freehanded look. This may sound like an odd way of doing it, and
why not just freehand it in the first place. Well, for me, it was much easier to
have a guide and the results are pleasing. Then the wing and tail blotches were
done in Medium Green, again using Aeromaster enamels.
Well, painting was a rather non-event. The first thing done was to paint the
underside in Neutral Grey. This was done using Aeromaster enamels. When dry, the
upper surfaces were painted with Olive Drab, also an Aeromaster enamel. Next the
demarkation lines between the two colors were masked and given a hard edge. Once
dry, I used the Neutral Grey and lightly went over the hard demarcation lines to
give it a more freehanded look. This may sound like an odd way of doing it, and
why not just freehand it in the first place. Well, for me, it was much easier to
have a guide and the results are pleasing. Then the wing and tail blotches were
done in Medium Green, again using Aeromaster enamels.
Next the kit was given several coats of acrylic clear gloss in preparation for the decals. Accurate Miniatures must have gotten a new decal maker. These decals are very similar to those done by Propagteam. They are beautifully done, opaque, and thin as tissue. In fact, for me, they were too thin. I managed to tear every one of the insignia at least once. I also had problems moving them once they were placed and as a result, was unable to get them all as square on as I would have liked. This was in spite of flooding the area to receive the decal with both water and Microscale setting solution. Such were the problems I was having with the decals, that in frustration, I stopped work on the kit and it sat for nearly two months.
Finally getting back to the kit, I suffered through the rest of the decals, tearing a number of them again, but finally getting them on.|
CONSTRUCTION CONTINUES |
 Then it was back to normal building. During all the handling, I had,
unfortunately, pushed in a couple of the rear windows. It proved impossible to
reinstall so I left off doing something about the opening until the very last
step. Meanwhile, the forward sections of the engines were painted and all
the tissue removed from the various places. The cowlings were popped off (they
were only temporarily attached) and the prop shaft and crankcase were glued in
place. Here I ran into another glitch. Though I thought I had the engine
cylinders installed properly (there is a notch to ensure this), they ended up
being shifted about 5 degrees to the left on both sides. This means that the
crankcase doesn't line up in the vertical. Take this to heart and completely
build the engines before gluing them to the backing plates!
Then it was back to normal building. During all the handling, I had,
unfortunately, pushed in a couple of the rear windows. It proved impossible to
reinstall so I left off doing something about the opening until the very last
step. Meanwhile, the forward sections of the engines were painted and all
the tissue removed from the various places. The cowlings were popped off (they
were only temporarily attached) and the prop shaft and crankcase were glued in
place. Here I ran into another glitch. Though I thought I had the engine
cylinders installed properly (there is a notch to ensure this), they ended up
being shifted about 5 degrees to the left on both sides. This means that the
crankcase doesn't line up in the vertical. Take this to heart and completely
build the engines before gluing them to the backing plates!
 The
cowlings were glued back in place and the props were pushed onto the shafts.
Only some fiddly bits to add now. Turning to the back of the plane, I glued in
the tail guns. A 'canvas' cover was made from tissue soaked in thinned white
glue and painted OD when dry. Looks convincing enough. Then the DF loop was
installed. The nose guns were cut off of the gun/box assembly and glued into the
slots in the nose (if you recall, I needed to fill the nose with weight to keep
the kit from tailsitting so glued the nose shut). The pitot tube was glued onto
the wing. Looking at the photo at the top of the page, I needed two more
antennas installed. The addendum page in the conversion set says nothing about
these. The holes were drilled and the antennas installed. Final thing were the
covers to the landing lights and these were glued in after the last touchup with
paint and the matte clear coat sprayed on.
The
cowlings were glued back in place and the props were pushed onto the shafts.
Only some fiddly bits to add now. Turning to the back of the plane, I glued in
the tail guns. A 'canvas' cover was made from tissue soaked in thinned white
glue and painted OD when dry. Looks convincing enough. Then the DF loop was
installed. The nose guns were cut off of the gun/box assembly and glued into the
slots in the nose (if you recall, I needed to fill the nose with weight to keep
the kit from tailsitting so glued the nose shut). The pitot tube was glued onto
the wing. Looking at the photo at the top of the page, I needed two more
antennas installed. The addendum page in the conversion set says nothing about
these. The holes were drilled and the antennas installed. Final thing were the
covers to the landing lights and these were glued in after the last touchup with
paint and the matte clear coat sprayed on.
Now to the final bits. First, all the masking was removed from the various clear parts. The kit supplied bits I used were the most difficult to remove, but also fit the tightest. I had a bit of bleed through on the upper eyebrow parts. That was removed with a sharpened toothpick. I also used Micromask to fill in the missing window in the back as there was no way I could get the darn thing back in.
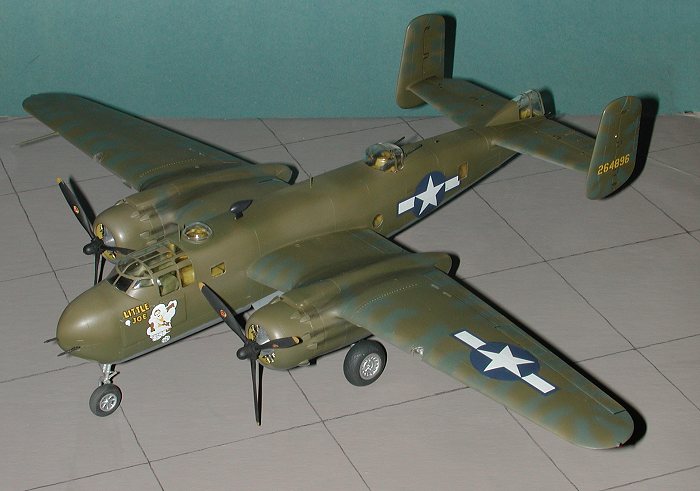
The exhaust stains were added by using pastels. When done, those were fixed in place with a quick spray of clear matte. Then the wingtip, tail, and formation lights were painted using various colors of clear and white. That was it! Another B-25 to add to the collection!
|
CONCLUSIONS |
 Final note: I found a lot of problems with the instructions for
the B-25G conversion. These instructions are geared to those who have the
B-25C/D kit. Like many of you, I used the B-25B as a basis for the conversion.
Hence the instructions left out a lot of things that need to be changed. Why the
instructions didn't assume that there would be those of us using the B model is
a mystery. Maybe it is just me, but I found the kit a bit more trouble
than I would have supposed. True, there are a LOT more pieces than in the other
AM kits I have built and it is one that does require precise construction.
Perhaps this increased precision worked against me. I will definitely build
several more AM Mitchells over the next few years, but not for a while, yet!
Final note: I found a lot of problems with the instructions for
the B-25G conversion. These instructions are geared to those who have the
B-25C/D kit. Like many of you, I used the B-25B as a basis for the conversion.
Hence the instructions left out a lot of things that need to be changed. Why the
instructions didn't assume that there would be those of us using the B model is
a mystery. Maybe it is just me, but I found the kit a bit more trouble
than I would have supposed. True, there are a LOT more pieces than in the other
AM kits I have built and it is one that does require precise construction.
Perhaps this increased precision worked against me. I will definitely build
several more AM Mitchells over the next few years, but not for a while, yet!
In the three months that it has taken me to build this kit, Accurate Miniatures has published a fix for the instructions and posted it on their website. I heartily encourage all who are using the B-25B as a basis for this conversion to go to http://www.accurateminiatures.com and copy that page. It will save you a lot of frustration. (Late note 2011: As most of you know, Accurate Miniatures has gone bust for the second time so the link will probably not work. However, if you use Google, you may well be able to find the article as many AM articles have been saved by kind modelers.
|
REFERENCES |
Deadly Duo: the B-25 and B-26 in World War II by Charles
A. Mendenhall, Specialty Press, 1981
Aero Pictorials 2: U.S. Army Air Forces in the Pacific by
Rene J. Francillon, Aero Publishers, 1969.
January, 2001
Copyright ModelingMadness.com. All rights reserved.
Review kit and conversion courtesy of me and my wallet!
For a look at the dedicated B-25G kit released in 2003, visit this review.
If you would like your product reviewed fairly and fairly quickly, please contact the editor or see other details in the Note to Contributors.