Matchbox 1/72 Brewster Buffalo
Kit Number: PK 24
Price: $3.00
Decals: Two Versions; one Dutch NEIAF, one British
The Brewster Buffalo is one of those aircraft that seems to have been truly wanted by no one. It was the US Navy's first monoplane fighter and served to pave the way for the more capable Wildcat. It was sold overseas at the beginning of WWII to the British , Dutch, and the Finns, mostly because they were desperate for aircraft and would take anything. The only ones to gain any true success with the aircraft were the Finns, who had several pilots become aces flying against the Russians in the early 1940s. The US, British, and Dutch experience with the aircraft against the Japanese is one of an obsolete aircraft being torn to bits by the superior Japanese aircraft. The US used them at the Battle of Midway in June, 1942 and lost almost all of them. The British experience in Burma and Singapore was similar. The Dutch managed to keep a few of them flying for a few months before they were all destroyed in their defense of Java. The only Buffalo left is a Finnish-manufactured one in a museum in Finland.
On to the kit. For those of you reading this, you are probably wondering why a Matchbox kit? Indeed, I asked myself that same question about halfway through construction. The main reason is that I had one. It also depicts (rather vaguely) the export version and not the F2A US Navy version of Airfix and Revell. Now that Hasegawa has come out with one that is truly superb, these other kits will probably never get built, although they are a third the price of th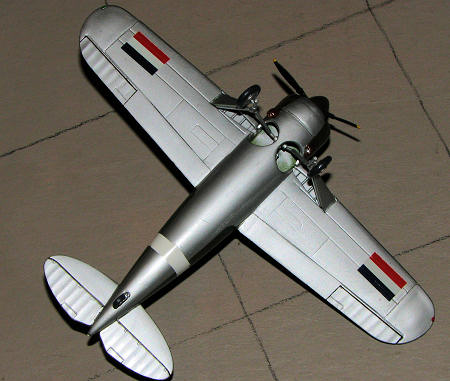 e Hasegawa kit. Besides, there is some unwritten law that states that when I nearly complete a crude kit, a superior version is released.
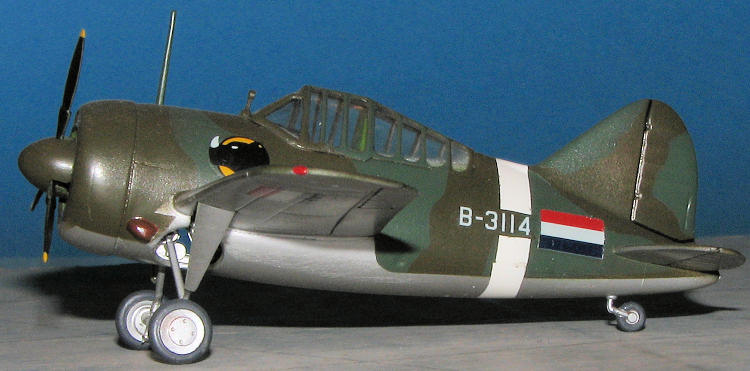
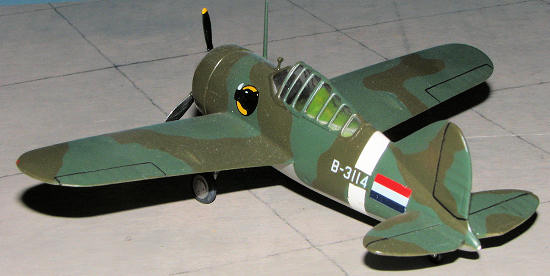
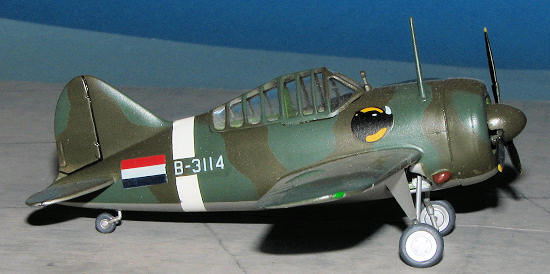
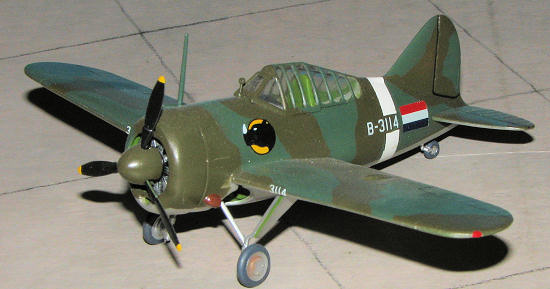
The Matchbox kit is all you would expect of Matchbox. It has colorful plastic (green and brown), terrible decals, it is made in China (!), and it has a lot of sinkholes on the wing and fuselage. Rather than bore you with the sordid details of construction, I recommend you read the blow by blow at the bottom of the page for that information. Needless to say the kit is a great deal of work for so few pieces. Having said that and having finished it, it doesn't look too bad if you can overlook the minimal interior and landing gear so scale that it is terribly flimsy. I basically built the kit to use a set of Tally-Ho decals. This set is for Dutch Netherlands East Indies (NEI) aircraft that replaced the orange triangle insignia with Dutch flags in Feb, 1942. The instructions for the decals are worth the price of the decals themselves. One thing I might have messed up on is the placement of the green and OD colors. The instructions just showed light and dark, not depicting which was which. Mine might be reversed, although it doesn't look bad, just a bit odd.
Interestingly enough, the Tally Ho sheet says the colors are not typical European colors, but are Olive Drab, dark green (FS34092) on top with silver undersides (!) This made for a very interesting kit indeed as the top colors are quite dark and have a kind of RAAF look. Anyway, I used Metallizer for the undersides and Gunze colors on top. Once the model was coated with Future, it dulled the Metallizer to look like aluminum paint. The decals are very similar to Modeldecal in all respects except one. I cut one of the decals carrier film off and it caused the edges of the decal to feather and split. Not a nice thing to happen. I left all the carrier on the others and had no additional problems. The scheme I chose is an aircraft with a Javan rhino insignia and the overall kit turned out OK.
If you are looking for a slap together kit for your five year-old, this is for you. Otherwise, the amount of putty work required for such a mediocre kit might put you off.
Matchbox #PK24 1/72 Buffalo
1 Dec '96
 This kit was picked up for a quick build and to use a set of Netherlands East
Indies decals from Tally Ho (and this is the original Tally Ho in Canada, not
the later one in the Czech Republic). This is one of the Matchbox kits with a few
trenches, but mostly some raised detail. I have built this kit a number of
times and find the weak link to be the undercarriage. The stage that was
reached before I stopped building was to have applied the second coat of putty.
This is all before assembling anything as there were massive sink marks on
the fuselage and wings. I attribute this to being molded in China and having the
plastic removed from the molds before they had completely cooled. I am
still looking for an aftermarket brass set and canopy for this kit. While it is
not the preferred kit (The Revell one is), it should make a nice replica.
This kit was picked up for a quick build and to use a set of Netherlands East
Indies decals from Tally Ho (and this is the original Tally Ho in Canada, not
the later one in the Czech Republic). This is one of the Matchbox kits with a few
trenches, but mostly some raised detail. I have built this kit a number of
times and find the weak link to be the undercarriage. The stage that was
reached before I stopped building was to have applied the second coat of putty.
This is all before assembling anything as there were massive sink marks on
the fuselage and wings. I attribute this to being molded in China and having the
plastic removed from the molds before they had completely cooled. I am
still looking for an aftermarket brass set and canopy for this kit. While it is
not the preferred kit (The Revell one is), it should make a nice replica.
7 Dec '96
No additional work
14 Dec '96
I have decided to do some work on this just to get it built and on the shelf. I assembled the interior and fuselage sides and applied several more putty coats to fill in the numerous sink marks. The engine cowling was assembled and attached to the fuselage, again requiring several applications of putty to fill sink marks and to get a smooth fit. Finally this week, I have attached the wings and horizontal stabilizers. The stabilizers fit with no problem, but the wings were too narrow for the slots in which they fit so (you guessed it), several applications of putty have been made to smooth out this area. In addition, I realized why it had been so long since I made a Matchbox Buffalo. The landing gear are quite fragile as I broke one removing it from the tree, and I also broke a propeller blade removing the prop from the tree. AARGH!
 21 Dec 96
The airframe is basically complete. I have attached the canopy and masked it using Scotch tape. All the puttying is done and now it awaits its initial paint which, after primer, will be white for the fuselage band. Frankly, I am getting pretty fed up with all the work and to add salt to the wound, I have heard that Hasegawa has come out with a Buffalo. Naturally, I will buy one or more as it must be the best on the market. I have built all the others (including Revell and Airfix), and each has some inaccuracies (according to the experts). Hopefully it will be almost finished by next report.
28 Dec '96
All I have done is paint the white fuselage band and paint the landing gear aluminum. It is on hold until a few of the other kits get finished.
4 Jan '97
This week, I was determined to make inroads on this kit. What I did was paint it. The underside (according to the Tally-Ho Decals) is silver with OD and medium green upper surfaces. The silver is Metallizer (which looks like silver lacquer when coated with Future), and the upper pattern is Gunze. I used the guide in the instructions, but the results look a little odd. It is possible that I have reversed the colors, but it looks "Aussie" enough to pass (besides it is a Matchbox kit and soon to be supplanted by a superior Hasegawa effort at nearly four times the price!!).
Next is adding landing gear and decals--stay tuned.]
10 Jan, '97
 Whoopee, it is finished. Actually it wasn't that much of a problem to
get it done. After painting it, I attached the scale, but flimsy landing
gear and then applied the decals. The Tally Ho decals are really very
nice, however, on this batch I found out that trimming all the clear can lead to
problems. On the first decal I trimmed, I found the edges feathering and
flaking off. Bad News!! On the others, I left the carrier on the
decals and had no problems. These decals are like Modeldecals so reacted
well to Solvaset. After all the decals were dry, I added all the final
pieces (antennas, propeller) semi-gloss coated the aircraft and let that dry.
I then pulled off the tape from the canopy and Presto! and aircraft which
very closely resembles a Buffalo. It isn't contest quality, but it looks
very nice on my shelf and is in a set of markings I have never used before.
To go into a little detail on the decals, the Dutch in the East Indies
used an Orange triangle marking until Feb, 1942. At that time they
switched to insignia that look like the Dutch Flag; rectangles of red,
white and blue. These are the marking I used on this kit. It also
included a squadron badge of a Javan rhino that is very nice. The white is
a bit transparent, but nothing major. It will be a long time until I build
another Matchbox Buffalo. Considering the time elapsed since I built the
last one, we are looking at about 19 years!
Whoopee, it is finished. Actually it wasn't that much of a problem to
get it done. After painting it, I attached the scale, but flimsy landing
gear and then applied the decals. The Tally Ho decals are really very
nice, however, on this batch I found out that trimming all the clear can lead to
problems. On the first decal I trimmed, I found the edges feathering and
flaking off. Bad News!! On the others, I left the carrier on the
decals and had no problems. These decals are like Modeldecals so reacted
well to Solvaset. After all the decals were dry, I added all the final
pieces (antennas, propeller) semi-gloss coated the aircraft and let that dry.
I then pulled off the tape from the canopy and Presto! and aircraft which
very closely resembles a Buffalo. It isn't contest quality, but it looks
very nice on my shelf and is in a set of markings I have never used before.
To go into a little detail on the decals, the Dutch in the East Indies
used an Orange triangle marking until Feb, 1942. At that time they
switched to insignia that look like the Dutch Flag; rectangles of red,
white and blue. These are the marking I used on this kit. It also
included a squadron badge of a Javan rhino that is very nice. The white is
a bit transparent, but nothing major. It will be a long time until I build
another Matchbox Buffalo. Considering the time elapsed since I built the
last one, we are looking at about 19 years!
Now for the fun part. What to build next?
10 Jan, 1997
Copyright ModelingMadness.com. All rights reserved.
Back to Reviews Page 2020