 Arii/Otaki 1/48 F4U-1A Corsair
Arii/Otaki 1/48 F4U-1A Corsair
Kit Number: 336
Price: $13.98
Media: Injected Plastic
Decals : Two versions: One USN, one RN
Date of Review: 1 May, 1996
Comments: The F4U Corsair has been a favorite of WWII USN modelers for as long as kits have been around. I have built several 1/48 versions including Monogram's old F4U-4 with all the operating bits and Hasegawa's superb F4U-4 of about fifteen years ago. For some reason, I had never considered the Otaki kit of the Corsair as I had built their Mustang and was not really all that impressed. Foolish me. The Otaki Corsair is probably one of the best -1s around, in spite of being well over 20 years old.
What makes it such a good kit? Well, first of all, all the panel lines are finely engraved and match from side to side when the parts are put together. Secondly, it has very good and deep wheel wells that look like the gear will fit inside it. It is also a very tight fit. I used almost no putty on the model during its building. It has a well detailed cockpit with a good seat, control stick and instrument panel. The fabric representation on the control surfaces and outer wing panels is also first-rate. There are a few areas that could use improvement, but remember, this is an over 20 year old kit!
 The gear wells are not fully boxed in; the engine isn't bad, but is only a half row and could use a replacement in resin; the canopy is one piece and my copy had a dimple at the top; the tire/wheel assembly is a bit
toy-like and the tire has no tread; finally, there is no sidewall detail in the cockpit. All of these areas are easily fixed with a few aftermarket parts and you will get a superb Corsair replica.
The gear wells are not fully boxed in; the engine isn't bad, but is only a half row and could use a replacement in resin; the canopy is one piece and my copy had a dimple at the top; the tire/wheel assembly is a bit
toy-like and the tire has no tread; finally, there is no sidewall detail in the cockpit. All of these areas are easily fixed with a few aftermarket parts and you will get a superb Corsair replica.
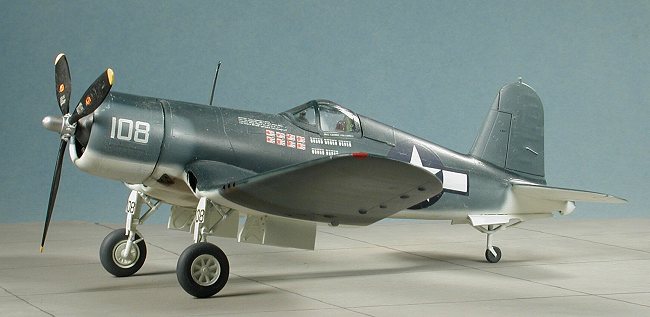
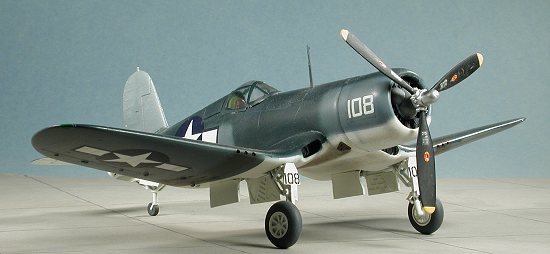
I like to build many of my kits straight from the box with only a decal change and that is how I built this one. The interior was built up and painted zinc chromate green. That was then trapped in the fuselage along with the engine and the tail wheel assembly. While that was drying, I assembled the wings. This was helped by the fact that the lower wing was in one piece so I had no trouble getting them straight. The trailing edge of the flap does not have the step cut into it so you need to do so if you are so inclined. Assembling the wing to fuselage required just a touch of putty at the front, the back forming a natural panel line. The horizontal stabilizers were then glued on and when dry, the entire airframe was lightly sanded with old 600 grit paper to get rid of any molding oils that would mess up painting. After final detailing of the cockpit, I cemented the canopy in place and masked it. A quick word on wheel well colors. Almost all Navy aircraft of this time period did not use primer in the wheel wells. Since an aircraft was expected to have a short life-span, these areas and the gear were painted the same color as the surrounding underside. It was not until the late 1950s that white became the color of choice for naval aircraft wheel wells.
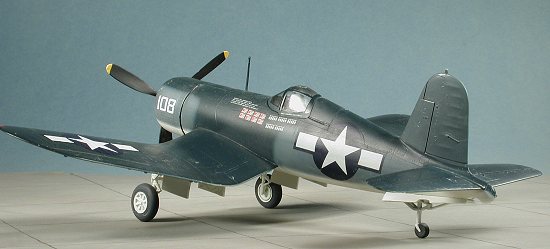 Since this was to be painted in the tri-colors of mid-war, I first painted the entire lower half of the airframe and the gear doors white. Once that was dry, the lower horizontal stabilizers and the inner lower wing panels were masked off to prevent overspray. Medium blue was then painted on the lower outer wing panels, tail and rudder, as well as the very front section of the engine cowling and the rear fuselage. After masking the tail/rudder area, the rest was painted dark blue on all the upper surfaces and the rest of the fuselage. There are a number of different ways the tri-color can be painted, but this one is typical of most Corsairs (see photo). After going back and forth several times with thinner and thinner paint, I got the blend between colors to look about right and set the entire kit aside to dry. One of the most difficult parts of freehand (no masks) painting of
camouflage is the need to keep going back and forth with the colors to fix inadvertent
oversprays.
Since this was to be painted in the tri-colors of mid-war, I first painted the entire lower half of the airframe and the gear doors white. Once that was dry, the lower horizontal stabilizers and the inner lower wing panels were masked off to prevent overspray. Medium blue was then painted on the lower outer wing panels, tail and rudder, as well as the very front section of the engine cowling and the rear fuselage. After masking the tail/rudder area, the rest was painted dark blue on all the upper surfaces and the rest of the fuselage. There are a number of different ways the tri-color can be painted, but this one is typical of most Corsairs (see photo). After going back and forth several times with thinner and thinner paint, I got the blend between colors to look about right and set the entire kit aside to dry. One of the most difficult parts of freehand (no masks) painting of
camouflage is the need to keep going back and forth with the colors to fix inadvertent
oversprays.
Once all the paint was dry (and I used a mixture of Gunze and Xtracolor), I drilled out the exhaust, painting it rust and then coated the entire model with Future floor wax. When that was dry I applied a set of decals from Superscale and then coated the entire aircraft with a clear flat. When dry it was time for the pastels for exhaust and gun stains. The addition of the antenna wire (something I often leave off because I'm lazy), and insertion of the propeller and I was done. (Dec 2001 update: In the time since I wrote this review, several parts have gone missing, including the antenna wire and aft antenna!)
I highly recommend this model to any Corsair enthusiast and it makes a good kit for a beginner as well.