Hasegawa 1/48 F6F-5 Hellcat
|
KIT # |
JT 35 |
|
PRICE: |
$31.98 |
|
DECALS: |
2 aircraft: VF-17 and VF32 circa 1945 |
|
REVIEW : |
|
|
NOTES: |
Dangerboy F6F wingfold set |
|
HISTORY |
 Just to put it all in a nutshell, the F6f was undoubtedly the
finest all-round American Naval fighter of WW2. Though not as fast as the
Corsair, it was ideal for its role at sea. It was fast enough to defeat it's
enemies, heavily armed with 6 .50 cal machine guns, easy to fly, easy to land
and it was a tough aircraft that could take a lot of damage.
Just to put it all in a nutshell, the F6f was undoubtedly the
finest all-round American Naval fighter of WW2. Though not as fast as the
Corsair, it was ideal for its role at sea. It was fast enough to defeat it's
enemies, heavily armed with 6 .50 cal machine guns, easy to fly, easy to land
and it was a tough aircraft that could take a lot of damage.
Designed in late 1941, some of the design was influenced by the A6Ms that were captured during the early months of the war, especially its excellent maneuverability. The Navy was so confident in the design that it was ordered into production before the prototype flew. The aircraft achieved the best kill ratio of any Naval fighter before or since at 19:1. Once the war was over, unlike the Corsair, the Hellcat was quickly removed from the inventory and scrapped in huge numbers. Today there are a few in museums and a few are still flying as warbirds.
|
THE KIT |
Dated 1996, this is one of Hasegawa's more recent vintage kits. Detailing is everything one would expect from a modern kit. Excellent engraved detailing, a complete cockpit with all the appropriate knobs and switches and a two piece canopy. If this is like the F6F-3, and it is, it will be difficult to display the cockpit open as the canopy is too thick to fit on the fuselage spine. Items that are with this kit that are not with the similar F6F-3 are rockets and the wing stubs for them. Should you wish, an F6F-3 can be made from all the parts in the kit, though you would be on your own for decals.
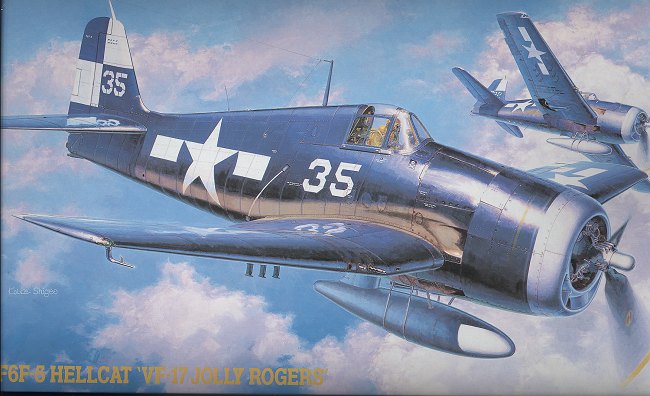
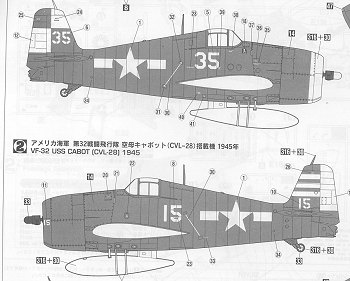 There are markings
for two aircraft, both of them in overall sea blue. One is from VF-17 aboard the
USS Hornet. It has a white cowling with the white checked tail and wing tip that
was part of the instant recognition marks so prominent in late 1944 and early
1945. The other is from VF-32 on the USS Cabot with a white rudder and three
stripes on the tail. All this is on the decal sheet, but white is notoriously
difficult to scan so here are the schemes from the instruction sheet.
There are markings
for two aircraft, both of them in overall sea blue. One is from VF-17 aboard the
USS Hornet. It has a white cowling with the white checked tail and wing tip that
was part of the instant recognition marks so prominent in late 1944 and early
1945. The other is from VF-32 on the USS Cabot with a white rudder and three
stripes on the tail. All this is on the decal sheet, but white is notoriously
difficult to scan so here are the schemes from the instruction sheet.
Speaking of which, the sheet is typical in that it gives an excellent and unambiguous depiction of the construction sequences, including color callouts. These colors are from the Gunze Sangyo range that we are all, by now, familiar.
Finally, I should mention, that this kit really is an F6F-3 as it sits in the box. To do a -5 one needs to fill in and rescribe a few panel lines as well as remove a few lumps.
Having built the -3 version a few years ago, I can tell you that this will be a very smooth build and leave you with an excellent example of one of the best from the Grumman 'Iron Works'.
|
CONSTRUCTION |
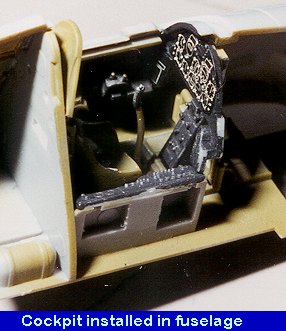 Like that kit of
several years ago, I started with the cockpit. This is quite complete, offering
separate side consoles as well as separate rudder pedals and other bits and
pieces. Compared to some German aircraft, the cockpit is actually quite
spacious. There are decals for the instrument panel which I used, though one of
them succumbed to the intensity of Champ setting solution. The interior bits
were painted US Interior Green from the Aeromaster line, while the panels were
painted flat black. The interior was then given a wash of dirty thinner and then
drybrushed with aluminum. Remembering that the canopy cannot be posed open means
that not a lot of extra work was done in the cockpit.
Like that kit of
several years ago, I started with the cockpit. This is quite complete, offering
separate side consoles as well as separate rudder pedals and other bits and
pieces. Compared to some German aircraft, the cockpit is actually quite
spacious. There are decals for the instrument panel which I used, though one of
them succumbed to the intensity of Champ setting solution. The interior bits
were painted US Interior Green from the Aeromaster line, while the panels were
painted flat black. The interior was then given a wash of dirty thinner and then
drybrushed with aluminum. Remembering that the canopy cannot be posed open means
that not a lot of extra work was done in the cockpit.
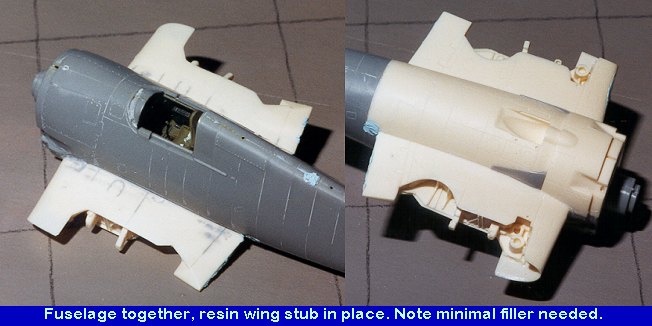
 At this time several other
subassemblies were done, mainly the horizontal tailplanes and drop tank. Since
this is to be a -5, some minor mods needed done. Specifically, the underside of
the cowling had to have panel lines filled and rescribed. Also the upper
fuselage had an anti-collision light base sanded off and the hole will be filled
when the fuselage halves are glued together. In addition, there is a panel on
the underside of the wing that is not on the F6F-5, though it is there for the
-3. This panel was filled with putty and sanded smooth. I didn't use superglue
as it would have taken more effort to sand off and I didn't want to sand too
much on the resin for fear of an air bubble pox appearing on the undersurface of
the wing. You can see the filled panel on the wing shown to the lower right.
At this time several other
subassemblies were done, mainly the horizontal tailplanes and drop tank. Since
this is to be a -5, some minor mods needed done. Specifically, the underside of
the cowling had to have panel lines filled and rescribed. Also the upper
fuselage had an anti-collision light base sanded off and the hole will be filled
when the fuselage halves are glued together. In addition, there is a panel on
the underside of the wing that is not on the F6F-5, though it is there for the
-3. This panel was filled with putty and sanded smooth. I didn't use superglue
as it would have taken more effort to sand off and I didn't want to sand too
much on the resin for fear of an air bubble pox appearing on the undersurface of
the wing. You can see the filled panel on the wing shown to the lower right.
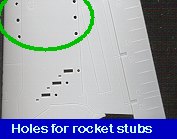
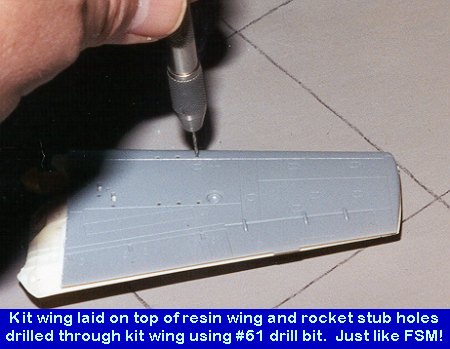 One other thing I wanted to do was to fit the rocket stubs to the kit.
Now this was going to be a bit difficult as there are no holes drilled in the
resin wings for this. However, I decided to use the kit wings as a template by
simply opening the holes in the kit wings, cutting off the wings, laying them
over the resin wings and drilling through the kit wings into the resin. You
can see the kit wing at the left. It was simply laid over the resin wing, held
tightly in place and the holes drilled. This was done without too much trauma
and the end result looks quite good, if I do say so myself. A note at this time
on the mounting holes already in the resin wings. Most of them, actually all of them, are
a bit too
shallow and need to be deepened and in a few cases enlarged with a drill bit.
Your other course of action is to trim down the injected plastic bits
themselves, and this was done a few times during assembly.
One other thing I wanted to do was to fit the rocket stubs to the kit.
Now this was going to be a bit difficult as there are no holes drilled in the
resin wings for this. However, I decided to use the kit wings as a template by
simply opening the holes in the kit wings, cutting off the wings, laying them
over the resin wings and drilling through the kit wings into the resin. You
can see the kit wing at the left. It was simply laid over the resin wing, held
tightly in place and the holes drilled. This was done without too much trauma
and the end result looks quite good, if I do say so myself. A note at this time
on the mounting holes already in the resin wings. Most of them, actually all of them, are
a bit too
shallow and need to be deepened and in a few cases enlarged with a drill bit.
Your other course of action is to trim down the injected plastic bits
themselves, and this was done a few times during assembly.
 The cockpit was then glued
into a fuselage half to assure a good fit and then the other fuselage half
glued. The hole in the spine was filled as per kit instructions. While that was
drying, the engine was painted flat black and dry-brushed with steel to bring
out details. Then the front housing parts were painted engine grey FS 16081, the
plastic retainer fit between the two housing parts and the housing glued to the
front of the engine. The engine was then set aside until later. Now that the
wings were taken care of, it was time to do some work on the fuselage itself.
The cockpit was then glued
into a fuselage half to assure a good fit and then the other fuselage half
glued. The hole in the spine was filled as per kit instructions. While that was
drying, the engine was painted flat black and dry-brushed with steel to bring
out details. Then the front housing parts were painted engine grey FS 16081, the
plastic retainer fit between the two housing parts and the housing glued to the
front of the engine. The engine was then set aside until later. Now that the
wings were taken care of, it was time to do some work on the fuselage itself.
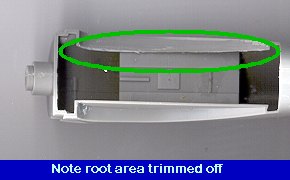 I found that the resin wing center section fit
very well, but not perfectly. Specifically, it wouldn't line up perfectly with
the kit fuselage and jutted out a bit to one side. Really, no big deal and
something that can be easily fixed by those used to working with resin. What I
needed was some more side to side slop. Two ways to get this: lots of sanding of
the resin piece, or cutting on the plastic fuselage. I chose the fuselage part.
There are two stops in the fuselage center section for the kit wings to butt up
against. I simply removed one of them to give me the needed play. Took all of
about two minutes. I simply scored the area with my hobby knife until it came
off and then scraped the area smooth. Now I had the play I needed and the part
fit quite well. There was a small gap at the root area and another area that
needed filled on the left rear section, but that was it.
I found that the resin wing center section fit
very well, but not perfectly. Specifically, it wouldn't line up perfectly with
the kit fuselage and jutted out a bit to one side. Really, no big deal and
something that can be easily fixed by those used to working with resin. What I
needed was some more side to side slop. Two ways to get this: lots of sanding of
the resin piece, or cutting on the plastic fuselage. I chose the fuselage part.
There are two stops in the fuselage center section for the kit wings to butt up
against. I simply removed one of them to give me the needed play. Took all of
about two minutes. I simply scored the area with my hobby knife until it came
off and then scraped the area smooth. Now I had the play I needed and the part
fit quite well. There was a small gap at the root area and another area that
needed filled on the left rear section, but that was it.
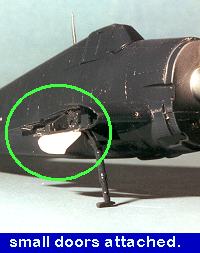
Once the resin section was firmly in place, it was time to start adding on the various plastic bits. I do this before painting as I like to glue as many bits onto a kit that will be the same color as possible. In this case, there were a few parts on the underside like some fairings peculiar to the -5 as well as an exhaust cover plate. There are also two catapult hooks that need glued in. I decided to glue in the landing gear, brace and two small upper doors at this time. Good thing too as it would have been a bit difficult to do a little later.

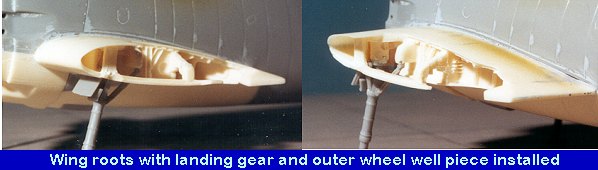
Next there are two small resin pieces that make up the outer section of the wheel well that need to be cut off the resin block and glued into place. These bits were the most difficult resin parts to do. While images of the final fit are nice, I wasn't too sure exactly how they went. It took a bit of fiddling around and some trimming to finally get them in place the way I think they should be. Had I waited to install the landing gear, I would have had to trim on the gear legs to get them to fit into the space left by the addition of the outer well resin bits.
Next, I glued in the tail wheel and the cockpit canopy sections. Those were then masked with Scotch tape. The radio mast was glued in and the kit was ready for the first trip to the paint shop.
|
PAINT & DECALS |
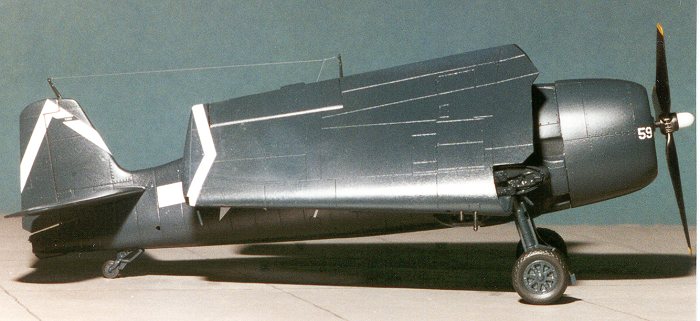
 As you know, this kit is going to be painted overall sea blue. I
like this color as you basically paint everything you see this color. No need to
sweat masking wheel wells or gear doors with this scheme. To provide that extra
bit of protection, everything was given this extra coat of paint. It was always
better to have an extra paint layer for corrosion to try to get through as
airframe corrosion maintenance at sea during war isn't quite as extensive as
during peace time, if at all!
As you know, this kit is going to be painted overall sea blue. I
like this color as you basically paint everything you see this color. No need to
sweat masking wheel wells or gear doors with this scheme. To provide that extra
bit of protection, everything was given this extra coat of paint. It was always
better to have an extra paint layer for corrosion to try to get through as
airframe corrosion maintenance at sea during war isn't quite as extensive as
during peace time, if at all!
Anyway, the kit bits were taken to the paint room and painted overall gloss sea blue using Aeromaster's enamels. Actually, I didn't completely paint the wings as I still had to mount the rocket stubs, but wanted to get a lot of the painting at least underway. With a kit like this, I didn't have to sweat painting it all at once and really wanted to get the fuselage done so it could be decaled. As usual, the Aeromaster paint went on smoothly and is really not ultra glossy, which is nice.
 Looking at the fuselage, I realized I still had one more piece
to glue on, and that is the access panel that drops down when the wings are
folded back. I wasn't sure how much this dropped down so I test fit one of the
wings. It needs to hang almost vertically or it will interfere with the folded
wing. Once that was in place, the rest of the fuselage was painted sea
blue.
Looking at the fuselage, I realized I still had one more piece
to glue on, and that is the access panel that drops down when the wings are
folded back. I wasn't sure how much this dropped down so I test fit one of the
wings. It needs to hang almost vertically or it will interfere with the folded
wing. Once that was in place, the rest of the fuselage was painted sea
blue.
Meanwhile, the wings had the rocket stubs, gun barrels and pitot tube attached. All the predrilled resin holes had to be enlarged with a #61 drill bit so the plastic pieces would fit well. Then the wings were taken to the paint shop and the remaining paint sprayed on.
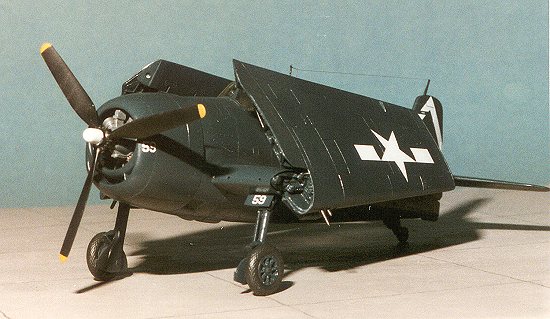
Then it was decaling time. This kit was going to represent an aircraft of VF-53 on the USS Saratoga. I used Aeromaster's sheet 'Tokyo Raiders' as it has a very nice selection of late war USN carrier aircraft. The decals are mostly white and went on with no problems. They are not totally opaque and so darken just a tiny bit when put on a very dark background like the gloss sea blue. Frankly, one has to choose between total opacity and decal thickness in this case and the tradeoff is acceptable. It is also fortunate that one doesn't have to put the underwing insignia on before the rocket stubs or I would have been in Hurt City!
|
CONSTRUCTION CONTINUES |
Once the decals had been applied and a clear coat put over them, the kit was treated to some pastels for exhaust. Then the kit was recoated again to seal in the pastels. Unfortunately, this additional clear coat caused the pastel work to disappear against the dark blue background! Another pastel job was done after the kit was completed. It was then time to add some of the final bits.
 First of all, the masking was taken off the canopy. During this,
I broke the radio antenna. When I glued it back on, the glue did a real number
on the paint surrounding the antenna. It shriveled up and dried like that. I
have only had this problem with Xtracolor gloss, so it appears that whatever
Aeromaster puts in its gloss is the same stuff Xtracolor uses! Once the antenna
was glued back and dry, the antenna itself was made from stretched sprue and
attached. I also drilled a hole in the fuselage side for the antenna lead as
shown on the box art.
First of all, the masking was taken off the canopy. During this,
I broke the radio antenna. When I glued it back on, the glue did a real number
on the paint surrounding the antenna. It shriveled up and dried like that. I
have only had this problem with Xtracolor gloss, so it appears that whatever
Aeromaster puts in its gloss is the same stuff Xtracolor uses! Once the antenna
was glued back and dry, the antenna itself was made from stretched sprue and
attached. I also drilled a hole in the fuselage side for the antenna lead as
shown on the box art.
I then added the tail hook which was put into its compartment in the tail section. It was then that I noticed that I had not drilled holes in the fuselage center section for the attachment of the drop tank. I don't mean the holes for the braces as those are on the resin piece, but the two holes for the mounting of the tank itself. I grabbed the drop tank that was painted several days ago, and had some of the paint come off on my hand. In frustration, I decided not to install the darn tank!!
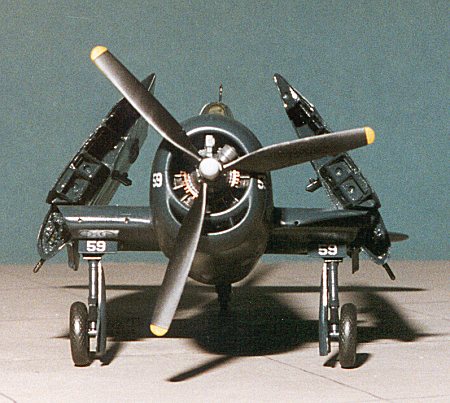
The prop was glued onto its plastic shaft and when dry pushed into the plastic retainer in the engine. Then it was time to attach the wings. I could easily have just press fit them in, but knowing my luck, one of them would have fallen out during handling so I put a drop of superglue on each one and slid it in place. A real no-brainer! It is a good thing that I didn't install the rockets on the stubs or they would not have cleared the wing center section.
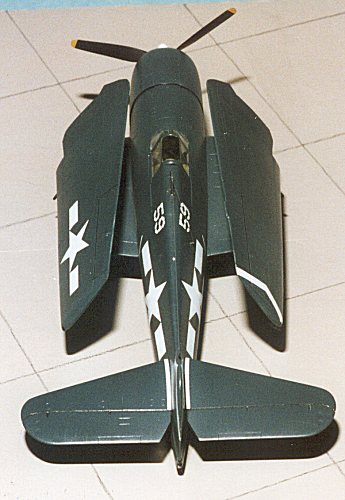
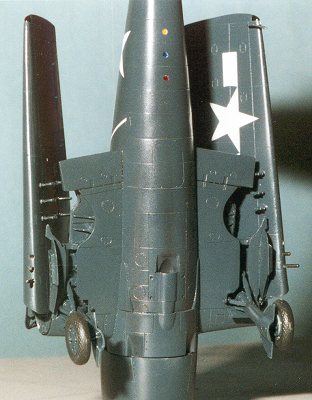
It was now that I realized that I hadn't put the ID lights on the bottom of the kit. There are three small transparencies; one painted red, one yellow and one green. These were painted with Gunze clears and simply pressed into place once dry. On the image above, you can see the underside lights, the rocket stubs and the fact that I missed the mounting holes on the lower fuselage!!
The final thing I did was to patch the mess at the base of the antenna as best I could, but with the closeness of decals, I just couldn't see any way to properly sand things down and repaint the area. I'll mark that down as the disaster of the kit. Every kit I build has at least one!
|
CONCLUSIONS |
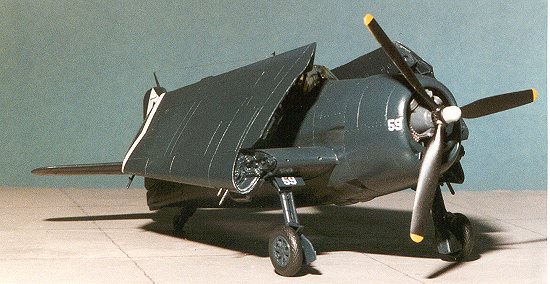
I had built the F6F-3 several years before, so knew that this was a painless kit to build. What really makes this one special is the Dangerboy Hobbies wing fold set. I don't do folded wings too often but this set is really super. I had almost no trouble with it at all and can unabashedly recommend this set to those wanting to undertake their first foray into the world of resin conversions.
May 2000
Copyright ModelingMadness.com. All rights reserved. No reproduction in part or in whole without express permission from the editor.
Review kit courtesy of me and my wallet! The resin conversion set is courtesy of Dangerboy Hobbies .
Nov 2004 update: Please note that Dangerboy is now out of business and their materials are no longer available.
If you would like your product reviewed fairly and quickly, please contact the editor or see other details in the Note to Contributors.
Back to Reviews Page 2022