ICM 1/48 P-51B Mustang
|
KIT # |
48122 |
|
PRICE: |
$25.00 |
|
DECALS: |
Two Aircraft |
|
REVIEW: |
|
|
NOTES: |
|
BACKGROUND |
For a look at the kit and what's in the box, please visit the preview.
|
CONSTRUCTION |
After much discussion and comparison, I'd say that this is basically a copy of the Tamiya 1/48 P-51B. The major differences are that there are no alignment pins, and a few other parts are slightly different from the Tamiya version. ICM also has more sink marks on it than I have seen in any Tamiya kit. This is undoubtedly spurred by the much softer plastic that ICM utilizes for its kits. One has to be quite careful not to spill or splash glue where it doesn't belong as it will rapidly melt whatever part of the kit it touches.
 Being based on the Tamiya kit, this means that the
general engineering of the kit is excellent. The first are to work on is the
interior. There is separate framework for the inside of the fuselage and this
was glued in place first. Then the floor, forward bulkhead and control stick
were glued together and when dry painted US interior green. The placement of the
forward bulkhead is not very exact and so it would behoove you to do much test
fitting before the glue dries. I also found that there was some interference
between the left side of the interior and floor assembly so had to do some
trimming to get it to properly fit. Though based on the Tamiya kit, it appears
that the fit isn't going to be as superlative as found on the Japanese product,
but we'll see how the rest of the build goes.
Being based on the Tamiya kit, this means that the
general engineering of the kit is excellent. The first are to work on is the
interior. There is separate framework for the inside of the fuselage and this
was glued in place first. Then the floor, forward bulkhead and control stick
were glued together and when dry painted US interior green. The placement of the
forward bulkhead is not very exact and so it would behoove you to do much test
fitting before the glue dries. I also found that there was some interference
between the left side of the interior and floor assembly so had to do some
trimming to get it to properly fit. Though based on the Tamiya kit, it appears
that the fit isn't going to be as superlative as found on the Japanese product,
but we'll see how the rest of the build goes.
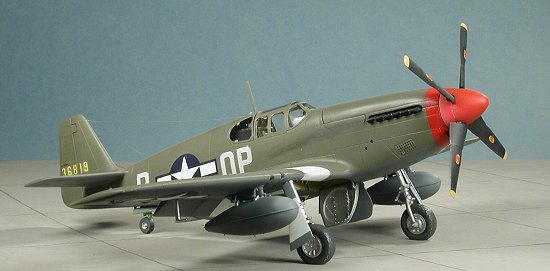
While the paint was drying on the interior parts, I assembled the wings. There is a small central wheel well section that gets glued in and there is a clear landing light that gets cemented in place. Then the holes for the drop tank pylons were opened and the upper wings glued on. Fit is quite good, though you'll have to do some trimming of the sprue attachment points. Some of them invade the gluing surface so need to be cleaned off prior to applying solvent. Then the pylons were cleaned up (they have HUGE ejector pin marks on them), and glued to the underside of the wings.
Letting those parts dry, the drop tanks were glued together, and several interior parts, including the instrument panel, were painted flat black. The instrument panel itself has nice dial faces, but nothing inside them. If you have access to reheat instrument decals, this would be a good use of them. Fortunately, I had spare instrument decals from a Tamiya F-51D kit so used them. The instrument panel was then glued into the interior.
 Now it was time to glue the interior into the fuselage halves. As luck would
have it, it didn't fit. The problem was that the instrument panel was too wide.
I ended up clipping a section off both sides before it would finally allow the
halves to mate. I think it is because I put the interior framework in the wrong
location. However, the instructions are not too clear as to exactly where they
are supposed to go, so I mounted them with the tops flush with the canopy sill.
Guess I missed. Once that was done, I glued in the radiators and then glued the
interior to one fuselage side. I had to use clamps to properly position the
interior while the glue dried.
Now it was time to glue the interior into the fuselage halves. As luck would
have it, it didn't fit. The problem was that the instrument panel was too wide.
I ended up clipping a section off both sides before it would finally allow the
halves to mate. I think it is because I put the interior framework in the wrong
location. However, the instructions are not too clear as to exactly where they
are supposed to go, so I mounted them with the tops flush with the canopy sill.
Guess I missed. Once that was done, I glued in the radiators and then glued the
interior to one fuselage side. I had to use clamps to properly position the
interior while the glue dried.
Once the interior had dried in place, I installed the small black box above the main radio and glued the fuselage halves together. Fit was not really that great. I ended up having to clamp the fuselage once the parts were glued together. When dry, the forward intake was glued in place and the seams were sanded. That wasn't enough to take care of the gaps, so filler was applied. During this, I noticed that the anti-glare panel was slightly short shot as was the small exhaust door on the underside.
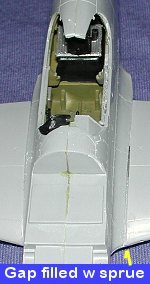 Next, the wings were attached. Fit was pretty good,
but not great. I had a rather large gap on the left root that needed some
stretched sprue to fill. In addition to the usual putty at the wing root, I also
filled in some of the more noticeable sink marks; especially a large one
adjacent to the flap on the right wing. While that was drying, the horizontal
stabilizers were glued in place. Fit here was very tight. A problem I had was
that they kept wanting to dry with a rather pronounced dihedral rather than
staying flat. I did some carving on the roots, but even then was unable to get
them properly horizontal when the glue dried. They were also a bit warped and
the centers were sunken in. I managed to flex the warp out of them, but did not
bother filling in the depressions as it would have basically covered the entire
surface!
Next, the wings were attached. Fit was pretty good,
but not great. I had a rather large gap on the left root that needed some
stretched sprue to fill. In addition to the usual putty at the wing root, I also
filled in some of the more noticeable sink marks; especially a large one
adjacent to the flap on the right wing. While that was drying, the horizontal
stabilizers were glued in place. Fit here was very tight. A problem I had was
that they kept wanting to dry with a rather pronounced dihedral rather than
staying flat. I did some carving on the roots, but even then was unable to get
them properly horizontal when the glue dried. They were also a bit warped and
the centers were sunken in. I managed to flex the warp out of them, but did not
bother filling in the depressions as it would have basically covered the entire
surface!
Flipping the model over, the lower intake scoop was glued in place. It is slightly undersized so filler was again needed. I believe I ran into the same situation with the Tamiya F-51D.
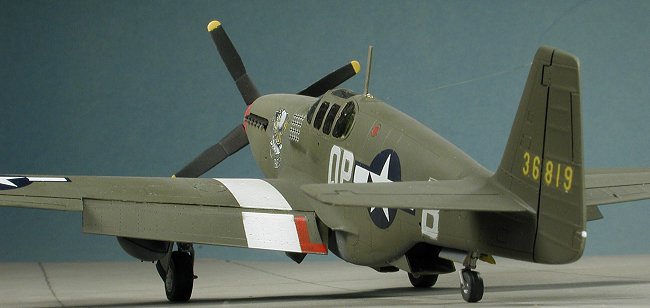
With that out of the way and all the filling and sanding pretty well done (this included the gear doors), the seat was installed. I made a major screw-up here as the seat is designed to be glued in along with the rest of the interior. I had to cut off the attachment tabs on the sides of the seat to get it to fit. Fortunately there is a floor attachment that allows for positive location. That'll teach me to leave it out until the last minute!
Anyway, the gun sight was painted and glued in the top of the anti-glare panel. It helps to cover up the short shot portion, so that is nice. Then the clear bits were glued in. They actually fit rather nicely and gave me no trouble at all. They were masked, the flaps and gear doors then held in place with putty and it was off to get some paint applied
|
PAINT & DECALS |
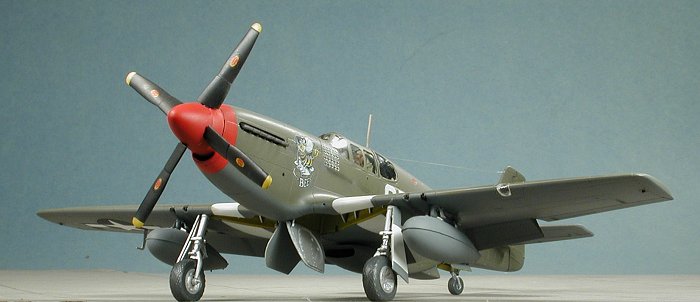
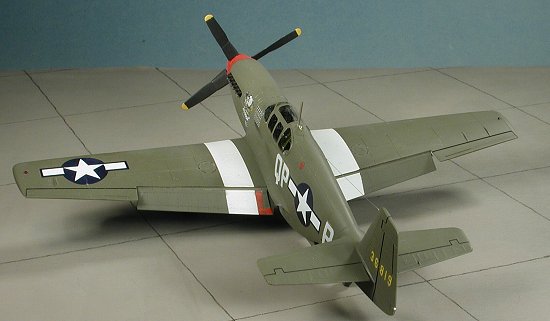
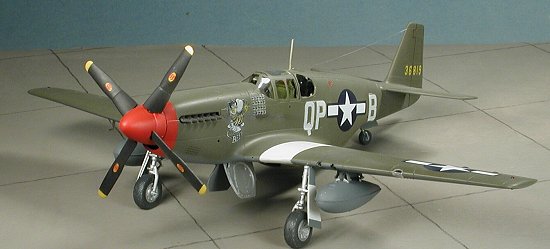 Deciding on a paint scheme for a 1/48 Mustang is always a real effort for
me. There are just so many cool markings to pick from. I have a number of
aftermarket sheets, but finally settled on the box art plane and the kit decals.
I've always liked Beeson's plane and wanted to do it. I've had pretty good luck with ICM decals in the past and wanted an early Mustang that
wasn't festooned with tail or D-Day stripes. Step one was to paint the
inner wings, nose and spinner white. The wings were then masked for the white
stripes that were applied to them as they are not supplied as part of the kit
decals. Good thing, too as wing stripe decals don't always work that well. Yes,
I know they are too wide. Stuff happens. These
were then masked off and the nose and spinner were painted red. This was then
masked off and the rest of the kit painted OD over neutral grey using Aeromaster
enamel paints.
Deciding on a paint scheme for a 1/48 Mustang is always a real effort for
me. There are just so many cool markings to pick from. I have a number of
aftermarket sheets, but finally settled on the box art plane and the kit decals.
I've always liked Beeson's plane and wanted to do it. I've had pretty good luck with ICM decals in the past and wanted an early Mustang that
wasn't festooned with tail or D-Day stripes. Step one was to paint the
inner wings, nose and spinner white. The wings were then masked for the white
stripes that were applied to them as they are not supplied as part of the kit
decals. Good thing, too as wing stripe decals don't always work that well. Yes,
I know they are too wide. Stuff happens. These
were then masked off and the nose and spinner were painted red. This was then
masked off and the rest of the kit painted OD over neutral grey using Aeromaster
enamel paints.
With the painting done, the kit was taken back to the work bench where the wheel wells were painted aluminum and zinc chromate yellow. Then the landing gear was installed. For this kit, you MUST install the gear doors with the landing gear. If you don't, you won't be able to get them to fit without some cutting. I decided to use the flattened tires option and just placed the wheels on the struts. The fit of the wheels is quite tight. When the plane was completed, the wheels were aligned so that the flat spot was on the bottom.
With the plane on its gear, the kit was taken back to the painting area and given several light coats of clear gloss acrylic in preparation for the decals. Then it was back to the workbench to have the decals added.
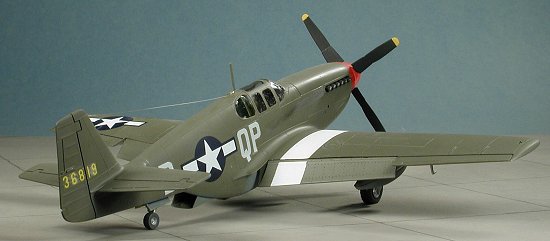
 Let me start off by saying that I was less than happy with these ICM kit decals. They are
slightly transparent (just look at the difference between the non-kit insignia
and the kit code letters), silver easily, and refuse to conform to panel lines. They
will not succumb to ANY decal setting solution at all, even the very strong
Champ. I found this out by applying the fuselage insignia and then discovering
first hand all of these features of the decals. Trouble is, I really wanted to
do Beeson's plane and could find no available aftermarket sheet with his
markings. So to cut my losses, I removed the screwed up ICM decals (when
they dry they stick like limpets so had to basically be sanded off and the plane
repainted in those areas), and used Superscale ones from another P-51 sheet for
the insignia and common markings.
Let me start off by saying that I was less than happy with these ICM kit decals. They are
slightly transparent (just look at the difference between the non-kit insignia
and the kit code letters), silver easily, and refuse to conform to panel lines. They
will not succumb to ANY decal setting solution at all, even the very strong
Champ. I found this out by applying the fuselage insignia and then discovering
first hand all of these features of the decals. Trouble is, I really wanted to
do Beeson's plane and could find no available aftermarket sheet with his
markings. So to cut my losses, I removed the screwed up ICM decals (when
they dry they stick like limpets so had to basically be sanded off and the plane
repainted in those areas), and used Superscale ones from another P-51 sheet for
the insignia and common markings.
This left the ICM markings. I knew how they reacted (or didn't) so tried to work around those propensities. For the fuselage codes, I trimmed the decals as close as I could and then shortly after applying them, used my fingernail to press the decals in to the panel lines. It sorta worked. For the nose art, I tried applying the decal in a small puddle of Future. It also worked fairly well. For the serial number, I cut them so that I wouldn't have problems with the rudder hinge line and applied them without any outside assistance other than the standard saliva. They silvered.
Now that I had finished that onerous task, I came to realize that my wing
stripes were too broad. To quote Dr Leonard McCoy 'Dammit, Jim!' Well, I'd come
this far with multiple goofs so one more shouldn't hurt and I left it. It
wouldn't see the light of a judge's penlight anyway so no great loss. With the
decals finished, the kit was given a coat of clear matte and the final bits were
added
|
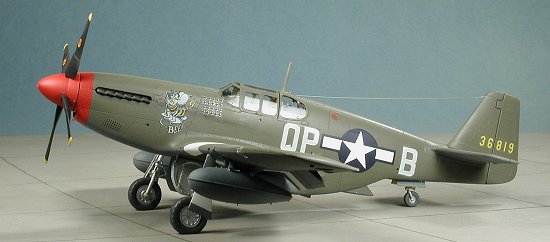
THE REST OF THE STORY |
 Basically, those final bits were the center gear doors and their actuating arms.
One of the arms was slightly short shot, but nothing that couldn't be disguised.
Then the tail wheel doors. These fit fairly well. The wheels were properly
aligned and glued onto the gear struts. Then the drop tanks were added. No fuss
here, nor with gluing the flaps. I still find it funny that the flaps have no
alignment lugs, but there are slots in the back of the wing to accept them. The
pitot tube glued in place and then the landing light cover. Well, this part is
either too long for the opening or the opening is too small. Either way, some
trimming of one sort or another needed done and the lens glued in place. The
exhausts were glued in, and were not drilled out. This is because I had botched
the drilling job on the wing guns and wanted to cut my losses. Small holes were
drilled into the fuselage spine and the tail for an antenna. Before stretching
sprue, the small clear upper fuselage light was glue in. Then the sprue was
stretched and attached. Final steps included removing the masking from the
canopy, pushing on the prop (tight fit) and painting the ID and wing/tail
lights. A touch of pastels for soot stains and the kit was done.
Basically, those final bits were the center gear doors and their actuating arms.
One of the arms was slightly short shot, but nothing that couldn't be disguised.
Then the tail wheel doors. These fit fairly well. The wheels were properly
aligned and glued onto the gear struts. Then the drop tanks were added. No fuss
here, nor with gluing the flaps. I still find it funny that the flaps have no
alignment lugs, but there are slots in the back of the wing to accept them. The
pitot tube glued in place and then the landing light cover. Well, this part is
either too long for the opening or the opening is too small. Either way, some
trimming of one sort or another needed done and the lens glued in place. The
exhausts were glued in, and were not drilled out. This is because I had botched
the drilling job on the wing guns and wanted to cut my losses. Small holes were
drilled into the fuselage spine and the tail for an antenna. Before stretching
sprue, the small clear upper fuselage light was glue in. Then the sprue was
stretched and attached. Final steps included removing the masking from the
canopy, pushing on the prop (tight fit) and painting the ID and wing/tail
lights. A touch of pastels for soot stains and the kit was done.
|
CONCLUSIONS |
 This kind of model just goes to prove that if you have
perseverance, putty and paper(sand) you can build a nice looking model. Is the
ICM kit a waste of my time and money. NO. Like other ICM kits, it takes some
skill and the use of your modeling talents to complete. If you want a shake and
bake kit then get the Tamiya one. The ICM kit, though basically a copy of the
Tamiya kit, does not quite fit like a Tamiya kit and is not molded to the same
standard of a Tamiya kit. On the other hand, it costs less than the Tamiya
kit. Unfortunately, you'll spend the money you save on aftermarket decals, but
you'll do the same for the Tamiya kit (at least in my experience) so it's a tie
on that respect.
This kind of model just goes to prove that if you have
perseverance, putty and paper(sand) you can build a nice looking model. Is the
ICM kit a waste of my time and money. NO. Like other ICM kits, it takes some
skill and the use of your modeling talents to complete. If you want a shake and
bake kit then get the Tamiya one. The ICM kit, though basically a copy of the
Tamiya kit, does not quite fit like a Tamiya kit and is not molded to the same
standard of a Tamiya kit. On the other hand, it costs less than the Tamiya
kit. Unfortunately, you'll spend the money you save on aftermarket decals, but
you'll do the same for the Tamiya kit (at least in my experience) so it's a tie
on that respect.
A correspondent answered my inquiry of 'why do we need another 1/48 P-51B' with the response that in the Ukraine, the Tamiya kit is very expensive where the ICM kit isn't. That makes good sense to me and fully justifies the reason for the kit. Undoubtedly in other parts of the world the same is true regarding the two models. For us here in the US where the difference is really only about $6-7, unless you are on a tight modeling budget, I can see a lot more Tamiya kits being bought than this one.
February 2002
Copyright ModelingMadness.com. All rights reserved. No reproduction in part or in whole without express permission from the editor.
Review kit courtesy of my kit collection.
If you would like your product reviewed fairly and fairly quickly, please contact the editor or see other details in the Note to Contributors.
Back to Reviews Page 2016