|
KIT: |
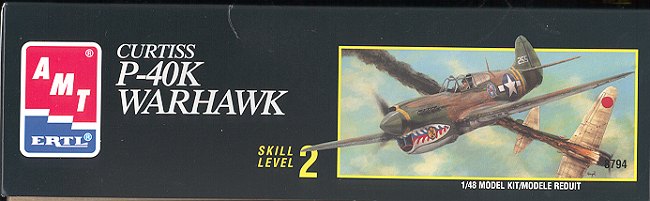
AMT 1/48 P-40E Warhawk |
|
KIT # |
8794 |
|
PRICE: |
$13.00 |
|
DECALS: |
One aircraft flown by Maj. Ed Hollmeyer of 16th FS in China in 1943 |
|
REVIEW & |
|
|
NOTES: |
|
|
HISTORY |
Say 'Flying Tigers' and anyone with any knowledge of aviation
will think of WW2 and the P-40 in China. They may also think of the John Wayne
movie of the same name (which by the way, isn't that bad if you want to see some
P-40s, though 'God is My Copilot' is better). Though the Flying Tigers
initially flew export P-40Cs, they did receive a number of the
 improved P-40E
version before becoming the 23rd Fighter Group on July 4 1942. It is from the
P-40E that the P-40K was developed. A total of 1300 P-40Ks were built and used
in all theaters of operation except Northern Europe.
improved P-40E
version before becoming the 23rd Fighter Group on July 4 1942. It is from the
P-40E that the P-40K was developed. A total of 1300 P-40Ks were built and used
in all theaters of operation except Northern Europe.
Now most aviation enthusiasts have never heard of the P-40K, and that isn't surprising as they were quietly integrated with the other Warhawks in the various units. Nearly identical to the P-40E, the telling visual difference is the addition of a small dorsal fin, giving it a bit of a different look. As with the P-40F before it, there were versions built with extended fuselages, those starting with serial number 42-10265 and being designated P-40K-10's. However only 500 of the K versions produced had this longer fuselage.
|
THE KIT |
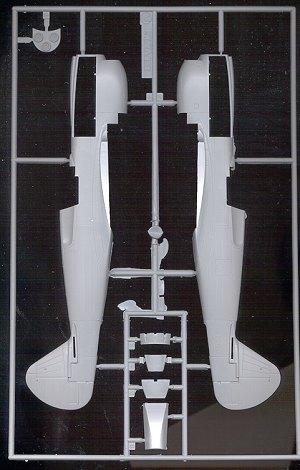 I'm going to
repeat much of what I said about the P-40F previewed earlier. This is a very
nice kit with engraved panel lines as one expects from a relatively new mold.
The interior consists of well detailed side panels, floor, seat with belts
molded in, control stick and instrument panel with rudder pedals. The clear bits
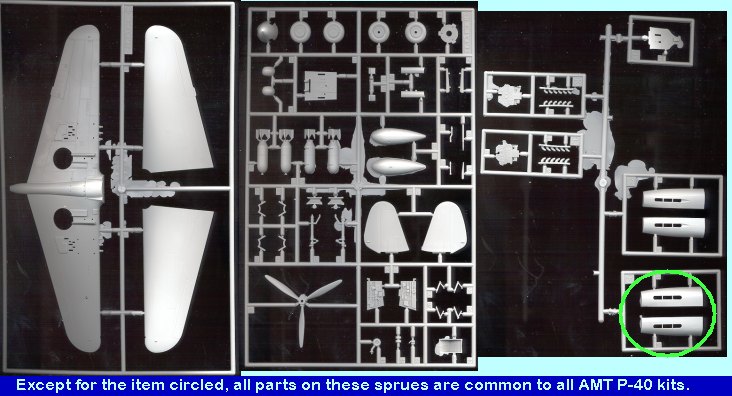
are very clear and flash free. A few of the sprues are valid for all three P-40
kits and those show a lot of flash on them. Unlike the sprue shown above for the
P-40F, there are no 'fishtail' exhausts for this kit which is weird as most K
models had them.
I'm going to
repeat much of what I said about the P-40F previewed earlier. This is a very
nice kit with engraved panel lines as one expects from a relatively new mold.
The interior consists of well detailed side panels, floor, seat with belts
molded in, control stick and instrument panel with rudder pedals. The clear bits
are very clear and flash free. A few of the sprues are valid for all three P-40
kits and those show a lot of flash on them. Unlike the sprue shown above for the
P-40F, there are no 'fishtail' exhausts for this kit which is weird as most K
models had them.
Ordnance consists of two wing mounted 500 lb bombs, again which is unusual as I could find almost no photographs of P-40s with this arrangement, most mounting the bomb centerline. The holes for the mounts are already drilled out which is inconvenient for those of us who won't be using the wing racks. Wheels have the circumflex tread pattern instead of the more common diamond pattern, requiring some aftermarket wheels.
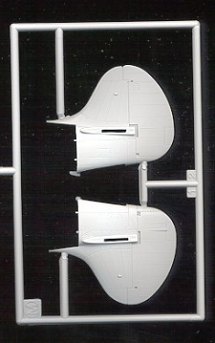 To do a P-40K from this kit, one needs
to cut off the rear of the kit supplied fuselage (the same one used on the P-40N
which is why you get some extra bits), and replace it with the K tail provided.
BTW, you'll notice that on my example the tip of the tail on one half is
slightly short shot. Good news is that you can use the redundant tail section to
do a long-tailed P-40F or L. Not sure how easy a job this will be so I'd
recommend reinforcing the join area with some plastic card stock.
To do a P-40K from this kit, one needs
to cut off the rear of the kit supplied fuselage (the same one used on the P-40N
which is why you get some extra bits), and replace it with the K tail provided.
BTW, you'll notice that on my example the tip of the tail on one half is
slightly short shot. Good news is that you can use the redundant tail section to
do a long-tailed P-40F or L. Not sure how easy a job this will be so I'd
recommend reinforcing the join area with some plastic card stock.
The
instruction sheet is very good, though it gives no history. Colors are generic
except for camo scheme ones which do have FS numbers. The steps are all
pictorial with no part names, but each part color is called out, another helpful
feature. 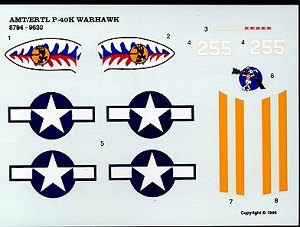 There is but one aircraft
scheme, that of Maj. Ed Hollmeyer of the 23rd Fighter Group in Kunming China
circa 1943. You can either do his early markings with no tiger mouth or fuselage
stripes or the other with all the goodies. By the way, the decal sheet shown has
been darkened to show the white letters. The yellow really isn't that orange.
Frankly, I doubt if ANYONE will do the non-tiger mouth scheme and wonder why
another scheme wasn't offered. Well, there are always aftermarket companies who
are more than happy to sell you a nice decal sheet!!
There is but one aircraft
scheme, that of Maj. Ed Hollmeyer of the 23rd Fighter Group in Kunming China
circa 1943. You can either do his early markings with no tiger mouth or fuselage
stripes or the other with all the goodies. By the way, the decal sheet shown has
been darkened to show the white letters. The yellow really isn't that orange.
Frankly, I doubt if ANYONE will do the non-tiger mouth scheme and wonder why
another scheme wasn't offered. Well, there are always aftermarket companies who
are more than happy to sell you a nice decal sheet!!
All in all, it looks like a very nice kit and one that I am surprised has not sold as well as hoped. It is a shame as AMT was releasing some kits of very interesting subjects before it decided to give up on aircraft and concentrate on cars.
|
CONSTRUCTION |
 Well, if you
haven't been able to guess from the previews, I'll be building this kit as a
P-40E. This will be done by grafting on the tail from the P-40F kit and using
the leftover tail from this kit on that one. Got it?? That means that really,
step 1 is to cut off the offending long tail from this kit. Fortunately, AMT has
been kind enough to make that a relatively painless job by poorly molding the
long tail extension, giving an easy-to-follow line on which to cut. Taking my
trusty razor saw, I hacked off the tail. (Sort of like in Three Blind
Mice!)
Well, if you
haven't been able to guess from the previews, I'll be building this kit as a
P-40E. This will be done by grafting on the tail from the P-40F kit and using
the leftover tail from this kit on that one. Got it?? That means that really,
step 1 is to cut off the offending long tail from this kit. Fortunately, AMT has
been kind enough to make that a relatively painless job by poorly molding the
long tail extension, giving an easy-to-follow line on which to cut. Taking my
trusty razor saw, I hacked off the tail. (Sort of like in Three Blind
Mice!)
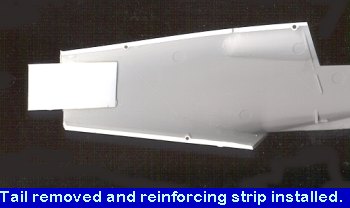 The
next thing I did was to glue in some pieces of reinforcement in the form of
sections of plastic card. That way, the new tail will have some additional
support in case I need to use some filler. ('In case', what a laugh, of
course I will need filler!) Once the reinforcements were dry it was a
matter of 'do I glue the tail to the fuselage halves first or glue the whole
tail on the whole fuselage?'. Knowing my track record, it was decided to glue
the tail halves together and glue it on the fuselage as a whole. That way, I
will have room to work with it as I will undoubtedly do something horrible to it
before that step arrives. So I glued together the tail halves. I also glued
together the wings, drop tank and interior bits.
The
next thing I did was to glue in some pieces of reinforcement in the form of
sections of plastic card. That way, the new tail will have some additional
support in case I need to use some filler. ('In case', what a laugh, of
course I will need filler!) Once the reinforcements were dry it was a
matter of 'do I glue the tail to the fuselage halves first or glue the whole
tail on the whole fuselage?'. Knowing my track record, it was decided to glue
the tail halves together and glue it on the fuselage as a whole. That way, I
will have room to work with it as I will undoubtedly do something horrible to it
before that step arrives. So I glued together the tail halves. I also glued
together the wings, drop tank and interior bits.
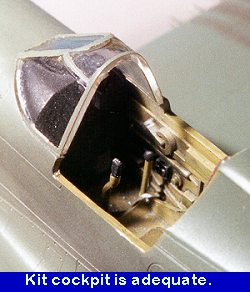
 The
interior really is acceptable, but not that good. For instance, the seat has an
uncomfortable-looking slant from the back to the front. There was a lot of flash
on the interior parts as well as the drop tank halves. Be very careful when
removing this flash as the plastic is a bit soft. Once the interior was
completed, all the bits that needed Interior Green were then painted using
Aeromaster Acrylics.
The
interior really is acceptable, but not that good. For instance, the seat has an
uncomfortable-looking slant from the back to the front. There was a lot of flash
on the interior parts as well as the drop tank halves. Be very careful when
removing this flash as the plastic is a bit soft. Once the interior was
completed, all the bits that needed Interior Green were then painted using
Aeromaster Acrylics.
Next, the engine panels were glued onto the appropriate gaps in the fuselage. These panels don't fit particularly well. You can get a reasonable fit by going carefully and gluing it in stages. Any way you do it, you will find they don't fit all the way to the front and so you need to fill the offending gap or there will be a big gap between the spinner and the front of the fuselage where those panels fit. You also need to smooth things out along the panel lines themselves as they will be a bit 'wavy'. After smoothing this out, the exhaust stacks were glued in place from the rear.
At this time, the wings were also glued together as was the drop tank. Both parts have flash that needs removed, but not so much as the interior bits. Since I wasn't using the wing bomb racks, those holes were filled in. Then the 'knee' parts were glued in place. Fit isn't too bad, but filler was needed to take care of some gaps.
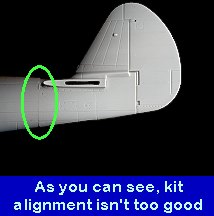
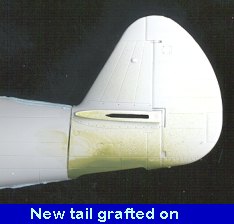 The radiator section was glued together, painted
interior green and glued onto one of the fuselage halves. Then the prop shaft
was set in place and the fuselage sections glued together. It really doesn't fit
that bad, but I still needed filler along the fuselage seam. Not having to put
in the interior at this stage is a real help. Once the fuselage was together, I
glued the tail from the P-40F kit onto it. Naturally, fit here was horrible. I
aligned it the best I could and flooded the join with superglue. Thankfully
those reinforcing strips really helped! It took several sessions with filler to
get the tail blended in well.
The radiator section was glued together, painted
interior green and glued onto one of the fuselage halves. Then the prop shaft
was set in place and the fuselage sections glued together. It really doesn't fit
that bad, but I still needed filler along the fuselage seam. Not having to put
in the interior at this stage is a real help. Once the fuselage was together, I
glued the tail from the P-40F kit onto it. Naturally, fit here was horrible. I
aligned it the best I could and flooded the join with superglue. Thankfully
those reinforcing strips really helped! It took several sessions with filler to
get the tail blended in well.
When completed, the interior was then glued in from the underside of the fuselage. The fit is very good, thanks to the soft plastic. Next the wings were glued in place. The fit is fair. The worst fitting part was at the front and a small file was needed to smooth out the area before the filler was used. In addition to the upper wing root, there was a gap at the back of the lower wing. This needed some plastic strip to fill the gap. Then the ubiquitous filler was slathered on all the gaps and smoothed out. At this time the gun barrels were drilled out.
 It was at this time that I decided
to do something about the indentations on either side of the nose caused by the
slightly short and poor-fitting engine exhaust panels. There are two ways of
taking care of this situation. One is to build up several layers of filler and
sand the area flat and smooth using sanding sticks. The other option is to use
plastic strip to fill in the indentations and then sand the strip flush with the
rest of the nose. Since I was building two P-40s at once, I used both these
methods. Take a look at the image to the left showing the results of these
ministrations. Both work well and give acceptable results, so the choice
is yours as to which to use. Of course, you could also shim the aft section of
the exhaust panel to make the front area flush as well, so there are really a
lot of options available for this one!
It was at this time that I decided
to do something about the indentations on either side of the nose caused by the
slightly short and poor-fitting engine exhaust panels. There are two ways of
taking care of this situation. One is to build up several layers of filler and
sand the area flat and smooth using sanding sticks. The other option is to use
plastic strip to fill in the indentations and then sand the strip flush with the
rest of the nose. Since I was building two P-40s at once, I used both these
methods. Take a look at the image to the left showing the results of these
ministrations. Both work well and give acceptable results, so the choice
is yours as to which to use. Of course, you could also shim the aft section of
the exhaust panel to make the front area flush as well, so there are really a
lot of options available for this one!
Now the radiator outlet section was glued to the back of the radiator section. It almost seems as if a bit is missing as there is a HUGE hole in the back of the aircraft at this point. Frankly, something needs to go in there as you can see clear through to the carb intake at the top of the nose! I will obviously not be entering this kit in any contests!
Next thing was the canopy. I used EZ masks
on this one as I got them on 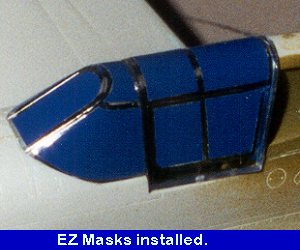 sale. Frankly, it takes just about the same time if
not less to use tape to mask a kit as easy as the P-40. Where these masks come
in real handy is when doing those kits that have a lot of transparencies with
compound curves like the Ju-188 or the G4M Betty. Aircraft that have a lot of
mostly flat or simple curve panels really don't need these masks. Don't forget
that the back windows are masked on the inside and painted interior green. Those
windows were left off as the panels behind them are probably painted in the
exterior color. At least, that is what I did barring info that disputes that. An
interesting side note on the canopy. It is actually thinner on one side than the
other. It really is only noticeable from the rear, but just adds to the quirks
of this kit. Fortunately, I'll be leaving the canopy closed so this glitch won't
just jump out at you when you look at it!
sale. Frankly, it takes just about the same time if
not less to use tape to mask a kit as easy as the P-40. Where these masks come
in real handy is when doing those kits that have a lot of transparencies with
compound curves like the Ju-188 or the G4M Betty. Aircraft that have a lot of
mostly flat or simple curve panels really don't need these masks. Don't forget
that the back windows are masked on the inside and painted interior green. Those
windows were left off as the panels behind them are probably painted in the
exterior color. At least, that is what I did barring info that disputes that. An
interesting side note on the canopy. It is actually thinner on one side than the
other. It really is only noticeable from the rear, but just adds to the quirks
of this kit. Fortunately, I'll be leaving the canopy closed so this glitch won't
just jump out at you when you look at it!
|
PAINT |
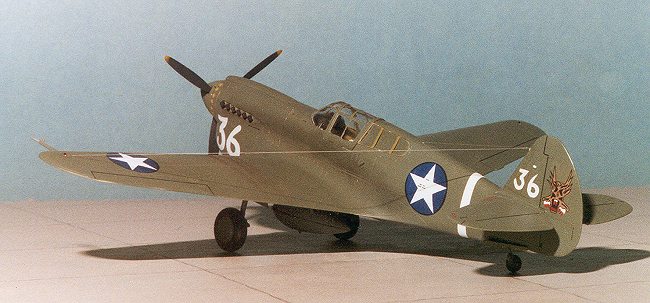
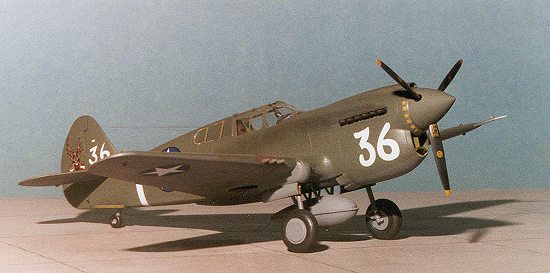
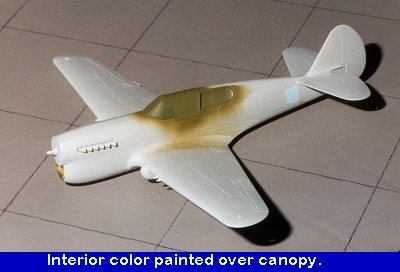 The scheme that I chose is from Superscale sheet 48-493. It is a
P-40E of the 7th Fighter Squadron/49th Fighter Group in 1942. This one is
painted Medium Green over Neutral Grey. Since it is obviously a repaint, I kept
the paint fresh and didn't trash it out too much. The first thing I did was to
paint the interior color over the canopy so that when you look into the cockpit,
you will see the interior color on the inside of the framework. You can also see
in this image the amount of filler finally needed to smooth in the tail section!
The scheme that I chose is from Superscale sheet 48-493. It is a
P-40E of the 7th Fighter Squadron/49th Fighter Group in 1942. This one is
painted Medium Green over Neutral Grey. Since it is obviously a repaint, I kept
the paint fresh and didn't trash it out too much. The first thing I did was to
paint the interior color over the canopy so that when you look into the cockpit,
you will see the interior color on the inside of the framework. You can also see
in this image the amount of filler finally needed to smooth in the tail section!
For the main colors, I used Aeromaster enamels on this one, painting the Neutral Grey first, then when dry, masking the tailplanes and painting the Medium Green. The main gear legs were also painted Neutral Grey at this time as were the gear doors. When the paint was dry, the wheel wells were repainted Interior Green from Aeromaster's acrylic line. Then it was back to the workbench to add on a few bits and pieces.
|
CONSTRUCTION |
 At this time, the drop tank mounts were glued in place. Though
there is no construction sequence for which part goes where, you need to know
that they are not the same. You will probably have to do as I did. Install them
and then swap them around before the glue sets. The mounts should be wider apart
at the front than the rear so they will fit on the drop tank. At this time, the
pitot tube and the tail wheel were glued in place. It was then back to the paint
shop. When there, some touch-up of neutral grey was sprayed on the gear, drop
tank mounts and the underside of the pitot tube. At this time the drop tank was
also painted neutral grey. The uppersurface was touched up with the Medium Green
and when dry, the entire airframe was sprayed with Future acrylic clear in
preparation for the decals.
At this time, the drop tank mounts were glued in place. Though
there is no construction sequence for which part goes where, you need to know
that they are not the same. You will probably have to do as I did. Install them
and then swap them around before the glue sets. The mounts should be wider apart
at the front than the rear so they will fit on the drop tank. At this time, the
pitot tube and the tail wheel were glued in place. It was then back to the paint
shop. When there, some touch-up of neutral grey was sprayed on the gear, drop
tank mounts and the underside of the pitot tube. At this time the drop tank was
also painted neutral grey. The uppersurface was touched up with the Medium Green
and when dry, the entire airframe was sprayed with Future acrylic clear in
preparation for the decals.
|
DECALS |
Mentioned earlier, the unit is the 7th FS/49th FG. This unit still exists today. The 7th FS and 49th FG are at Holloman AFB in New Mexico and fly black T-38 Talons in support of the wing's stealth fighters. Anyway, on to the decals. This sheet not only includes three interesting schemes, but also has enough stencils for two aircraft. These decals look well printed and are in register.
 It
is when they get wet and are put onto the kit that some oddities are noticed.
First, they are not very densely printed. By this I mean that you can see that
they are made of a bunch of dots when you get close to the decal. This is most
obvious in the white and in some respects the blue of the insignia. You can see
a hint of the background color behind these dots. Also, the roundels seem to
have a black ring around them once they are on the aircraft and dry. Neither of
these traits are really visible on the sheet itself. Very odd. Anyway, they do
adhere well, are relatively opaque and react favorably to industrial strength
setting solutions. As usual, decaling took a few days, after which all the
residue was wiped off.
It
is when they get wet and are put onto the kit that some oddities are noticed.
First, they are not very densely printed. By this I mean that you can see that
they are made of a bunch of dots when you get close to the decal. This is most
obvious in the white and in some respects the blue of the insignia. You can see
a hint of the background color behind these dots. Also, the roundels seem to
have a black ring around them once they are on the aircraft and dry. Neither of
these traits are really visible on the sheet itself. Very odd. Anyway, they do
adhere well, are relatively opaque and react favorably to industrial strength
setting solutions. As usual, decaling took a few days, after which all the
residue was wiped off.
Then there were a few more bits to put on.
First were the landing gear doors. These fit reasonably well though are a bit
thick. For the tail wheel doors; these were not always used in the field, but if
you choose to install yours, they need to be mounted horizontal to the ground,
not near vertical as the  instructions would lead you to believe. I used the kit
wheels instead of resin ones as my local shop only had one set and those were
put on another P-40. The kit wheels are a VERY sloppy fit so use superglue and
hold them until they dry.
instructions would lead you to believe. I used the kit
wheels instead of resin ones as my local shop only had one set and those were
put on another P-40. The kit wheels are a VERY sloppy fit so use superglue and
hold them until they dry.
Then it was back to the paint shop for a nice coat of semi-matte clear to seal in the decals and to provide a surface for the pastel exhaust stain treatment. Once the pastels were put on, the kit was then given another coat of semi-matte to seal in the pastels. Then all the transparencies were unmasked and any leakage cleaned up with a sharpened toothpick. The rear transparencies were then glued in place using a touch of non-fogging superglue. Then the formation lights were painted using clear red and green for the wings and regular gloss white for the tail light. These lights seem to stick up too much and if you want to make them more accurate, they do need to be sanded down somewhat. The final job was to attach the radio antenna wire using stretched sprue. Holes were drilled where appropriate to accept the wire, and that was it.
|
CONCLUSIONS |
Well, there you have it. A P-40E. It seems as if I took the hard way around to do this, but looking back, it was probably the best use of parts. I really did not want to do a K and wanted a kit a bit more modern than the much older Otaki/ARII and Revell kits in this scale. The end result is a very pleasing P-40E. I put this in the category of what I call '3 foot models'. They look good from about 3 feet away. It is when you get close up that you notice all the little glitches like the huge empty cavity where the radiator exhaust is and the canopy of varying thicknesses!
Can I recommend this kit? Well, yes I can, but with some reservations. It isn't a shake and bake kit my any stretch of the imagination, but it is also not beyond the skill of most modelers if they take their time and accept the glitches with the kit. Probably one of the biggest pluses with this kit at this time is that it can usually be found at deep discount, especially with AMT having gotten out of the airplane kit business and their new boss, Racing Champions having severe money and legal problems!
|
REFERENCES |
P-40 Hawks at War by Joe Christy and Jeff Ethell, Scribner's and Sons, 1980, $15.95
Curtiss P-40 in Action, by Ernest R McDowell, Squadron Signal Publications, 1976
June 2000
Review copy courtesy of me and my wallet!
If you would like your product reviewed fairly and quickly by a site that has over 800 visits a day, please contact me or see other details in the Note to Contributors.