Aoshima 1/72 P-63A Kingcobra
Kit Number: 215
Price: $5.00
Decals : one version; very generic
Date of Review: 10 May, 1996
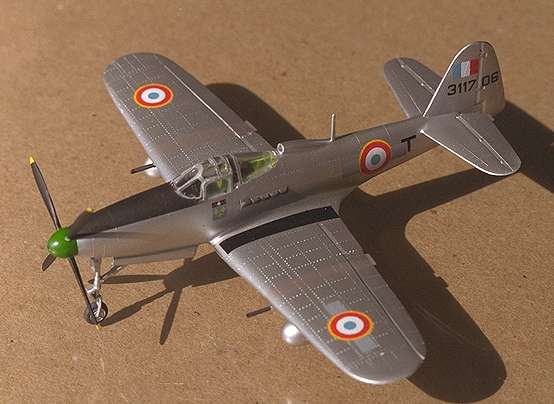
Comments: The Kingcobra was a huge improvement over the P-39 Airacobra. Both put Bell aircraft on the map and were the only really successful fixed wing aircraft produced by the company. Most of the P-63 production went to the Soviet Union where it was much appreciated, especially because of the nose mounted cannon that was good against German armored units. In the US, it was used for target towing, training, and as an aerial target, by plating most of the aircraft with armor plate, thus making it a real pig to fly. The other major user was the French, who used it late in WWII and in Indochina.
The Aoshima kit must be at least thirty-five years old. It is a serious case of rivet city, with almost no cockpit detail, working bits like retractable landing gear, and huge sink marks on almost every part. This is mostly due to the thickness of the plastic (very), as well as the age of the kit. I have built several other Aoshima kits because they have such interesting subject material. In 1980 I built a Serian float bomber, in 1982 an A7M2 and Ki-100. These kits were extremely crude, but did provide a basic shape and a good starting point. Before MPM came on the scene, Aoshima's was the only P-63 available in injected plastic. Several years ago, I decided to build one, mainly because I had just purchased the great Carpena decal sheet on French aircraft used in Indochina, and because I knew what I was getting myself into.
As previously stated, the Aoshima kit is truly just a shape. I first filled in a number of sinkholes trying to leave most of the rivets. I then rescribed the panel lines I had trashed during sanding. I had to scratchbuild a cockpit using pieces scrounged from the spares bin. Nothing fancy, but at least there is now a cockpit. I also took it upon myself to scratch main landing gear as the kit ones were supposed to be retractable and were a joke. The main wheels were also replaced using a set from a P-51 that I had scrapped for parts. The nose landing gear is not that bad and can be used. While I was at it, I boxed in the wheel-wells and thinned down the kit gear doors. During this stage I also drilled out the gun barrels. The rest of the kit was pretty straightforward and the only real pain area was the wing/fuselage join which needed a bunch of putty. Don't forget to pack the nose with weight.
Once the basic kit was finished, I filled in the cockpit with tissue (opening doors) and sprayed the airframe gloss white and then Metallizer Aluminum. This was followed by a coat of Future to seal and slightly dull the Aluminum. The Carpena decals went on like a dream. I have several sheets and they are well worth the money. Don't ask what unit as I am not fully up to speed on French squadrons. All the insignia and markings were provided on the sheet and the final result, while not a contest kit, did fill a space in my collection of US fighters from P-1 to F-117 without having to resort to a vacuform.
Only recommended if you are willing to put in the work or want a toy for
your kids.
Back to Reviews Page 2016