Tamiya 1/48 F4F-3 Wildcat
|
KIT # |
61034 |
|
PRICE: |
$26 |
|
DECALS: |
Three aircraft |
|
REVIEW : |
|
|
NOTES: |
Just Plane Stuff F4F-3 Conversion |
|
BACKGROUND |
To read a preview of what is in the box, follow this link. To read other reviews of the Tamiya F4F Wildcat, check the Kit Reviews section under 'F' for F4F, 'M' for Martlet and 'W' for Wildcat.
When I got the JPS conversion set, the first thing I did was to find a set of markings for it.
Superscale 48-723 for F4F-3 Wildcat Aces which was just recently released, has markings for three early war Wildcats; those of Thatch, O'hare and McCuskey. I figured that Thatch and O'hare's planes would be done to death so picked on the least known of the three, E.Scott McCuskey. McCuskey flew with VF-42 and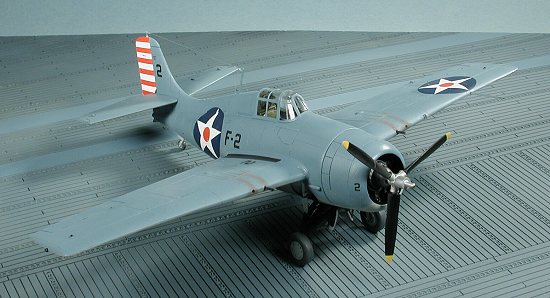 was involved
in all the early war action. He got his first victory (a shared one) by
shooting down a Kawanishi 'Mavis' flying boat at the Gilbert islands in Feb of
1942. This was the US carrier forces' first offensive carrier action. The next
time the McCuskey was involved in an interesting incident was in early May. They
were attacking the Japanese seaplane base at Tulagi in the Solomons. McCuskey
and two others got lost and had to make a forced landing on a nearby island
called Guadalcanal after running too low on fuel to return to the ship.
They were later picked up by the Destroyer Hammann and on their
return, given a major butt-chewing by the CAG for having lost the planes.
According to the references, McCuskey ended up with 6 1/3 victories flying
Wildcats with VF-42 and VF-3 through the Midway battle. Later, he added 6
victories flying Hellcats.
was involved
in all the early war action. He got his first victory (a shared one) by
shooting down a Kawanishi 'Mavis' flying boat at the Gilbert islands in Feb of
1942. This was the US carrier forces' first offensive carrier action. The next
time the McCuskey was involved in an interesting incident was in early May. They
were attacking the Japanese seaplane base at Tulagi in the Solomons. McCuskey
and two others got lost and had to make a forced landing on a nearby island
called Guadalcanal after running too low on fuel to return to the ship.
They were later picked up by the Destroyer Hammann and on their
return, given a major butt-chewing by the CAG for having lost the planes.
According to the references, McCuskey ended up with 6 1/3 victories flying
Wildcats with VF-42 and VF-3 through the Midway battle. Later, he added 6
victories flying Hellcats.|
CONSTRUCTION |
The real purpose of this review is to try out the Just Plane Stuff F4F-3 conversion set. It also gives me an opportunity to build a kit I've had in my collection for years, but never built. JPS was kind enough to send me a test shot to use in this review. For those of you who don't know, a test shot is done to make sure the mold is properly doing what it should. As a result, these items generally are not to the same standards of the finished production version. In my test shot I found some very minor glitches like an oxygen bottle not fully formed and the kit attachment points not quite deep enough as well as a surface texture that was a tiny bit rough. No biggies and on many other manufacturers products, this would be exceeding what you'd be buying from them. Just Plane Stuff's products are to a much higher standard that you'd get from others.
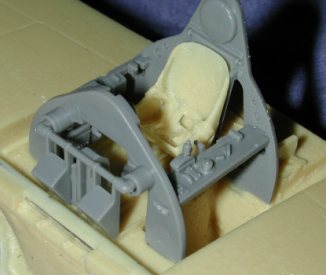
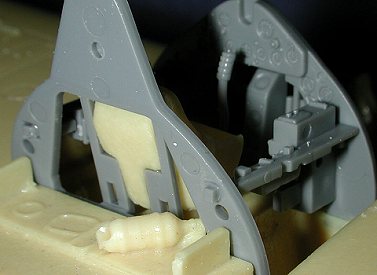
After doing the usual sanding of mold marks and cleaning up of a few resin bubbles and flash, the cockpit bits were glued in place. I trimmed back on the Tamiya kit parts mounting tabs a bit to get them to fit. Always test fit parts when working with resin or you may easily be sorry. I then assembled the interior bits minus the kit floor. The fit was really super. With the main Tamiya interior bits in place, the new resin seat was cut from its block and glued in place. The kit seat attaches to the floor, whereas the resin replacement attaches to the back frame as in the real aircraft. You can see this in the images below.
|
|
|
With the main part of the interior in place, it was then painted. According to kit instructions, the lower areas below the floorboards were painted white and the upper US Interior Green. Then details were picked out in various shades according to the instruction sheet. Seat belts were painted an off white with silver buckles. The entire assembly was then washed and dry-brushed to bring out detail.
 While this was drying, some of
the other components were assembled and painted. The gear area is to be painted
white so the firewall had some strut pieces glued in place and this assembly was
painted white as was the forward section of the two fuselage halves. The
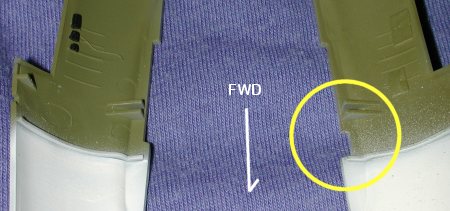
fuselage halves were then test fitted to the wing assembly to check for fit.
Test shots come with no instructions and I found from test fitting that a
section has to be removed from the fuselage wing root to accommodate the large
wing spar that is part of the new resin wing. A few minutes and several cuts
later (as you can see from the image to the right), the parts fit perfectly.
While this was drying, some of
the other components were assembled and painted. The gear area is to be painted
white so the firewall had some strut pieces glued in place and this assembly was
painted white as was the forward section of the two fuselage halves. The
fuselage halves were then test fitted to the wing assembly to check for fit.
Test shots come with no instructions and I found from test fitting that a
section has to be removed from the fuselage wing root to accommodate the large
wing spar that is part of the new resin wing. A few minutes and several cuts
later (as you can see from the image to the right), the parts fit perfectly.
At this time, the fuselage halves were glued together and cleaned up. Attention then turned to the rest of the landing gear assembly. Now you can't build it as the kit would have you do it because of the way that the cockpit parts are integral with the lower wing. But this is not a problem as the bits do fit rather well. First thing done was the firewall and upper landing gear framework. This gets painted white to match the rest of the inner surfaces. The chains are painted gunmetal and a wash applied to dirty things up a bit.
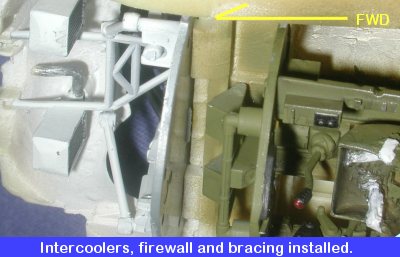 Meanwhile, the two new resin
intercoolers are cleaned up, painted white with aluminum grilles and a wash
applied to the grills. These are then glued into the forward section of the
lower fuselage. The fit here is going to be a bit tight when the firewall is
installed so it is a good idea to place the firewall in while the superglue sets
on the intercoolers. A bit of tweaking is needed to get them all to fit well.
With the intercoolers dry, the firewall can be removed with a bit of a twist to
get it out.
Meanwhile, the two new resin
intercoolers are cleaned up, painted white with aluminum grilles and a wash
applied to the grills. These are then glued into the forward section of the
lower fuselage. The fit here is going to be a bit tight when the firewall is
installed so it is a good idea to place the firewall in while the superglue sets
on the intercoolers. A bit of tweaking is needed to get them all to fit well.
With the intercoolers dry, the firewall can be removed with a bit of a twist to
get it out.
Now you'll find when you go to fit in the firewall that the attachment tabs on the back are going to prevent it from fitting well. I removed all three of them, but in reality, only the bottom two have to go. If you cut them all off it isn't a problem as it will fit well without them. With the interior painted and pretty well ready to go, superglue was slathered on the area the firewall was to go, the firewall moved into position and pressed up into the mass of superglue. The upper fuselage was fit in place to make sure of proper alignment and the firewall held up against the resin wing with a pencil placed through the hole the engine goes into.
While that was drying, The lower landing gear assembly was glued together and the upper struts painted white as was a small lower brace. Then those were masked and the rest painted flat black. The housing that fits over it was not glued on at this time as it needs to be painted the underside color. The lower assembly was test fit into the lower wing to make sure that all will fit properly when the time comes. It is most helpful not to install the engine until after the landing gear is fully glued in as you can get access to the glue joins much easier with it out. The engine itself was painted aluminum with a magnesium colored gearbox. You'll have to drill out a hole through the replacement resin gear box to accept the prop shaft. Needless to say, you can't use the little plastic hold down as the resin gearbox isn't hollow. A black wash was added and the ignition wires painted brass.
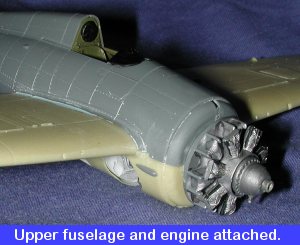 Then the moment of truth. The
upper fuselage was glued to the lower section. Fit was very good, though there
was a bit of a gap at the aft wing area. Hindsight leads me to believe that this
was caused by the upper portion of the backrest bulkhead contacting the upper
fuselage a bit too soon. A touch of trimming of this will undoubtedly ensure a
much better fit. That is what I'll do on the next one. Another result of this
was that the wings didn't fully meet the wing root so a bit of filler was used
to get a smooth transition. After all the joins were sanded and filled as
needed, the little plastic fairings were glued in place as were the under wing
radiators. The engine was placed in its hole to get a picture and then removed.
Then the moment of truth. The
upper fuselage was glued to the lower section. Fit was very good, though there
was a bit of a gap at the aft wing area. Hindsight leads me to believe that this
was caused by the upper portion of the backrest bulkhead contacting the upper
fuselage a bit too soon. A touch of trimming of this will undoubtedly ensure a
much better fit. That is what I'll do on the next one. Another result of this
was that the wings didn't fully meet the wing root so a bit of filler was used
to get a smooth transition. After all the joins were sanded and filled as
needed, the little plastic fairings were glued in place as were the under wing
radiators. The engine was placed in its hole to get a picture and then removed.
Other things were painted at this time. Since I was using the red and white rudder stripes, the rudder was painted white. After researching the aircraft a bit more, the small tip extension forward of the hinge line was painted blue grey to match the rest of the upper surface colors. On this kit, the horizontal stabilizer is a single piece that slots into the fin. It is a VERY tight fit. To simplify painting, it was painted separately.
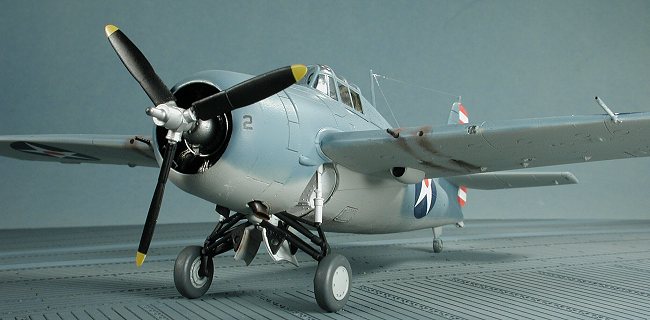
Back at the cockpit, the gunsight was painted and installed. Then the canopy was masked and glued in place. Unfortunately, the sliding hood is too thick to pose in the open position, so was glued closed. If you want an open canopy, you'll have to get a vac canopy. I didn't as I wanted to build this kit using only the conversion set (and aftermarket decals). Tom Cleaver pointed out to me that many F4F-3s had an extra frame on the windscreen's quarter windows. When you look at photos they are quite evident. They are also not on all F4F-3s (such as the early ones) so a good reference is needed. This extra frame was easy to replicate with a few knife swipes through the masking. The canopies were then glued in place.
 The F4F-3 that I was modeling was a late production version with the P&W
R-1830-86 engine. As a result, this one used the cowling with no upper air scoop
and three cowl flaps. Now if you want to, you can take the kit cowling and
simply remove the upper air scoop to get the effect needed. However, the purpose
of this review is to evaluate the conversion set so I used was was offered. The
resin for the cowlings is much thinner than the kit part and is in two parts.
Removing the bits from the resin block was quite easy. A touch of sanding
smoothed out the mating surfaces and they were attached together with super
glue.
The F4F-3 that I was modeling was a late production version with the P&W
R-1830-86 engine. As a result, this one used the cowling with no upper air scoop
and three cowl flaps. Now if you want to, you can take the kit cowling and
simply remove the upper air scoop to get the effect needed. However, the purpose
of this review is to evaluate the conversion set so I used was was offered. The
resin for the cowlings is much thinner than the kit part and is in two parts.
Removing the bits from the resin block was quite easy. A touch of sanding
smoothed out the mating surfaces and they were attached together with super
glue.
I then glued in the two intercooler scoops. After that dried, I plugged in the engine and did a test fit. It seems I didn't get the scoops close enough to the cowling lip as they interfered with the engine. A bit of judicious sanding was then done to get things to fit. Not having instructions was a bit of a drawback, as I also placed the scoops a bit too low. The bottom of the scoop assembly should be level with the top of the lower cowling flap. The interior of the cowling was painted flat black.
Now the kit was off to get its paint scheme.
|
PAINT |
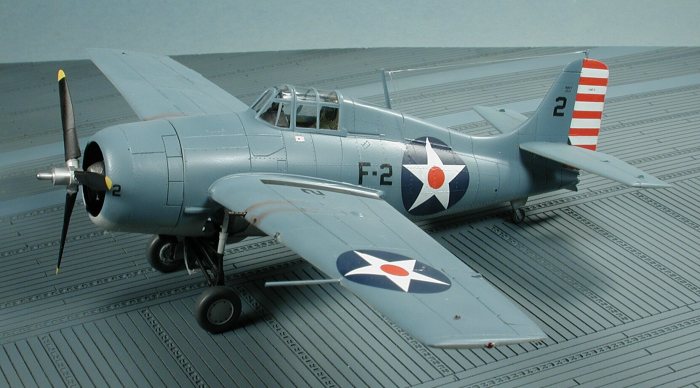
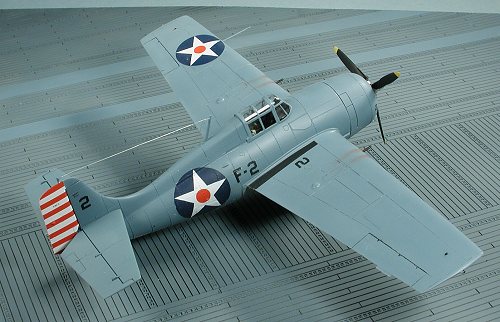
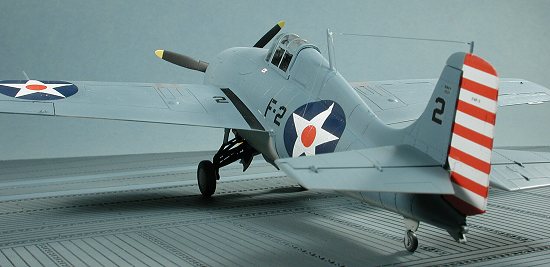 Wildcats of this era were painted blue-grey upper and light grey
undersides. According to the decal sheet I was going to use, this meant FS 36118
(gunship grey) uppers and FS 36440 (light gull grey) undersides. I didn't think
that the 36118 was blue enough so used Testors Model Master Navy Blue-Grey for
the upper sides. This may be too blue for some tastes, but I like it. I did use
light gull grey for the underside as that has been a Navy color for decades.
McCuskey's plane had a low demarcation line that didn't meet up to the
tail planes. Other Wildcats of the period had higher demarcation lines, some of
which did blend in with the tail planes. Check your references.
Wildcats of this era were painted blue-grey upper and light grey
undersides. According to the decal sheet I was going to use, this meant FS 36118
(gunship grey) uppers and FS 36440 (light gull grey) undersides. I didn't think
that the 36118 was blue enough so used Testors Model Master Navy Blue-Grey for
the upper sides. This may be too blue for some tastes, but I like it. I did use
light gull grey for the underside as that has been a Navy color for decades.
McCuskey's plane had a low demarcation line that didn't meet up to the
tail planes. Other Wildcats of the period had higher demarcation lines, some of
which did blend in with the tail planes. Check your references.
|
WHAT? MORE WORK? |
With the paint now on it, the kit was returned to the workshop. At this time, the wheel well was unmasked and the lower section of the landing gear was glued in place. Fit was pretty good, though a bit of grunt work and superglue were needed to keep it all together. Moving on, the engine was glued on, followed by the cowling. The resin cowling is a tight fit, so be prepared to do a tiny bit of trimming to get it on the way you want it.
With the flat now sealing the decals in place, I did just
a tiny bit of touch-up painting and recoating. The final steps involved
attaching a bunch of little bits. These included the tailhook, the main wheels,
prop, exhaust stacks, pitot tube (you have to make a new one. I used thin
stainless tubing), under wing light lens (which literally snapped in place
without cement), and inboard gun barrels. I could not get the leading edge light
to fit so filled the area with superglue instead. The radio antenna was made
from clear stretched sprue and glued in place and finally, the masking taken off
the canopy. The absolute final items were painting the anti-collision lights
(Gunze clear red and green) and the application of exhaust and gun stains using
pastels.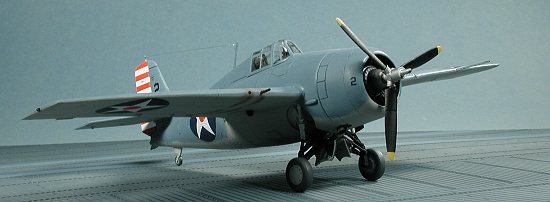 With all the major bits glued on, the plane was given a gloss coat in
preparation for decals. As mentioned earlier,
Superscale 48-723
for F4F-3 Wildcat Aces was chosen to decal this one. First the rudder
stripes were put in place. These fit quite well and only needed a little
touch-up with red and white paint to get everything to cover well. The most
difficult decals were the large fuselage stars. The compound curve in addition
to all those rivets makes this a challenge. Several applications of Solvaset
were needed to get things where they snuggled down properly. I also used the
decals for the wing walks. For some odd
With all the major bits glued on, the plane was given a gloss coat in
preparation for decals. As mentioned earlier,
Superscale 48-723
for F4F-3 Wildcat Aces was chosen to decal this one. First the rudder
stripes were put in place. These fit quite well and only needed a little
touch-up with red and white paint to get everything to cover well. The most
difficult decals were the large fuselage stars. The compound curve in addition
to all those rivets makes this a challenge. Several applications of Solvaset
were needed to get things where they snuggled down properly. I also used the
decals for the wing walks. For some odd
 reason, the fin numbers silvered and I
didn't discover it until after the flat coat had been applied. Not a major
disaster, but something I guess I should have checked before applying the clear
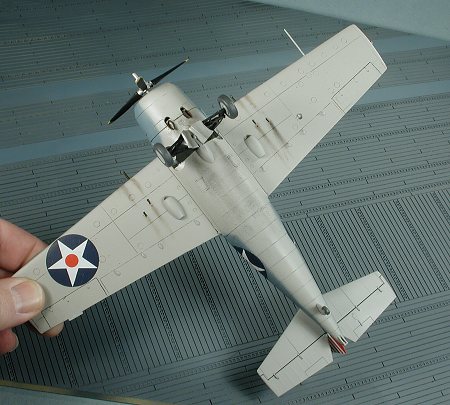
flat. Some of you may be wondering why there are not insignia on both wings.
This was not a universal application by all units, though by mid-1942,
it was standard for all new aircraft and several squadrons or air wings had come
up to speed with the new directives.
reason, the fin numbers silvered and I
didn't discover it until after the flat coat had been applied. Not a major
disaster, but something I guess I should have checked before applying the clear
flat. Some of you may be wondering why there are not insignia on both wings.
This was not a universal application by all units, though by mid-1942,
it was standard for all new aircraft and several squadrons or air wings had come
up to speed with the new directives.
|
CONCLUSIONS |
So there you have it. A bonafide F4F-3 Wildcat. The JPS conversion set is about as painless as any that you'll find. The production set will undoubtedly be even better. No word as to what else will come with it, but I would recommend a vac canopy if you want to display the interior. The Tamiya kit is about the easiest model I have ever done. To mess one up, you'd really have to work on it!!
As a bit of advice, you cannot do the very early -3 Wildcat (the ones with the yellow wings) unless you make a telescopic sight and cut a notch in the windscreen 'glass' for it to fit. These planes did not have the extra frame in the windscreen as did the later -3.
Overall, I can highly recommend both the kit and the conversion set. Thanks to Just Plane Stuff for providing the conversion set.
PS, the base for most of the images is the JPS USS Hornet 1/48 flight deck.
January 2001
|
REFERENCES |
The Wildcat in WWII by Barret Tillman, 1983
F4F Wildcat in Action: Aircraft #84 by Don Linn, 1988
Review kit courtesy of my kit collection. Conversion set courtesy of Just Plane Stuff.
Copyright ModelingMadness.com. All rights reserved. No reproduction in part or in whole without the express permission of the editor.
If you would like your product reviewed fairly and fairly quickly, please contact the editor or see other details in the Note to Contributors.
Back to Reviews Page 2022