Airfix 1/72 Curtiss P-40B
| KIT #: | A01003 |
| PRICE: | $7.25 SRP |
| DECALS: | One option |
| REVIEWER: | Scott Van Aken |
| NOTES: |
| HISTORY |
The Curtiss P-40 Warhawk
was an American single-engine, single-seat, all-metal fighter and ground
attack aircraft that first flew in 1938. The P-40 design was a modification
of the previous Curtiss P-36 Hawk which reduced
development time and enabled
a rapid entry into pr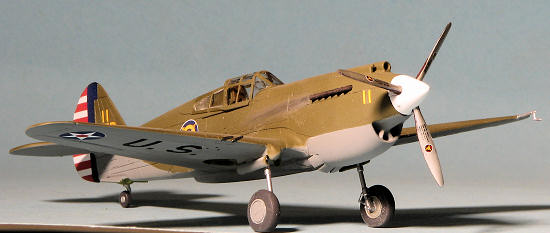 oduction and operational service. The Warhawk was used
by the air forces of 28 nations, including those of most Allied powers
during World War II, and remained in front line service until the end of the
war. It was the third most-produced American fighter, after the P-51 and
P-47; by November 1944, when production of the P-40 ceased, 13,738 had been
built, all at Curtiss-Wright
Corporation's main production facilities at Buffalo, New York.
oduction and operational service. The Warhawk was used
by the air forces of 28 nations, including those of most Allied powers
during World War II, and remained in front line service until the end of the
war. It was the third most-produced American fighter, after the P-51 and
P-47; by November 1944, when production of the P-40 ceased, 13,738 had been
built, all at Curtiss-Wright
Corporation's main production facilities at Buffalo, New York.
The P-40 version in this kit is also the best fighter available to the USAAC
at the start of the war, and while not as overly capable as the A6M, if used
as a hit and run fighter, it was able to do quite well against Japanese
aircraft. This is thanks to its superior diving speed and ability to handle
greater battle damage than the lightly built Japanese planes.
| THE KIT |
 This
is not the first 1/72 P-40B/C. Frog was probably the initial developer of
one of these and is the basis for the Academy kit and probably others.
Though Jo-han listed one on box sides, they never carried through with
developing the kit prior to the company going under. There have also been early
P-40s by short run and resin kit manufacturers.
This
is not the first 1/72 P-40B/C. Frog was probably the initial developer of
one of these and is the basis for the Academy kit and probably others.
Though Jo-han listed one on box sides, they never carried through with
developing the kit prior to the company going under. There have also been early
P-40s by short run and resin kit manufacturers.
The kit is well shaped and has engraved panel lines. These panel lines are
actually far deeper than they need to be for a 1/72 kit and this has put off
several modelers who have seen these kits. Frankly, the majority of modelers
will not care one way or the other and while it is said that they will
soften out under paint, you will need a lot of paint!
The interior floor slots into the inside of the lower wing, to be followed
by a seat, stick and instrument panel. A decal is provided for instruments.
There is also detailing on the inside of the fuselage walls. Nothing great,
but better than a blank slate. The upper cowling is a separate piece to
facilitate the installation of the prop so it can spin. The lower
cowling/radiator is also separate. This will eliminate the need to fill
seams in these areas. The kit comes with open or closed cowl flap and can be
built with gear up, though you will need to fabricate your own stand. There
are separate exhaust sections and the kit comes with a pilot. The canopy i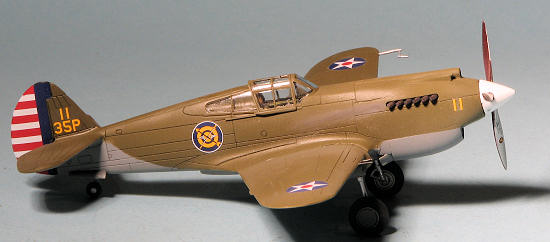 s
clear, but thick and can only be glued in the closed position. I should also
mention that there is wheel well detailing and the wheels have flat spots
molded on them.
s
clear, but thick and can only be glued in the closed position. I should also
mention that there is wheel well detailing and the wheels have flat spots
molded on them.
Hard to believe that the instructions for this comprise 16 steps, but they
do. You will have to cut off a radio mast molded on one fuselage half, but
that is about it. Naturally, all color numbers are Humbrol. The only cross
reference is on the back of the box and that is only for external painting
information. The lone markings option is for Charles Older's #68 of the 3rd
Pursuit Squadron 'Hells Angels' in US
equivalent RAF colors. The decal sheet is nicely printed with data markings
where appropriate. I think the roundels are a bit too light, but then I have
been used to seeing darker blue for these things for decades. There are
aftermarket sheets if one wants something different.
| CONSTRUCTION |
Just like the earlier build, I started by painting cockpit bits and gluing those together. This P-40 in engineered so that you can cement the fuselage halves together and insert the cockpit from the underside, which is really quite nice. The cockpit is glued to the lower wing and was built up while in place. It and the interior walls were painted US Interior Green using Pollyscale acrylics. It took two coats as the acrylic does not like to stick to bare plastic all that well. A primer coat of enamels would be recommended. The sidewall detail was picked out with black and the fuselage halves cemented together.
 Meanwhile, I glued on the upper wings. Be careful not
to overapply cement on these kits as the plastic is fairly soft. That is a
benefit when it comes to removing the rather large sprue stubs, but can result
in oversanding as well. I also attached the upper and lower cowling pieces after
the main fuselage had its joins filled with super glue and sanded. I did have to
rescribe a few panel lines. The lower cowling piece is not a great fit as it is
a tad undersize, requiring filler to take care of the difference in size. While
that was drying, the rudder was attached.
Meanwhile, I glued on the upper wings. Be careful not
to overapply cement on these kits as the plastic is fairly soft. That is a
benefit when it comes to removing the rather large sprue stubs, but can result
in oversanding as well. I also attached the upper and lower cowling pieces after
the main fuselage had its joins filled with super glue and sanded. I did have to
rescribe a few panel lines. The lower cowling piece is not a great fit as it is
a tad undersize, requiring filler to take care of the difference in size. While
that was drying, the rudder was attached.
With the various interior bits in place, the lower wing was mated to the fuselage. There is not the greatest fit on the forward section and there is a step between the fuselage wing root and the rest of the wing. Thanks to the soft plastic, this step is easily sanded out. Of course, I broke a couple of wing guns in the process. It is a toss-up as to whether I prefer these sorts of things molded in place, or separately on the sprues, where it can often be difficult to cleanly remove.
Following this, the radiator exhaust flaps were glued on. Airfix offers both open and closed and I chose the open option. Next, the horizontal stabs were glued in place. I then glued on the main gear doors after cutting them apart. This is not as easy as it should be as there is no demarcation groove to assist. I then looked for the clear bits and they were no where to be found. Not sure if I lost them or if they were never in the kit, but it was a bummer. I went to the Airfix web site and placed a request for the bits. Three weeks later, I had heard nothing. An inquiry on the forum resulted in a reliable e-mail. I got a verification of my request the next day and within two weeks the bits arrived. I sent a thank you note. The clear bits were masked and the the kit headed for the paint shop.
| COLORS & MARKINGS |
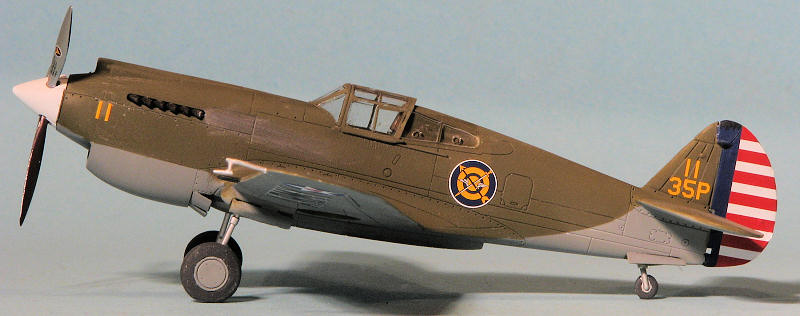
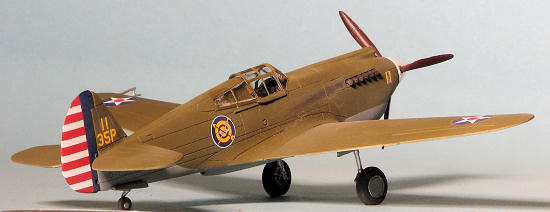
Pretty simple stuff on this one. The underside was painted Testors Neutral Grey enamel, then masking was done where needed and the upper surface painted in an OD that I had mixed for the earlier Dutch P-40N. Returning to the bench, the Chromate Green wheel wells were painted. I should mention that I also painted the tail gear door/well assembly at this time. This was glued in place as were the main landing gear. The main gear is a rather wobbly affair even when the glue is dry. These and the tail wheel had been painted with Alclad II Aluminum as had the back of the main wheels. The tires were painted with Floquil Weathered Black and the tail gear glued in. I then coated the airframe with Pledge (Future) in preparation for the decals.
 I need to
back up a tad. I painted both spinner bits Gloss White using Tru-Color lacquer
paint and the prop was painted Aluminum on the front. The back of the prop is
supposed to be Maroon #18. Not having this shade, I mixed up what I hoped would
be close using Tru-Color Vermillion and Pan-Am Blue.
I need to
back up a tad. I painted both spinner bits Gloss White using Tru-Color lacquer
paint and the prop was painted Aluminum on the front. The back of the prop is
supposed to be Maroon #18. Not having this shade, I mixed up what I hoped would
be close using Tru-Color Vermillion and Pan-Am Blue.
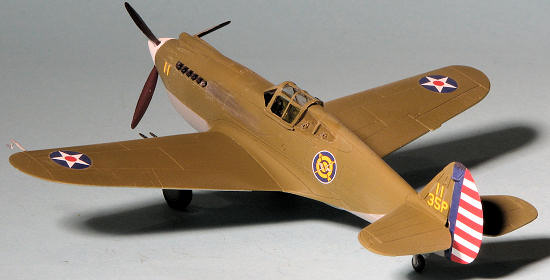
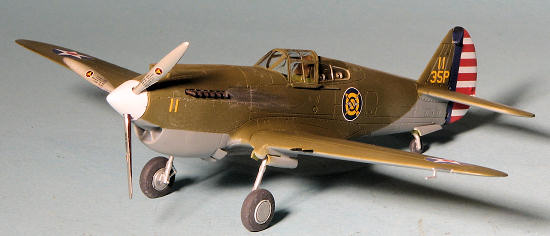
For markings, I used Starfighter Decals 72-134, which has four excellent choices. I decided on the markings for a P-40B of the 55 PS/35 PG in 1941. The decals themselves are really superb and quite opaque. I found that the left side set of rudder stripes did not take into consideration the rudder hinge and so it did not fit particularly well. You can either wing it and paint later, or remove this hinge and replace it once the decals are in place. I chose the former. The rudder decals would benefit from a bit of extra on the top and bottom as they do not quite cover the rudder. Fortunately, Tru-Color Vermillion and Pan-Am Blue are a perfect match for Insignia Red and Insignia Blue so I was able to touch things up using that.
| FINAL CONSTRUCTION |
 Once the
painting and decals were finished, the model was given a Matte Clear coat using
Gunze Flat Base mixed with Pledge. I hoarded several bottles once I heard that
Gunze acrylics were not longer being sold. Nearly gone :(. I then removed the
masks and with much effort, pushed on the main wheels. The main gear is so thin
I was constantly afraid I would break them. It got even worse when I tried to
install the separate outer hubs. I highly recommend gluing those on before
trying to install the wheels. I ended up having to chamfer the edges of the
inserts so they would more easily fit in place. I am not sure why these are so
tight. Next, the prop was installed. It is also a very tight fit. The last item
was the pitot tube. This is extremely fine and mine was not straight. Despite
some careful bending, I could not straighten it out. A bit more paint touch up
then the exhaust was added with pastels and that was it.
Once the
painting and decals were finished, the model was given a Matte Clear coat using
Gunze Flat Base mixed with Pledge. I hoarded several bottles once I heard that
Gunze acrylics were not longer being sold. Nearly gone :(. I then removed the
masks and with much effort, pushed on the main wheels. The main gear is so thin
I was constantly afraid I would break them. It got even worse when I tried to
install the separate outer hubs. I highly recommend gluing those on before
trying to install the wheels. I ended up having to chamfer the edges of the
inserts so they would more easily fit in place. I am not sure why these are so
tight. Next, the prop was installed. It is also a very tight fit. The last item
was the pitot tube. This is extremely fine and mine was not straight. Despite
some careful bending, I could not straighten it out. A bit more paint touch up
then the exhaust was added with pastels and that was it.
| CONCLUSIONS |
I enjoyed this build as much as I did the first time I built this kit. It makes into a very nice model and is a great value for the money. Will I build yet another? Well, I still have markings on the decal sheet to use!
| REFERENCES |
http://en.wikipedia.org
October 2012
Thanks to me for the kit and Starfighter Decals for the decals.
If you would like your product reviewed fairly and fairly quickly, please contact the editor or see other details in the Note to Contributors.