Hasegawa 1/72 B-26F/G Marauder
| KIT #: | 00557 |
| PRICE: | about $45.00 MSRP |
| DECALS: | Three options |
| REVIEWER: | Scott Van Aken |
| NOTES: |
| HISTORY |
In 1939, the United States Army Air Corps issued a specification for a twin-engined medium bomber, Circular Proposal 39-640. Six months later, Glenn L. Martin Company presented a design to the Air Corps. Peyton M. Magruder led the design team for this aircraft after Martin won the contract. This design, Martin Model 179, was accepted for production before a prototype even flew, due to the desperate need for medium bombers following the intensification of the war in Europe.
Once the first aircraft came off the production line in November 1940, Martin conducted tests, the results of which were promising. The first B-26 with Martin test pilot William K. "Ken" Ebel at the controls, flew on 25 November 1940 and was effectively the prototype. Soon after, it was turned over to the Army Air Corps to be service tested. It went from paper concept to working plane in less than two years.
 While the B-26 was a fast plane with better performance
than the contemporary B-25 Mitchell, its relatively small wing area and
resulting high wing loading (the highest of any aircraft used at that time) led
to tricky high-speed landings (approach at 140 mph (225 km/h) and stall at 130
mph (210 km/h) indicated airspeed). The R-2800 engines were reliable, but the
electric pitch change mechanism in the propellers required impeccable
maintenance and was prone to failure. Failure of the mechanism placed the
propeller blades in flat pitch with instant total loss of power. Due to the
rotund fuselage, the B-26 engines were placed far outboard, and loss of power on
one side resulted in a violent snap roll flipping the aircraft on its back. This
led to a high number of accidents during takeoff, thus earning B-26 the nickname
"Widowmaker" by its pilots. Other colorful nicknames included "Martin Murderer,"
"The Flying Coffin," "B-Dash-Crash," "The Flying Prostitute" (because it had no
visible means of support, referring to the small wings), and "The Baltimore
Whore" (because the Martin Company was located there) (Higham 1975).
While the B-26 was a fast plane with better performance
than the contemporary B-25 Mitchell, its relatively small wing area and
resulting high wing loading (the highest of any aircraft used at that time) led
to tricky high-speed landings (approach at 140 mph (225 km/h) and stall at 130
mph (210 km/h) indicated airspeed). The R-2800 engines were reliable, but the
electric pitch change mechanism in the propellers required impeccable
maintenance and was prone to failure. Failure of the mechanism placed the
propeller blades in flat pitch with instant total loss of power. Due to the
rotund fuselage, the B-26 engines were placed far outboard, and loss of power on
one side resulted in a violent snap roll flipping the aircraft on its back. This
led to a high number of accidents during takeoff, thus earning B-26 the nickname
"Widowmaker" by its pilots. Other colorful nicknames included "Martin Murderer,"
"The Flying Coffin," "B-Dash-Crash," "The Flying Prostitute" (because it had no
visible means of support, referring to the small wings), and "The Baltimore
Whore" (because the Martin Company was located there) (Higham 1975).
The toll eventually led to a halt in production. During this time a commission of inquiry (led by then-Senator Harry Truman) was appointed to look into the problem. When Truman and the other commission members arrived at the Avon Park Bombing Range, they were greeted by the still-burning wreckage of two crashed Marauders. Indeed, the regularity of crashes by pilots training at MacDill Field — up to fifteen in one thirty day period — led to the only mildly exaggerated catchphrase, "One a day in Tampa Bay."
 The resulting aircraft (designated B-26B) had a 6 ft
(1.8 m) increase in wingspan, and other changes, some of which reduced the
aircraft's speed. The newer version had reduced landing and stall speeds. The
safety of the B-26B was an immense improvement: it had the lowest attrition rate
of any aircraft used during the war. Nevertheless, it remained a challenging
plane to fly and continued to be unpopular with potential crews throughout its
life.
The resulting aircraft (designated B-26B) had a 6 ft
(1.8 m) increase in wingspan, and other changes, some of which reduced the
aircraft's speed. The newer version had reduced landing and stall speeds. The
safety of the B-26B was an immense improvement: it had the lowest attrition rate
of any aircraft used during the war. Nevertheless, it remained a challenging
plane to fly and continued to be unpopular with potential crews throughout its
life.
B-26 crews began flying combat missions in the South Pacific in spring 1942, but most of the aircraft were sent to England and the Mediterranean. The 22nd Army Air Force Bomb Group was originally based in northern Australia to protect the aircraft from Japanese fighter attack but often staged its flights out of Port Moresby, New Guinea. On 9 June 1942, Lt. Cmdr. Lyndon B. Johnson flew on a bombing mission departing for Lae, New Guinea. Johnson's B-26 developed engine trouble and was forced to return to base.
Like the B-25, the B-26 had been designed for medium-altitude bombing, but the war brought medium bombers down to treetop level, and later versions of the B-26 were equipped with a side-mounted battery of forward-firing machine guns for strafing ground targets. The low-level bombing of Utah Beach by the Marauders during the Normandy Invasion contributed to the low casualties among the American assault force.
 The B-26 was
phased out of Army Air Force service before the end of the war. Their last
mission was flown in May 1945.
The B-26 was
phased out of Army Air Force service before the end of the war. Their last
mission was flown in May 1945.
According to an article in an edition of AOPA Pilot on Kermit Weeks's "Fantasy of Flight", the Marauder had a tendency to "hunt" in yaw. This instability is similar to "Dutch roll". This would make for a very uncomfortable ride, especially for the tail gunner.
Below are specs for the two variants done in this boxing.
| THE KIT |
I'm going to start this description by stating that I was not able to find any sprues that were listed specifically for the F/G variant. What's more, I've not bought or seen the earlier B-26B kit but can tell you that Hasegawa did change the wing incidence, making this a whole new fuselage. Looking at the parts diagram in the instructions, it seems that there are only a few small parts not used in this kit. I do note that there is no D, H, or I sprue with this one. Perhaps those are the ones that are used on the earlier version. Another note is that there are two sprues like the one with the prop blade. I only used one in the photo.
 Anyway, the kit is very nicely molded and I noticed no
molding flaws in my inspection of the kit parts. It very much looks like
Hasegawa has decided to continue the detail level of their superb B-25s by
offering full cockpits, full bomb bay and detailed gunner's positions. In fact,
the horizontal stabilizer assembly is in clear plastic as there are two small
windows on the upper portion of it for the rear gunner. Even the rear gunner
station is nicely done for this scale. The landing gear are rather complex and
though it looks fragile, it should hold up well. The bomb bay provides a full
load of four 500 lb bombs and one has the option of having the bay doors open or
closed. A separate closed bay door piece is provided for that. Of course, closing them allows one to be lazy and not install the bombs.
Anyway, the kit is very nicely molded and I noticed no
molding flaws in my inspection of the kit parts. It very much looks like
Hasegawa has decided to continue the detail level of their superb B-25s by
offering full cockpits, full bomb bay and detailed gunner's positions. In fact,
the horizontal stabilizer assembly is in clear plastic as there are two small
windows on the upper portion of it for the rear gunner. Even the rear gunner
station is nicely done for this scale. The landing gear are rather complex and
though it looks fragile, it should hold up well. The bomb bay provides a full
load of four 500 lb bombs and one has the option of having the bay doors open or
closed. A separate closed bay door piece is provided for that. Of course, closing them allows one to be lazy and not install the bombs.
The upper turret is a mini-model in itself and looks
quite complex. This kit includes side gun packs which may not have been part of
the B kit. I found it odd that the two props have separate hubs. There are a
considerable number of small windows in the Marauder and those are so designed
to allow external application, a real plus for most of us. I can
attest that this aircraft is a major
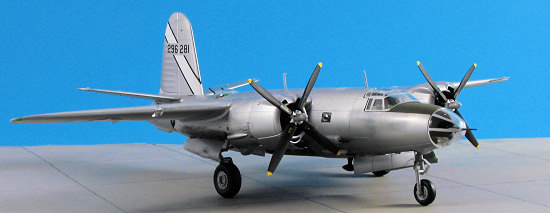 tail-sitter, thanks to the forward raked
main gear as much as anything. Finding room for nose weight seems pretty well
impossible as it will take a considerable amount so a tail stand is provided
tail-sitter, thanks to the forward raked
main gear as much as anything. Finding room for nose weight seems pretty well
impossible as it will take a considerable amount so a tail stand is provided
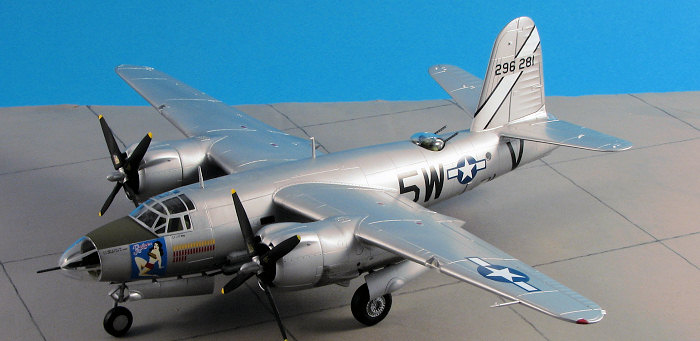
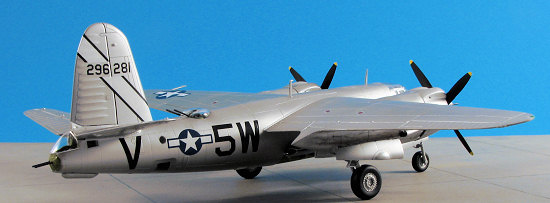
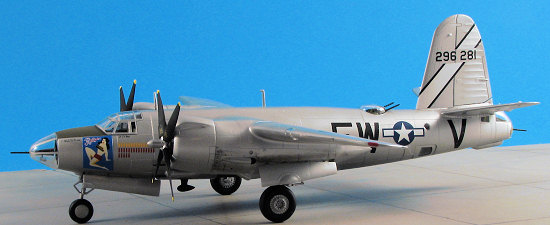
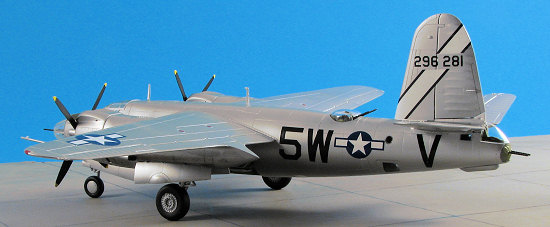
Instructions are the usual for Hasegawa and superbly done with Gunze paint references. There are markings for three aircraft. First is the box art plane from the 587th BS/394th BG in 1944. This unpainted metal plane has a nice nose art. The builder will have to paint the medium blue background. Next is a 459th BS/344th BG aircraft with the upper surfaces painted in Olive Drab. Finally, another plane from the 394th BG, though this one from the 584th BS. Again the OD background to the nose art will need to be painted. Decals are the new type with white white and a properly non-bright reds. Should work fine with setting solutions. I anticipate there being many aftermarket sheets for these planes in the near future.
| CONSTRUCTION |
It will come to no one's surprise that I started by searching out subassemblies. There are quite a few of them and amongst those found were wing and bomb assembly as well as cementing the main gear bits. I then moved to the interior and assembled most of the cockpit and all of the bomb bay pieces. I chose to use the door actuating mechanism because I want my plane with doors open. Fitting these takes a bit of thought as there are lots of possible mounting holes, but only a few are for these pieces. You will find, as did I, that there are a considerable number of little 'sprue stubs' to remove and so a bit more cleanup than on some kits is needed. However, this is all good as it means few ejector pin marks. Not that those are absent as the bomb bay has quite a few and all are not going to be easy to fill so I left them all as is.
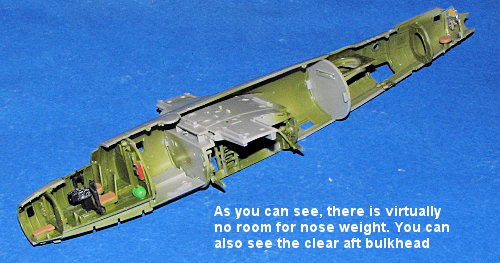 I then
painted all of the interior bits with Colourcoats US interior green. The very
aft bulkhead is clear as there is a window in it. Don't forget to mask it. When
this was done, I drilled out the needed holes in the fuselage for those bits
that are peculiar to the B-26. I then did some detail painting on the various
little interior modules and on the fuselage interior. The kit instructions give
no information in this regard, but I'm sure that not everything was interior
green. With that done, I started cementing the various modules into one interior
half. The fit is fairly good, though some of the pieces didn't have matching
alignment areas on the fuselage as I'd have hoped. Still, I did manage to get
everything in place, test fitting the other half after every section had been
installed. It is quite a tight fit.
I then
painted all of the interior bits with Colourcoats US interior green. The very
aft bulkhead is clear as there is a window in it. Don't forget to mask it. When
this was done, I drilled out the needed holes in the fuselage for those bits
that are peculiar to the B-26. I then did some detail painting on the various
little interior modules and on the fuselage interior. The kit instructions give
no information in this regard, but I'm sure that not everything was interior
green. With that done, I started cementing the various modules into one interior
half. The fit is fairly good, though some of the pieces didn't have matching
alignment areas on the fuselage as I'd have hoped. Still, I did manage to get
everything in place, test fitting the other half after every section had been
installed. It is quite a tight fit.
Now I'm sure that there are folks out there who would leave out some of this stuff. After all, some will be pretty well invisible when the halves are closed. It is my feeling that if it is included, then the review would be less than totally honest if not all the bits are put in there. After all, the purchaser is buying a complete kit, not one with bits missing and most of us would include this stuff anyway. It is all part of the package.
As I was letting this stuff dry, I got an e-mail from a
reader who said he got his plane to sit on its gear by packing the radio
compartment and nacelles behind the engine with weight. Figuring I had nothing
to lose, I filled this area with about a half dozen conical fishing weights. It
definitely adds to the heft of things. Then the other fuselage half was
attached. I mentioned it was a tight
 fit, so much so that I had to use clamps
and cemented it during several sessions, doing a bit at a time. Then I applied
filler to nearly all the seams. The upper ID lights just in front of the fin
were such that there was a gap around them when the halves were joined. I had to
fill and sand those away for there was no way I could see to save that detail.
It is times like this that I wish these bits were separate. I also realized at
this time that I'd forgotten to install the lower waist guns, but it turns out
that they will not be easily seen anyway so no problem.
fit, so much so that I had to use clamps
and cemented it during several sessions, doing a bit at a time. Then I applied
filler to nearly all the seams. The upper ID lights just in front of the fin
were such that there was a gap around them when the halves were joined. I had to
fill and sand those away for there was no way I could see to save that detail.
It is times like this that I wish these bits were separate. I also realized at
this time that I'd forgotten to install the lower waist guns, but it turns out
that they will not be easily seen anyway so no problem.
Meanwhile I cemented the wings together and then glued together the engine nacelles. It is recommended that you attach the nacelles as early as possible as the fit isn't the greatest at the upper top. I again had to clamp those in place to prevent there being a step and even this didn't fully remove it. The little tail cone pieces are very difficult to install and I came to find out that one slides them in from the top or bottom to get them to fit. It is quite tight.
Back at the fuselage, the clear horizontal stab was glued together and then glued to the fuselage. Filler was needed at the forward join to take care of a step. The fin was then glued on and the join there was also smoothed with some filler. I then masked the small windows in the rear gunner's area, forgetting to remove them until after I took pictures of the model!
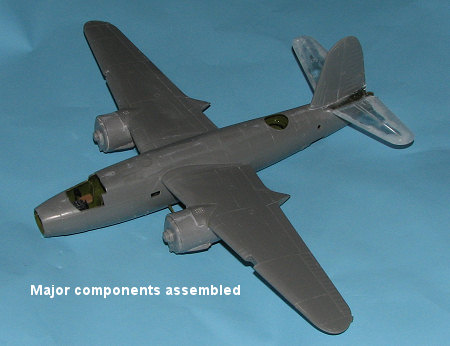
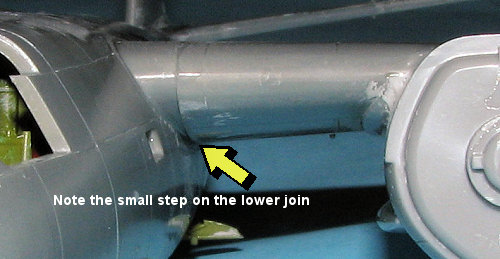 With
the wings complete and the nacelles in place and all the usual filler taken care
of, I slid the wings onto the short stubs. One side was not a problem while the
other required some grunt to get it in place. I also discovered that the wings
were a bit thicker than the fuselage roots or I messed something up. It results
in a step that I placed on the underside. I also needed to use super glue and
accelerator to get a tight wing fit. I tacked a few spots with the super glue
and used standard liquid cement for the rest.
With
the wings complete and the nacelles in place and all the usual filler taken care
of, I slid the wings onto the short stubs. One side was not a problem while the
other required some grunt to get it in place. I also discovered that the wings
were a bit thicker than the fuselage roots or I messed something up. It results
in a step that I placed on the underside. I also needed to use super glue and
accelerator to get a tight wing fit. I tacked a few spots with the super glue
and used standard liquid cement for the rest.
 I
now had a pretty complete airframe and so decided to move on to the painting
portion of things. This meant quite a bit of masking for the cockpit canopy and
nose section. The cockpit was pretty easy, but the nose, with all those compound
curves was a bit more of a challenge. They were 'glued' to the airframe using
clear paint. Thankfully, all the myriad little windows can be added near the end
so I only had to stuff the rear gunner's compartment and the upper turret hole
with tissue. I also used the 'closed' bomb bay to cover the bay area itself
after enlarging the holes where the hinges protruded.
I
now had a pretty complete airframe and so decided to move on to the painting
portion of things. This meant quite a bit of masking for the cockpit canopy and
nose section. The cockpit was pretty easy, but the nose, with all those compound
curves was a bit more of a challenge. They were 'glued' to the airframe using
clear paint. Thankfully, all the myriad little windows can be added near the end
so I only had to stuff the rear gunner's compartment and the upper turret hole
with tissue. I also used the 'closed' bomb bay to cover the bay area itself
after enlarging the holes where the hinges protruded.
| COLORS AND MARKINGS |
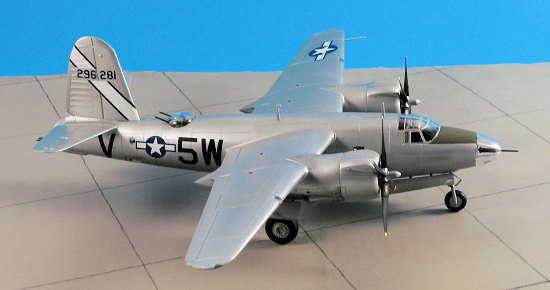
Since I didn't have any aftermarket decals for this
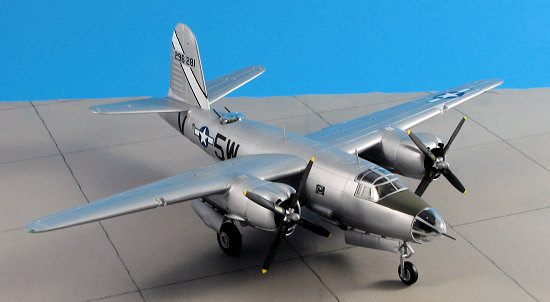
kit, I used the box art option, which meant overall aluminum with an OD
anti-glare panel and a blue background for the nose art. I had run out of
Humbrol #11 and Alclad II aluminum, so decided to use some of the Xtracolor
Aluminum enamel that I had. One nice thing about having a lot of paint is that
one rarely totally runs out of a color! This was thinned with lacquer thinner
and went on well. It dries somewhat glossy, which is good for paint. During this
process, I repainted the wheel wells with the Aluminum, but left the bomb bay in
Interior Green. I used Tamiya Blue for the Medium Blue area as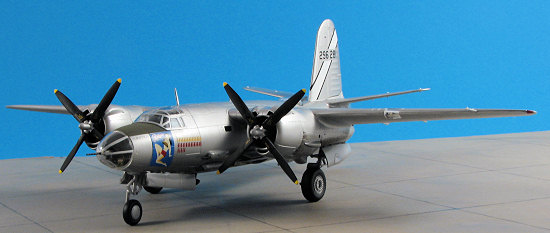 it seemed to be about the right color and I already had some mixed up from the
Porsche racer I did several months back.
it seemed to be about the right color and I already had some mixed up from the
Porsche racer I did several months back.
When the paint had dried, I took the kit back to the workbench to glue in the landing gear. This is a relatively complex affair and so I had to take my time in assembling it. When doing the main gear, I found that one strut just wouldn't fit well, necessitating some trimming of the tab to get it to fit. The other was no problem at all. Quite odd. One really needs to get all the main gear pieces glued up well as the angle of the gear means there will be quite a bit of stress on the joins. Even more so with all the additional weight.
While that was drying, I constructed and painted the bombs and the wheels. I also started work on the main turret, getting it ready to install at the end of things. The gear doors I left off until after decaling.
The kit decals were a real delight to use. I applied the weakest setting solution I had, Microsol, and that is all that was needed to get them to behave. After 30 plus years, Hasegawa has finally gotten 'the word' on decals and I'm quite pleased to see it. Now it needs to be done all the time.
| FINAL BITS |
Back to installing parts, and there are a LOT of them.
First, I realized I needed to attach some more bits, like the side gun pods and
the small fairing under the tail. Those were glued in place after making the
holes MUCH larger (note to self; make sure they are the proper size before
cementing the fuselage halves together) and then those areas were repainted. I
then started gluing in the little 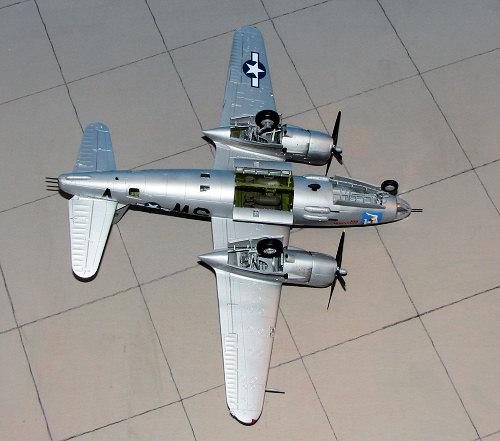 clear
windows. I used clear gloss paint on these as any use of glue with mar the
Xtracolor paint, requiring sanding and repainting. Before adding the windows on
the radio compartment, I painted the weights one could see with matte black. I
also had to glue on the rear gunner's bits before attaching that transparency.
The flexible 'bag' the guns go through had to have the holes enlarged and needed
to be held in place while the cement dried, for it kept wanting to pop free.
clear
windows. I used clear gloss paint on these as any use of glue with mar the
Xtracolor paint, requiring sanding and repainting. Before adding the windows on
the radio compartment, I painted the weights one could see with matte black. I
also had to glue on the rear gunner's bits before attaching that transparency.
The flexible 'bag' the guns go through had to have the holes enlarged and needed
to be held in place while the cement dried, for it kept wanting to pop free.
With all the clear bits save the landing light covers in place, I then installed the bombs and the outer rack. The instructions are a tad vague on this, but it is simple enough to eventually figure out. Then the doors were glued on. Fit here was quite good and if you had pre-cemented the two doors together, they will 'snap' in place. The same cannot be said of the main gear doors. Each one of these had to be held in position while the glue dried. Nose gear doors were an easy fit as were the main wheels and the nose gear wheel itself. Two of these are supplied, but the one with the separate insert is what is used.
While this was drying, I attempted to attach the spirals to the prop spinners, but totally botched it so gave them up as a nice idea, but not something I could do. The spinners were pressed onto the props. BTW, if the prop data markings look like decals, well, they were on the real aircraft so making them matte would not be accurate.
Still more 'stuff' and that is in the form of aerials and pitot tube. I glued in the landing light cups and put in #25 MV lenses. The covers to the landing lights were press fits. The last things to do were to remove the masking from clear bits, paint the exhaust and formation lights, and as a final touch, I added some exhaust streaks using Marmo's Magic Dust. This stuff is great for glossy finishes as it sticks much better than standard pastels.
| CONCLUSIONS |
So there you have it. Another fine twin from Hasegawa. I will have to say that I found the B-25 to be an easier build. This one was a lot more 'fiddly' than the Mitchell and thus it took me longer to complete it than I'd originally thought. However, it is a beauty when it is done so very much worth the additional effort. I think that you'll find it to be a model you'll enjoy building and it helps to fill a space in my WWII bomber collection.
August 2007
#1479 in a series
Copyright ModelingMadness.com. All rights reserved.
If you would like your product reviewed fairly and fairly quickly, please contact the editor or see other details in the Note to Contributors.