Hasegawa 1/72 P-40N Warhawk
| KIT #: | 00293 |
| PRICE: | 1400 yen SRP at the time |
| DECALS: | Two options |
| REVIEWER: | Scott Van Aken |
| NOTES: | 337 FS boxing from 2002 |
| HISTORY |
 production blocks dropped a .50 in (12.7 mm) gun from each
wing, bringing the total back to four; later production blocks reintroduced it
after complaints from units in the field. Supplied to Commonwealth air forces as
the Kittyhawk Mk IV. A total of 553 P-40Ns were acquired by the Royal
Australian Air Force, making it the variant most commonly used by the RAAF.
Subvariants of the P-40N ranged widely in specialization from stripped down
four-gun "hot rods" that could reach the highest top speeds of any production
variant of the P-40 (up to 380 mph), to overweight types with all the extras
intended for fighter-bombing or even training missions. The 15,000th P-40 was an
N model decorated with the markings of 28 nations that had employed any of
Curtiss-Wright's various aircraft products, not just P-40s. "These spectacular
markings gave rise to the erroneous belief that the P-40 series had been used by
all 28 countries." Survivors were redesignated as ZF-40N in June 1948.
production blocks dropped a .50 in (12.7 mm) gun from each
wing, bringing the total back to four; later production blocks reintroduced it
after complaints from units in the field. Supplied to Commonwealth air forces as
the Kittyhawk Mk IV. A total of 553 P-40Ns were acquired by the Royal
Australian Air Force, making it the variant most commonly used by the RAAF.
Subvariants of the P-40N ranged widely in specialization from stripped down
four-gun "hot rods" that could reach the highest top speeds of any production
variant of the P-40 (up to 380 mph), to overweight types with all the extras
intended for fighter-bombing or even training missions. The 15,000th P-40 was an
N model decorated with the markings of 28 nations that had employed any of
Curtiss-Wright's various aircraft products, not just P-40s. "These spectacular
markings gave rise to the erroneous belief that the P-40 series had been used by
all 28 countries." Survivors were redesignated as ZF-40N in June 1948.| THE KIT |
Hasegawa's P-40 kits have been around for a very long time. They were one of
their first series of engraved kits and a 1976 catalogue I have shows them as
part of their line-up. As such, these kits have very nice external detailing; to
an extent. The wheel wells have no detail and are actually a bit shallow. The
rear cockpit section is lacking any of the panel lines normally seen. There are
some sink areas on my kit, the back cockpit area being one offender. The worst
area is the upper wing section, which has
 one that is the length of the flap.
The cockpit itself is very basic with a seat shape, instrument panel, floor and control stick. At this time, one was expected to use the pilot figure, which would cover up most of the lack of detail or accuracy. Hasegawa likes to mold pieces on larger parts, hence the radio mast and pitot tube are already in place, ready to be knocked off by handling.
The wing is a single lower piece with two upper wing sections. Typical of P-40 kits in this scale, the main wing guns are on the centerline of the wing instead of just below it. Main landing gear are lacking retraction struts, again, something pretty normal in this scale. Gear doors are molded in one piece and will need to be cut for the gear down option. Prop and spinner are separate items. Exhaust are a single piece that can be installed after the kit has been painted. This is all topped by a one-piece canopy section that is quite clear. Decals are provided for two options; one from the 337 FS/502 FG with the large parrot's head marking and the other a somewhat generic 7FS/49 FG plane from 1944.
| CONSTRUCTION |
First thing I did was to look for aftermarket. I found a True Details cockpit set for this in the stash and while I looked for replacement resin exhaust, was unable to locate any. I then painted all the interior bits with Testors Interior Green and then proceeded to detail paint and assemble the resin cockpit. One has to enlarge the gun sight opening at the top of the anti-glare panel after removing the rather pathetic looking stock gun sight.
I then assembled the nose radiator bits and closed the
fuselage halves. I also built the wings. The wings have very long sink areas on
the top inboard of the ailerons that needed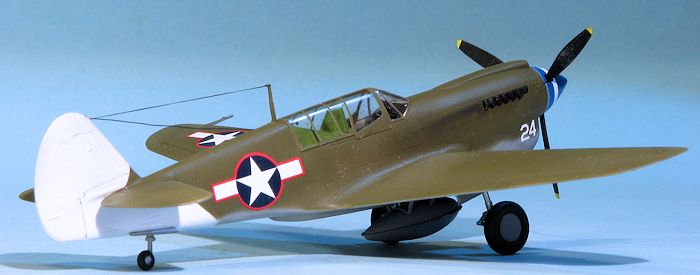 filled. There is also a rather poor
fit over the landing gear 'knuckles' on the front that needed work. I then installed the
instrument panel. This was followed by the cockpit. In this case, I had to
remove the old mounting stubs and shave off quite a bit of the lower floor's
excess resin to get the wings to fit. When installing the cockpit, I used
superglue to first cement one of the interior side pieces to the fuselage wall.
This had to be clamped. When dry, I did the same on the other side.
filled. There is also a rather poor
fit over the landing gear 'knuckles' on the front that needed work. I then installed the
instrument panel. This was followed by the cockpit. In this case, I had to
remove the old mounting stubs and shave off quite a bit of the lower floor's
excess resin to get the wings to fit. When installing the cockpit, I used
superglue to first cement one of the interior side pieces to the fuselage wall.
This had to be clamped. When dry, I did the same on the other side.
With the fuselage together along with the interior, I then attached the wings. As mentioned previously, I had to sand away quite a bit of the large pour stub under the fuselage floor to get the wings to fit. This was pretty much a sand, test fit, repeat sort of thing. Eventually I got it to where the wing fit. This is a very good fit so I'm pleased with how it turned out. On the underside there is a seam that needs filled as Hasegawa molded part of the flap with the upper wing piece and part with the lower wing, leaving a gap. I then attached the tailplanes, which are a snug fit.
At this point I masked and attached the canopy, getting ready to paint.
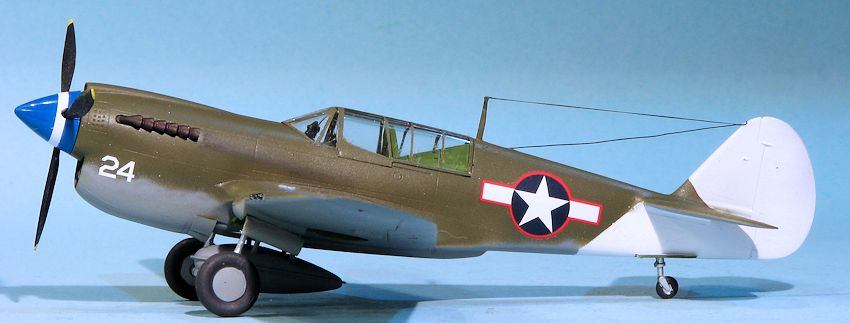
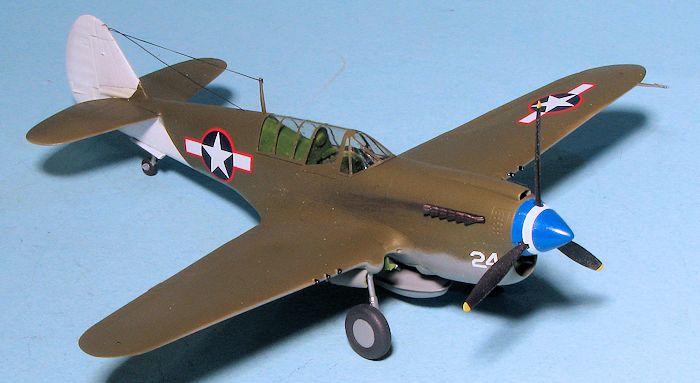
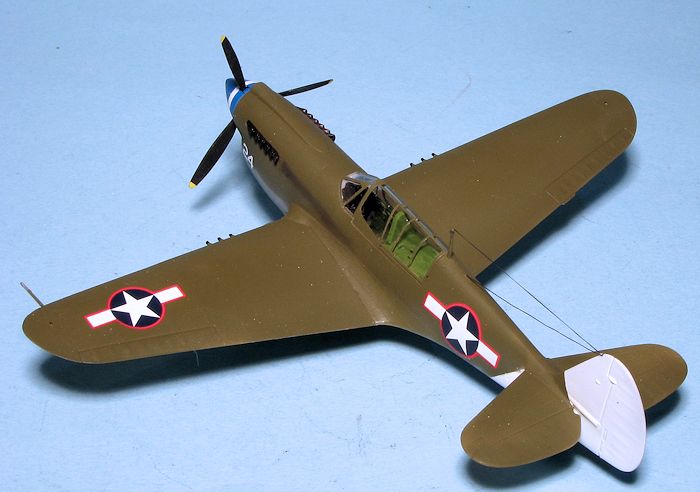
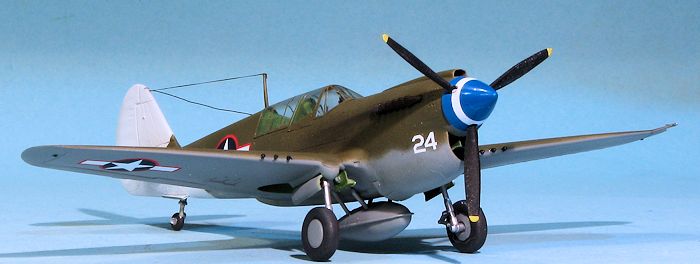
| COLORS & MARKINGS |
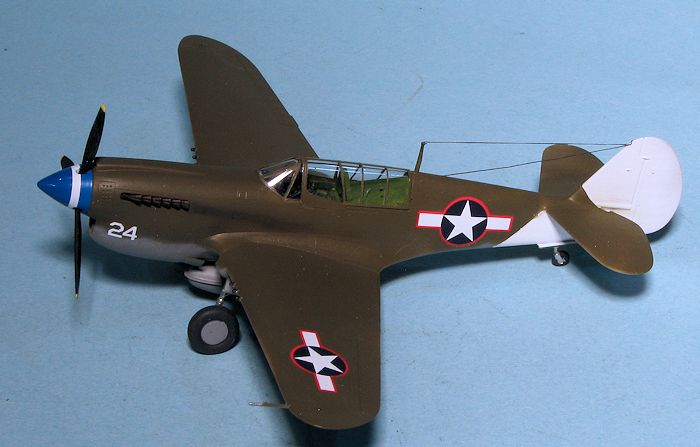 Often times, decal sheets will include markings which are generally lacking
in a lot of color or art work just to fill up a sheet. These schemes are
almost never modeled, so I decided to pick one like that for this model. It
is on FCM sheet # 72024 that shows a 49 FG P-40N that has little more than
insignia and a nose number. The plane is in the standard scheme with a white
after fuselage and rudder, but with the tailplanes still in camouflage. This
aircraft, from 1943, sports the short lived red surround insignia.
Often times, decal sheets will include markings which are generally lacking
in a lot of color or art work just to fill up a sheet. These schemes are
almost never modeled, so I decided to pick one like that for this model. It
is on FCM sheet # 72024 that shows a 49 FG P-40N that has little more than
insignia and a nose number. The plane is in the standard scheme with a white
after fuselage and rudder, but with the tailplanes still in camouflage. This
aircraft, from 1943, sports the short lived red surround insignia. | FINAL CONSTRUCTION |
 e went on without
a hitch and I continued the build, adding gear doors and wheels. Once I
mounted the prop, I sprayed the airframe with clear matte acrylic. The
exhaust were installed after painting them Vallejo tinny tin. BTW, one
should leave the mold seams on the exhaust as this nicely represents the
weld seam on each of the stacks.
e went on without
a hitch and I continued the build, adding gear doors and wheels. Once I
mounted the prop, I sprayed the airframe with clear matte acrylic. The
exhaust were installed after painting them Vallejo tinny tin. BTW, one
should leave the mold seams on the exhaust as this nicely represents the
weld seam on each of the stacks. | CONCLUSIONS |
| REFERENCES |
http://en.wikipedia.org/wiki/Curtiss_P-40_Warhawk
December 2014 Thanks to me for the review kit and resin. Thanks to FCM
for the decals. If you would like your product reviewed fairly and fairly quickly, please
contact
the editor
or see other details in the
Note to
Contributors.