Airfix 1/72 Hawk 81A-2
| KIT #: | A01003 |
| PRICE: | $6.99 SRP |
| DECALS: | One option |
| REVIEWER: | Scott Van Aken |
| NOTES: | New tool kit |
| HISTORY |
The Curtiss P-40 Warhawk
was an American single-engine, single-seat, all-metal fighter and ground
attack aircraft that first flew in 1938. The P-40 design was a modification
of the previous Curtiss P-36 Hawk which reduced
 development time and enabled
a rapid entry into production and operational service. The Warhawk was used
by the air forces of 28 nations, including those of most Allied powers
during World War II, and remained in front line service until the end of the
war. It was the third most-produced American fighter, after the P-51 and
P-47; by November 1944, when production of the P-40 ceased, 13,738 had been
built, all at Curtiss-Wright
Corporation's main production facilities at Buffalo, New York.
development time and enabled
a rapid entry into production and operational service. The Warhawk was used
by the air forces of 28 nations, including those of most Allied powers
during World War II, and remained in front line service until the end of the
war. It was the third most-produced American fighter, after the P-51 and
P-47; by November 1944, when production of the P-40 ceased, 13,738 had been
built, all at Curtiss-Wright
Corporation's main production facilities at Buffalo, New York.
As a bit of a note, the Hawk 81A-2 was the version of the early P-40 that
was built specifically for the British. According to the reference, the
Flying Tiger Hawk was an 81A-3 version. Visually, there is no difference. I
should also point out that the box art is pure fiction. The Flying Tigers
rarely, if ever, fought the Japanese Navy and so shot down few if any Zeros.
Most Japanese aircraft in China and Burma during the seven month 'reign' of the Tigers
were fixed landing gear Ki-27s with some Ki-43s tossed in the mix.
| THE KIT |
This
is not the first 1/72 P-40B/C. Frog was probably the initial developer of
one of these and is the basis for the Academy kit and probably others.
Though Jo-han listed one on box sides, they never carried through with
developing the kit prior to the company going under. There have also been early
P-40s by short run and resin kit manufacturers.
The kit is well shaped and has engraved panel lines. These panel lines are
actually far deeper than they need to be for a 1/72 kit and this has put off
several mode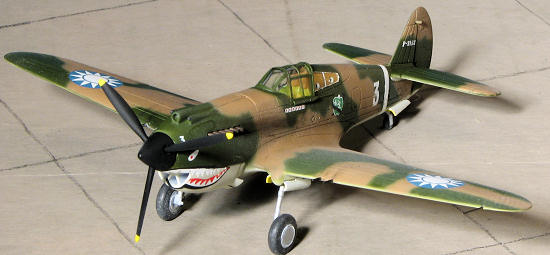 lers who have seen these kits. Frankly, the majority of modelers
will not care one way or the other and while it is said that they will
soften out under paint, you will need a lot of paint!
lers who have seen these kits. Frankly, the majority of modelers
will not care one way or the other and while it is said that they will
soften out under paint, you will need a lot of paint!
The interior floor slots into the inside of the lower wing, to be followed
by a seat, stick and instrument panel. A decal is provided for instruments.
There is also detailing on the inside of the fuselage walls. Nothing great,
but better than a blank slate. The upper cowling is a separate piece to
facilitate the installation of the prop so it can spin. The lower
cowling/radiator is also separate. This will eliminate the need to fill
seams in these areas. The kit comes with open or closed cowl flap and can be
built with gear up, though you will need to fabricate your own stand. There
are separate exhaust sections and the kit comes with a pilot. The canopy is
clear, but thick and can only be glued in the closed position. I should also
mention that there is wheel well detailing and the wheels have flat spots
molded on them.
Hard to believe that the instructions for this comprise 16 steps, but they
do. You will have to cut off a radio mast molded on one fuselage half, but
that is about it. Naturally, all color numbers are Humbrol. The only cross
reference is on the back of the box and that is only for external painting
information. The lone markings option is for Charles Older's #68 of the 3rd
Pursuit Squadron 'Hells Angels' in US
equivalent RAF colors. The decal sheet is nicely printed with data markings
where appropriate. I think the roundels are a bit too light, but then I have
been used to seeing darker blue for these things for decades. There are
aftermarket sheets if one wants something different.
| CONSTRUCTION |
Airfix designed this kit to bring back the appeal of
the inexpensive and somewhat easy to build kit that was the mainstay of Airfix
during the 1960s and 1970s. What this means is that you will not find fiddly
details such as 25 piece cockpits, but will find the kit well engineered. I
started this one by first gluing together all the cockpit bits. There are four
of them; seat, stick, instrument panel and floor. I was warned that the control
stick was easy to break so carefully removed mine with a fine razor saw and
equally carefully cleaned up the sprue gate remnants with a very sharp scalpel.
Once all these bits were assembled, they and the inside of the fuselage
 walls
were painted an interior green. As my Testors had turned to a goo, I used
Vallejo #967, which is supposed to be a similar color. It is a bit bright for my
tastes, but brushes on well. I then painted several other inside bits with matte
black using Citadel colors (which do not stick well to bare plastic and need an
undercoat).
walls
were painted an interior green. As my Testors had turned to a goo, I used
Vallejo #967, which is supposed to be a similar color. It is a bit bright for my
tastes, but brushes on well. I then painted several other inside bits with matte
black using Citadel colors (which do not stick well to bare plastic and need an
undercoat).
Once that was dry, I made a tape shoulder harness and started gluing the fuselage. The interior fits atop the wing and can be installed after the rest of the fuselage is complete. I did have to use some filler on the wing near the landing gear knuckle protrusions. The fuselage went fairly quickly. This is as much thanks to the rather soft plastic Airfix uses as anything. The large sprue gates resulted in a few notches in the plastic that needed a bit of filler once the part was in place. My fuselage halves were a bit warped so needed tape to hold them together while the glue dried.
I then attached the upper and lower cowling sections. The lower cowling was the poorest fitting part of the kit, leaving large seams. The cockpit was glued to the upper wing, the head rest installed in the fuselage and then the wing assembly glued to the fuselage. I also glued the horizontal stabilizers in place. The fit of these last two is really quite good. Then the inevitable gaps were filled and sanded down. Of course, I broke one of the wing guns during this and I would be surprised if it were the only time!
| COLORS & MARKINGS |
After masking the cockpit, I started looking for
paint. Now the instructions state that these planes were painted in US
equivalent paints and not official RAF colors. Using the very handy IPMS
Stockholm paint chart conversion, the colors turned out to be some I actually had. So I
used very thin Testors enamels so that I could hand spray the colors. The
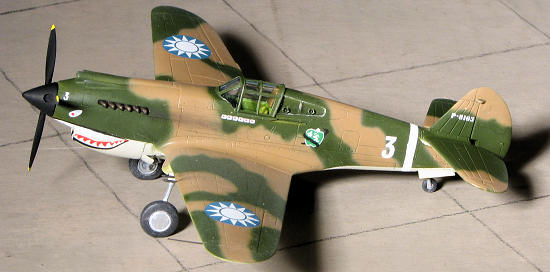
underside was FS 36622 light grey and when dry, that was masked and the upper
side was painted FS 34097 dark green. I first tried FS 34102, but it was too
light when compared to an autographed color photo of the Flying Tigers in
flight. The 34097 is darker and closer to what was in the photo. Then I painted
the earth shade using FS 30219. There was the usual back and forth to take care
of glitches. The canopy was painted dark green at this time and attached later
in the build. The back quarter panels were not painted as these were, I believe,
simply screwed together plexiglas.
paint chart conversion, the colors turned out to be some I actually had. So I
used very thin Testors enamels so that I could hand spray the colors. The
underside was FS 36622 light grey and when dry, that was masked and the upper
side was painted FS 34097 dark green. I first tried FS 34102, but it was too
light when compared to an autographed color photo of the Flying Tigers in
flight. The 34097 is darker and closer to what was in the photo. Then I painted
the earth shade using FS 30219. There was the usual back and forth to take care
of glitches. The canopy was painted dark green at this time and attached later
in the build. The back quarter panels were not painted as these were, I believe,
simply screwed together plexiglas.
| FINAL CONSTRUCTION |
With the colors on and ancillery bits painted (spinner, gear doors, wheels, prop), it was time to put the gear under it. For the tail gear, the open door piece has to be installed first. The main gear are very thin and the fit is not as tight as I would have liked.
 I initially
started to attach the wheels to gear prior to putting on the wheel covers, but
this brought fourth two issues. One is the the fit on the axles is VERY tight,
so I backed them off and thinned the attachment points a bit. The gear are so
thin that I was truly afraid I would snap them with any struggling. Secondly the
inserts are even tighter and not only required some sanding down along the
edges, but I ended up using a pair of pliers suitably softened with material to
get them in the wheels. During this time, I painted the wheel wells in yellow
zinc chromate before attaching the gear doors.
I initially
started to attach the wheels to gear prior to putting on the wheel covers, but
this brought fourth two issues. One is the the fit on the axles is VERY tight,
so I backed them off and thinned the attachment points a bit. The gear are so
thin that I was truly afraid I would snap them with any struggling. Secondly the
inserts are even tighter and not only required some sanding down along the
edges, but I ended up using a pair of pliers suitably softened with material to
get them in the wheels. During this time, I painted the wheel wells in yellow
zinc chromate before attaching the gear doors.
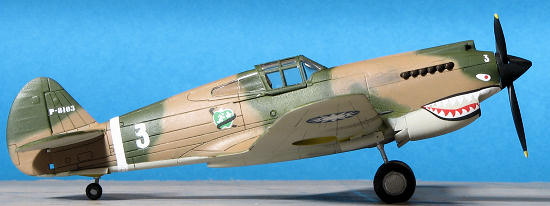
Before putting on the last bits, I gave the kit a coat of gloss clear and put on the decals. I have Microscale sheet 72-10, Flying Tiger Aces of which I had already used several schemes, so thought I would use one of the remaining three out of the seven that were initially offered. This sheet has the darker blue roundels of which I am more familiar.
So I soaked off a small decal I would not be using and it came away just fine. Then I cut out the shark mouth. Well, it did not work so well, falling into several pieces. It also did not fit well, being designed for the Frog kit. So I coated the rest of the decal sheet with Testors Metallizer Sealer, something I should have done from the start. I used the kit shark mouth as it was designed to fit. All went well until shortly after applying setting solution, I stupidly grabbed the kit by the nose, thus smudging the now very soft and pliable decal.
AUUUUGH!
 Regaining
my composure, I fixed up the nose decal best I could, realizing that I would
have to paint in the smudged areas once that was cleaned up. I also noticed that
I had broken off two more guns and could not find the remnants to reinstall. The
guns were replaced and the decals finally put on with the sharkmouth repainted
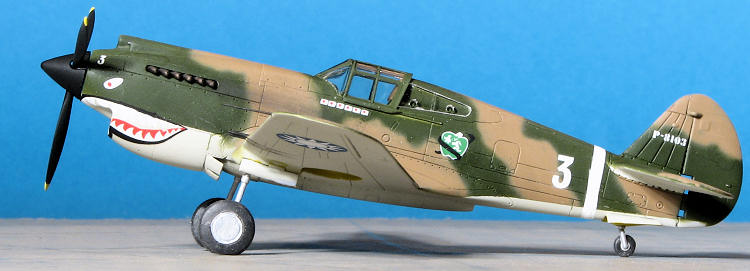
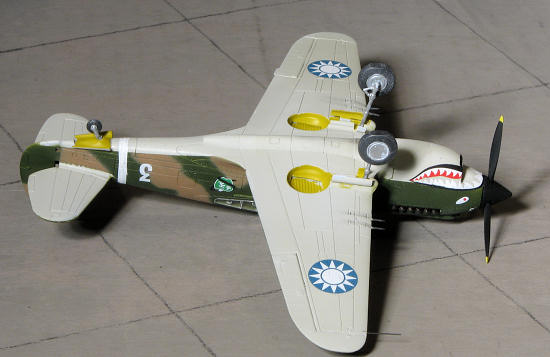
where I screwed it up. I did the aircraft in the markings of Dick Rossi, who
flew with the 1st Pursuit Squadron (Adam and Eves), and since his aircraft had a
black spinner, so does mine. With all the markings in place, I then sprayed on a
matte coat to seal in the decals.
Regaining
my composure, I fixed up the nose decal best I could, realizing that I would
have to paint in the smudged areas once that was cleaned up. I also noticed that
I had broken off two more guns and could not find the remnants to reinstall. The
guns were replaced and the decals finally put on with the sharkmouth repainted
where I screwed it up. I did the aircraft in the markings of Dick Rossi, who
flew with the 1st Pursuit Squadron (Adam and Eves), and since his aircraft had a
black spinner, so does mine. With all the markings in place, I then sprayed on a
matte coat to seal in the decals.
With that done, a new pitot tube was installed (I broke the ones from the kit taking them off the sprue), main wheels installed, exhaust glued in, the masking removed from the canopy, and the rear quarter windows installed. This latter item fit so snugly it was not necessary to glue them in place. I was also pleased the the canopy is clear enough so that one can see the interior so adding the tape harness was not an exercise in futility.
| CONCLUSIONS |
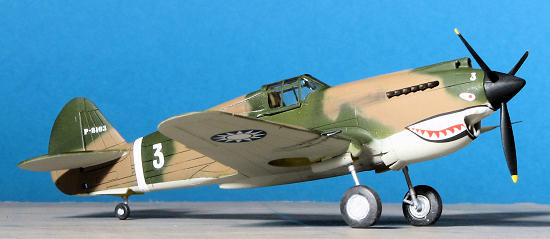
 It is nice
to have a more modern P-40B/C. I generally enjoyed building the kits but a few
observations. One is that the sprue attachment points are far too large. The
difficulty removing small pieces from the sprue and keeping them intact is
probably beyond the means of the target market. I also found the fit of some
parts (like the wheels) to be too tight, while others (like the spindly landing
gear legs) was quite loose. The fit of other bits like the wing to fuselage and
fuselage halves was quite good. Those few kit supplied decals I used also went
on without any drama. Overall, it is a very nice kit, most reasonably priced and
one that I am sure will sell well for Hornby.
It is nice
to have a more modern P-40B/C. I generally enjoyed building the kits but a few
observations. One is that the sprue attachment points are far too large. The
difficulty removing small pieces from the sprue and keeping them intact is
probably beyond the means of the target market. I also found the fit of some
parts (like the wheels) to be too tight, while others (like the spindly landing
gear legs) was quite loose. The fit of other bits like the wing to fuselage and
fuselage halves was quite good. Those few kit supplied decals I used also went
on without any drama. Overall, it is a very nice kit, most reasonably priced and
one that I am sure will sell well for Hornby.
| REFERENCES |
http://en.wikipedia.org/wiki/Curtiss_P-40
December 2011
Thanks to me for spending the big bucks on this one
Copyright ModelingMadness.com. All rights reserved. No reproduction in part or in whole without express permission from the editor.
If you would like your product reviewed fairly and quickly, please
contact the editor or see other details in the
Note to
Contributors.
Back to the Review
Index Page 2024