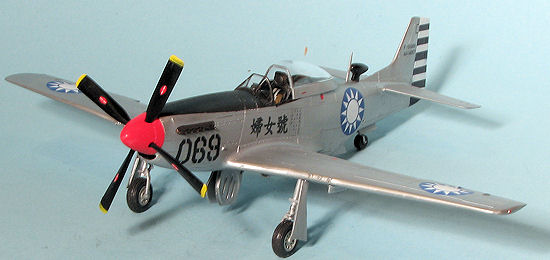
Tamiya 1/48 F-51D Mustang
| KIT #: | 61089 |
| PRICE: | $ |
| DECALS: | Four options |
| REVIEWER: | Scott Van Aken |
| NOTES: |
Aftermarket from True Details and Ultracast. Decals by PMA |
| HISTORY |
tAfter WWII, the P-51 Mustang served in the air arms of more than 55 nations. During wartime, a Mustang cost about 51,000 dollars, while many hundreds were sold postwar for the nominal price of one dollar to the American countries that signed the Inter-American Treaty of Reciprocal Assistance, ratified in Rio de Janeiro in 1947.
 One of the countries using refurbished
as well as new US P-51Ds was China.
China acquired P-51Cs and P-51Ds from the US 10th AF in India by early
1945. These Mustangs were provided to the 3rd, 4th and 5th Fighter Groups of the
China Air Force (CAF) and used to attack Japanese targets in occupied areas of
China. After the war Chiang
Kai-shek's Nationalist government
used the planes against insurgent Communist forces. The Nationalists retreated
to Taiwan in
1949. Pilots supporting Chiang brought most of the Mustangs with them, where the
aircraft became part of the island's defense arsenal. Taiwan subsequently
acquired additional Mustangs from the USAF and other sources. Some Mustangs
remained on the mainland, captured by Communist forces when the Nationalists
left. Later on, many Mustangs were purchased via public subscription, enough to
maintain a goodly number for the various units still flying the aircraft. ROCAF
Mustangs soldiered on into the late 1950s.
One of the countries using refurbished
as well as new US P-51Ds was China.
China acquired P-51Cs and P-51Ds from the US 10th AF in India by early
1945. These Mustangs were provided to the 3rd, 4th and 5th Fighter Groups of the
China Air Force (CAF) and used to attack Japanese targets in occupied areas of
China. After the war Chiang
Kai-shek's Nationalist government
used the planes against insurgent Communist forces. The Nationalists retreated
to Taiwan in
1949. Pilots supporting Chiang brought most of the Mustangs with them, where the
aircraft became part of the island's defense arsenal. Taiwan subsequently
acquired additional Mustangs from the USAF and other sources. Some Mustangs
remained on the mainland, captured by Communist forces when the Nationalists
left. Later on, many Mustangs were purchased via public subscription, enough to
maintain a goodly number for the various units still flying the aircraft. ROCAF
Mustangs soldiered on into the late 1950s.
| THE KIT |
Tamiya's Mustang kit needs no introduction to a lot of modelers. It is quite possible that there are more kit reviews in Modeling Madness of Tamiya P-51Ds than any other specific kit. The kit is well engineered, has good base detail, and goes together fairly quickly. It offers niceties such as dropped flaps, a nicely detailed interior, a canopy that can be posed open and depending on the boxing, there are different props and optional things under wings as well as optional canopies.
 This particular boxing is the '8th Air Force boxing so has
among the options, a set of 108 gallon paper tanks that were used in Europe. It
also has the short spinner and cuffless props as options as well as a pair of
bombs to place on the wing pylons. For the engine, it offers options in terms of
exhaust with or without the housing above them. The kit includes a standing
pilot and two optional sitting pilots.
This particular boxing is the '8th Air Force boxing so has
among the options, a set of 108 gallon paper tanks that were used in Europe. It
also has the short spinner and cuffless props as options as well as a pair of
bombs to place on the wing pylons. For the engine, it offers options in terms of
exhaust with or without the housing above them. The kit includes a standing
pilot and two optional sitting pilots.
There are four markings options though two of them are almost the same. The duplicate scheme is for 'Big Beautiful Doll'; one with and the other without wing tip checkers. Chuck Yeager's 'Glamorous Glen III is another option as is Bud Anderson's 'Old Crow', probably one of the most kitted schemes ever done. Decals are well done and a seat harness decal is included, something I like. If the kit has any flaws it is that the canopy glass and frame are separate, making it nigh impossible to get a clean join. Many modelers use filler on this seam and simply repaint the canopy frame line about a millimeter higher. Others will use vacuform replacements that include the frame. When this kit came out there were complaints that the engraved detailing was overdone and for that reason, there are modelers who prefer the Hasegawa kit.
| CONSTRUCTION |
I have had this kit in the stash for ages, having only built it one time
before many, many years ago when I did the F-51 boxing. However, a bevy of new
Mustang decal sheets encouraged me to pull it out and give it a go. When I
reopened the box, I found a True Details cockpit set inside so that led me to
grabbing a number of Ultracast sets for this that include a prop and spinner,
corrected flaps, proper gun inserts, and block pattern wheels. While I am pretty
confident that most post war Mustangs (which this one will be) did not use this
pattern, there is also no proof
 they
did not. I will also be hunting up some exhaust replacements as I could not find
any when I went looking.
they
did not. I will also be hunting up some exhaust replacements as I could not find
any when I went looking.
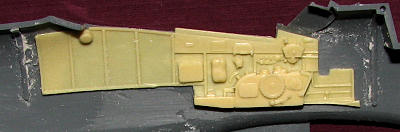
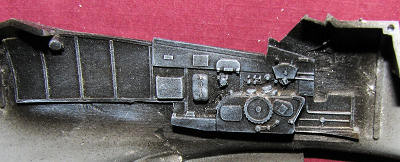
The first thing to do is to grind out the kit provided sidewall detail. This
has to be done to allow the resin replacements to fit so I grabbed my motor tool
and a ball grinder and went to work. The end result is not pretty, but it is
effective and that is all that counts. The new side walls simply glue in place
and are truly much nicer than the kit offerings. It is almost a shame to have to
paint them, they are so nice. But painted they must be so I took all the
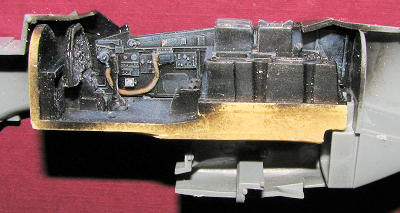
 interior bits to the paint shop
and sprayed them black. I know that many will be raising eyebrows at this, but
the truth is that most post-war Mustangs had the interior painted black by the
various places that were contracted to do overhauls. These overhauls also
resulted in the airframes generally painted in aluminum lacquer. You will notice
the use of non-exact language in this regard as there were always exceptions,
which is why having a period photo of the subject is so important if total
accuracy is important. So the True Detail instructions stated that I had to cut
off the kit cockpit at the rear bulkhead so that was done and the rear bulkhead
and radiator ducting was then cemented into one fuselage half. With the base
coat applied to the cockpit bits, I dry brushed the
interior bits to the paint shop
and sprayed them black. I know that many will be raising eyebrows at this, but
the truth is that most post-war Mustangs had the interior painted black by the
various places that were contracted to do overhauls. These overhauls also
resulted in the airframes generally painted in aluminum lacquer. You will notice
the use of non-exact language in this regard as there were always exceptions,
which is why having a period photo of the subject is so important if total
accuracy is important. So the True Detail instructions stated that I had to cut
off the kit cockpit at the rear bulkhead so that was done and the rear bulkhead
and radiator ducting was then cemented into one fuselage half. With the base
coat applied to the cockpit bits, I dry brushed the
 resin bits to bring out detail.
Contrary to what you see in magazines and some other articles, airplane cockpits
are not a myriad of colors and lights. This is especially true with older
planes. When we add these things to our models, we are deviating from reality
for the sake of the art. Drybrushing is pretty much the same thing. Sure, there
are scuffs and scrapes, but not to the extent that we usually portray them. We
do these things to make these areas more visually interesting. Just like pre and
post shading panel lines.
resin bits to bring out detail.
Contrary to what you see in magazines and some other articles, airplane cockpits
are not a myriad of colors and lights. This is especially true with older
planes. When we add these things to our models, we are deviating from reality
for the sake of the art. Drybrushing is pretty much the same thing. Sure, there
are scuffs and scrapes, but not to the extent that we usually portray them. We
do these things to make these areas more visually interesting. Just like pre and
post shading panel lines.
I then did a bit of housekeeping and put all of the parts I would not be using as well as those that were being replaced into a bag. I was quite surprised at how full the bag was with some sprues going in there with all their parts intact. I then returned to doing some painting on interior bits and installing all of the interior items in anticipation of closing up the fuselage. The radiator tunnel and radiator were painted aluminum prior to cementing the halves together.
 I then added the control
stick and the instrument panel (with the Tamiya instrument panel decal in place)
into the cockpit floor section. The seat will be added much later. I then went
to put in the rear of the radiator piece in place and realized that I needed to
severely trim the width of the upper attachment arms to get it to fit. With this
done, it was grunted into place along with the forward radiator section. I test
fit the lower wing with the wheel well insert in place to see if it would fit
and found that I needed to grind away some of the pour block under the cockpit
floor piece. Would have probably been easier to remove prior to gluing it in
place, but I was hoping it would fit without having to do so as I really dislike
those long slab pieces. I then glued the fuselage halves together after a bit of
fiddling to get it all to fit. Apparently the resin bits make things a bit of a
tight squeeze. During this the oil cooler intake piece and the upper cowling
piece were also glued in place.
I then added the control
stick and the instrument panel (with the Tamiya instrument panel decal in place)
into the cockpit floor section. The seat will be added much later. I then went
to put in the rear of the radiator piece in place and realized that I needed to
severely trim the width of the upper attachment arms to get it to fit. With this
done, it was grunted into place along with the forward radiator section. I test
fit the lower wing with the wheel well insert in place to see if it would fit
and found that I needed to grind away some of the pour block under the cockpit
floor piece. Would have probably been easier to remove prior to gluing it in
place, but I was hoping it would fit without having to do so as I really dislike
those long slab pieces. I then glued the fuselage halves together after a bit of
fiddling to get it all to fit. Apparently the resin bits make things a bit of a
tight squeeze. During this the oil cooler intake piece and the upper cowling
piece were also glued in place.
 At the wings, I had decided
to go ahead and use the Ultracast resin gun inserts so cut out the appropriate
sections in the wings. The lower section has a notch in it that makes it
somewhat difficult to clean up, but it is not impossible. I simply used a razor
saw on the panel lines and got a pretty clean cut. With my luck, when I go to
put the inserts in, I will have found I cut too much. We shall see. After
filling in the few gaps in the fuselage bits attached, I then glued on the lower
wing. Though I usually assemble the upper and lower wings before attaching them
to the fuselage, Tamiya recommends doing it this way so I did. I also glued the
lower intake lip at this time. It doesn't fit perfectly so sanding was needed to
get it to conform properly.
At the wings, I had decided
to go ahead and use the Ultracast resin gun inserts so cut out the appropriate
sections in the wings. The lower section has a notch in it that makes it
somewhat difficult to clean up, but it is not impossible. I simply used a razor
saw on the panel lines and got a pretty clean cut. With my luck, when I go to
put the inserts in, I will have found I cut too much. We shall see. After
filling in the few gaps in the fuselage bits attached, I then glued on the lower
wing. Though I usually assemble the upper and lower wings before attaching them
to the fuselage, Tamiya recommends doing it this way so I did. I also glued the
lower intake lip at this time. It doesn't fit perfectly so sanding was needed to
get it to conform properly.
I then installed the resin gun sections and found the usual gaps that needed filled. Sanding was quite a challenge to keep from sanding too much, but I eventually got them installed in good order. On the next one, I will eschew these bits as it is just easier. I glued on the tail planes and the front windscreen. It and the canopy were masked and the canopy tacked on (still have to install the seat). It was time for paint.
| COLORS AND MARKINGS |
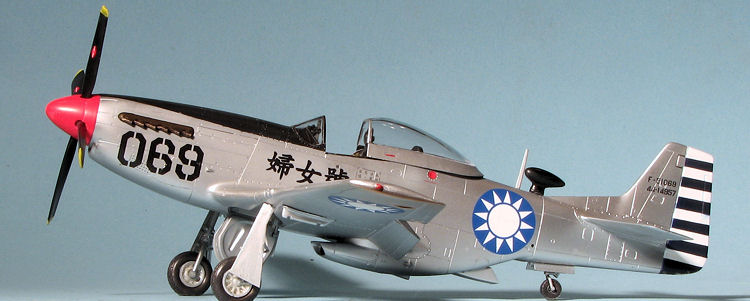
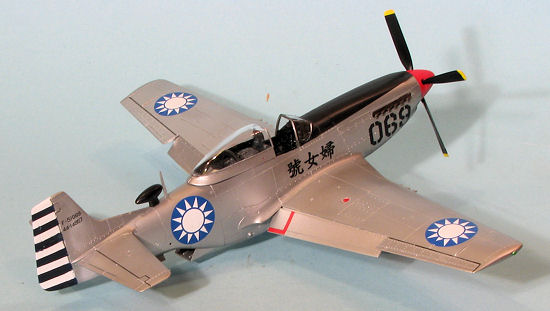
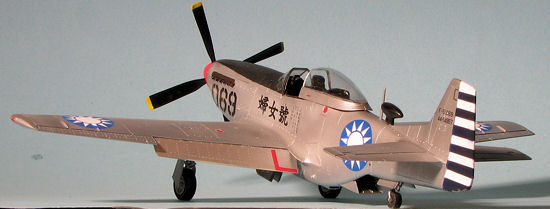
The scheme chosen was an aluminum lacquer painted
Republic of China aircraft. I thought I would try something different. I painted
the entire airframe with Testors Chrome Silver, thinking that it would fill in
some scratches and provide a good base for
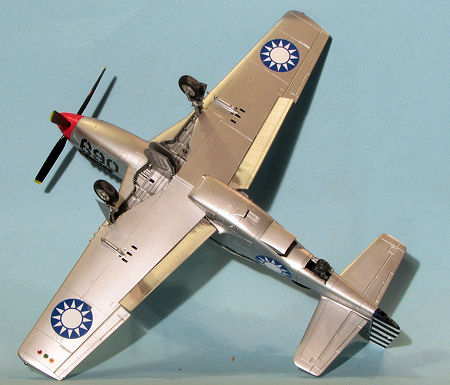 Alclad II.
What it did was show some gaps that needed work, though it did fill in the minor
scratches. It also took a while to dry. Once dry, I sprayed on a coat of Alclad
II, hoping for the look of aluminum lacquer. Still a bit too metallic, but
nothing a clear coat will not fix. I then masked off the area around the rudder
and painted that white.
Alclad II.
What it did was show some gaps that needed work, though it did fill in the minor
scratches. It also took a while to dry. Once dry, I sprayed on a coat of Alclad
II, hoping for the look of aluminum lacquer. Still a bit too metallic, but
nothing a clear coat will not fix. I then masked off the area around the rudder
and painted that white.
Using PMA's 3mm striping tape, I masked off the areas to be left white and painted the rudder with FS 15044 Insignia Blue as called for in the PMA decals. The front was masked off and the anti-glare panel was painted black. In the mean time, I had painted the resin spinner white then red.
It was when I started pulling off the masking that the air turned blue. The Alclad II apparently does not stick well on Testors Chrome Silver as the Alclad came off on the tape. Worse, the white areas masked on the rudder also pulled up when the tape was removed. In frustration, the kit sat for a while .
When I got back to it, I simply removed as much tack as I could from the tape and repainted. When done, the areas that had the Alclad II pull up were repainted freehand.
| FINAL BITS |
I drilled out the back of the resin spinner and after cutting off much of the shaft sticking out the nose, it was cemented in place without the blades. The landing gear with the resin main wheels was then cemented on. For the resin wheels. I put a bit of clear paint on the axles so I could get them to sit properly on the flat areas. Then when dry and in place, a bit of super glue was added to fix things. Gear doors were glued on and I started on the decals.
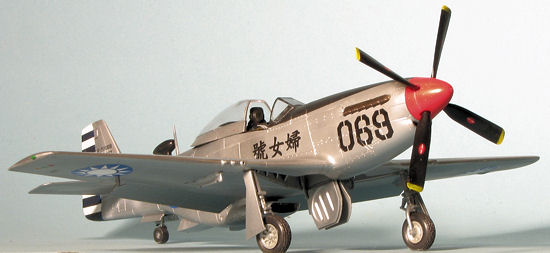 PMA decals
are very nicely done. They are quite thin so one has to be cautious on
application. They also tend to stick where they are first applied so I ended up
flooding the area with water to help them float into place. I used Mr. Mark
Softer to help a few snuggle down. Many of the myriad stencil decals were not
used. I chose one of the later planes that were bought by subscription so have
names on the fuselage side. The instructions are a bit vague on which name goes
with which serial, so I interpolated what I thought was the right one. You will
notice that the insignia are not the exact same shade as the rudder stripes. One
reason I wish the sheet came with stripe decals.
PMA decals
are very nicely done. They are quite thin so one has to be cautious on
application. They also tend to stick where they are first applied so I ended up
flooding the area with water to help them float into place. I used Mr. Mark
Softer to help a few snuggle down. Many of the myriad stencil decals were not
used. I chose one of the later planes that were bought by subscription so have
names on the fuselage side. The instructions are a bit vague on which name goes
with which serial, so I interpolated what I thought was the right one. You will
notice that the insignia are not the exact same shade as the rudder stripes. One
reason I wish the sheet came with stripe decals.
With things pretty well done, I attached the radio mast and glued on the inner gear doors and actuators. The landing light was then cemented in place. Thanks to reader jmclaugh, I was able to get an ADF antenna for aft of the radio mast. The mount was thinned and a hole drilled for it. It was fit as far aft as I could, but even then it barely touches the radio mast. The actual base used on ROCAF Mustangs is different and angles more to the rear to give clearance. Still, it looks pretty good and is a part that all these planes used. I then gave the airframe a coat of semi-matte clear to dull down the metallic sheen. The ID lights and clearance lights were painted and the prop blades glued in place. I finally removed the masking, popped off the canopy, installed the seat and glued the canopy back in place.
| CONCLUSIONS |
 Now I
realize that a Mustang is not a rare occurrence in MM, but it is for me as I
generally shy away from many of the more popular types. The PMA decals were my
main reason for doing this, plus all the Ultracast bits and the True Details
cockpit set. These had been gathering dust and I figured it was time to give
them a go. While not particularly colorful, it is something a bit different and
something that perhaps you may wish to give a go.
Now I
realize that a Mustang is not a rare occurrence in MM, but it is for me as I
generally shy away from many of the more popular types. The PMA decals were my
main reason for doing this, plus all the Ultracast bits and the True Details
cockpit set. These had been gathering dust and I figured it was time to give
them a go. While not particularly colorful, it is something a bit different and
something that perhaps you may wish to give a go.
For those wondering part numbers and such, here is that info:
True Details P-51D cockpit: 48453
Ultracast upgrade bits: 48009 - P-51 Detailed Exhaust; 48133 - Mustang Wheels,
Block Tread; 48137 - Hamilton Standard Cuffless Prop and Spinner; 48139 -
Corrected and Detailed Flaps; 48206 - Gun Fairings
| REFERENCES |
http://en.wikipedia.org/wiki/P-51D_Mustang
Thanks to Me for the kit and True Details set; to
Ultracast for the resin bits and to
PMA
for the decals If you would like your product reviewed fairly and fairly quickly, please contact the editor or see other details in the
Note to
Contributors.