Bronco 1/48 P-40C (Hawk 81A2) "AVG"
| KIT #: | FB 4006 |
| PRICE: | $60.00 SRP |
| DECALS: | Six options |
| REVIEWER: | Scott Van Aken |
| NOTES: | New tool kit |
| HISTORY |
 slow realization that the US would be getting involved
saw these items added. By the time of the P-40C, the aircraft was ready
for combat.
slow realization that the US would be getting involved
saw these items added. By the time of the P-40C, the aircraft was ready
for combat. | THE KIT |
 The cockpit is quite nicely done the only thing really lacking being a
nice seat
harness. While one is molded in, it is pretty anemic. A full engine is provided along with engine mounts and an accessory
section. This is built up and then inserted onto the rest of the airframe.
The kit comes with clear side engine panels so you can show the engine
detail. In that case, there are a few additional bits that will need to be
added. The lower cowl flaps can be modeled open or closed with separate
pieces offered for this. Thankfully, you have a well detailed radiator
system so there will be something to see if you peer into that area. The kit
also provides both an open and a closed canopy option. The closed option has
a piece with the windscreen and canopy molded as one. A separate armored
screen is provided to place behind the windscreen (another item often
missed).
The cockpit is quite nicely done the only thing really lacking being a
nice seat
harness. While one is molded in, it is pretty anemic. A full engine is provided along with engine mounts and an accessory
section. This is built up and then inserted onto the rest of the airframe.
The kit comes with clear side engine panels so you can show the engine
detail. In that case, there are a few additional bits that will need to be
added. The lower cowl flaps can be modeled open or closed with separate
pieces offered for this. Thankfully, you have a well detailed radiator
system so there will be something to see if you peer into that area. The kit
also provides both an open and a closed canopy option. The closed option has
a piece with the windscreen and canopy molded as one. A separate armored
screen is provided to place behind the windscreen (another item often
missed). 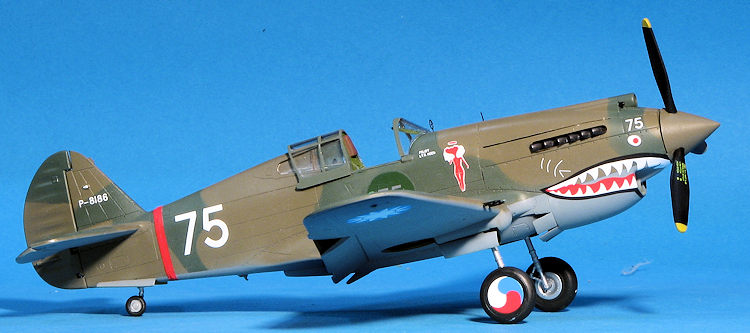 Instructions are superbly done and are in color. You get detail images and
every part that needs paint is shown painted, and did I mention it is in
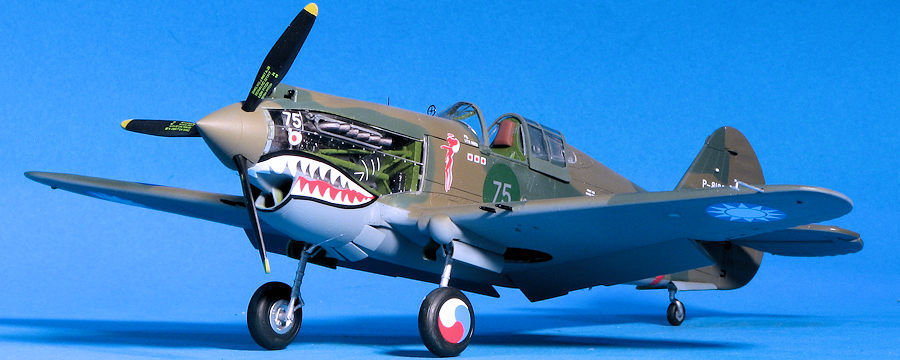
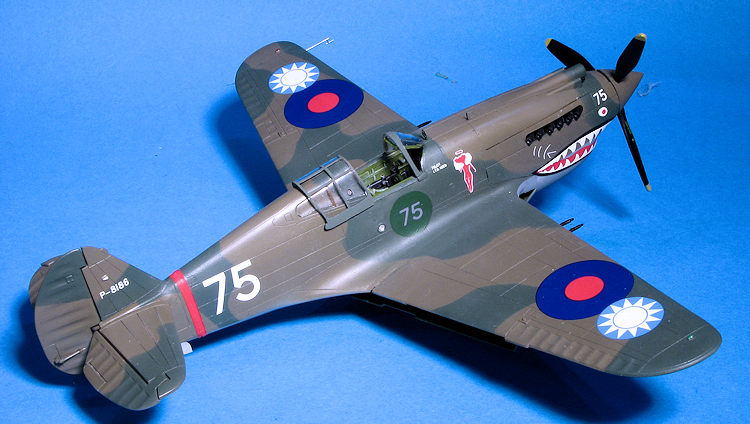
color? There are markings options for six AVG aircraft. All are in the US
equivalent dark earth and dark green over a grey. Each of the tiger mouths,
just like on the real planes, are a bit different. One option includes the
RAF upper wing roundels as apparently they did not get around to removing
these before the plane went in service.
One area I disagree with the painting chart is that they don't show a dark
earth, but list it as middlestone. Again, you decide. The decals are
superbly printed and should work beautifully.
Instructions are superbly done and are in color. You get detail images and
every part that needs paint is shown painted, and did I mention it is in
color? There are markings options for six AVG aircraft. All are in the US
equivalent dark earth and dark green over a grey. Each of the tiger mouths,
just like on the real planes, are a bit different. One option includes the
RAF upper wing roundels as apparently they did not get around to removing
these before the plane went in service.
One area I disagree with the painting chart is that they don't show a dark
earth, but list it as middlestone. Again, you decide. The decals are
superbly printed and should work beautifully. | CONSTRUCTION |
 This is a straight out of the box build using no aftermarket. The instructions have you start by building up the main gear
wells and wing. I first assembled and installed each of the four piece gear
wells. I also started building up the cockpit, gluing in the seat, control
stick, flap handle and most of the instrument panel. Note that the control stick
and some other pieces are VERY thin so care is required removing them from the sprue and cleaning them up. I then painted all this along with the insides of
the fuselage and various other bits with Model Master interior green.
This is a straight out of the box build using no aftermarket. The instructions have you start by building up the main gear
wells and wing. I first assembled and installed each of the four piece gear
wells. I also started building up the cockpit, gluing in the seat, control
stick, flap handle and most of the instrument panel. Note that the control stick
and some other pieces are VERY thin so care is required removing them from the sprue and cleaning them up. I then painted all this along with the insides of
the fuselage and various other bits with Model Master interior green.
When assembling the wings, do not forget to install the flaps. You could probably do it just prior to mating these to the fuselage, but better to do it now. One thing I noticed during this is that some of the receptacles for the mating pins were too small or too shallow. Check over everywhere these sorts of things are located and drill them out a bit more if test fitting shows them to be an issue. One then installs the 'kunckes' on the wing leading edge as well as the p.e. detail bits. I took care of the wing leading edge seam work prior to gluing these in place. These actually fit quite well, something not the case with some other 1/48 P-40s. I decided not to glue in the pitot tube or the landing light and also skipped most of the next construction step, which was installing the main landing gear.
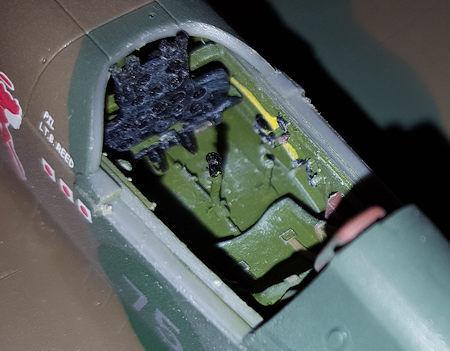 Next step in the instructions is building up the cockpit.
This took a bit of time due to all the painting that needed to be done. The
color instructions are a big help here. When all was finally done, I
dry-brushed everything with white. It would have been nice to have had some
sort of instrument faces as a decal. The rudder was built up and a bulkhead
installed in the rear of the fuselage. The tail gear has to be installed
prior to closing the fuselage halves. Not an ideal situation, but one that
needs to be done. Remind yourself not to accidentally trim the lower
mounting pin, thinking it is just a sprue attachment.
Next step in the instructions is building up the cockpit.
This took a bit of time due to all the painting that needed to be done. The
color instructions are a big help here. When all was finally done, I
dry-brushed everything with white. It would have been nice to have had some
sort of instrument faces as a decal. The rudder was built up and a bulkhead
installed in the rear of the fuselage. The tail gear has to be installed
prior to closing the fuselage halves. Not an ideal situation, but one that
needs to be done. Remind yourself not to accidentally trim the lower
mounting pin, thinking it is just a sprue attachment.
I then assembled the rest of the cockpit. Note that there are small ejector towers on the back side of the side panels and must be removed to ensure that the pieces will fit. With that done, it and the rudder were installed and the fuselage halves were glued together.
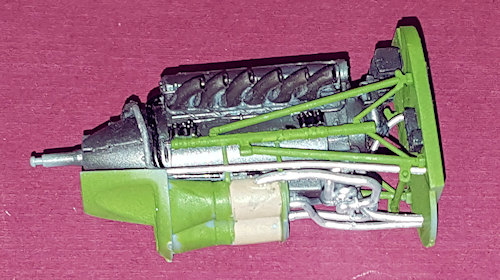 Next step was to work on the engine. This was quite time
consuming as parts have to be painted prior to assembly. It doesn't help
that all the exhaust are separate and one has to be very careful to get them
properly aligned as they are quite wiggly. There are quite a few butt joins
when it comes to the piping. Note also that if one does not get the center
pieces of the outer radiators installed in the right position, there will be
issues later. Another area where one has to be cautious is on the motor
mounts. The small pieces that attach to the engine block have little tabs
sticking down onto which the mounts attach. On the first one I cut this off
thinking it was a spure attachment nub.
Next step was to work on the engine. This was quite time
consuming as parts have to be painted prior to assembly. It doesn't help
that all the exhaust are separate and one has to be very careful to get them
properly aligned as they are quite wiggly. There are quite a few butt joins
when it comes to the piping. Note also that if one does not get the center
pieces of the outer radiators installed in the right position, there will be
issues later. Another area where one has to be cautious is on the motor
mounts. The small pieces that attach to the engine block have little tabs
sticking down onto which the mounts attach. On the first one I cut this off
thinking it was a spure attachment nub.
Meanwhile, I attached the wing to the fuselage. Fit is fairly good, but not great. Though the elevators are not designed to be positioned anywhere but neutral, I drooped them slightly. The fit of the 'knuckles on the wing leading edge is quite good. There are two small p.e. pieces that fit on the inside of the forward wheel well. These are slightly too tall so you may wish to sand these down.
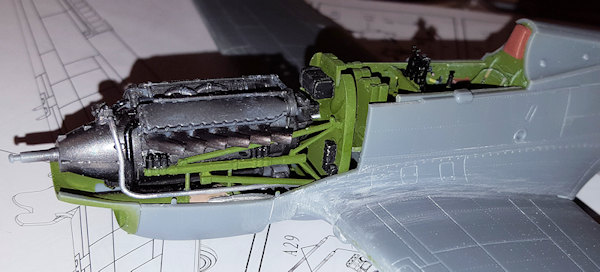 After finally getting the engine attached to the firewall,
I tried to install it. There is a section in the lower fuselage into which
the bottom of the firewall fits. Then, about half way up the back of the
firewall piece, is a ledge that fits under the floor of the cockpit. This
proved to be impossible to get in place. Apparently one needs to not glue in
the cockpit assembly in order to have enough give to get this in place. Good
luck with that. I had to cut off about 1/8 inch from the bottom of the
firewall piece to get it all to fit.
After finally getting the engine attached to the firewall,
I tried to install it. There is a section in the lower fuselage into which
the bottom of the firewall fits. Then, about half way up the back of the
firewall piece, is a ledge that fits under the floor of the cockpit. This
proved to be impossible to get in place. Apparently one needs to not glue in
the cockpit assembly in order to have enough give to get this in place. Good
luck with that. I had to cut off about 1/8 inch from the bottom of the
firewall piece to get it all to fit.
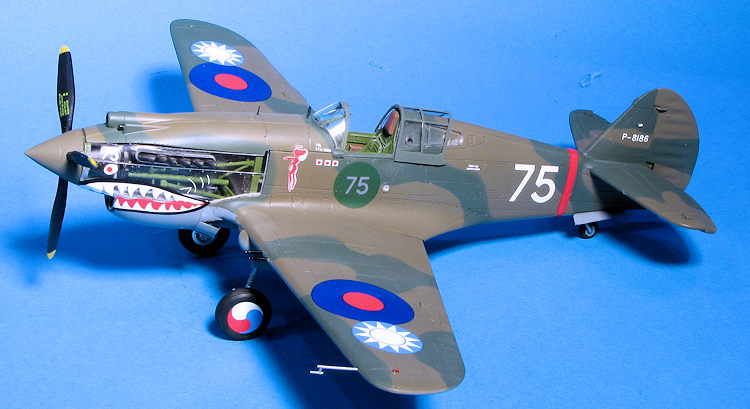
Once that was in place, it was time for the rest of the cowling. I wanted to keep one side clear so first glued the right side in place. This took a bit of work to get it without many gaps. Then there is a forward piece that fits in place behind the prop. In order to get this in its proper place, I had to use the 'squeeze things together, apply super glue and then accelerator' deal. The same for when the upper cowling section was fit into place. It is particularly difficult to get the side panels over the exhaust. I test fit the left side (which will remain clear) and found it even more difficult to remove!
Meanwhile, I worked on cleaning up the landing gear and getting the prop assembly done. I also started on the clear bits. Bronco includes the armored glass to fit behind the windscreen, which is a very nice touch and something missed by other kits.
| COLORS & MARKINGS |
 With all the major bits in place, it was time to prep for
painting. Thanks to Bronco offering a closed canopy option, I used that piece to
cover the interior for painting. I then masked the open engine panel and the
right side exhaust as well as the tail gear as best I could.
With all the major bits in place, it was time to prep for
painting. Thanks to Bronco offering a closed canopy option, I used that piece to
cover the interior for painting. I then masked the open engine panel and the
right side exhaust as well as the tail gear as best I could.
For the underside, I used medium sea grey as I thought the color called out in the instructions, neutral grey, would be too dark. When dry, those areas were masked off and it was time for the upper colors. For the dark earth, I used a mixture of ANA 617 dark earth and faded OD, both from the Model Master line. This produced what is essentially a lighter dark earth color that looked about right. When that dried, I set about with the dark green, for which I used Humbrol 30 thanks to Testors discontinuing this color in its enamel line.
I had never tried the putty masking technique so thought I'd give it a go. I did not have any blu-tak so used Silly Putty instead. This was extremely time consuming, even more so than just masking with regular tape. However, it did produce the near hard-edged look that was typical with these planes.
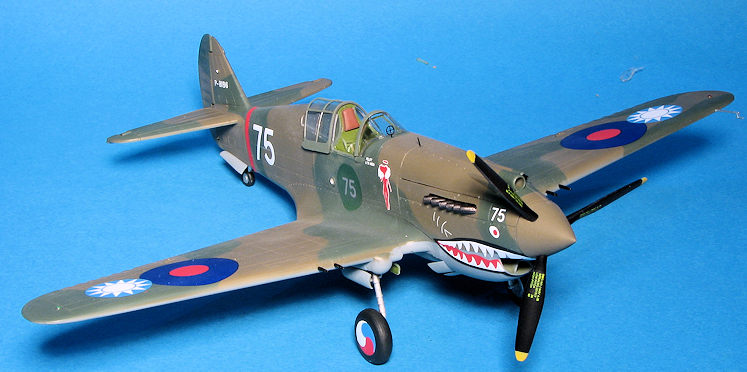
Before getting it ready for decals, I installed the main landing gear. It looks fussy, but is quite strong when you are done. With the airframe on its legs, I went to the decals.
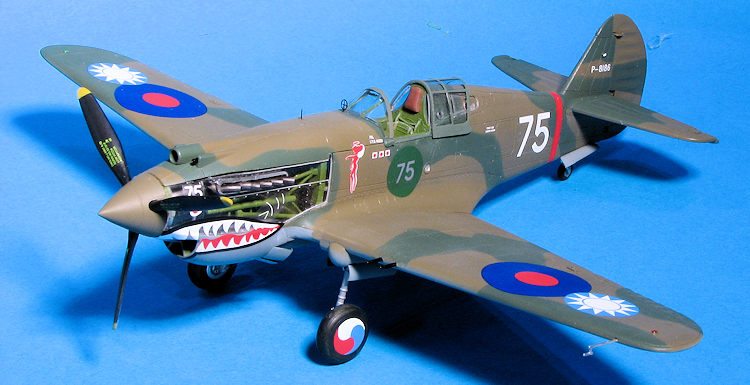
I was struck by the one option that still had the RAF roundels on the upper wing as flown by Bill Reed of the 3rd PS in early 1942. This option killed two birds with one stone so to speak. I didn't have to paint brown circles where the old roundels were, and it gave me something out of the norm. First task was to deal with the red fuselage band. One of Bronco's brain farts was not providing tail stripes. I considered robbing a Cutting Edge sheet for it, but have several sheets of Microscale stripes that I thought would work.
 I used two somewhat narrow red stripes for the rear
fuselage and while they work, they don't look as nice as one stripe or
painting. The rest of the Bronco decals were slowly applied, this process
taking several days as I did a few, hit them with setting solution, and them
moved on. Note that the Bronco decals worked well, but need a fairly strong
setting solution. I used Mr. Mark Softer. I also saw that the red in the RAF
roundel appeared too bright, but perhaps it is the way it should be. Do not
install the decals that is shown on the inside of the wheels as no period
photos showed anything of the sort. In fact, not all planes had the tricolor
paint on the outer wheel. All of the markings were applied save for the
shark mouth that would go on the clear panel. When all were in place, they
were given a coat of clear semi-matte.
I used two somewhat narrow red stripes for the rear
fuselage and while they work, they don't look as nice as one stripe or
painting. The rest of the Bronco decals were slowly applied, this process
taking several days as I did a few, hit them with setting solution, and them
moved on. Note that the Bronco decals worked well, but need a fairly strong
setting solution. I used Mr. Mark Softer. I also saw that the red in the RAF
roundel appeared too bright, but perhaps it is the way it should be. Do not
install the decals that is shown on the inside of the wheels as no period
photos showed anything of the sort. In fact, not all planes had the tricolor
paint on the outer wheel. All of the markings were applied save for the
shark mouth that would go on the clear panel. When all were in place, they
were given a coat of clear semi-matte.
| FINAL TOUCHES |
With that done, it was time to deal with the final bits, of which there were actually quite a few. First off the canopy I used for painting was removed and the bits of clear paint cleaned up. I then installed the clear engine cowling. Fit is not great and I had to use super glue in the front to hold it in place. The decals were then applied to it.
 I then did a bit of touch up painting and installed the
main wheels. Much to my dismay, I noticed that I had attached one of the
main gear legs slightly crooked and it affected the angle of one of the
wheels. I then attached the tail wheel followed by the gear doors. These
have a very positive attachment point that is broad. I then glued on the
windscreen with clear paint, followed by the various light lenses. Then the
clear bits were attached. I used clear paint to glue on the armored glass
and then attached the windscreen to the fuselage. I guess it slipped as I
had a bit of a gap once it dried. Note that the windscreen should not have
any bracing on it so you may wish to sand that away. The various wing and
fuselage light lenses were then glued on, followed by the p.e. gun sight
pieces. The canopy is actually a bit too wide to just sit on the fuselage so
I had to glue it in the open position. When it is glued down, much of the
curve on the side disappears. I also test fit the Monogram P-40 canopy prior
to this and while it does fit, it is thick and is missing the lower section,
which is actually molded onto the kit's fuselage. The last step was to
attach the prop.
I then did a bit of touch up painting and installed the
main wheels. Much to my dismay, I noticed that I had attached one of the
main gear legs slightly crooked and it affected the angle of one of the
wheels. I then attached the tail wheel followed by the gear doors. These
have a very positive attachment point that is broad. I then glued on the
windscreen with clear paint, followed by the various light lenses. Then the
clear bits were attached. I used clear paint to glue on the armored glass
and then attached the windscreen to the fuselage. I guess it slipped as I
had a bit of a gap once it dried. Note that the windscreen should not have
any bracing on it so you may wish to sand that away. The various wing and
fuselage light lenses were then glued on, followed by the p.e. gun sight
pieces. The canopy is actually a bit too wide to just sit on the fuselage so
I had to glue it in the open position. When it is glued down, much of the
curve on the side disappears. I also test fit the Monogram P-40 canopy prior
to this and while it does fit, it is thick and is missing the lower section,
which is actually molded onto the kit's fuselage. The last step was to
attach the prop.
| CONCLUSIONS |
This one took longer than I had anticipated. Much of the additional time was spent on the engine and even more on the rather complex masking job. The general parts fit is quite good, but you have to plan ahead on everything and test fit as much as you can. The kit's instructions have areas that are really not all that logical to me as I'd never install the main landing gear before attaching the wing to the fuselage and certainly not prior to painting.
So let's review. Slams on the kit from those who have not built it include canopy sides that are too round. Check. A too shallow cockpit. Check. Poor fabric representation on the control surfaces. Check. They are all still there in the completed kit. Take a look at the photos and decide for yourself if these are as horrendous as the pundits profess. I am sure aftermarket will take care of all these.
Considering that the list price of the coming Airfix kit will be half of this one, I doubt if many will pick this up, which is a shame as it actually is a nice kit.
2 September 2016
Copyright ModelingMadness.com
My thanks to www.dragonmodelusa.com for the review kit. Get yours today at your local retailer or ask them to order it in for you.
If you would like your product reviewed fairly and fairly quickly, please contact the editor or see other details in the Note to Contributors.