Revell AG 1/72 P-47D-30 Thunderbolt
| KIT #: | ? |
| PRICE: | $9.98 MSRP |
| DECALS: | Two options |
| REVIEWER: | Scott Van Aken |
| NOTES: |
| HISTORY |
 Without going into a lot of detail, the P-47 was
probably America's finest ground attack fighter of the war. Though originally
designed as an escort fighter with a turbocharged engine to allow it to fly at
high altitudes, its short range, even with drop tanks meant that it was unable
to escort bombers on missions that went very far into enemy territory. It wasn't
until the advent of the P-51 Mustang into that role (after a lot of political
wrangling) that the US had a true escort fighter.
Without going into a lot of detail, the P-47 was
probably America's finest ground attack fighter of the war. Though originally
designed as an escort fighter with a turbocharged engine to allow it to fly at
high altitudes, its short range, even with drop tanks meant that it was unable
to escort bombers on missions that went very far into enemy territory. It wasn't
until the advent of the P-51 Mustang into that role (after a lot of political
wrangling) that the US had a true escort fighter.
The P-47 then spent the last year of the war performing admirably in the ground attack mission, where its robust construction and heavy firepower from its eight .50 caliber machine guns would inflict a lot of damage on whatever was in its sights.
| THE KIT |
The Revell AG kit has been around for a while and is one of those that is often overlooked by many modelers. It is of a reasonable cost and provides what seems to be very good detail. As it is a D-30 variant, it comes with the spoked wheels, Curtiss-Electric asymmetrical prop and the option of adding the fin fillet, something that, I believe is not available in any other P-47D in this scale.
 The engraved detail is quite well done and it seems RoG
has done their homework in getting this one right. The cockpit is quite complete
with a floor, seat, rear bulkhead, control column and a nicely detailed
instrument panel with rudder pedals. There is well done detail on the cockpit
side walls. Detail can also be found in the main gear wells and though a tad
generic, the engine is also nicely done. The tail wheel well is a separate piece
that includes the doors molded in so no problem getting that done right. A two
piece canopy/windscreen is provided so that the interior detail can be shown.
This kit also provides the turbocharger exhaust side doors as separate bits and
shows them in the open position. The wing pylons are separate
and you have the option of a flat centerline tank and either bombs or wing tanks
for the pylons. I should mention that my kit had quite a bit of flash. The
engine cowling, wing guns, instrument panel, canopy, and some other bits being
particularly noticeable.
The engraved detail is quite well done and it seems RoG
has done their homework in getting this one right. The cockpit is quite complete
with a floor, seat, rear bulkhead, control column and a nicely detailed
instrument panel with rudder pedals. There is well done detail on the cockpit
side walls. Detail can also be found in the main gear wells and though a tad
generic, the engine is also nicely done. The tail wheel well is a separate piece
that includes the doors molded in so no problem getting that done right. A two
piece canopy/windscreen is provided so that the interior detail can be shown.
This kit also provides the turbocharger exhaust side doors as separate bits and
shows them in the open position. The wing pylons are separate
and you have the option of a flat centerline tank and either bombs or wing tanks
for the pylons. I should mention that my kit had quite a bit of flash. The
engine cowling, wing guns, instrument panel, canopy, and some other bits being
particularly noticeable.
The instructions are those usual top-folded booklet types that I have come to really dislike. Fortunately, the paper quality has improved. Construction steps are well drawn and color information (in Revell paints of course) is provided. Only two of the 15 shades required need to be mixed and generic names are given so you can use alternates if you can figure out what colors like 'Anthricite Grey' really are. A nice decal sheet is provided giving markings for the box art plane from the 509 FS/407 FG in unpainted metal, and a French version from GC II/5 in OD over neutral grey. The decals are well printed and matte, offering all the data markings and stripes needed. The modeler will have to paint most of the red bits on the initial offering.
| CONSTRUCTION |
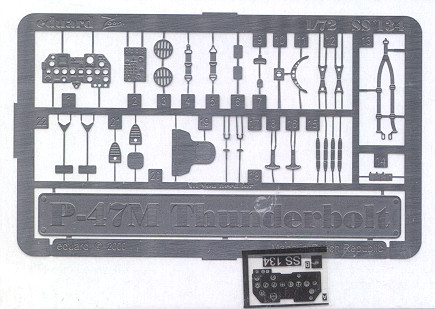 For
this kit, I decided to use one of those Eduard 'Zoom' sets. These are basically
cockpit bits and some other external details. It does not include flaps,
replacement gear doors and other such things. A very
For
this kit, I decided to use one of those Eduard 'Zoom' sets. These are basically
cockpit bits and some other external details. It does not include flaps,
replacement gear doors and other such things. A very
 nice way to get into using
photo-etch, though even these sets have a lot of small parts. This set is for
the P-47M, so I can't use the name plate that makes up about 20% of the mass of
the fret, but other than that, the parts are all basically the same.
nice way to get into using
photo-etch, though even these sets have a lot of small parts. This set is for
the P-47M, so I can't use the name plate that makes up about 20% of the mass of
the fret, but other than that, the parts are all basically the same.
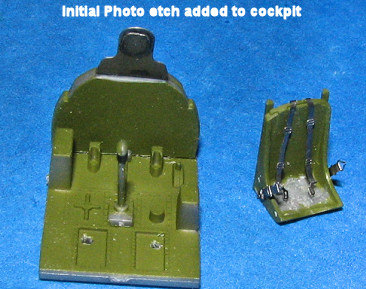 To use
this set, several bits need to have molded on detail scraped off. This includes
the seat and the instrument panel. Application of these parts is really quite
simple. If the area will be under stress, I use super glue. If it isn't, I use
clear paint. Once it dries, it is able to handle a bit of work without falling
apart and you don't glue your fingers together with paint!
To use
this set, several bits need to have molded on detail scraped off. This includes
the seat and the instrument panel. Application of these parts is really quite
simple. If the area will be under stress, I use super glue. If it isn't, I use
clear paint. Once it dries, it is able to handle a bit of work without falling
apart and you don't glue your fingers together with paint!
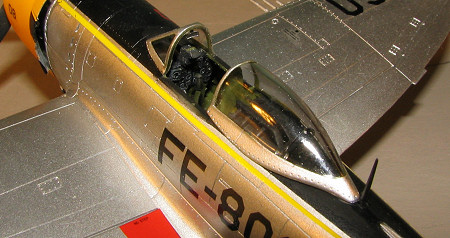
You need to remove the kit head armor as well to replace it with the etched bit. Same for the turbocharger intake screens on the lower engine mount piece and the landing gear oleo scissors. The set comes with rear drop tank stabilizers but I don't think the wing tanks on the P-47 used them. At least I don't see any photos of them. These are used with the longer, P-38 style tanks that are used on the P-47N, so perhaps if your kit has these tanks they'd be applicable.
Because of the photo-etch, the construction time was about quadruple what it would normally be. For some reason, if I add PE or resin aftermarket, the build time is substantially longer than the norm.
 Once I had enough bits in place with the interior, I
painted everything with a darkened Testors US Interior Green enamel. Then I used
black and a few other colors to paint some of the various bits as shown in the
instruction. When all this was dry, I attached the acetate instruments to the
back of the etched panel (using clear paint) and painted the back gloss white so
you could see the instrument. When dry, this was cemented to the instrument
panel. At this point, I should mention that the instrument panel section had
more flash than 'the singer once known as Prince'. Flash was evident in
some other parts, but not as much as on the instrument panel.
Once I had enough bits in place with the interior, I
painted everything with a darkened Testors US Interior Green enamel. Then I used
black and a few other colors to paint some of the various bits as shown in the
instruction. When all this was dry, I attached the acetate instruments to the
back of the etched panel (using clear paint) and painted the back gloss white so
you could see the instrument. When dry, this was cemented to the instrument
panel. At this point, I should mention that the instrument panel section had
more flash than 'the singer once known as Prince'. Flash was evident in
some other parts, but not as much as on the instrument panel.
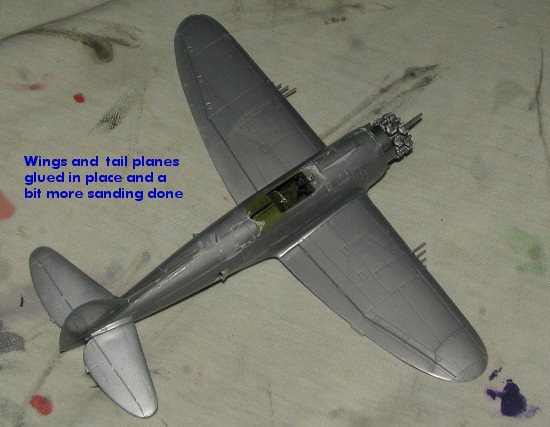
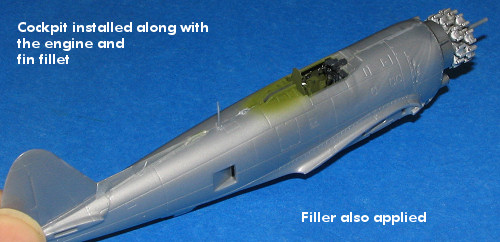 With
the cockpit bits properly painted, washed and dry brushed, it was glued to one
fuselage half. I opened the notch for the spine antenna, glued it in and then
cemented the fuselage halves together. Next, the fin fillet was glued in place
after trimming it back a tad as it was too long, bumping into the fuselage
antenna. The fillet had several sink areas that needed filled as did the
fuselage, mostly opposite alignment pins. Wings were glued together without
opening any holes aside from those for the drop tanks. Other holes are for
the P-47M kit as it has rockets as well and I wish I had those for this one as I
could have used them.
With
the cockpit bits properly painted, washed and dry brushed, it was glued to one
fuselage half. I opened the notch for the spine antenna, glued it in and then
cemented the fuselage halves together. Next, the fin fillet was glued in place
after trimming it back a tad as it was too long, bumping into the fuselage
antenna. The fillet had several sink areas that needed filled as did the
fuselage, mostly opposite alignment pins. Wings were glued together without
opening any holes aside from those for the drop tanks. Other holes are for
the P-47M kit as it has rockets as well and I wish I had those for this one as I
could have used them.
 The
wings were then glued in place and the fit was very good. I then assembled and
painted the engine (steel), running the prop shaft through it. It was then glued
to the firewall section, which was glued to the forward fuselage. Again, a very
good fit. Tail planes were next and while the fit is good, it isn't as tight as
the wings.
The
wings were then glued in place and the fit was very good. I then assembled and
painted the engine (steel), running the prop shaft through it. It was then glued
to the firewall section, which was glued to the forward fuselage. Again, a very
good fit. Tail planes were next and while the fit is good, it isn't as tight as
the wings.
Meanwhile, I glued the turbocharger intake section into
the lower cowling. This had been rather badly damaged during shipment and when I
tried to fit the cowling as a test fit, the small 'arms' that went towards the
rear caused the cowling to not fit all the way. I removed these bits and the
cowling fit was better. Though shown as being
 chromate, I painted the inside of
the cowling with a rather greasy dark grey, figuring that oil would have been
slung all over the place in there during ops. The cowling was then painted
white, followed by yellow as shown in the decal markings guide. I also painted
the rudder white then yellow at this time.
chromate, I painted the inside of
the cowling with a rather greasy dark grey, figuring that oil would have been
slung all over the place in there during ops. The cowling was then painted
white, followed by yellow as shown in the decal markings guide. I also painted
the rudder white then yellow at this time.
Then I glued on the windscreen and the canopy after masking them. The windscreen was attached with standard glue, but the canopy section was tacked in place with white glue. While this was drying, I glued the oleo scissors to the landing gear struts and the bomb braces to the wing pylons. These pylons were then put on after sanding down the leading edge attachment. They fit better on the opposite wings from what was shown in the instructions. There are no etched sway braces for the center fuel tank so those inserts were glued in place as they were. Then the wheel wells and inside gear doors were painted with yellow chromate primer. I then stuffed the wheel wells with tissue and covered the engine with tape before heading for the paint shop.
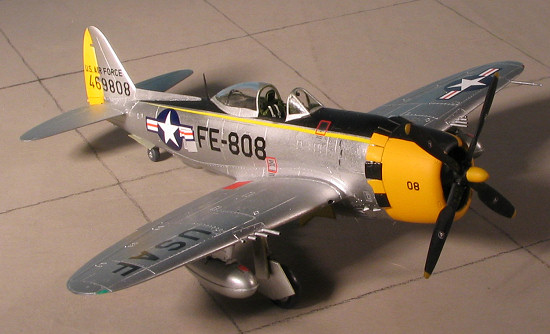
| COLORS & MARKINGS |
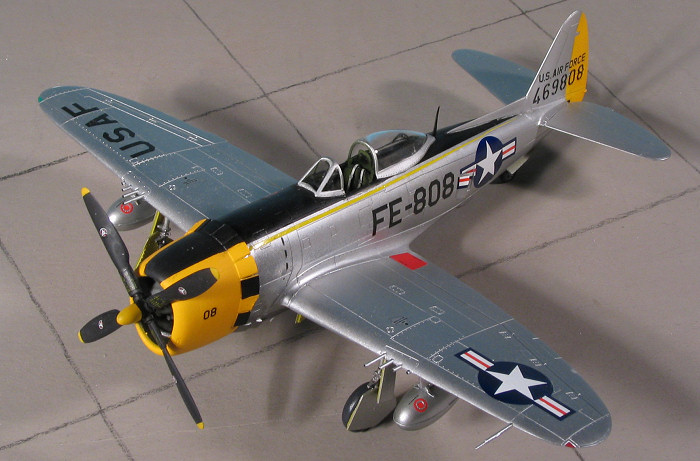
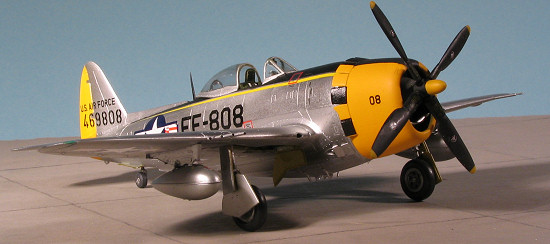
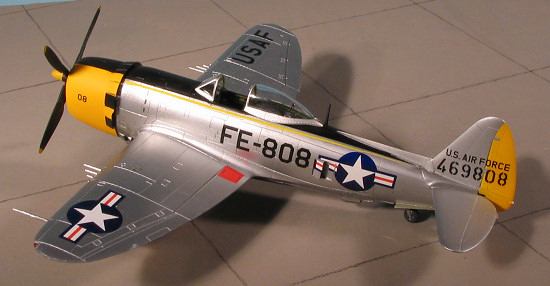
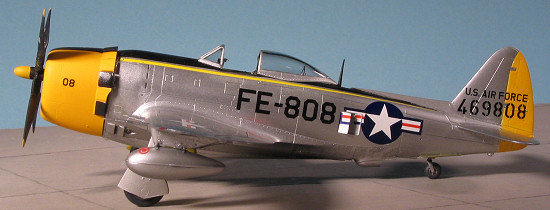
As with the majority of P-47 Bubbletops, this one would
be unpainted metal. But first I had to paint the rudder which was first painted
white then yellow. Same with the cowling and I did the prop tips at the time.
After drying, that was masked. For the rest of
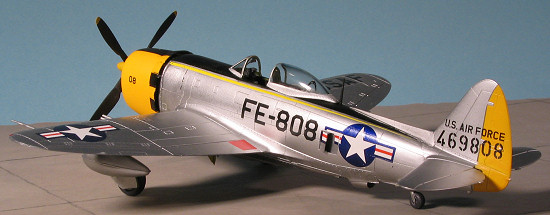 the airframe I used Alclad II Aluminum as it is a nice dark color of
weathered aluminum. As was pointed out in the Forum, old aluminum weathers to a
pretty solid shade with only those panels treated for high heat being a
different shade. With this in mind. I painted the entire airframe with Aluminum
and then masked off some of the high heat areas around the turbocharger with
Dark Aluminum.
the airframe I used Alclad II Aluminum as it is a nice dark color of
weathered aluminum. As was pointed out in the Forum, old aluminum weathers to a
pretty solid shade with only those panels treated for high heat being a
different shade. With this in mind. I painted the entire airframe with Aluminum
and then masked off some of the high heat areas around the turbocharger with
Dark Aluminum.
I then touched up the zinc chromate yellow bits where the aluminum had snuck under the masking. The main gear were then glued in place as was the tail wheel well insert. This was followed by the wheels. Once those were dry, the main gear doors were cut and glued in place. Fit of all these components is really quite good, though I did have the inner gear doors fall off a couple of times.
I then masked off the upper area to be painted black
and sprayed that area. I was careful to mask the canopy and windscreen frames to
keep them in Aluminum. It was difficult to mask the fin fillet so that required
some additional work once the black had dried. I also paint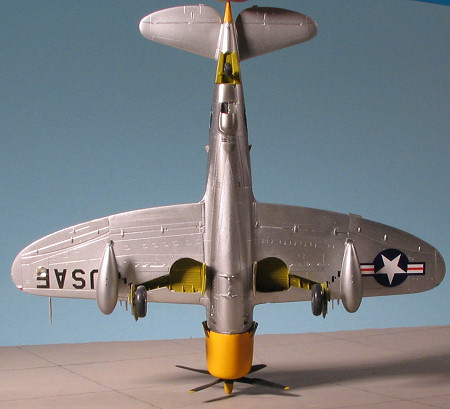 ed the upper cowling.
When dry, the canopy was removed and the area under it touched up with matte
black. I had painted the area under the canopy with Interior Green, but
following a comment from Lee Kolosna that this should be black (just as Mustang
wheel wells and inner gear doors should be bare metal), I quickly repainted that
area as to not look too stupid!
ed the upper cowling.
When dry, the canopy was removed and the area under it touched up with matte
black. I had painted the area under the canopy with Interior Green, but
following a comment from Lee Kolosna that this should be black (just as Mustang
wheel wells and inner gear doors should be bare metal), I quickly repainted that
area as to not look too stupid!
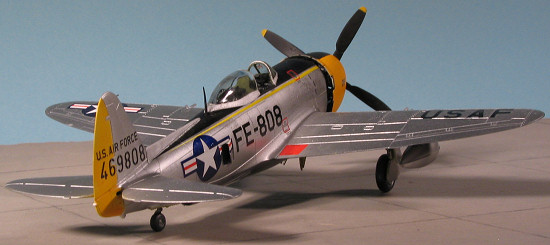
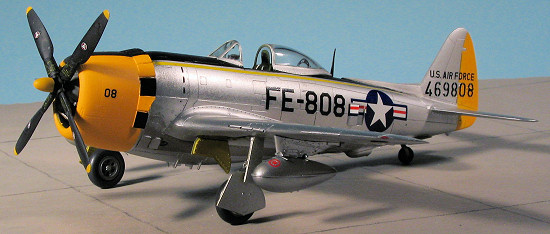
Now for the decals. I used Eurodecals 72-104: USAF Occupation Germany. In it are two Thunderbolt options. Both are supposed to be from the 527 FBS/86 FBW. I chose the one with the yellow bits because it had a Buzz Number on it. No other reason. The decals went on well and succumbed to Solvaset without any trouble. I did note two areas of concern. One was the shade of the yellow stripe. Though I matched my paint to the drawings, the stripe is a lighter shade. In fact, all of the colors seem a bit light and you can see this in the insignia, where the blue is also lighter than Insignia Blue. Not a bit deal, but I should have paid more attention and matched my colors to the decals and not the instructions. The other is that the fuselage insignia are broken down to go into the side fuselage exhaust. One of the bits that fits inside, has the wrong distance between the red, white, and blue bits. Looks odd and since only one set of Thunderbolt (and Mustang) insignia is provided, there is no other option but to use it. I also used a few of the Revell kit stencils as Eurodecals provides none. I found the Revell ones to be quite matte and the red 'No Step' markings for the inner flaps are too small for the kit, a rather odd set of circumstances. Only a few were used.
| FINAL CONSTRUCTION |
 I had to do some touch-up painting as I found a few
areas of overspray. The prop had the Revell decals put on it and left to dry
after painting the spinner yellow. I reattached the small sway braces that fell
off after initially installed prior to painting. I also fit on the rear tank
brace, but in the stowed position. These were only used on much larger drop
tanks. I also was unable to bend the tips flush against the pylon as shown in
the few photos I found. I also noted a few places where I'd had a bit of glue
hit. I sanded some of these down and carefully resprayed. Then the pitot tube
was installed along with an MV lens in place of the landing light. I attached
the rear view mirror with white glue and used the same substance for the canopy.
The final act was to remove the masking from the clear bits, push on the prop
(which didn't want to fit so I had to trim the shaft to a nub to get it on) and the model was complete.
I had to do some touch-up painting as I found a few
areas of overspray. The prop had the Revell decals put on it and left to dry
after painting the spinner yellow. I reattached the small sway braces that fell
off after initially installed prior to painting. I also fit on the rear tank
brace, but in the stowed position. These were only used on much larger drop
tanks. I also was unable to bend the tips flush against the pylon as shown in
the few photos I found. I also noted a few places where I'd had a bit of glue
hit. I sanded some of these down and carefully resprayed. Then the pitot tube
was installed along with an MV lens in place of the landing light. I attached
the rear view mirror with white glue and used the same substance for the canopy.
The final act was to remove the masking from the clear bits, push on the prop
(which didn't want to fit so I had to trim the shaft to a nub to get it on) and the model was complete.
| CONCLUSIONS |
 I enjoy these group build kits. It gives me an opportunity to
build something that I otherwise may not have bothered with. The inclusion of
the etched fret, small as it was added about 2 weeks to the build time. It is
just the way it is with me and aftermarket. The more aftermarket the longer the
build time. Actually, I should extend that to include multi-media kits as they
include P.E. and resin and metal bits as well. Those take me a long time as
well.
I enjoy these group build kits. It gives me an opportunity to
build something that I otherwise may not have bothered with. The inclusion of
the etched fret, small as it was added about 2 weeks to the build time. It is
just the way it is with me and aftermarket. The more aftermarket the longer the
build time. Actually, I should extend that to include multi-media kits as they
include P.E. and resin and metal bits as well. Those take me a long time as
well.
The Revell AG P-47 was as nice a build as the other fairly recent (as in last ten years), kits I've done from them and at a most reasonable price in today's market. It is a kit that I can recommend, regardless of your personal abilities.
I bought this for you to see how nice a model this inexpensive kit can make.
May 2006
#1411 in a series
My thanks to Fantasy Printshop for the decal sheet.
If you would like your product reviewed fairly and fairly quickly, please contact the editor or see other details in the Note to Contributors.
Back to the Review Index Page 2016