
Roden 1/48 UC-43 Staggerwing
| KIT #: | 442 |
| PRICE: | $52.99 SRP |
| DECALS: | Three options |
| REVIEWER: | Scott Van Aken |
| NOTES: | New tool kit |
| HISTORY |
At the end of the 1920's, when the United States was ailing from the
Great Depression, the numerous air shows were a rare pastime for
many people who were disillusioned with their future and wanted
distraction from the gray life around them. Pilots and stuntmen who
every weekend entertained an ordinary audience, also dreamed of
another existence, one with much less risk of losing their
livelihood at any moment, and often even their life. Many former
barnstormers soon went on to find work in newly formed airlines and
numerous mail and cargo delivery services, but some of them, such as
Clyde Cessna and Walter Beech, devoted their lives to aircraft
building.
 In 1924 they founded a small company, Travel Air Manufacturing,
which soon was absorbed by the aviation giant Curtiss Wright. Some
years later Walter Beech together with his wife Olive founded their
own aircraft manufacturing company, the Beech Aircraft Corporation.
One of the first successful projects of the newly formed company was
the Model 17, which acquired the name Staggerwing because of its
unconventional biplane wing arrangement - that is, with the upper
wing located to the rear of the lower one.
In 1924 they founded a small company, Travel Air Manufacturing,
which soon was absorbed by the aviation giant Curtiss Wright. Some
years later Walter Beech together with his wife Olive founded their
own aircraft manufacturing company, the Beech Aircraft Corporation.
One of the first successful projects of the newly formed company was
the Model 17, which acquired the name Staggerwing because of its
unconventional biplane wing arrangement - that is, with the upper
wing located to the rear of the lower one.
The new aircraft was designed by the company as a luxury high-speed
cabin plane for short-distance flights, but America was just coming
out of the Great Depression, so orders for this novel type from
Walter Beech were scarce in the early years. In the mid 1930's the
designer made a number of changes to its construction - the fuselage
was lengthened, the ailerons were moved to the upper wing, and the
track of the undercarriage extended. The modified version was
designated the D17 and quickly won the favor of pilots. Before the
Second World War the company was able to sell 424 planes of this
type and not only in the U.S. The D17 gained great fame after taking
part in the prestigious Bendix Trophy race, and in 1937 pilot Jackie
Cochran set a women's speed record of 203 miles per hour.
The Staggerwing experienced war before the U.S. joined WWII: it had
time to fight in the sky of Spain, and in the confrontation between
China and Japan. After the turning point of Pearl Harbor the U.S.
military authorities began to be more interested in types which
pre-war might have been considered as of little use for military
purposes. The Beech D17 was ideal for the role of liaison aircraft -
it was small, compact, and with good speed and an excellent cabin it
ideally met the requirements of a staff transport and aircraft of
rapid communication between military facilities. With only minor
improvements in order to comply with military specifications, it
soon arrived in the Army Air Forces as the UC-43 and in Naval
aviation as the GB-1 and GB-2. The government ordered 270 such
aircraft from Walter Beech's company, and at least another 118 were
purchased by the government from private owners for military needs.
They always had work at all major air bases and in the vast spaces
of the U.S., from Texas in the west to the District of Columbia in
the east. The Naval planes were often used far from the sea, and
were immediately noticeable at airfields among their army colleagues
because of their incongruous blue camouflage.
Before the U.S. entered WWII several Staggerwings were sent to the
UK, however not for the Air Forces of His Majesty, but in accordance
with an order from Prince Bernhard of the Netherlands, who at that
time was in exile in London. The purchasing committee of the R.A.F.,
which already worked in close cooperation with the U.S. Lend-Lease
program, obviously could not but
 pay attention to this unique
airplane, and soon the Royal Air Force and the Royal Navy received
the Staggerwing, on which the British by tradition bestowed their
own name Traveller Mk.I, unusually for an American eye spelled with
a double "L". By agreement, 107 machines of this type should have
been delivered to the British, but at least 12 of them never reached
the shores of Foggy Albion, when their U.S. carrier was attacked by
a German submarine and sank. Another 95 machines were extensively
used by military staff in every territory, from the Orkney Islands
in the north to the sandy airfields of the Middle East. After the
war they had to be transferred back to the U.S. under the terms of
the Lend-Lease agreement, but some Travellers nevertheless found new
private owners in the U.K. Post-war the company of Walter Beech
returned to the production of an improved civil model, the G17S;
however, only 16 aircraft would be built. All of them immediately
found owners despite the price doubling compared with that before
the inflation of the war period. The last Staggerwing left the
factory in early 1949, becoming the 785th series machine after 17
years of production.
pay attention to this unique
airplane, and soon the Royal Air Force and the Royal Navy received
the Staggerwing, on which the British by tradition bestowed their
own name Traveller Mk.I, unusually for an American eye spelled with
a double "L". By agreement, 107 machines of this type should have
been delivered to the British, but at least 12 of them never reached
the shores of Foggy Albion, when their U.S. carrier was attacked by
a German submarine and sank. Another 95 machines were extensively
used by military staff in every territory, from the Orkney Islands
in the north to the sandy airfields of the Middle East. After the
war they had to be transferred back to the U.S. under the terms of
the Lend-Lease agreement, but some Travellers nevertheless found new
private owners in the U.K. Post-war the company of Walter Beech
returned to the production of an improved civil model, the G17S;
however, only 16 aircraft would be built. All of them immediately
found owners despite the price doubling compared with that before
the inflation of the war period. The last Staggerwing left the
factory in early 1949, becoming the 785th series machine after 17
years of production.
Remarkable accolades have been won by this aircraft: in 2003,
according to a poll in Plane & Pilot Magazine, it was judged to be
in the top ten Top Ten All-Time Favorite aircraft of the Twentieth
Century. Four years later, according to a poll of three thousand
members of the American Aircraft Owners and Pilots Association, the
Staggerwing was voted the Most Beautiful Airplane of all time.
| THE KIT |
 pin marks that will need to be taken care
of (inside gear doors and cabin doors). I also noted some slight mold shift
on one of the large sprues.
pin marks that will need to be taken care
of (inside gear doors and cabin doors). I also noted some slight mold shift
on one of the large sprues. | CONSTRUCTION |
First thing I did was to start assembling the cockpit and some of the other
sub-assemblies. It is best when attaching the back bulkhead, to set it inside
the interior when drying. I did not and it is angled back. I used a tan for the
wood floor and though the instructions call for chromate green side walls, this
was basically an off shelf civil aircraft and so I used a light grey instead. I
found that most of the small parts were not molded well, suffering from mold
shift. This means that your round seat supports, for
 instance, will end up being
flat once you scrape them clean. You will also need to open up all of the
holes in the floor as they are too small as molded. Another thing to watch for
is that the instructions show the control column to be cemented to the forward
central hole. This is wrong. Use the rear central hole. The forward one needs to
be opened up a lot more as it is the mount for the instrument panel.
Instructions call for the instrument panel to be painted black and this is how
it was on many Staggerwings. However, the black decal detail will disappear when
you do so. I suggest a light grey.
instance, will end up being
flat once you scrape them clean. You will also need to open up all of the
holes in the floor as they are too small as molded. Another thing to watch for
is that the instructions show the control column to be cemented to the forward
central hole. This is wrong. Use the rear central hole. The forward one needs to
be opened up a lot more as it is the mount for the instrument panel.
Instructions call for the instrument panel to be painted black and this is how
it was on many Staggerwings. However, the black decal detail will disappear when
you do so. I suggest a light grey.
The engine cowling is nicely done, but my kit had but one of the two carb intakes. The second one simply was not molded as the sprue stub is shorter and smooth, so the part didn't break off and disappear. I left these intakes off rather than have just one intake. I also found the engine to be less than easy to glue. The instructions are somewhat vague on exactly where all the bits go, and despite a nice drawing of the exhaust side of things, the proper mounting of other parts is not shown. I had to shorten all of the pushrod pieces to get that section to fit and also had to remove the key for it or it would not have lined up.
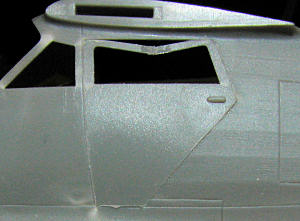 There is a separate door, but
no hinges so it is not designed to be posed open. It is also larger than the
opening and my attempt to get it to fit resulted in the upper window opening
buckling. The upper section was cemented in place and held by clamps. Meanwhile,
the wing sections were glued, and provided no real problems. The next step was
to install the clear bits. All of the openings had to be carefully sanded or
scraped in order to get the clear bits to fit. Be careful when pressing on the
clear pieces as they easily will show stress fractures. In fact, the clear bits
are pretty distorted and so any detail work done on the interior will be pretty
well lost from view. The windows were held in place with clear gloss paint or
with Tamiya cement. Both seem to work equally well.
There is a separate door, but
no hinges so it is not designed to be posed open. It is also larger than the
opening and my attempt to get it to fit resulted in the upper window opening
buckling. The upper section was cemented in place and held by clamps. Meanwhile,
the wing sections were glued, and provided no real problems. The next step was
to install the clear bits. All of the openings had to be carefully sanded or
scraped in order to get the clear bits to fit. Be careful when pressing on the
clear pieces as they easily will show stress fractures. In fact, the clear bits
are pretty distorted and so any detail work done on the interior will be pretty
well lost from view. The windows were held in place with clear gloss paint or
with Tamiya cement. Both seem to work equally well.
The fuselage halves were cemented together. Fit is only fair. I'd remove the alignment pins as they seem to cause the parts to be mis-aligned. I also took this opportunity to fill in the sink marks on the upper wing center section.
 With the fuselage seams puttied and sanded, the lower wing was attached.
There is no actual wheel well with this kit, and I'd think that the real plane
had one. None is shown in the instructions either so if you don't want to look
at the underside of the interior, you'll have to cobble something together. The
lower wing was then glued in place. It fit fairly well at the back and while
there are gaps at the side, they aren't bad. The forward attachment point is not
good and much sanding/filler/repeat was needed. The instructions totally omit
the installation of the lower fuselage section. It just sort of appears in a
later step. I glued it in place at this time.
With the fuselage seams puttied and sanded, the lower wing was attached.
There is no actual wheel well with this kit, and I'd think that the real plane
had one. None is shown in the instructions either so if you don't want to look
at the underside of the interior, you'll have to cobble something together. The
lower wing was then glued in place. It fit fairly well at the back and while
there are gaps at the side, they aren't bad. The forward attachment point is not
good and much sanding/filler/repeat was needed. The instructions totally omit
the installation of the lower fuselage section. It just sort of appears in a
later step. I glued it in place at this time.
Then, as sometimes happens, I lost interest in the project and let it sit for a while.
Later, in a desire to finish some incomplete projects, I got back to work. I started by masking the cabin windows and then installed the windscreen. This seemed to be too wide for the opening. I trimmed on the part as much as I dared until I got a better fit, but it still isn't all that good. This was then masked. The wings had the rigging location holes drilled out more to make it easier to install the rigging once the airframe was built. Then the upper wings and the struts were glued in place. The fit on these is actually quite good. Tailplanes were cemented in place and it looked like a good time to do some painting.
| COLORS & MARKINGS |
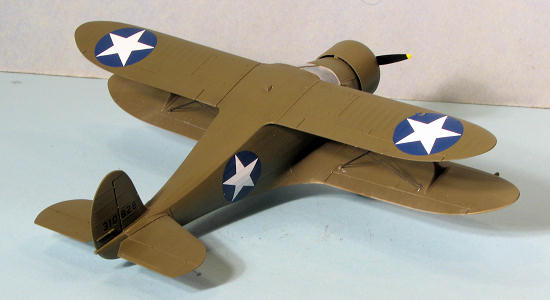
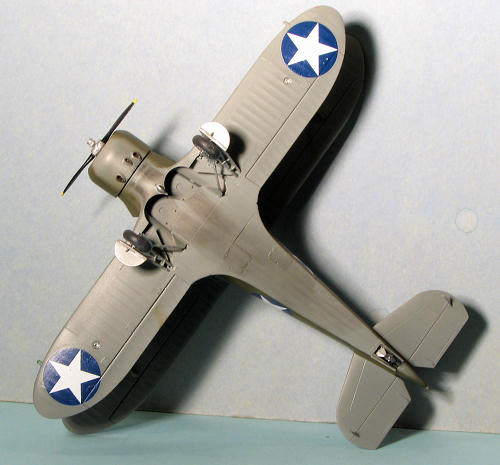
 I decided to to an OD/Neutral Grey scheme, but to do one of
the earlier markings not provided in the kit, but shown in several good period
color photos I found via Google. For both of these colors, I used Model Master
enamels. I first did the Neutral Grey bits and then masked those off and painted
on the Olive Drab. The Olive Drab turned out really bad. It was splotchy and did
not coat well. I decided to paint over it and used some Aeromaster Olive Drab in
an acrylic. This is a bit more to the green side of OD than the Model Master
enamel. Several coats of clear gloss using Future were sprayed on.
I decided to to an OD/Neutral Grey scheme, but to do one of
the earlier markings not provided in the kit, but shown in several good period
color photos I found via Google. For both of these colors, I used Model Master
enamels. I first did the Neutral Grey bits and then masked those off and painted
on the Olive Drab. The Olive Drab turned out really bad. It was splotchy and did
not coat well. I decided to paint over it and used some Aeromaster Olive Drab in
an acrylic. This is a bit more to the green side of OD than the Model Master
enamel. Several coats of clear gloss using Future were sprayed on.
| FINAL CONSTRUCTION |
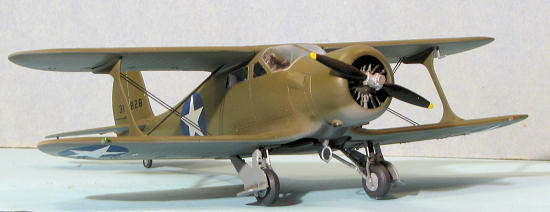
Continuing on, the engine was glued into place followed by the cowling. I then started on the landing gear. The kit does not have an enclosed gear well, which is really odd for a modern kit. I found out that the tail wheel's tabs wouldn't fit with the fuselage halves together, so I had to trim one side off to get it in place. Main gear was really fiddly with attachment holes that were either too large for the pins or didn't line up properly. I did get it all to fit, but had to use super glue as the standard glue attachments just did not want to dry straight. The wheels were a loose fit so had to be glued onto the landing gear instead of being allowed to turn.
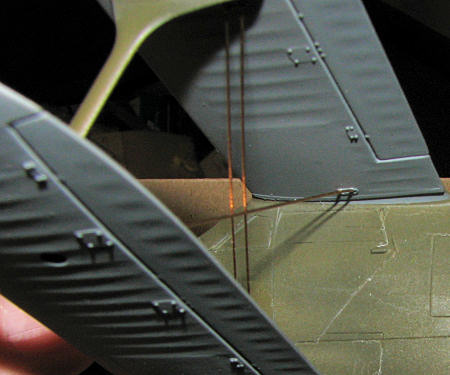 With all the
gear bits in place, I turned my attention to the rigging. Eight wires. Easy, eh?
Well, not for this rigaphobe. I finally settled on using .0125 phosphor bronze
wire from Tichytraingroup. It looks to be an acceptable thinness and is pretty
stiff, yet can be cut with small scissors. Thankfully, I drilled out the
attachment holes a bit deeper than standard and so all I had to do was ensure
that the wires were the right length. I cut four to 2.2 inches and four to 2
inches and nipped back what was too long. Once they were in there, a small bit
of super glue was applied to keep them there. These were later painted silver. A
bit later, I painted them gunmetal as I thought the silver was a bit too bright.
With all the
gear bits in place, I turned my attention to the rigging. Eight wires. Easy, eh?
Well, not for this rigaphobe. I finally settled on using .0125 phosphor bronze
wire from Tichytraingroup. It looks to be an acceptable thinness and is pretty
stiff, yet can be cut with small scissors. Thankfully, I drilled out the
attachment holes a bit deeper than standard and so all I had to do was ensure
that the wires were the right length. I cut four to 2.2 inches and four to 2
inches and nipped back what was too long. Once they were in there, a small bit
of super glue was applied to keep them there. These were later painted silver. A
bit later, I painted them gunmetal as I thought the silver was a bit too bright.
Now for decals. Roden's markings have less than a sterling reputation, and when applying the data decal under the windscreen, I found that silvering was the term of the day and that setting solutions were pretty well useless. Time to dig through the decal stash. I got the serials from Superscale sheet 48-1147. The large insignia took some digging. I have no USAAF roundels of the post 'get rid of the red dot' era that were anywhere near large enough to match a color photo I found of this plane in flight. I did find a nice Wildcat sheet, Superscale 48-1032, that had big roundels so wiped that sheet clean of what was there to use on the wings and fuselage.
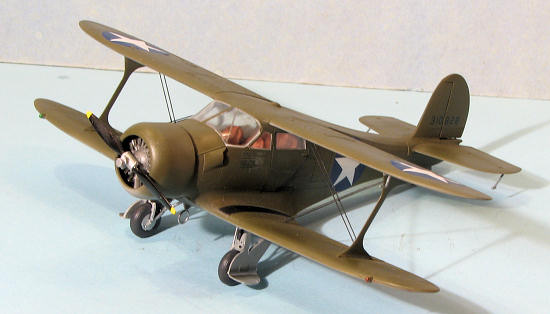
With the decals in place and though not as nice as I'd like (some wrinkles and air bubbles), added on the final items. These were the elevator balances, DF antenna, pitot tube, and a pair of venturi tubes. Exhaust were painted and the entire airframe given a coat of clear to seal in the decals.
Then, in place of landing lights, a pair of MV Production lenses, part number 29 were installed using clear paint. Exhaust stains were added an the prop was glued on. Finally, the masks were removed from the clear bits and the kit was done.
| CONCLUSIONS |
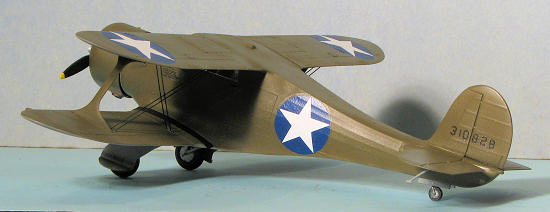
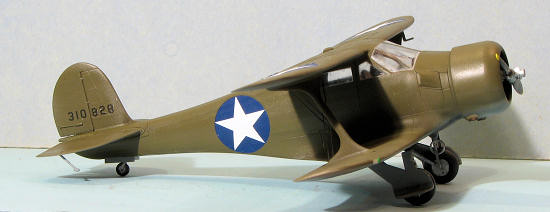
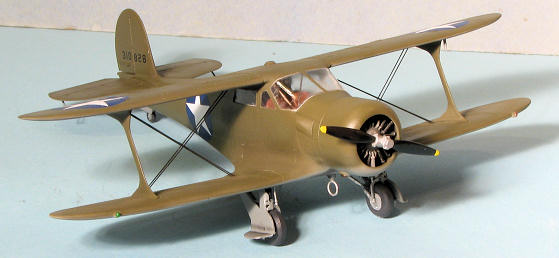 Even in
military colors, the Staggerwing is a beautiful aircraft. I had some issues with
this, as I have with nearly every Roden kit I have built. They are not
insurmountable and just part of the hobby. My major beef about any Roden kit is
the quality of their decals. It is unfortunate that they do not farm them out as
Roden's subjects are such that rarely will you find aftermarket replacements.
Even in
military colors, the Staggerwing is a beautiful aircraft. I had some issues with
this, as I have with nearly every Roden kit I have built. They are not
insurmountable and just part of the hobby. My major beef about any Roden kit is
the quality of their decals. It is unfortunate that they do not farm them out as
Roden's subjects are such that rarely will you find aftermarket replacements.
Still, with careful building, you will end up with a very nice model that you will be pleased to display.
September 2011
Thanks to Squadron Products for the review kit. Get yours at your local retailer or have them order one for you.
If you would like your product reviewed fairly and quickly, please contact me or see other details in the Note to Contributors.