
Anigrand 1/72 Curtiss XP-60C/E
| KIT #: | AA-2064 |
| PRICE: | $49.00 |
| DECALS: | Two options |
| REVIEWER: | Scott Van Aken |
| NOTES: | Short run resin with vacuformed canopy |
| HISTORY |
The P-60 series of aircraft were the last attempts by Curtiss to build a replacement for the P-40. Previous attempts included the XP-46 and XP-53. The Army Air Corps wanted a "Merlin" powered aircraft so the second XP-53 was modified for the new engine and re-designated XP-60. Because the V-1650 engine was in demand for production aircraft (e.g. P-51), the P-60 underwent many modifications.
 The P-60B was to be powered by a Wright engine
and the P-60C was supposed to be powered by a new Chrysler engine, but
development problems delayed the engine. The P-60C airframe was modified for the
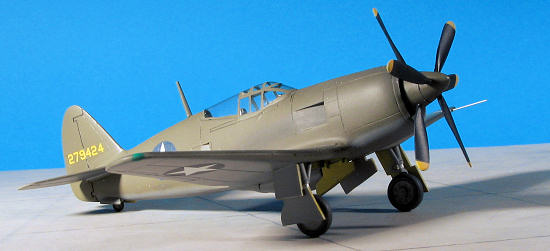
proven P&W R-2800, this time driving a contra-rotating propeller. While the
first flight of the P-60C in mid 1943 was satisfactory, the USAAF already had a
similar or better performing aircraft in the P-47 that was already being sent to
units.
The P-60B was to be powered by a Wright engine
and the P-60C was supposed to be powered by a new Chrysler engine, but
development problems delayed the engine. The P-60C airframe was modified for the
proven P&W R-2800, this time driving a contra-rotating propeller. While the
first flight of the P-60C in mid 1943 was satisfactory, the USAAF already had a
similar or better performing aircraft in the P-47 that was already being sent to
units.
The P-60B was modified for the R-2800 as well, but this time fitted with a four bladed prop and designated the P-60E. This was a more promising design than the P-60C due to the less complex prop, but it still was not better than current P-47/P-51 aircraft. Even a redesign to provide a 'bubble canopy' and to remove excess weight was unable to provide an aircraft with any promise so the program was cancelled in mid 1944. The sad truth was that the Army was never really able to make up its mind on this aircraft and what could have been developed into a successful aircraft was actually killed by indecision as much as anything else.
| THE KIT |
The sturdy box opens to find the usual
compartmentalized bag full of tan resin parts. As I usually do, I opened the
sections with the large parts and left all the little ones in their
compartments. Inspecting the big bits, I found the usual air holes in some of
the thinner parts and on the tips of the wings. I also found a couple of
instances where the thin resin pour stubs had broken off a part, leaving a chunk
to be repaired. Nothing really unusual about this as Anigrand kits can run the
gamut from well done to having 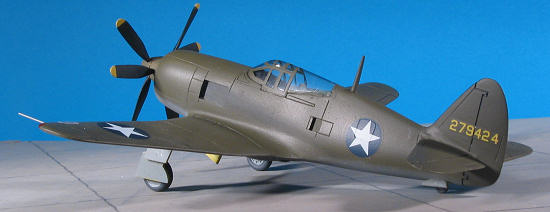 more than their share of molding faults.
Generally the kits are closer to well done. As much as you may think "how can
you put up with those things?", the truth is that most of what is out there is
much, much worse in terms of mold flaws. Anigrand's are minor by comparison and
the truth is that fixing them rarely adds more than an hour's work to the kit.
more than their share of molding faults.
Generally the kits are closer to well done. As much as you may think "how can
you put up with those things?", the truth is that most of what is out there is
much, much worse in terms of mold flaws. Anigrand's are minor by comparison and
the truth is that fixing them rarely adds more than an hour's work to the kit.
The kit provides the two different props as used on the P-60C and P-60E. In fact, that is the ONLY difference between the two as Anigrand decided not to do the later P-60E with the revised cockpit and bubble canopy as that would have needed new fuselage halves. A nice clear canopy comes with the kit and while the frame lines are still a bit too indistinct for my tastes, it is well molded. This time, the kit comes with a cut out for the landing light and a cover for it attached to the back of the canopy section, so be sure not to destroy that when removing the canopy from the sheet. I should mention that I verified that both spinners were properly drilled. One can never be too careful! Another neat thing is that the wings lock together, thanks to a rather ingenious design. This also gives proper dihedral to the wings. You will have to sand down the edges to remove some excess resin but the engineering is good and most welcome.
 I would be remiss if I didn't mention a bit of a
short-cut in regards to props. The ones in the kit are rather generic and not
exactly what was used on either aircraft. The XP-60E blades are more of what
you'd find on a P-47 and the XP-60C ones are actually a bit more pointed on the
tips, at least to judge from the photos in several magazines. Anigrand is known
for generalizing some aspects of their kits (like prop blades, wheel well detail
and wheels), and so it is with this one as well. For those of you wondering why
I didn't fix these, I tend to build review kits as they are supplied.
I would be remiss if I didn't mention a bit of a
short-cut in regards to props. The ones in the kit are rather generic and not
exactly what was used on either aircraft. The XP-60E blades are more of what
you'd find on a P-47 and the XP-60C ones are actually a bit more pointed on the
tips, at least to judge from the photos in several magazines. Anigrand is known
for generalizing some aspects of their kits (like prop blades, wheel well detail
and wheels), and so it is with this one as well. For those of you wondering why
I didn't fix these, I tend to build review kits as they are supplied.
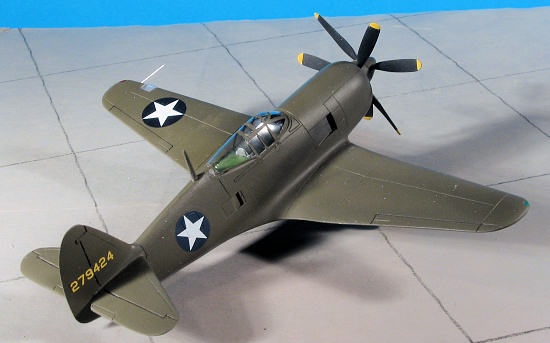
Instructions are the norm wit basically an exploded view for construction and a nice markings guide on the back of the sheet. A set of generic mid war insignia are supplied along with two serial numbers. To do an XP-60C during it first flight, you'll need to use the older non-barred insignia from your spares bin. Anigrand decals work well and while a bit resistant to setting solutions, will stick to relatively flat surfaces no sweat. Both of these aircraft are in OD over Neutral Grey, so no worries about unpainted metal finishes!
| CONSTRUCTION |
 First step in any Anigrand kit is to clean up the
parts. This means removing the resin pour intakes and taking care of any air
pockets. This one didn't have a ton of them, but both wing tips, the ends of the
horizontal stabilize, trailing edge of the rudder and over one of the tail wheel
openings had some. Easiest way to fill these is with
superglue/accelerator/immediate sanding. At least that will take care of the big
ones. Small holes can be filled with multiple applications of a thin filler like
Mr. Surfacer 500. One does have to be careful that the sanding won't open up
more holes so use fine and extra fine sand paper for this.
First step in any Anigrand kit is to clean up the
parts. This means removing the resin pour intakes and taking care of any air
pockets. This one didn't have a ton of them, but both wing tips, the ends of the
horizontal stabilize, trailing edge of the rudder and over one of the tail wheel
openings had some. Easiest way to fill these is with
superglue/accelerator/immediate sanding. At least that will take care of the big
ones. Small holes can be filled with multiple applications of a thin filler like
Mr. Surfacer 500. One does have to be careful that the sanding won't open up
more holes so use fine and extra fine sand paper for this.
With the holes taken care of (so I thought), the next step was to clean the mating surfaces. I then glued the the engine, which I'd painted aluminum into the fuselage and then glued the fuselage halves together, making sure things were as aligned as I could get them. Clamps help for this while one puts superglue into the joins. When done, a bit more super glue was put on the joins and this then sanded. Any obvious gaps were given another treatment of glue. The forward lower intake needed some additional filler to get properly smoothed out
Next, I installed the fin. Fit is fairly good with the
usual mating gap as the fin lower profile is not the same as the join surface.
The two alignment pins were helpful on this. I then attached the wings. These
have an interlocking feature that can be helpful, but I found that I must have
sanded away too much as when the upper wing roots were aligned with the
fuselage, there was a bit of a gap. Could be that the fuselage is too wide. I'm
not sure, but the gap was there. I then tacked the wings in place as b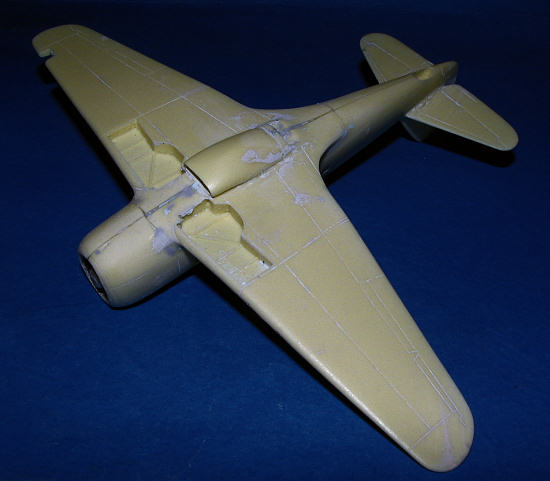 est
I could and when I thought they were properly aligned, I added more glue to he
rest of the seams. I had quite a bit to fill and found that the lower scoop was
a tiny bit too narrow. Some more sanding took care of the fit and the scoop was
glued in. As you can see by the picture, one does have to do more than just glue
parts together
est
I could and when I thought they were properly aligned, I added more glue to he
rest of the seams. I had quite a bit to fill and found that the lower scoop was
a tiny bit too narrow. Some more sanding took care of the fit and the scoop was
glued in. As you can see by the picture, one does have to do more than just glue
parts together 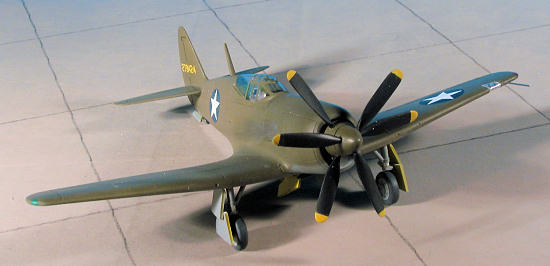 with these kits.
Moving to the tail planes, one side was a perfect fit while the other needed the alignment pins removed to get a proper fit. These are quite thin so one needs to take care. This left me with basically a complete airframe. I sanded the sides of the seat so it would fit and drilled out the control column hole so it would fit easier. The interior was painted and it was on to the next step.
It was now time for the part I dread more than any on a short run kit; the vacuformed canopy. Anigrand's are more of a challenge as the frame lines are so indistinct and make masking more work than normal. This time, I was even more tenuous when it came to trimming the canopy than normal. When it was all done, I'd left a bit extra at the back and didn't trim the rear sides as much to get a good fit. It was attached with white glue and a few strategic locations had a dab of superglue put in place to hold everything down.
| COLORS & MARKINGS |
Time to paint and this would be a pretty easy job.
Basically Olive Drab over Neutral Grey. I initially painted the gear legs,
inside gear doors and wheels with aluminum, but after looking at some images of
this area, it seems to me that the gear doors and wells were a chromate yellow
(as Curtiss was using that shade with their Helldivers at the time) with the
gear legs and wheels in Neutral 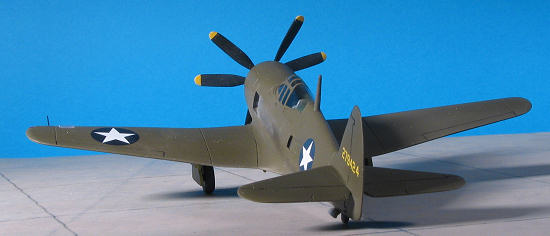 Grey.
It also seems as if the plane used P-40 covered wheels with diamond tread tires
and not the type that come with the kit. As I didn't have any 1/72 replacement
wheels, I went with what is in the kit.
Grey.
It also seems as if the plane used P-40 covered wheels with diamond tread tires
and not the type that come with the kit. As I didn't have any 1/72 replacement
wheels, I went with what is in the kit.
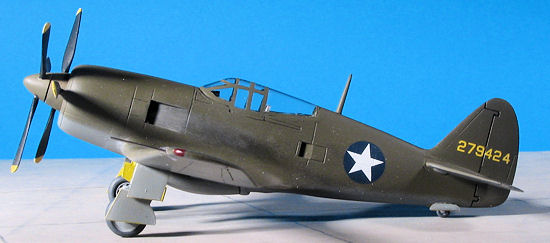
Anyway, the canopy area was first sprayed with interior green then the lower surfaces sprayed in Neutral Grey. I used Model Master enamels for these. For the OD, I used Humbrol 155. Naturally, this painting showed stuff I'd missed so I went and did some more Mr.Surfacer/sanding. After the usual stuff, the airframe was painted and clear gloss acrylic was sprayed where the decals were to go.
Back at the bench, the landing gear were installed. The
mounting holes need to be drilled out wider as they are too small. I also
trimmed back the pins as I wanted them to fit, but didn't want to have to worry
about drilling through the wing for the right depth. With these in place, the
main wheels were glued on as well. 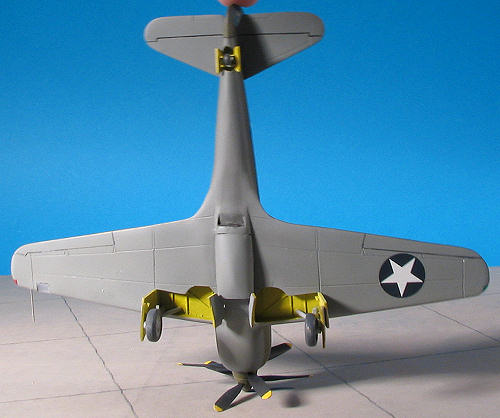
I then applied the decals. The kit provides markings as used post mid 1943. I wanted to use the earlier insignia as I'd decided to do the XP-60C. Fortunately, there are lots of aftermarket insignia sheets. Unfortunately, not many of them have the sorts of insignia for which I was looking. You'd think that with literally hundreds of sheets I'd fine one dedicated to the circle and star, but NOOOOO. So it was off to the spares. The wing ones came from a 1/72 B-25 and the ones on the fuselage from an ancient Revell 1/72 P-40E sheet. Seem to work well. The tail numbers are from the kit and you have separate last digits for the C or E version.
Meanwhile, I went to put the blades into the spinners. I hate this as I'm not good at either getting the angle right or getting them properly aligned. You get eight blades; four right and four left rotation. Guess they couldn't figure how the XP-60E engine rotated so you have a choice! Would have been nice to know from the instructions just how the back row rotated compared to the front. I guessed and so have a 50/50 chance of being right. If I'm wrong, keep it to yourself. There are times when one gets tired of only having negative feedback on builds.
| FINAL CONSTRUCTION |
The gear doors have the scribing in slightly different
locations on the inside of the door compared to the outside. Choose the outside
lines when snapping off the sections or it will look darn odd. These are butt
joins as are all A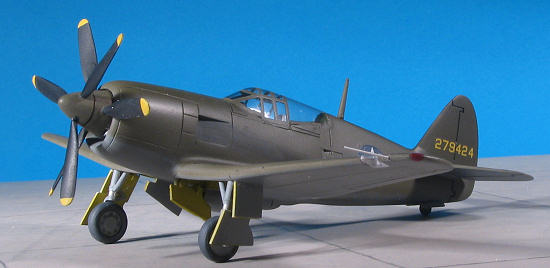 nigrand gear
doors. Sure, they have little hinges, but most of the time these are broken off
or in this case, have to be removed to get them to fit. I also cut out the
landing light cover and glued it in place with white glue. It was then masked
with a small piece of tape.
nigrand gear
doors. Sure, they have little hinges, but most of the time these are broken off
or in this case, have to be removed to get them to fit. I also cut out the
landing light cover and glued it in place with white glue. It was then masked
with a small piece of tape.
By this time, the decals had dried so I glued on the radio mast, wiped down the model and gave it a coat of matte clear. Actually, this thing must have tossed a lot of oil as photos show the cowling and forward section of the airframe to be nearly glossy with the rest in its normal matte sheen. The usual pastels were added for exhaust and I outlined the control surfaces with a drafting pen. A pitot tube was made using a piece of fine tubing. The wing formation lights were applied using Vallejo's clear red and green. Tape was removed from the canopy and landing light, whatever paint touchup was needed was done and that was it.
| CONCLUSIONS |
One more prototype to add to the P-1 to F-117 collection and I didn't have to do a metallic finish! I'm thrilled that Anigrand is doing some of these WWII prototypes and hope that they do more of them. What with the commonality in parts, will an XP-62 be far away?
October 2006
#1434 in a series
Copyright ModelingMadness.com. All rights reserved. No reproduction in part or in whole without express permission from the editor.
If you would like your product reviewed fairly and quickly, please contact the editor or see other details in the Note to Contributors.