| KIT #: | 92111 |
| PRICE: | $29.95 SRP |
| DECALS: | Three options |
| REVIEWER: | Scott Van Aken |
| NOTES: | Short run kit |
| HISTORY |
In 1942, John K. Northrop conceived the XP-79 as a high-speed rocket-powered flying-wing fighter aircraft.
In January 1943, a contract for three prototypes designation XP-79 was issued by the United States Army Air Forces.
To test the radical design, glider prototypes were built. One designated MX-324 was towed into the air on 5 July 1944 by a P-38 making it the first US-built rocket-powered aircraft to fly.
 Originally, it was planned to use a 2,000 lbf (9 kN) thrust
XCALR-2000A-1 "rotojet" rocket motor supplied by Aerojet that
used monoethyl
aniline and red fuming
nitric
acid; because of the corrosive and toxic nature of the liquids, the XP-79
was built using a welded
magnesium
alloy
monocoque structure (to protect the pilot if the aircraft was damaged in
combat) with a ⅛ in (3 mm) skin thickness at the trailing edge and a ¾ in
(19 mm) thickness at the leading edge. However, the rocket motor configuration
using canted rockets to drive the turbopumps was unsatisfactory and the aircraft
was subsequently fitted with two
Westinghouse 19-B (J30) turbojets instead. This led to changing the
designation to XP-79B. After the failure of the rocket motor, further
development of the first two prototypes ended.
Originally, it was planned to use a 2,000 lbf (9 kN) thrust
XCALR-2000A-1 "rotojet" rocket motor supplied by Aerojet that
used monoethyl
aniline and red fuming
nitric
acid; because of the corrosive and toxic nature of the liquids, the XP-79
was built using a welded
magnesium
alloy
monocoque structure (to protect the pilot if the aircraft was damaged in
combat) with a ⅛ in (3 mm) skin thickness at the trailing edge and a ¾ in
(19 mm) thickness at the leading edge. However, the rocket motor configuration
using canted rockets to drive the turbopumps was unsatisfactory and the aircraft
was subsequently fitted with two
Westinghouse 19-B (J30) turbojets instead. This led to changing the
designation to XP-79B. After the failure of the rocket motor, further
development of the first two prototypes ended.
The pilot controlled the XP-79 through a tiller bar and rudders mounted below; intakes mounted at the wingtips supplied air for the unusual bellows-boosted ailerons. Though it was to be armed with four .50 cal machine guns, initially the aircraft was to be unarmed and to down its foes by slicing through their flying surfaces with its thick wing leading edge.
 The XP-79B (after delays because of bursting tires and brake problems on
taxiing trials on the
Muroc dry lake) was lost on its first flight 12 September 1945. While
performing a slow roll 15 minutes into the flight, control was lost for unknown
reasons. The nose dropped and the roll continued with the aircraft impacting in
a vertical spin. Test pilot
Harry Crosby attempted to bail out but was struck by the aircraft and fell
to his death. Shortly thereafter, the project was cancelled.
The XP-79B (after delays because of bursting tires and brake problems on
taxiing trials on the
Muroc dry lake) was lost on its first flight 12 September 1945. While
performing a slow roll 15 minutes into the flight, control was lost for unknown
reasons. The nose dropped and the roll continued with the aircraft impacting in
a vertical spin. Test pilot
Harry Crosby attempted to bail out but was struck by the aircraft and fell
to his death. Shortly thereafter, the project was cancelled.
| THE KIT |
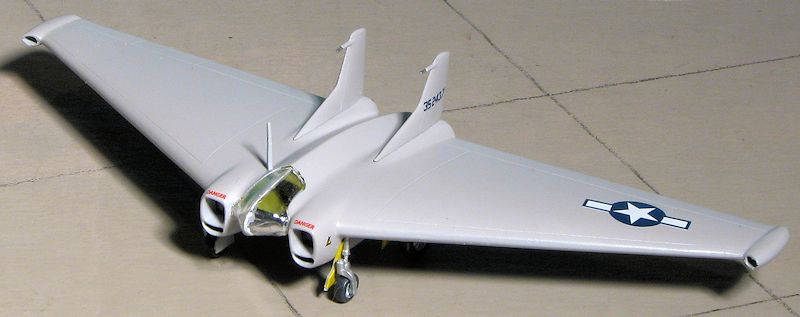
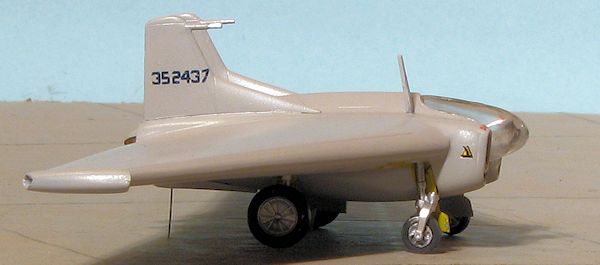
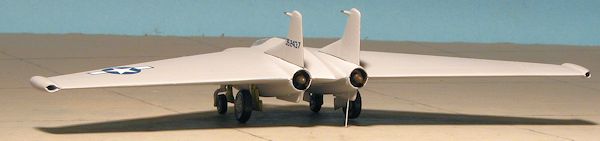
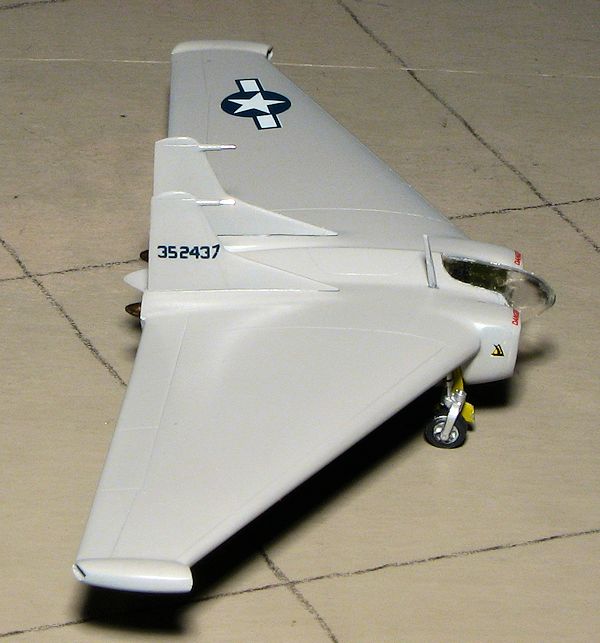
Not much plastic in the box for this one. A single grey sprue and a clear one with the canopy rattles around in their small size box. The canopy is in two halves split down the middle, which is where it appears there was a join area on the real aircraft.
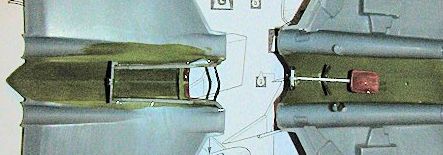
The rest of the kit is pretty standard stuff for RS Models. Very nicely engraved detail with some rather large ejector pin stubs on the inside of the wings, intake pieces and a bulkhead piece. Easy enough to remove. The cockpit will take most of your construction time as it consists of inner walls and bulkheads as well as the flight controls. There is a pad for the pilot to lay on but it looks pretty far back in the fuselage to me.
 There are intake pieces that go back about a
half inch and one has to insert exhaust cones prior to closing the fuselage
halves. I doubt if this will be a tail sitter, thanks to the two nose and
two main landing gear assemblies (building showed this not to be the case
and it needs a lot of weight). If anything, one will have to be careful
to make sure all four tires touch the ground. Apparently the outer nose and
outer main gear doors were normally closed, and one wonders why these parts
were even included at all. The inside of the gear wells and doors is shown
as chromate yellow with the interior also in this shade.
There are intake pieces that go back about a
half inch and one has to insert exhaust cones prior to closing the fuselage
halves. I doubt if this will be a tail sitter, thanks to the two nose and
two main landing gear assemblies (building showed this not to be the case
and it needs a lot of weight). If anything, one will have to be careful
to make sure all four tires touch the ground. Apparently the outer nose and
outer main gear doors were normally closed, and one wonders why these parts
were even included at all. The inside of the gear wells and doors is shown
as chromate yellow with the interior also in this shade.
Instructions are well drawn and pretty minimal as you might expect from so few parts. Markings are for three planes. One is the aircraft that actually flew. It is limited to wing insignia and a tail serial. The painting instructions state it was white, which is an interesting choice and probably based on extant black and white photos. If it were truly white, it would be the same shade as the inside of the wing insignia, but it appears a bit darker so I think it was probably pearl grey like the P-80. It is difficult to tell, but seems logical. The other two markings options are for a British version in test colors and an operational version based in Alaska with red on the leading edges of the flight surfaces. The small decal sheet is nicely printed and should work beautifully.
| CONSTRUCTION |
 There are grooves in the lower
fuselage for the steering shaft, but before that is installed, the V brace
needs to be glued in front of the aft one. The brace is too thick at its
juncture and needs to be severely sanded down to sit low enough for
the shaft to fit into its notch in the back. You also need to trim the shaft
right at where it goes into the area for the canopy glass or you will not be
able to fit it behind the instrument panel. It is a close fit even when
doing that. I would not waste a bunch of time detailing the cockpit as not
much will be seen once the fuselage halves are joined.
There are grooves in the lower
fuselage for the steering shaft, but before that is installed, the V brace
needs to be glued in front of the aft one. The brace is too thick at its
juncture and needs to be severely sanded down to sit low enough for
the shaft to fit into its notch in the back. You also need to trim the shaft
right at where it goes into the area for the canopy glass or you will not be
able to fit it behind the instrument panel. It is a close fit even when
doing that. I would not waste a bunch of time detailing the cockpit as not
much will be seen once the fuselage halves are joined. 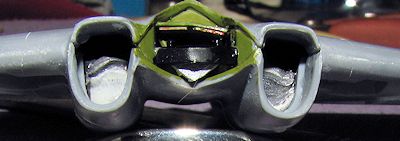 Before joining the upper and
lower sections, the exhaust pieces need to be installed. Then the ejector
towers need to be trimmed flush. Do not forget the ones on the wheel well
pieces. I also added weight in the intake areas relatively close to the
front as the instructions indicated they would be needed. Once the halves
are joined, filler is required in some of the areas. I removed the ejector
towers from the intakes and attached them. Fit is not very good. The fins
were the next items glued on. These are handed by having the tabs different
lengths. These tabs are a bit too deep so were sanded down prior to gluing.
Before joining the upper and
lower sections, the exhaust pieces need to be installed. Then the ejector
towers need to be trimmed flush. Do not forget the ones on the wheel well
pieces. I also added weight in the intake areas relatively close to the
front as the instructions indicated they would be needed. Once the halves
are joined, filler is required in some of the areas. I removed the ejector
towers from the intakes and attached them. Fit is not very good. The fins
were the next items glued on. These are handed by having the tabs different
lengths. These tabs are a bit too deep so were sanded down prior to gluing.
| COLORS & MARKINGS |
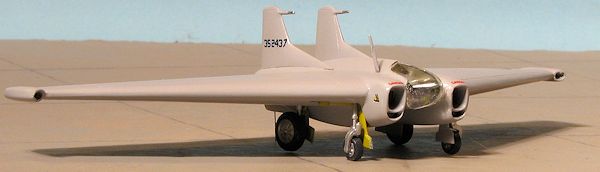
 The kit's instructions call for the aircraft to be overall white.
Perhaps this is correct, but I always figured it was a grey color, such
as what was on the Lockheed P-80. I certainly does not look white in
photos, so I set about looking for a suitable grey. ADC grey is too dark
and it was suggested that I try Vallejo Sky Grey. So after the usual
primer, I sprayed on the Vallejo and followed it with a good spray of
Future to gloss it up. One shade paint schemes sure help the build go
along smoothly and though it darkened up with the application of the
clear, it is still light enough to be different from the ADC grey. Back
at the bench, I brush painted the wheel wells using Testors Zinc
Chromate Yellow.
The kit's instructions call for the aircraft to be overall white.
Perhaps this is correct, but I always figured it was a grey color, such
as what was on the Lockheed P-80. I certainly does not look white in
photos, so I set about looking for a suitable grey. ADC grey is too dark
and it was suggested that I try Vallejo Sky Grey. So after the usual
primer, I sprayed on the Vallejo and followed it with a good spray of
Future to gloss it up. One shade paint schemes sure help the build go
along smoothly and though it darkened up with the application of the
clear, it is still light enough to be different from the ADC grey. Back
at the bench, I brush painted the wheel wells using Testors Zinc
Chromate Yellow. | FINAL BITS |
 gear doors
and glue those in place in the closed position. The main gear doors were a
perfect fit, while the nose gear doors are a bit loose. It also seems that
there is a bit of gear door missing from the nose as the section that
fits into the groove in the side of the intakes is not provided.
gear doors
and glue those in place in the closed position. The main gear doors were a
perfect fit, while the nose gear doors are a bit loose. It also seems that
there is a bit of gear door missing from the nose as the section that
fits into the groove in the side of the intakes is not provided.  pace for.
I ended up drilling a hole for a small section of .010 bronze wire near the
rear of the model to hold things up. The last part to add was the radio
mast.
pace for.
I ended up drilling a hole for a small section of .010 bronze wire near the
rear of the model to hold things up. The last part to add was the radio
mast. | CONCLUSIONS |
| REFERENCES |
http://en.wikipedia.org/wiki/XP-79
May 2013
Thanks to me for picking up the review kit.
Copyright ModelingMadness.com. All rights reserved. No reproduction in part or in whole without express permission from the editor.
If you would like your product reviewed fairly and fairly quickly, please contact the editor or see other details in the Note to Contributors.