| KIT #: | 60774 |
| PRICE: | $17.25 from GreatModels |
| DECALS: | Four options |
| REVIEWER: | Scott Van Aken |
| NOTES: |
| HISTORY |
I'm sure that most of us know at least something about
the Corsair. The earliest versions were the F4U with the heavily frames canopy
and wi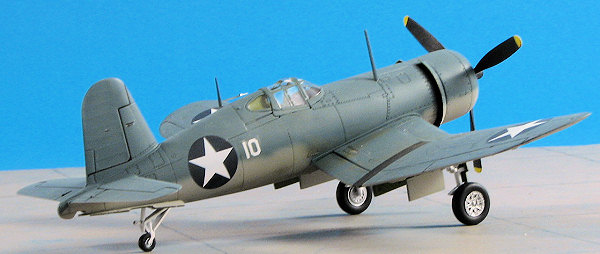 ndscreen sections that led to them being called 'birdcage' corsairs. These
planes were used almost exclusively from land bases as the aircraft had too much
'bounce' for the tastes of the USN and this kept them off carriers. Oddly, this
wasn't a problem for the British, who used these planes with slightly clipped
wing tips on their carriers.
ndscreen sections that led to them being called 'birdcage' corsairs. These
planes were used almost exclusively from land bases as the aircraft had too much
'bounce' for the tastes of the USN and this kept them off carriers. Oddly, this
wasn't a problem for the British, who used these planes with slightly clipped
wing tips on their carriers.
Anyway, this 'no carrier' edict was a boon for the USMC who got the majority of these planes and used them with much effectiveness in the Solomon campaign during 1943. Along with the Marines, VF-17, which was the initial recipient of the type and did much of the carrier work with them, also operated them from land bases, building up an enviable kill record and forever ensuring that there would be a 'Jolly Rogers' squadron somewhere in naval air.
| THE KIT |
Detailing is quite reminiscent of the larger scale kit. So is the general part breakdown and options. It should be no surprise that this is basically the F4U-1D kit with new sprues for the birdcage variant. The image to the left is of the -1D bits with the additional small image showing the new parts.
The interior detail is just superb and rivals that of the 1/48 version,
including the see-through cockpit floor and under fuselage window that just
about all other Corsair models miss. There is a decal for the instrument panel,
and for the seat harness. There is good sidewall and wheel w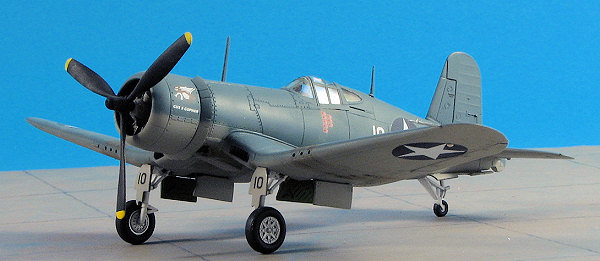 ell
detail and the wells themselves are properly deep. The engine has both rows of
cylinders and there is an option for open or closed cowl flaps.
ell
detail and the wells themselves are properly deep. The engine has both rows of
cylinders and there is an option for open or closed cowl flaps.
The new sprue includes inserts for the different canopy. I personally don't like these inserts, but the Tamiya ones usually fit very well. As many of you know, the small scale Tamiya kits don't have the dropped flaps of the larger cousins. Interestingly, this has an insert for the inboard right flap to replace the -1D version which had a step molded in it. The other difference is the propeller, which is a bit odd as I thought they were all the same size.
Instructions are superb and the standard of the industry, though this one continues the irritating use of Tamiya-only paint references. Markings are for four aircraft, three in the tri-color paint scheme. The first two are from VF-17 'Jolly Rogers' that differ only in code and the insignia that they use. Third is a 'Pappy' Boyington VMF-214 aircraft, also in the tri-color scheme. I'm not sure if he actually flew this on or if it was just used for publicity. The final option is in the earlier blue-grey over light grey scheme and is a plane flown by Ken Walsh with VMF-124. Markings are well done and the white is actually white, though, for some reason, the red surround background has the inner bits in ivory. Anyway, the sheet also includes the masking tape that was often used to help seal the frequently leaky forward fuel tank.
| CONSTRUCTION |
This one was going to be done right from the box with
no real add-ons aside from the decals. First thing was the interior (surprise!),
which was first assembled as much as I could and then, along with the other
interior bits of the wings and fuselage, was painted US Interior Green. I did
end up breaking the control column getting it off the sprue, as this was as much
due to a 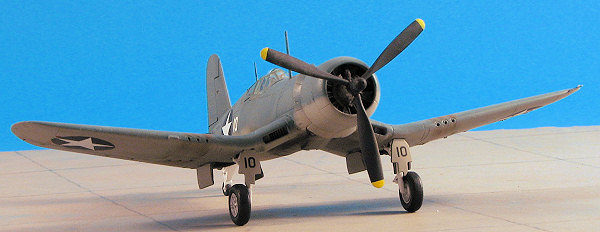 somewhat large sprue
attachment point as anything. It seems that one can either have the bits firmly
held in place, or open a kit to find things rattling around in the bag. I'm not
sure if there is a middle ground for these things.
somewhat large sprue
attachment point as anything. It seems that one can either have the bits firmly
held in place, or open a kit to find things rattling around in the bag. I'm not
sure if there is a middle ground for these things.
With all the bits initially painted, I used my brush and some Vallejo matte black acrylic to do the detail stuff, which included the instrument panel. I then put on the decal that is supplied with the kit for both the panel and the seat. I have noticed over the last several Tamiya kits that I've built, that their decals are now a lot more compatible with setting solutions. I used Solvaset on this and others without any problems. I should also mention that I like having a decal harness in with a kit. There are times you don't want to mess with an etched set and decals are the next best thing.
With the interior painted, it was glued in place and the fuselage halves joined. While that dried, the wings were attended to. As this version has none of the drop tanks, bombs or rockets that are normal with later versions, I didn't have to open any holes in the wings. It also gives a goodly number of spare bits that can be used on other projects. There is one flap that is left separate as later Corsairs had a hole in it for a step. Not the early ones as that was covered over. The fit is fairly good, though it is noticeable that one side is different from the other in terms of a bit of a gap when you look at it.
The cooler intakes are separate bits, and like many of these sorts of inserts, the fit is good, but not perfect. I used filler on this and a little on the one for the rear quarter windows. The latter insert is just a little bit too small for the opening in terms of width. Nothing major, but it is something you might keep in mind. Perhaps it is to allow the canopy to slide back over it, which would make sense except that the canopy won't fit on it properly. At least mine did not.
 The fit
of the wings to the fuselage is also pretty good. I had some fit issues with the
rear wing/fuselage join that required some filler. There is also a clear window
that fits into the bottom of the fuselage, so be sure to take care of the mold
seam on the control linkage as it will be quite visible. The tail planes were
then glued in with no problems at all.
The fit
of the wings to the fuselage is also pretty good. I had some fit issues with the
rear wing/fuselage join that required some filler. There is also a clear window
that fits into the bottom of the fuselage, so be sure to take care of the mold
seam on the control linkage as it will be quite visible. The tail planes were
then glued in with no problems at all.
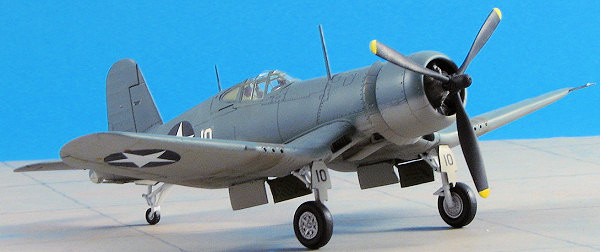
Moving to the front, you have the option of open or closed cowl flaps. I chose open as it just looks a bit better to my eyes. It also means that the pipe work that is in the back of the firewall should be painted as it is quite visible. No worries on the engine, though you do have to be sure to install the poly cap into the crankcase cover so you can push in the prop later. This assembly was then glued onto the nose.
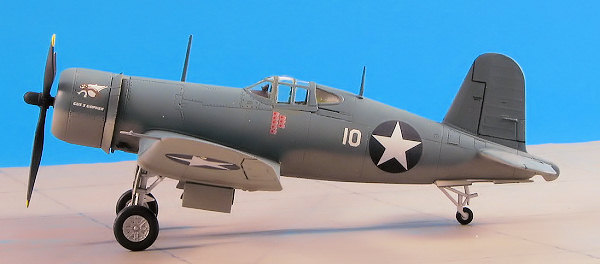
At this time I masked the clear bits and glued them onto the airframe. Nearly forgot to install the gun sight so don't make that mistake. The kit offers both a really early and later canopy, the later having a bit of a bulge in it for a rear view mirror. I wasn't sure just which one was best to use, so hunting through some references, I found some images of Marine Corsairs in the Solomons and all seemed to have the later version. Tissue was stuffed into the wheel wells and it was off for some paint.
| COLORS & MARKINGS |
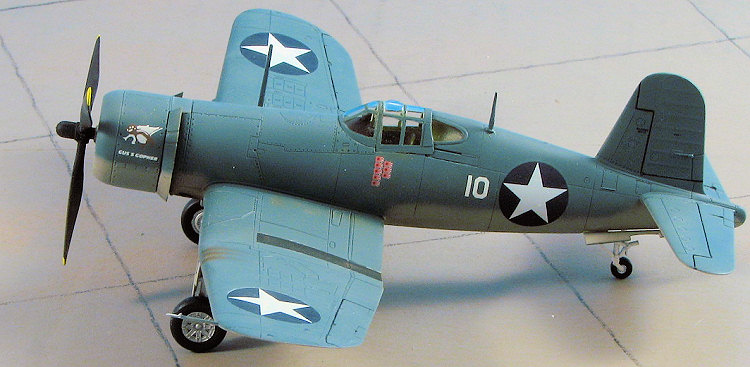
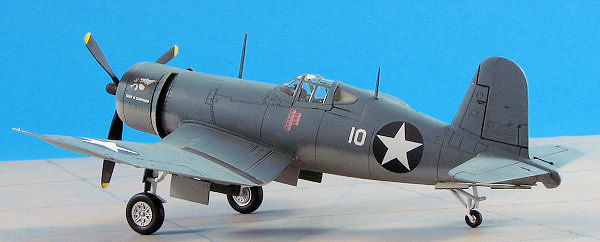
 I wanted
to model a USMC Corsair as used in the Solomons campaign so relied on an old
Superscale sheet to give me markings. This meant a blue-grey over light grey
scheme, and ColourCoats has both of them in their fine enamel line. But first, I
painted over the clear bits with US Interior green so that this color would
appear on the inside. When dry, I did the underside shade first. I thinned the
paint to water consistency and used lacquer thinner on it. This will allow
fairly low pressure and assure rather rapid drying time, even with the
ColourCoats paint, which generally needs a day before you can handle it. As I
generally allow that much time anyway, it wasn't a problem, but I didn't want to
deal with runny paint, something the low pressure and lacquer thinner will
prevent.
I wanted
to model a USMC Corsair as used in the Solomons campaign so relied on an old
Superscale sheet to give me markings. This meant a blue-grey over light grey
scheme, and ColourCoats has both of them in their fine enamel line. But first, I
painted over the clear bits with US Interior green so that this color would
appear on the inside. When dry, I did the underside shade first. I thinned the
paint to water consistency and used lacquer thinner on it. This will allow
fairly low pressure and assure rather rapid drying time, even with the
ColourCoats paint, which generally needs a day before you can handle it. As I
generally allow that much time anyway, it wasn't a problem, but I didn't want to
deal with runny paint, something the low pressure and lacquer thinner will
prevent.
Thanks to the thin paint and my Skybow AB-100 airbrush,
I was able to freehand the demarcation line between the two shades with ease.
I also painted the landing gear during this sequence of events. I used white for
the gear legs and silver for the main wheel hubs as shown in the instructions.
I'm not really sure if the gear legs on these early Corsairs would have been
that shade, 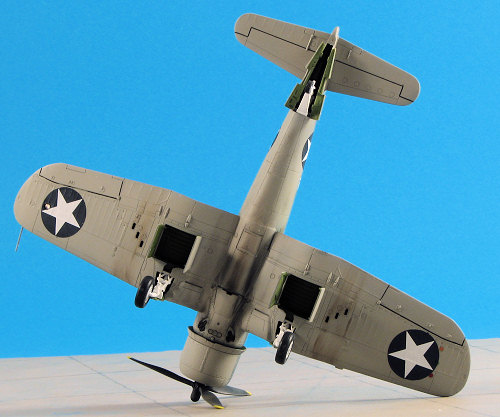 though it was
appropriate for the tri-color schemes provided with the Tamiya kit decals. As
the deed is now done, I'll live with it. I should point out that Tamiya keys
their wheels so if using aftermarket versions, you'll need to modify the axle to
remove the key. I also cut off the tail hook as the Marines didn't need them
when operating from land bases.
though it was
appropriate for the tri-color schemes provided with the Tamiya kit decals. As
the deed is now done, I'll live with it. I should point out that Tamiya keys
their wheels so if using aftermarket versions, you'll need to modify the axle to
remove the key. I also cut off the tail hook as the Marines didn't need them
when operating from land bases.
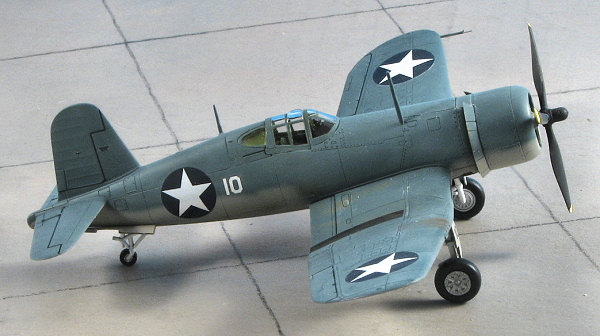
With the landing gear installed, I started applying decals. I was somewhat dismayed when I slide the wing insignia off the sheet to find a little sliver of white around about 40% of the circumference. It was a mis-registration that one can't seen on the sheet but is apparent on the darker background. Fortunately, Tamiya had those insignia on the sheet and though I had to trim the bars away from two of them, they did work quite well. They were also a bit smaller than the Superscale insignia, though really, it makes little or no difference. Superscale sheet 72-738 has markings for aircraft from VMF-213, and I'd already used one of those when doing a Hasegawa 'birdcage' several years ago. This time I did "Gus' Gopher". In reality, I only used the nose art, serials and aircraft numbers from the sheet with the insignia, kill markings, and wing walk areas being gleaned from the kit decals. It is interesting to see the difference in colors between the Testors and Colourcoats paints, both ostensibly the same shades. Oh yes, I used no clear coat on this one, the semi-gloss Colourcoats paint seeming to work out well as I had nearly no silvering.
| FINAL CONSTRUCTION |
 With the
decals in place, it was time for the rest of the stuff. I glued on the landing
gear doors as well as the radio masts and pitot tube. It seems to me that the
mast behind the canopy wasn't used on these early aircraft, but as I'd already
made the hole for it, I installed it. Instructions would lead you to believe
this mast was appropriate for their markings options. These items were brush
painted to match the surrounding area. On the underside of the wing, the ID
lights were painted with Red, Green, and Orange using Vallejo transparent
paints. An MV lens (LS 25) was used in place of the clear piece provided by
Tamiya, my only aftermarket part. Some of Tamiya's pastels were used for exhaust
and gun soot as you probably know by now that I'm not into heavy weathering. And
that was it.
With the
decals in place, it was time for the rest of the stuff. I glued on the landing
gear doors as well as the radio masts and pitot tube. It seems to me that the
mast behind the canopy wasn't used on these early aircraft, but as I'd already
made the hole for it, I installed it. Instructions would lead you to believe
this mast was appropriate for their markings options. These items were brush
painted to match the surrounding area. On the underside of the wing, the ID
lights were painted with Red, Green, and Orange using Vallejo transparent
paints. An MV lens (LS 25) was used in place of the clear piece provided by
Tamiya, my only aftermarket part. Some of Tamiya's pastels were used for exhaust
and gun soot as you probably know by now that I'm not into heavy weathering. And
that was it.
| CONCLUSIONS |
 Well, it
is no surprise that the kit builds as advertised. Minimum fit problems, an
accurate model when done, and finally, decals that can be treated like any
other. One has to wonder if the increased price is worth it as it retails well
above $20, but I'd say that most can tolerate it. If on a budget, the Hasegawa
Birdcage with the True Details cockpit will give you more for your money,
especially as the Hasegawa kit can be found from vendors at contests and swap
meets for around $5. But if are one who has to have Tamiya, then you will find
that this one meets all your expectations.
Well, it
is no surprise that the kit builds as advertised. Minimum fit problems, an
accurate model when done, and finally, decals that can be treated like any
other. One has to wonder if the increased price is worth it as it retails well
above $20, but I'd say that most can tolerate it. If on a budget, the Hasegawa
Birdcage with the True Details cockpit will give you more for your money,
especially as the Hasegawa kit can be found from vendors at contests and swap
meets for around $5. But if are one who has to have Tamiya, then you will find
that this one meets all your expectations.
May 2007
#1466 in a series
Copyright ModelingMadness.com. All rights reserved. No
reproduction in part or in whole without express permission from the editor. If you would like your product reviewed fairly and fairly quicklyh, please
contact
the editor or see other details in the
Note to
Contributors.