Hasegawa 1/48 F6F-5 Hellcat
| KIT #: | JT 35 (standard F6F-5 boxing) |
| PRICE: | $10.00 from a swap meet |
| DECALS: | Two options |
| REVIEWER: | Scott Van Aken |
| NOTES: | Kit had been started |
| HISTORY |
A little realized fact is that more
Japanese planes were shot down by Hellcats than any other airplane in the
Pacific War. This is because the later battles against the Japanese and
their Kamikaze aircraft were generally fought using Hellcats. They were the
primary carrier-borne fighter after 1942, replacing the F4F Wildcat. Sure,
there were Corsairs on board ships too,
 but not that many and not until
later in the war.
but not that many and not until
later in the war.
The nice thing about the Hellcat was that it had sufficient performance to best most Japanese aircraft. It had very good maneuverability, and it was an easy aircraft to fly. Even the most junior pilot felt confident in his abilities while flying the Hellcat. He could concentrate on his flying skills and not have to worry about some idiosyncrasy of the aircraft killing him while doing so.
They were built in rather large numbers for a Naval fighter and served well. After the war, they were already obsolete and any of their jobs in the post war world were taken over by the F4U Corsair. A few soldiered on in the reserves and some were used as target drones, even being used against North Korean targets in the early 50s. But for all intents and purposes, by 1950 they were pretty much gone to the scrap yard. Only a few remained to fly again as war birds or be saved for museums.
| THE KIT |
This is Hasegawa's standard F6F-5
boxing. It includes the additional bits used on the -5 variant, like the
different clear bits and the wing mounted rockets that you don't get in the
-3 boxing. The decals are for two nice late war units with the geometric
air wing markings, but the white is very much an ivory color so most
modelers will want to replace those with
 aftermarket decals. The level of
detail of the rest of the kit is quite good and most will be satisfied with
the kit interior. This is especially so as the canopy is too thick to be
posed in the open position. Anyone who wishes to do so will have to get a vacuformed canopy, which will be thin enough to slide back.
aftermarket decals. The level of
detail of the rest of the kit is quite good and most will be satisfied with
the kit interior. This is especially so as the canopy is too thick to be
posed in the open position. Anyone who wishes to do so will have to get a vacuformed canopy, which will be thin enough to slide back.
Tthe kit is one of those that goes together well and can be built without a lot of fuss. While I'm not really a big Hellcat fan, I seem to have built quite a few over the years. And now, I'm doing yet another. This is as much because I got one cheap at a swap meet and I had a bunch of sea blue paint left over from doing the F-18F.
| CONSTRUCTION |
Step one was to undo the sloppy gluing done on the wings by the previous owner. This wasn't pretty, but it did allow me to open up the missile rail holes on the underside of the wing. Gluing it back together, I saw that much filler would be needed to repair some of the rips in the plastic. I though I had a spare wing from an earlier build when I used a Dangerboy Hobbies wing fold set, but must have tossed it, figuring I'd never need a Hellcat wing. I was wrong.
 While all that was drying, I started
on the cockpit. Basically, I glued together all the bits that were going to
be painted Interior Green, including a bit or two on the inside fuselage
wall. I used Testors ModelMaster enamels for this. Once dry, I painted the
various bits that were supposed to be black and dry brushed them. The
rudder pedals were painted Steel just because I wanted to.
While all that was drying, I started
on the cockpit. Basically, I glued together all the bits that were going to
be painted Interior Green, including a bit or two on the inside fuselage
wall. I used Testors ModelMaster enamels for this. Once dry, I painted the
various bits that were supposed to be black and dry brushed them. The
rudder pedals were painted Steel just because I wanted to.
Before I attached the right side wall, I wanted to install some aftermarket seat belts. My local hobby shop was out of the Eduard pre-painted ones I wanted, so I was talked into using some generic US WWII belts by a company called Lion's Roar. They offer four sets of belts for $7, which isn't bad. These have to be the thinnest etched brass I've every used. They are almost paper thin. They also don't like to glue to each other as I had some difficulty getting the ends of the belts to stay attached. Once in place, they were painted Ivory using Vallejo acrylics.
Moving to the instrument panel, I cut out the Hasegawa kit decals for these and applied them using Champ setting solution. Thanks to some good luck, they snuggled down just as they were supposed to. This doesn't always work out like this! With the interior bits all together, I assembled the fuselage halves. Some minor filler work was needed and I also had to sand off an upper light mount that is for the F6F-3.
 Next, the completed wing was glued to
the lower fuselage. Fit is quite good, but I still needed a touch of filler
on the side seams and a little bit on the rear join. Then the tail planes
were glued in place. Fit here is a bit sloppy so one has to be careful to
be sure they are straight.
Next, the completed wing was glued to
the lower fuselage. Fit is quite good, but I still needed a touch of filler
on the side seams and a little bit on the rear join. Then the tail planes
were glued in place. Fit here is a bit sloppy so one has to be careful to
be sure they are straight.
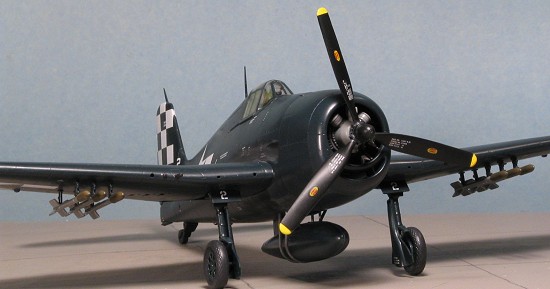
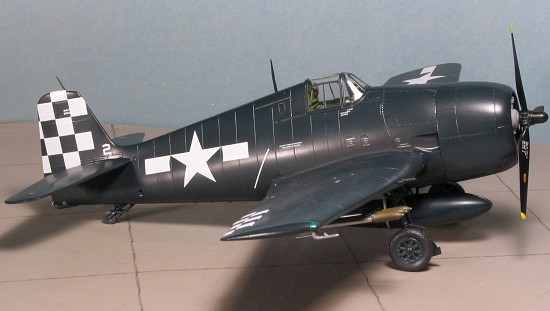
One really nice thing about late war Hellcats is that EVERYTHING is painted dark sea blue. This enables the builder to get just about all the parts on the plane before painting. Makes for nice, sturdy glue joins. In this vein, I installed the landing gear and small doors, tail wheel assembly (I even went so far as to drill out the holes in the brace), radio mast and the rocket stubs under the wing. The instructions would have you attach these to the rockets first, but that will complicate painting quite a bit.
I then glued on the gun sight, followed by the windscreen and the canopy, both of which had been masked. It was time to do some painting.
| COLORS & MARKINGS |
 For this job, the best sea blue paint
I've found is by Testors Model Master. This enamel dries very quickly (I
could have handled the aircraft within 3 hours of application, but let it
dry overnight). Since one usually does several applications to be sure all
was covered, this is a real boon. During all this some of the other parts
like wheels and main gear doors were done. You'll find that you have some
rather unsightly ejector pin marks on the inside of the gear doors so be
sure to sand these parts down to remove them. I had the misfortune of
dropping the engine cowling so had to sand off all the crud and respray. I
also managed to snap off the radio mast. It's a talent.
For this job, the best sea blue paint
I've found is by Testors Model Master. This enamel dries very quickly (I
could have handled the aircraft within 3 hours of application, but let it
dry overnight). Since one usually does several applications to be sure all
was covered, this is a real boon. During all this some of the other parts
like wheels and main gear doors were done. You'll find that you have some
rather unsightly ejector pin marks on the inside of the gear doors so be
sure to sand these parts down to remove them. I had the misfortune of
dropping the engine cowling so had to sand off all the crud and respray. I
also managed to snap off the radio mast. It's a talent.
When it was all dry, I returned to the work bench to do some more 'stuff'. One was to paint the tail wheel and main wheels using Floquil's Weathered Black. I also assembled the engine (which had been painted steel, washed using thinned black acrylic, and the had the dark grey engine housing glued on) and started to test fit it into the cowling. The fit was really bad when I realized that I wasn't supposed to glue it to the cowling, but to the firewall on the front of the airframe. As Homer Simpson says; "DUH!". I pushed in the prop shaft and left it to dry for a while. Meanwhile I drilled out the exhaust and painted them Burnt Iron.
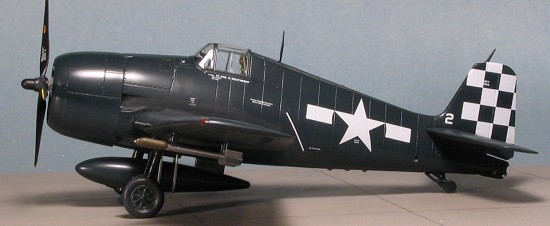
I also went to work on the mess that
was made of the drop tank by the previous owner. Not only poorly cemented,
but looks like he/she tried to use it as filler for there were se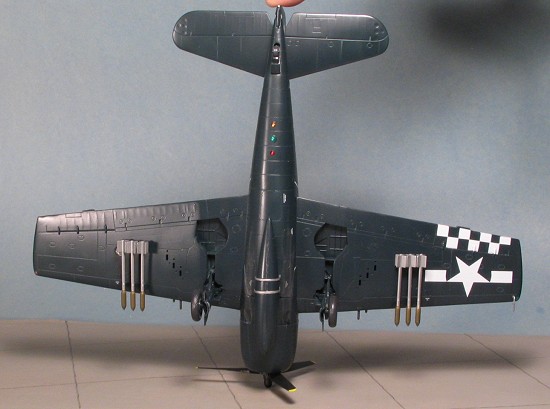 veral
melted and deformed spots on it. More filler and sanding on this one!
Eventually I filled it into submission and it was ready to be properly
painted. The straps that hold this thing on the plane are supposed to be in
aluminum, so I glued on the sway brace piece and painted it the color of
the rest of the plane.
veral
melted and deformed spots on it. More filler and sanding on this one!
Eventually I filled it into submission and it was ready to be properly
painted. The straps that hold this thing on the plane are supposed to be in
aluminum, so I glued on the sway brace piece and painted it the color of
the rest of the plane.
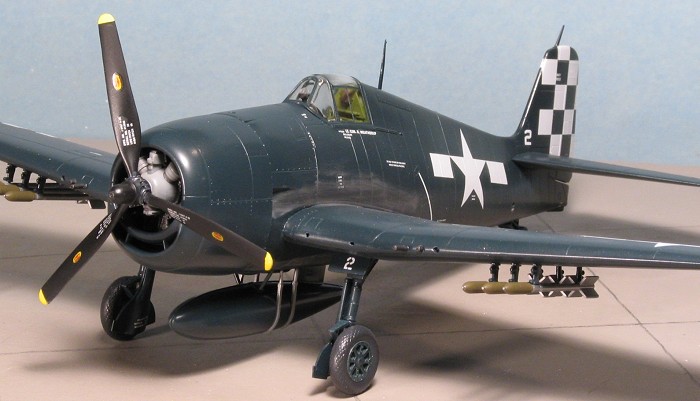
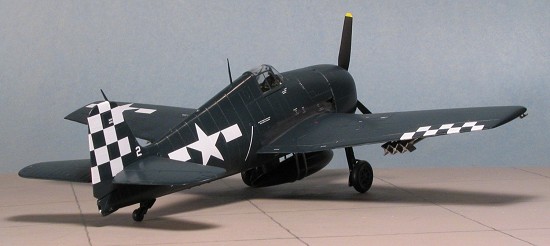
Around about this time, things were ripe for decals. I chose Superscale 48-1040 as it had a nice pair of markings on it. In fact, Superscale has released several very nice Hellcat sheets in the last few months. This one caught my eye as it had a checkered tail as one of the options. It turns out that this was the plane of the squadron XO of VF-46 aboard the USS Independence. I assume he was the XO as the CO would have had aircraft #1.
First thing I did was to apply all the standard markings. This included the nice batch of data markings that is included. The instructions have a good guide that was quite helpful. I also put on all the insignia. When I had the plane marked as it would have been fresh from the factory, I applied the air wing markings, doing the underside of the aileron and one side of the tail first. The underside of the wing will need multiple applications of setting solution as there are some rather large actuating fairings for it to snuggle over. After applying the other side and the rest of the markings, I left it to dry. Then the entire airframe was wiped down with fresh water and dried, so that all the setting solution and dried glue was removed. I noted that there were a few gaps on the air wing markings as they are just a teeny bit too small to properly meet. Some flat white acrylic paint was used as a touch-up and it worked great.
| FINAL CONSTRUCTION |
The next step was to attach some of
these bits that were left off for decaling. During the time the decals were
drying, I also drilled out the wing guns and pre-painted a bunch of smaller
bits that would need to go on about this time. I glued in the exhaust ports
and glued the cowling in place. The propeller shaft is too long so that was
trimmed back and the prop glued on. I also glued on the gear doors and oleo
scissors and main wheels, after wrapping the oleos with Chrome Bare Me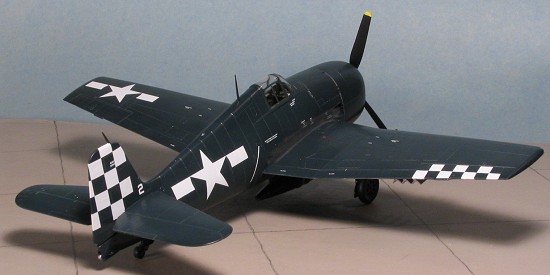 tal
Foil. I also glued on the drop tank and its straps. Then the airframe was
given a coat of semi-gloss clear. The Testors sea blue enamel is so shiny
that it would be perfect for a car, but it is way too much for an airplane.
Matte blue would be out of character but a semi-gloss wouldn't be too bad.
It would also provide some 'bite' for the pastels used a bit later.
tal
Foil. I also glued on the drop tank and its straps. Then the airframe was
given a coat of semi-gloss clear. The Testors sea blue enamel is so shiny
that it would be perfect for a car, but it is way too much for an airplane.
Matte blue would be out of character but a semi-gloss wouldn't be too bad.
It would also provide some 'bite' for the pastels used a bit later.
Once that was dry, the final pieces
came into place. First, I painted the wing tip running lights with red and
green. Then, I used MV Lenses (which you can find at model railroad shops)
in place o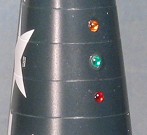 f the landing light and the three ID lights on the bottom of the
fuselage. I couldn't find any blue MV lenses in my stash, so used
a green one instead. They do make these in blue. These really look great and are highly recommended. I held
them in place with a teeny drop of super glue.
f the landing light and the three ID lights on the bottom of the
fuselage. I couldn't find any blue MV lenses in my stash, so used
a green one instead. They do make these in blue. These really look great and are highly recommended. I held
them in place with a teeny drop of super glue.
Final bits to add on were the guns, pitot tube and tail hook. A clear light went on the top of the fuselage as did the radio mast. I then glued on the rockets, which had previously been painted with an aluminum body/fins, OD warhead, and steel tip. The canopy and windscreen were unmasked and I did some additional painting on the canopy sill where it was still bare plastic. The canopy was clicked in place (no cement needed), and I did some final touch-up painting. Then the pastels were applied and it was complete. Oh yeah, for those of you who are saying that the markings on the prop look like decals, well let me clue you in. The ones on the real planes WERE decals!
| CONCLUSIONS |
I do hope I've left the impression that this is a really nice kit. Hasegawa makes some that are fussy, some that aren't and this one really isn't. It is one that just about anyone can make look good and if you've been bogged down by some complex project, this one would be a perfect relaxer.
Additional info: The MV Lenses I uses were L 149 (.147 inches/3.8 mm) for the landing light and L 200-203 for the ID lights (.086 inches/2.1844mm). The ID lights are actually larger than the openings so you may want to drill those out a bit. I used them as they were all I could find in the colors I wanted.
December 2005
# 1392 in a series
Copyright ModelingMadness.com. All rights reserved. No reproduction in part or in whole without express permission of the editor.
If you would like your product reviewed fairly and fairly quickly, please contact the editor or see other details in the Note to Contributors.