Valom 1/72 TBD-1 Devastator (1942)
| KIT #: | 72012 |
| PRICE: | $ |
| DECALS: | Two options |
| REVIEWER: | Scott Van Aken |
| NOTES: | Short run with photo etch and resin parts |
| HISTORY |
While the US Navy became
aware by about 1940 that the TBD had become outclassed by the fighters and
bombers of other nations and a replacement (the TBF Avenger) was in the works,
it was not in service yet by the entry of the United States into World War II.
Training attrition had reduced their numbers by then to just over 100 aircraft.
The U.S. Navy assigned popular names to its aircraft in late 1941, and the TBD
became the "Devastator".
 In the early days of the Pacific war the TBD acquitted itself well during
February and March 1942 and in the Battle of the Coral Sea, in which Devastators
helped sink the Japanese aircraft carrier Shoho.
In the early days of the Pacific war the TBD acquitted itself well during
February and March 1942 and in the Battle of the Coral Sea, in which Devastators
helped sink the Japanese aircraft carrier Shoho.
Problems were being discovered with the Mark XIII torpedo at this point. Many
were seen to hit the target yet fail to explode; it took over a year for the
problems to be corrected, including a tendency to run deeper than the set depth.
It really wasn't until mid 1944 that the aviators on board carriers were able to
take advantage of these corrections as the submarine and surface forces had
first call on the modified torpedoes.
These problems were not corrected by the time of the Battle of Midway on June 4,
1942. Forty-one Devastators were launched from USS Hornet, USS
Enterprise and USS Yorktown to attack the Japanese fleet. Their
fighter escort lost contact, and the TBDs started their attacks without
protection from the Japanese fighters. Torpedo delivery requires a long,
straight-line attack run, making the planes vulnerable anyway, and the slow
speed of the aircraft made them sitting ducks for the Mitsubishi Zeros. One by
one they fell; only four planes made it back to the Enterprise; none to the
Hornet or Yorktown. Worse, not a single torpedo hit its target.
The Navy immediately withdrew the TBD from front-line units after Midway. There
were only 39 aircraft left in any case. They remained in service briefly in the
Atlantic and in training squadrons until 1943. None survived the war.
In fairness to the type, the disaster of the Battle of Midway was as much due to
the vulnerability of torpedo bombers against AAA fire and defending fighters
fielded by an undistracted enemy fleet as anything else. Without a fighter escort to keep off the
Zeroes and distract the ship borne AAA guns, not even the TBF Avengers escaped nearly
as heavy losses.
| THE KIT |
Valom has steadily been improving their kits over the years. Their initial releases were, to be honest, rather difficult builds. Fit issues were the main culprit and this was not helped by instructions that were sometimes rather vague about part placement. However, we all grow and learn by doing and so it has been with Valom. The last kit of theirs I built, the Lockheed XFV-1, was very nice and went together quite well. Even won a silver award at the IPMS Butch O'Hare show last November, something few of my short run builds ever do. With that positive result in hand, I was very much looking forward to building this most recent kit of theirs.
| CONSTRUCTION |
 First thing I did was to cut the big pieces (fuselage
and wings) from the sprue. Then I removed the ejector stubs with a pair of flush
cutters, and sanded the sprue attachment intrusions from the mating surfaces.
With that done, I headed for the resin. There are several parts that have rather
substantial pour stubs. These are the cowling, interior section, engine and
bombs. These were laboriously removed and cleaned up. The smaller bits still on
the sprues will be taken off when they are needed. Keeps me from losing them or
having them break. I already saw that I'd have to do some repair as there were
some small 'sticks' in the bag.
First thing I did was to cut the big pieces (fuselage
and wings) from the sprue. Then I removed the ejector stubs with a pair of flush
cutters, and sanded the sprue attachment intrusions from the mating surfaces.
With that done, I headed for the resin. There are several parts that have rather
substantial pour stubs. These are the cowling, interior section, engine and
bombs. These were laboriously removed and cleaned up. The smaller bits still on
the sprues will be taken off when they are needed. Keeps me from losing them or
having them break. I already saw that I'd have to do some repair as there were
some small 'sticks' in the bag.
I started with the interior part. This required that I attach the resin control stick (one of the broken parts with the stick part AWOL) and the photo etch belts and rudder ramps/pedals. The belts are all quite generic and as I draped them over the seat sides and back, I realized they were way too short. Perhaps this is the fault of my installation, I don't know. I also installed the rather unusual foot ramps after threading the rudder pedals through them. The pedals were left loose until everything was properly glued down. Once in place, this assembly was painted aluminum. The instructions say interior green, but photos I've seen of these planes show an aluminum interior and I seriously doubt this was repainted when the outside was done.
 Meanwhile, I was looking things over and trying to
decide how the engine was installed. The instructions show it glued onto a
plastic circular firewall, but this firewall part did not want to fit into the
cowling as shown. I thought I'd be creative and glue this firewall to the very front of
one of the fuselage halves as it seemed to have a stop in there for it. I'd also
noticed that the very small area in front of the windscreen on both halves
wasn't curved over enough (probably due to how thin it was) so gluing it to this
firewall may be a way to get a better fit.
Meanwhile, I was looking things over and trying to
decide how the engine was installed. The instructions show it glued onto a
plastic circular firewall, but this firewall part did not want to fit into the
cowling as shown. I thought I'd be creative and glue this firewall to the very front of
one of the fuselage halves as it seemed to have a stop in there for it. I'd also
noticed that the very small area in front of the windscreen on both halves
wasn't curved over enough (probably due to how thin it was) so gluing it to this
firewall may be a way to get a better fit.
After gluing the firewall to one half, I went back to the interior and added on a few more parts. The gunner's position was a rather fussy construct, but I was able to get it all together. The etched mounting hole for the gun is way too small so you'll have to do as did I and sand down the attachment point on the gun. Speaking of the gun, after breaking off the barrel, I drilled out the forward section and reinserted it. There is a photo etch piece that fits atop it. I assume it is a gun sight, but it is huge and looks decidedly odd. After folding it and attaching it, it left me wondering if I'd keep it there or remove it prior to gluing on the canopy.
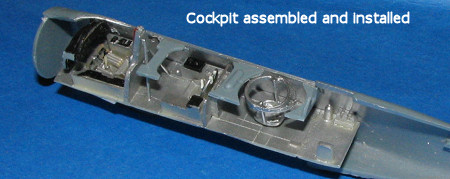 Back at the fuselage,
I installed the interior atop one of the mounting shelves. One has to be careful
to get this straight. I got it a bit off, but was able to snap it in place a bit
later. I also mounted in all the cross pieces. These were a bit too wide for the
first two and the aft one was a bit narrow. I trimmed these first two, but
overdid one and had to add in a piece of plastic to get it to fit. I also
installed the instrument panel. There is no really good attachment point for it
so one just has to get it where it looks good, dab on some superglue to hold it
and then test fit the other fuselage half.
Back at the fuselage,
I installed the interior atop one of the mounting shelves. One has to be careful
to get this straight. I got it a bit off, but was able to snap it in place a bit
later. I also mounted in all the cross pieces. These were a bit too wide for the
first two and the aft one was a bit narrow. I trimmed these first two, but
overdid one and had to add in a piece of plastic to get it to fit. I also
installed the instrument panel. There is no really good attachment point for it
so one just has to get it where it looks good, dab on some superglue to hold it
and then test fit the other fuselage half.
Once all was in place, I glued the other fuselage half onto the right side and, using superglue and clamps, got the parts to fit fairly well. I installed the flat bottom at this time after ensuring it would fit. A bit of a note in that the lower insert is flat while the bottom of the fuselage curves, so it wouldn't be a bad idea to bend the insert some. I tried, but it wasn't enough so several rounds of filler were needed for this and the other seams.
I then assembled the wings. Fit is about as expected with sanding needed to get the parts to mate. It seems as if the lower wing is a bit wider than the upper as with the forward section properly aligned, the lower wing stuck out the back. Once it was glued and filled, I went over the leading edge with a saw blade to restore the corrugations. During the period the wings were drying, I glued on the tail planes. Fit is fair as I had gaps on the lower side once the upper side was properly installed. These were filled as best I could as the corrugations go right up to the root.
 Back at
the wings, there are resin fairings that fit around the forward sections of the
wheel wells. These are a bit narrower than the well openings but fit well. The
smaller sections are quite thin and both of mine broke while being cleaned up.
There is also a two part intake that fits under one wing root. As kitted the fit
is poor as it sits way too proud of the lower wing. Using my motor tool, I
ground away at the wing until this intake fit a lot more into the wing. The
outer edges were faired in with filler and some of the upper surface was sanded
down until it matched more what was on the box art. I then glued on both wings,
being sure that I got the best fit on the upper wing as it would be easier to
fix any lower wing problems.
Back at
the wings, there are resin fairings that fit around the forward sections of the
wheel wells. These are a bit narrower than the well openings but fit well. The
smaller sections are quite thin and both of mine broke while being cleaned up.
There is also a two part intake that fits under one wing root. As kitted the fit
is poor as it sits way too proud of the lower wing. Using my motor tool, I
ground away at the wing until this intake fit a lot more into the wing. The
outer edges were faired in with filler and some of the upper surface was sanded
down until it matched more what was on the box art. I then glued on both wings,
being sure that I got the best fit on the upper wing as it would be easier to
fix any lower wing problems.
I then cut and assembled the bombs. You may wish to replace these with others as I had a terrible time getting the separate fin sections and body to fit. The problem was as much my inability to saw straight as anything and sanding the filler was not an easy task.
 With
the underside filled multiple time and sanded as smooth as I could, I installed
the bomb racks. These are really just sections of plastic that look little like
the actual racks on the plane, but they serve their purpose. I also installed
the tail wheel and the tail hook. I had to bend the tail hook to get it to fit
flush with the underside of the fuselage.
With
the underside filled multiple time and sanded as smooth as I could, I installed
the bomb racks. These are really just sections of plastic that look little like
the actual racks on the plane, but they serve their purpose. I also installed
the tail wheel and the tail hook. I had to bend the tail hook to get it to fit
flush with the underside of the fuselage.

Next, I glued the engine to the firewall and then glued
the cowling over all that. It is a butt fit and actually fits quite well. I
drilled out the exhaust ports so that the pipes would fit in there later on. Up
atop the small insert in the upper rear was trimmed a touch and glued in place.
Filler was used to take care of the oversized gaps, which were later rescribed.
I had discovered that the little metal b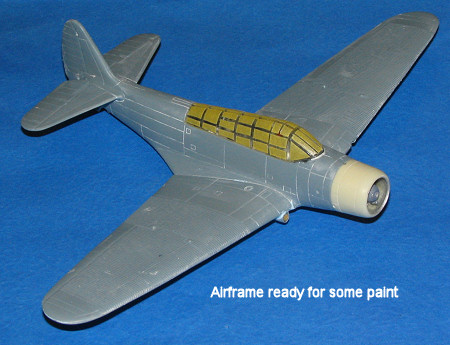 it
that went with the gun did not sit atop it as the instructions suggested, but
was to go on the side for the ammunition. Once this was done, the gun was glued
in place. I then test fit the canopy, discovering that I couldn't get rid of the
large gap in the front. This was eventually taken care of by a small bit of
epoxy putty. I rolled out a section, placed it in the front and then pressed the
canopy into it. I held the canopy in place with tape until the putty had dried,
then removed the canopy and trimmed the putty to shape. Then the canopy was
permanently installed, after a rather tedious masking session. With this done,
the engine was covered with tissue, the radio mast installed and it was time to
paint.
it
that went with the gun did not sit atop it as the instructions suggested, but
was to go on the side for the ammunition. Once this was done, the gun was glued
in place. I then test fit the canopy, discovering that I couldn't get rid of the
large gap in the front. This was eventually taken care of by a small bit of
epoxy putty. I rolled out a section, placed it in the front and then pressed the
canopy into it. I held the canopy in place with tape until the putty had dried,
then removed the canopy and trimmed the putty to shape. Then the canopy was
permanently installed, after a rather tedious masking session. With this done,
the engine was covered with tissue, the radio mast installed and it was time to
paint.
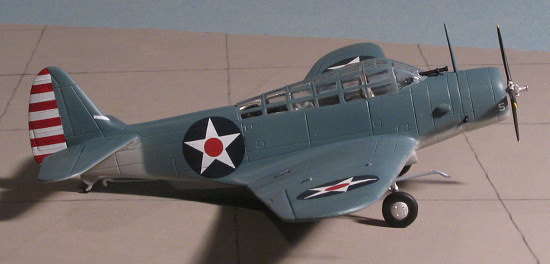
| COLORS & MARKINGS |
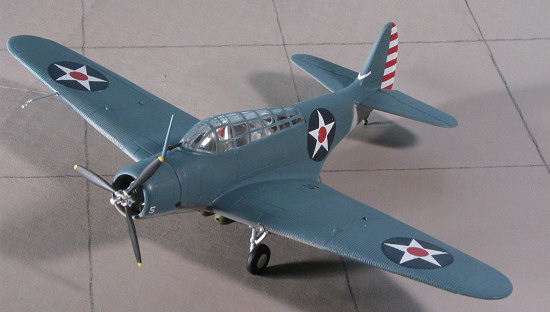 I have some ColourCoats enamels for this time period,
so I grabbed the USN WWII Light Grey and applied it to the underside. It
turned out more of a brown caste than I'd anticipated, so after some discussion
with the Forum, I resprayed that section with Light Gull Grey, and color that
turned out much more to my liking. When dry, more masking to prevent overspray
and the upper surface was given a coat of USN WWII Blue-Grey, one of the darker
shades of this enigmatic color. A bit of back and forth along the demarcation
line and I then applied some Future clear acrylic gloss before the decals.
I have some ColourCoats enamels for this time period,
so I grabbed the USN WWII Light Grey and applied it to the underside. It
turned out more of a brown caste than I'd anticipated, so after some discussion
with the Forum, I resprayed that section with Light Gull Grey, and color that
turned out much more to my liking. When dry, more masking to prevent overspray
and the upper surface was given a coat of USN WWII Blue-Grey, one of the darker
shades of this enigmatic color. A bit of back and forth along the demarcation
line and I then applied some Future clear acrylic gloss before the decals.
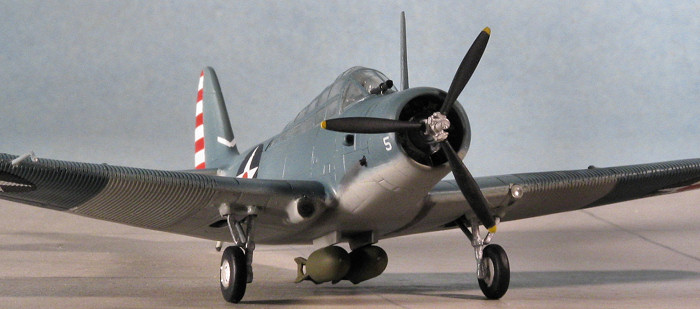
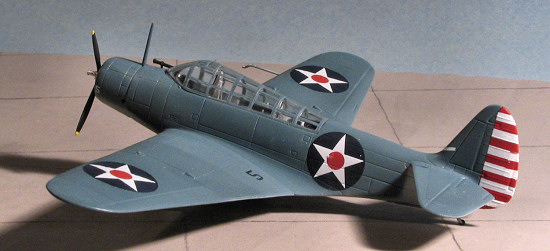
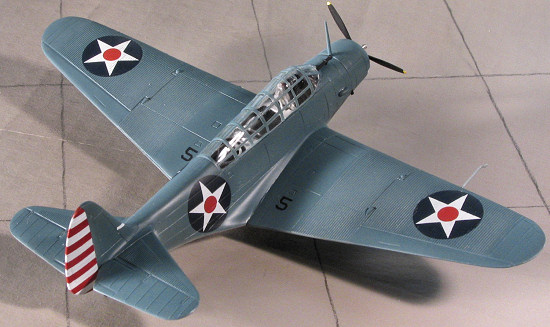
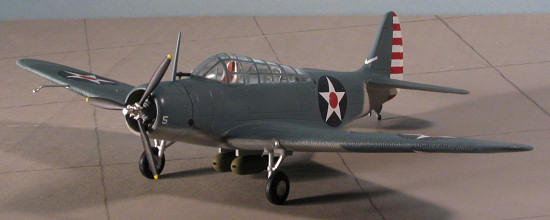
I had already found that the insignia on the kit sheet was out of register, so found exact matches for the kit's insignia on Yellow Wings sheets 48-05 and 48-018. These were applied using the strongest solvent I have, but it was somewhat in vain as despite multiple applications, I was unable to get the wing insignia to snuggle down into all the corrugations. No problem with the fuselage. I used kit decals for the numbers and tail stripes. The kit's decals are thin and rather fragile as I had trouble with them breaking when I tried to move them. This was a real problem with the tail stripes. Due to the misregistration, I had to trim them and along these trim lines they were rather ragged. The LSO landing stripe on the fin is no where near the right shape to fit properly so I had to cut it in half and reposition it. The fin stripes are too short to completely cover the rear of the rudder, but the colors are pretty standard and I was able to brush paint on the missing areas using some generic Testors acrylic colors.
| FINAL CONSTRUCTION |
 Before applying a matte coat, I wanted the have it on
its landing gear. These were installed and painted aluminum, though I suppose
they could have been in Light Gull Grey as well. I drilled out the wheels (which
look very much like copies of the ones in the Airfix kit), and glued them in
place. The exhaust were installed as was the pitot tube and the two bombs. The
clear matte was then applied and I thought I was done. Something was missing.
Before applying a matte coat, I wanted the have it on
its landing gear. These were installed and painted aluminum, though I suppose
they could have been in Light Gull Grey as well. I drilled out the wheels (which
look very much like copies of the ones in the Airfix kit), and glued them in
place. The exhaust were installed as was the pitot tube and the two bombs. The
clear matte was then applied and I thought I was done. Something was missing.
It was the landing light. Search as I might, I couldn't find it anywhere. Time was running short so I stretched some sprue, cut a section that corresponded somewhat to the missing part, glued it in place and sanded the front of it flat. Then, taking an MV lens from the stash, glued that in its place. Not perfect, but better than a hole in the wing. Back up top, I drilled a rather large hole in the windscreen for the sight. This required a #53 drill bit and the sight was then attached using clear paint. The last thing was the prop. The one in the kit is a bit lacking in hub detail so I scrounged through my stash of Aeroclub props that I'd bought on a whim about 20 years ago. I needed a 10' 3" Hamilton Standard prop, but could only find a 10' version. A search of the Aeroclub website showed that they don't do the larger one so after painting it black with yellow tips, it was installed. I did have to cut off the prop shaft from the engine and drill a hole, but aside from that, the fit is good and it is a major improvement.
| CONCLUSIONS |
I do have to say that the end result is quite pleasing. Though the canopy is thick, you can see the interior detail quite well. Despite a few glitches (which seems to be part and parcel of any short run kit), things went well and I now have a nice, 1/72 Devastator to add to the collection. I'm sure there will be comparisons with the Airfix kit, but really, it is like comparing apples and oranges. I'm sure the Airfix kit is an easier build, but there is a lot more detail in the Valom offering and one won't have problems doing the model without the wings folded.
February, 2006
#1400 in a series
| REFERENCES |
The Internet
My thanks to VALOM for providing the review kit and Yellow Wings Decals for the insignia.
Copyright ModelingMadness.com. All rights reserved. No reproduction in any form without express permission from the editor.
If you would like your product reviewed fairly and fairly quickly, please contact the editor or see other details in the Note to Contributors.