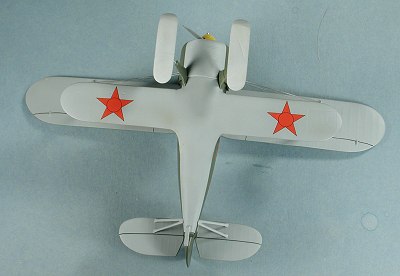
Classic Airframes 1/48 I-152 with skis
|
KIT # |
455 |
|
PRICE: |
$39.98 |
|
DECALS: |
9 aircraft |
|
REVIEWER: |
|
|
NOTES: |
Multi-media with resin, metal and vac parts |
|
BACKGROUND |
Please visit the preview for more information on the kit and the aircraft.
|
CONSTRUCTION |
I've never built a Classic Airframes kit. Yes, I know that
sounds rather odd coming from someone who has tackled French short run and
vacuformed kits before, but it is true. Oh, I started one several years
ago, but never finished it so that doesn't count as 'built'. The instructions
make it look like a breeze, but like most short run kits, it isn't. I'd been
warned by the owner 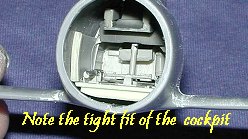 of the company that the cockpit didn't fit well and even
when done, little could be seen of it. Despite that I religiously followed the
instructions on building the cockpit. You know what, it didn't fit. In fact, it
was way too wide. I grabbed my trusty motor tool and did several grinding
sessions on both fuselage sides. To get the interior to fit, the fuselage has to
be
of the company that the cockpit didn't fit well and even
when done, little could be seen of it. Despite that I religiously followed the
instructions on building the cockpit. You know what, it didn't fit. In fact, it
was way too wide. I grabbed my trusty motor tool and did several grinding
sessions on both fuselage sides. To get the interior to fit, the fuselage has to
be 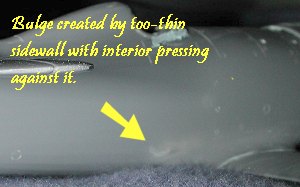 nearly paper thin. I did break through in a spot or two while grinding.
I also ground on the interior bits to help out in that area. I should have
narrowed things a bit more than I did as it was a very tight fit.
Needless to say, it did fit and it is nearly invisible! A downside of all the
grinding is that there is also a bulge where the cockpit is pressing against the
too-thin plastic. I left it alone for fear that I'd make things worse! The
halves did not completely mate in a few spots so filler was needed to take care
of the gaps and seams. Not a major problem, and one I'm getting used to (I
really need to build a shake and bake Tamiya kit, and soon!).
nearly paper thin. I did break through in a spot or two while grinding.
I also ground on the interior bits to help out in that area. I should have
narrowed things a bit more than I did as it was a very tight fit.
Needless to say, it did fit and it is nearly invisible! A downside of all the
grinding is that there is also a bulge where the cockpit is pressing against the
too-thin plastic. I left it alone for fear that I'd make things worse! The
halves did not completely mate in a few spots so filler was needed to take care
of the gaps and seams. Not a major problem, and one I'm getting used to (I
really need to build a shake and bake Tamiya kit, and soon!).
Turning
my attention to the cowling, there are two circular grilles. The aft one is to
be glued in place just inside the cowling opening, leaving enough room for the
forward one to fit and be flush with the front of the cowling. If done right,
the forward grille can be turned to simulate opening or closing it. Well, the
grille is actually a bit larger than the opening, so I did a touch of sanding
and then installed the grille between the two cowling halves. I then glued the
forward grille in 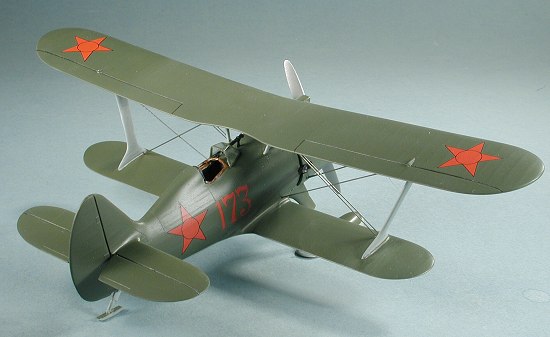 place where it was flush with the leading edge of the cowling.
I figured I'd never get it to 'work' so didn't even try. Fit of the cowling was
as to be expected and it took filler to smooth things out. Don't forget the
small intake that goes on the top. I nearly did!
place where it was flush with the leading edge of the cowling.
I figured I'd never get it to 'work' so didn't even try. Fit of the cowling was
as to be expected and it took filler to smooth things out. Don't forget the
small intake that goes on the top. I nearly did!
With the cowling done, I cleaned up the wings and glued them to the fuselage. They are a butt fit, but by using a 'hot' liquid glue such as Ambroid's Pro-Weld, I was able to get a tight fit. The next step was to glue in the 'firewall'. This was a bit wide (well actually, it was circular and the fuselage wasn't quite a match! I did some filing on the inside of the fuselage until the firewall fit. The nice thing about hot glues is that it will help get tight fitting items in place by the nature of them 'melting' away the plastic and helping the fit. You may want to paint the face of this black as there is no engine, but it is dark in there with the cowling on so it isn't really needed. The instructions would have you add the exhaust to the cowling at this time. While that's fine for the large one, I'd leave off the small one until the cowling is glued in place. I did and it made things much easier. When gluing on the cowling, you really need to make sure it is on there square. There's quite a bit of fudge room and getting it off center is a major possibility, so be careful.
While that was
drying, I took my drill twists and started drilling the holes for the flying
wires. The instructions are helpful in this regard, but they don't totally match
the box art. Don't forget to drill them at an angle and
 try to keep from
drilling through the wings. I succeeded in this regard, much to my surprise. I'm
using small piano wire for mine and found that a #77 drill bit was perfect for
this. Moving to the landing gear, I cut off the lower section as instructed.
Then I glued the gear in place as well as the small exhaust. Not willing to
trust the rather soft plastic oleos, I'm going to use a paper clip for the lower
struts. For this a #65 drill bit was used to drill the lower oleo holes and to
drill through the skis. The lower oleos are going to be very thin compared to
the box art. I'm not sure which is right, but I'd bet that the real lower oleos
are not as skinny as the paper clips. However, there is no choice as the struts
themselves are too thin for anything larger. At this time, the horizontal
stabilizers were glued in place.
try to keep from
drilling through the wings. I succeeded in this regard, much to my surprise. I'm
using small piano wire for mine and found that a #77 drill bit was perfect for
this. Moving to the landing gear, I cut off the lower section as instructed.
Then I glued the gear in place as well as the small exhaust. Not willing to
trust the rather soft plastic oleos, I'm going to use a paper clip for the lower
struts. For this a #65 drill bit was used to drill the lower oleo holes and to
drill through the skis. The lower oleos are going to be very thin compared to
the box art. I'm not sure which is right, but I'd bet that the real lower oleos
are not as skinny as the paper clips. However, there is no choice as the struts
themselves are too thin for anything larger. At this time, the horizontal
stabilizers were glued in place.
Now on to the wing struts. I
started with the cabanes. The forward ones fit atop the cowling and from what I
can see in the instructions vs the box art, one of them has them upside down. I
chose the wide part on the bottom. The back V struts are
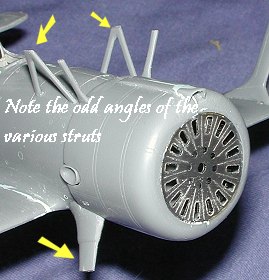 angled for the wrong
side as shown on the instructions and are touch too wide to fit on the marks
made on the upper fuselage. I did some careful measuring to ensure that they'd
be wide enough to match the marks on the underside of the upper wing and not too
wide or narrow so that they'd cover the pre drilled holes for the rigging. I do
hope that I got it right. At the same time, I took one of the outer wing struts
and glued it in place. I had to flatten the lower attachment point by sanding to
get a semi-good fit. Even then, I didn't put enough of an angle on it so will
have to use some filler on the resulting gap. Again, I made sure it didn't
interfere with the rigging holes and matched its spot on the upper wing. I
removed the guide pins as they didn't match the shallow depressions on the wing
where they were supposed to go. Fortunately, Classic Airframes has a long
engraved guide that is the same length as the strut so fitting it won't be a
real problem. One thing I noticed is that the angles of the various strut ends
(including the landing gear) wasn't as straight as I'd have though. They will
need some adjustment before final painting. I let all of that dry for a goodly amount of time and moved
on to preliminary painting before attempting to affix the upper wing.
angled for the wrong
side as shown on the instructions and are touch too wide to fit on the marks
made on the upper fuselage. I did some careful measuring to ensure that they'd
be wide enough to match the marks on the underside of the upper wing and not too
wide or narrow so that they'd cover the pre drilled holes for the rigging. I do
hope that I got it right. At the same time, I took one of the outer wing struts
and glued it in place. I had to flatten the lower attachment point by sanding to
get a semi-good fit. Even then, I didn't put enough of an angle on it so will
have to use some filler on the resulting gap. Again, I made sure it didn't
interfere with the rigging holes and matched its spot on the upper wing. I
removed the guide pins as they didn't match the shallow depressions on the wing
where they were supposed to go. Fortunately, Classic Airframes has a long
engraved guide that is the same length as the strut so fitting it won't be a
real problem. One thing I noticed is that the angles of the various strut ends
(including the landing gear) wasn't as straight as I'd have though. They will
need some adjustment before final painting. I let all of that dry for a goodly amount of time and moved
on to preliminary painting before attempting to affix the upper wing.
|
CAMOUFLAGE & MARKINGS |
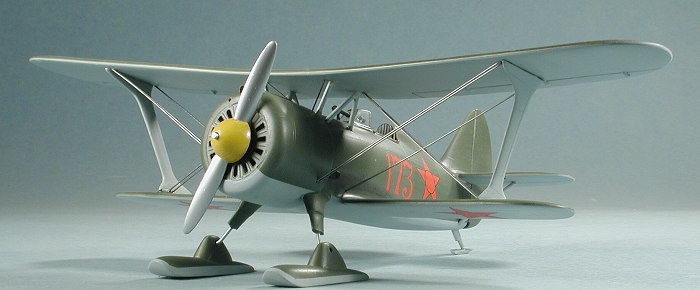
After filling the cockpit with tissue, I started the painting process. The upper
wing and tail plane struts were not glued to the model to facilitate painting.
The undersides were done in Russian light blue-grey and the upper sides in
Russian topside 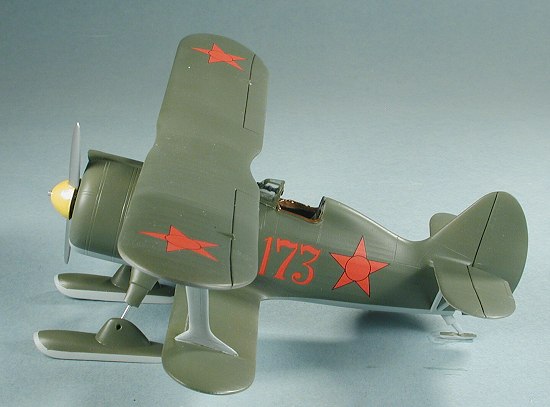 green, using my dwindling stocks of Aeromaster paints. I chose the
design with the yellow spinner to give it a touch of color. I guess that white
would have been appropriate as well, but wasn't one of the decal choices. I
didn't want to do a Finnish version, though it would have been more colorful.
The usual back and forth was needed to get everything properly covered.
green, using my dwindling stocks of Aeromaster paints. I chose the
design with the yellow spinner to give it a touch of color. I guess that white
would have been appropriate as well, but wasn't one of the decal choices. I
didn't want to do a Finnish version, though it would have been more colorful.
The usual back and forth was needed to get everything properly covered.
Then it was time to install the upper wing and the flying wires. I discovered that I'd not given enough fore and aft space on the cabanes for them to match the attachment spots on the underside of the upper wing. Hindsight is that it would have made one problem area disappear had I done so, for it would have lowered the upper wing in relation to the rest of the model. I glued the cabanes and one wing strut, leaving the other strut open. Made it much easier to install the flying wires.
I used .15" piano wire for the flying wires. This stuff is quite stiff and one needs to exert real care when cutting it as the small pieces can go flying. I used a towel to keep the small bits from zigging around the room. It was a case of cut and fit for them all, but having the predrilled holes really helped. Make sure that when you do pre-drill the holes, that they are at an angle as it will be impossible to have them properly fit into a straight hole.
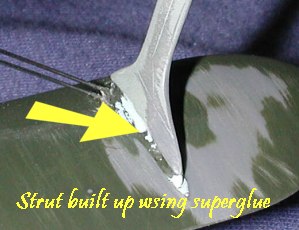 After installing the flying
wires, I put in the other strut. Well, this strut didn't reach the bottom
of the wing as I'd have hoped. I superglued the upper portion of the strut,
then built up the bottom with superglue, which I hit immediately with
accelerator. I did this several times, then sanded and filled it until it
looked like it was a single piece. Not exactly the best way of doing it as
I'm sure that adding a piece of card stock to the strut would have worked
just as well if not better.
After installing the flying
wires, I put in the other strut. Well, this strut didn't reach the bottom
of the wing as I'd have hoped. I superglued the upper portion of the strut,
then built up the bottom with superglue, which I hit immediately with
accelerator. I did this several times, then sanded and filled it until it
looked like it was a single piece. Not exactly the best way of doing it as
I'm sure that adding a piece of card stock to the strut would have worked
just as well if not better.
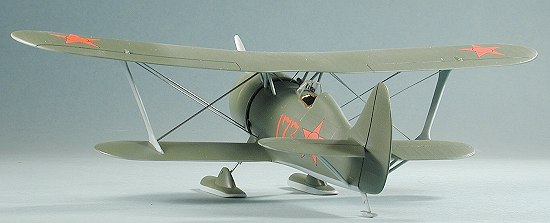
Next was the installation of the lower gear legs from paper clip. They still look too skinny to me, but they are no thinner than the plastic bits from the kit and a lot sturdier. They were slipped into the skis. The tail ski was added and the kit put on a flat surface. A touch of super glue on the metal attachment points in the gear legs and skis fixed things in place. I also cut out and painted the canopy at this time. The horizontal stabilizer braces were then glued in place, having been pre-painted. One side fit very well and the other didn't, requiring some fussing around to get it properly placed.
The areas that were to accept decals were sprayed with clear acrylic gloss (Future) in preparation for the decals. I chose the Russian one with the yellow spinner as I didn't want to do a Finnish aircraft. The decals are very thin and went on beautifully. No problems at all and all I used was a touch of Microset to make sure they were on well. It also helps that there are only insignia and numbers so the decaling was a rather rapid affair!
|
FINAL CONSTRUCTION |
With the decals on and dry, the model was wiped down to get rid of any
excess setting solution. I outlined the control surfaces with an artist's
pen and then gave the model an overall coat of clear matte using a mixture
of Future and flat base that I've been using for years. Returning to the
desk, the exhaust were painted and some light staining was applied to
the fuselage sides. Then prop hub was then glued o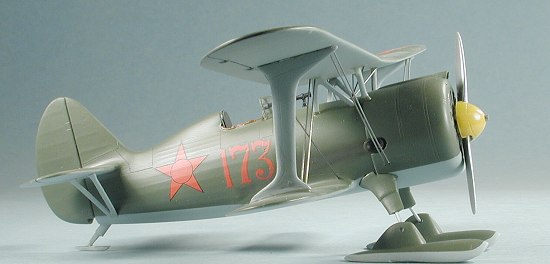 nto the prop. The hub
seems a bit short for all that it has to cover and didn't cover the prop as
far as is shown on the box art or drawings. To get the shaft to fit through
the etched engine covers, you'll have to either open up the holes in the
etched metal or thin the prop shaft. I chose the former. The prop was
painted with Alclad II Aluminum sprayed directly on the bare plastic.
nto the prop. The hub
seems a bit short for all that it has to cover and didn't cover the prop as
far as is shown on the box art or drawings. To get the shaft to fit through
the etched engine covers, you'll have to either open up the holes in the
etched metal or thin the prop shaft. I chose the former. The prop was
painted with Alclad II Aluminum sprayed directly on the bare plastic.
At this time, the canopy was installed. I was not sure if I was going to drill a hole in it for the telescopic sight or not. All of the pictures show this installed and I feared I'd make a mess of it. Fortunately, this didn't happen and the end result is convincing enough. What I didn't do was to make some ski restraining bungees. All of the photos show these things attached and if one was to enter a contest, they should be added. I also drilled out a couple of machine gun holes in the upper cowling. This isn't shown in the instructions, but it needs to be done. Actually small blast tubes should protrude a tiny bit and there should be a similar pair protruding from the engine cover as well.
|
CONCLUSIONS |
 Well, this is a milestone for me. It is my first competed Classic Airframes
kit and it is a biplane to boot. Overall, it wasn't as big a trauma as I'd
anticipated. It was helpful that it only had 12 wires to rig. Jules was
right and little can be seen of the interior. It was the biggest hurdle of
the kit and one that took quite a bit of time. Once that was solved, the
rest of the kit went together rather rapidly. Overall, I'm pretty pleased
with myself for completing this one and may drag out the other biplane that
has been in the 'cooler' for the last three-four years!
Well, this is a milestone for me. It is my first competed Classic Airframes
kit and it is a biplane to boot. Overall, it wasn't as big a trauma as I'd
anticipated. It was helpful that it only had 12 wires to rig. Jules was
right and little can be seen of the interior. It was the biggest hurdle of
the kit and one that took quite a bit of time. Once that was solved, the
rest of the kit went together rather rapidly. Overall, I'm pretty pleased
with myself for completing this one and may drag out the other biplane that
has been in the 'cooler' for the last three-four years!
May 2003
#1266 in a series
|
REFERENCES |
War Planes of the Second World War: Fighters, Volume 3, William Green, 1961
Copyright ModelingMadness.com. All rights reserved. No reproduction in part or in whole without express permission from the editor.
mailto:svanaken61@gmail.comIf you would like your product reviewed fairly and fairly quickly, please contact the editor or see other details in the Note to Contributors.