| KIT #: | 7220 |
| PRICE: | $10.75 at GreatModels |
| DECALS: | One option |
| REVIEWER: | Scott Van Aken |
| NOTES: | Treat as a short run kit. |
| HISTORY |
The Soviet Union was always in the need of a fast bomber interceptor. Though it did develop several aircraft, something faster was needed. That meant rocket power.
In 1940, the Rocket Propulsion Research Institute
started design of a jet powered aircraft. The designer AG Kostikov was a
capable but controversial engineer who felt that the best way to do things was
with ramjets, the aircraft getting its initial boost
 from a liquid fuel rocket.
It seemed like the way to do things.
from a liquid fuel rocket.
It seemed like the way to do things.
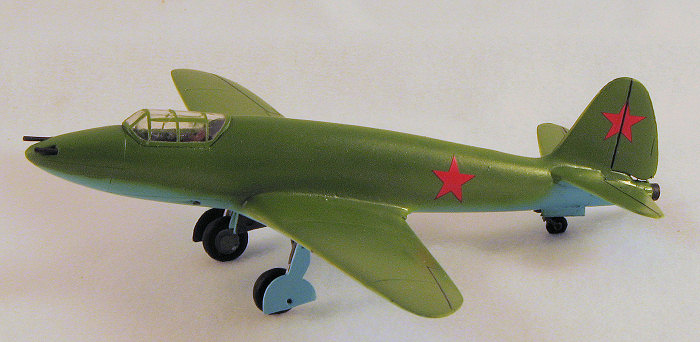
The "302" was the result of this work and was to use the RD-1400 liquid fuel rocket for its initial boost. The ramjets were in-house designs and due to the expected 'thirst' of these engines, a relatively large airframe was developed. The basically wooden airframe was to be armed with two 20mm cannon.
Not unexpectedly, there were problems with both of the engines, though the airframe was ready for testing by late 1943. Also by that time it was apparent that the ramjets would never be ready and a rocket-only design was developed. Gliding tests with the first and second prototype were quite successful, with the test pilot commenting that it was one of the best handling aircraft he'd ever flown. However, the writing was on the wall and by this time in the war it was pretty obvious that the rocket engine would never be fully functional. Nor would the aircraft have any sort of endurance and after one test flight in early 1944 (on skis), the aircraft crashed when a ski collapsed and the project was abandon.
| THE KIT |
How many of you have built A-Model kits? I see a few hands and you all know that these kit are best treated as short run. They have thick sprues, relatively soft white plastic, fairly good engraved detailing, and generally a low level of flash on all the parts.
 Same is true with this one. Thankfully,
none of the flash is major and the kit has no areas where there are sink
sections. The wings are in three pieces with a nearly full span lower wing
section. The tips and ailerons/flaps are molded in the upper wing providing a
nice sharp trailing edge. Cockpit consists solely of a seat that is attached
to the rear bulkhead. Nothing else. But not a problem as you will see darn
little through the thick canopy. In fact, the canopy has no frame lines at all
so one will need to be a bit careful when it comes to masking them. Follow the
box art.
Same is true with this one. Thankfully,
none of the flash is major and the kit has no areas where there are sink
sections. The wings are in three pieces with a nearly full span lower wing
section. The tips and ailerons/flaps are molded in the upper wing providing a
nice sharp trailing edge. Cockpit consists solely of a seat that is attached
to the rear bulkhead. Nothing else. But not a problem as you will see darn
little through the thick canopy. In fact, the canopy has no frame lines at all
so one will need to be a bit careful when it comes to masking them. Follow the
box art.
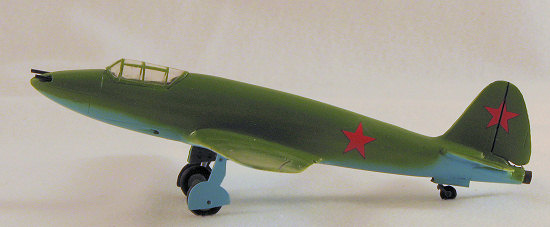
Another area to watch is that of the main gear doors. The attachment holes go all the way through the doors so you'll have to fill these once the gear legs are attached. It may be a good ideal to replace the nose gun barrels with fine tubing as the kit ones are a bit large.
Markings are for one plane in Dark Green over Light Blue with eight stars. Actually, not only will four do, but you'll have to get them from another source as the reference shows them only on the fin and under wings. These should have white surrounds. There is also a speedline fronted by a small star on the fuselage that could be added as those are shown on the initial airframe. Instructions are more than adequate for a kit of this size and paint info is provided in both generic and Humbrol references.
| CONSTRUCTION |
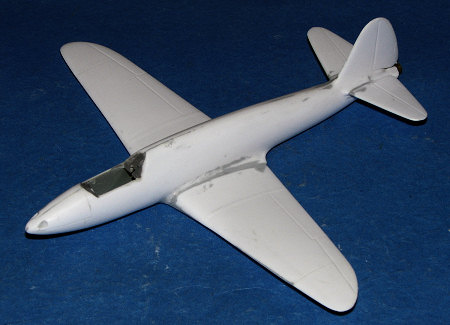
This is one of those cases where simple does not necessarily mean easy. Since the only cockpit component was the seat and that could be put in later during the build, I started by assembling the fuselage and the wings.
 The fuselage first needed to have the mating surfaces
sanded down. This was particularly important near the fin as the fin was molded
on one half and the other half had a fin root about twice the needed thickness.
This also carried back to the rocket exhaust in the rear. Some sanding was done
before assembly and more after, along with filler on all the joins. The nose
guns are supposed to be parallel but one is higher than the other. Only cure is
to fill one and redrill the opening. I didn't do this as I'm lazy. The fit of
the wings is fairly good though
again, some sanding is needed to get too-thick parts (like the wing ends on the
lower half) to meet somewhat flush. Copious amounts of filler were used on this
model with most taking several applications.
The fuselage first needed to have the mating surfaces
sanded down. This was particularly important near the fin as the fin was molded
on one half and the other half had a fin root about twice the needed thickness.
This also carried back to the rocket exhaust in the rear. Some sanding was done
before assembly and more after, along with filler on all the joins. The nose
guns are supposed to be parallel but one is higher than the other. Only cure is
to fill one and redrill the opening. I didn't do this as I'm lazy. The fit of
the wings is fairly good though
again, some sanding is needed to get too-thick parts (like the wing ends on the
lower half) to meet somewhat flush. Copious amounts of filler were used on this
model with most taking several applications.
Fitting the wings was a bit of a challenge as well and more trimming and fitting and trimming and sanding was needed to get things in place. Then there was more filler needed for the various joins. This is all quite common with A-Model kits, at least in my experience and from what I've read of the works of others. One does this because one wants an interesting subject on their shelves.

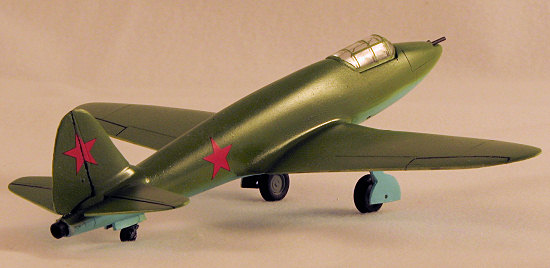
 The tailplanes were next. The tab on the tailplane is
about twice the thickness of the slot in the fuselage. I chose the option of
sanding on the tab until it fit. Despite my attempts to make these straight, I
ended up with a slight dihedral in them and left it as such. The rocket exhaust
was not only splayed right and left sides with a goodly gap, but also oval. I
cut it back to the two small vents on the side and drilled it out for a piece of
tubing. This improved the looks quite a lot.
The tailplanes were next. The tab on the tailplane is
about twice the thickness of the slot in the fuselage. I chose the option of
sanding on the tab until it fit. Despite my attempts to make these straight, I
ended up with a slight dihedral in them and left it as such. The rocket exhaust
was not only splayed right and left sides with a goodly gap, but also oval. I
cut it back to the two small vents on the side and drilled it out for a piece of
tubing. This improved the looks quite a lot.
I then drilled out the nose cannon and installed stainless steel tubing in place of the lumpy rod sections provided in the kit. As I mentioned earlier, the gun port sections were not parallel with each other so I set one gun barrel farther back than the other, telling myself that this staggered arrangement was how it had to be to get them to fit. The canopy was then masked as best as I could considering that there are no frame lines anywhere on it. The seat and interior were painted and the canopy attached. I also enlarged the attachment hole for the rear wheel well/doors and glued that in place.
The landing gear was given a good cleanup during which the soft plastic for the tail wheel gave way and I had to glue it back on. The gear attachment holes were enlarged and the landing gear glued in place. Once dry, it was time for paint.
| COLORS & MARKINGS |
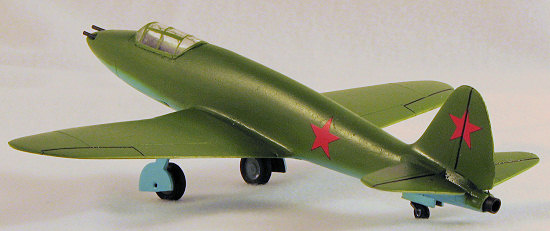 I had some AII green and light blue already mixed up
for another project so decided to use those instead of the later AMT paints.
These are lighter than the late war colors, but for a project like this, it
could very well be that the prototype was painted in these shades. No color
photos so who can say for sure. One thing is that it will make the insignia more
visible.
I had some AII green and light blue already mixed up
for another project so decided to use those instead of the later AMT paints.
These are lighter than the late war colors, but for a project like this, it
could very well be that the prototype was painted in these shades. No color
photos so who can say for sure. One thing is that it will make the insignia more
visible.
Anyway, I sprayed the underside first, masked off the underside of the stabs and then did the upper side. I used Colourcoats excellent Soviet enamels for this, after mixing them with lacquer thinner. This allowed me to really thin down the paint and use low pressure. It also meant that the paint dried to the touch within an hour or two, though I did give each coat a minimum of 12 hours.
| FINAL CONSTRUCTION |
With the paint in place, I then grabbed a brush and did
the landing gear and wheel wells in dark grey, along with the inside of the gear
doors. I used the kit decals as I didn't have any Soviet stars with a black
border as shown in photos of the aircraft. These went on well and I put them in
the six standard positions even t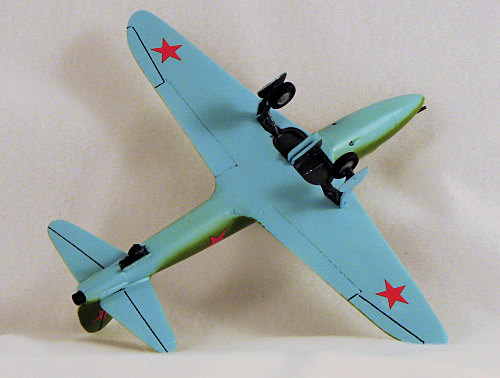 hough I knew that they were not carried on the
wings. I used Solvaset on them without any problems.
hough I knew that they were not carried on the
wings. I used Solvaset on them without any problems.
The gear axles had to be trimmed by about half and the openings in the wheels for them enlarged. The gear doors did not fit onto the stubs protruding from the axles as the holes that had been drilled in the doors did not line up to match. These were glued on, the masking taken off the canopy and any touch up painting done.
| CONCLUSIONS |
Some may complain about the poor fit of this kit, but I knew what to expect right from the start in this regard. The build was not trouble free, but yet it was satisfying to be able to add to my model collection a rather rare and unusual aircraft. The price is right in today's economy and so if you are willing to expend the effort, you too can have a neat looking craft like this to share the space with your BI-I and Me-163.
July 2007
#1476 in a series
Copyright ModelingMadness.com. All rights reserved. No reproduction in part or in whole without express permission from the editor.
If you would like your product reviewed fairly and fairly quickly, please contact the editor or see other details in the Note to Contributors.
Back to the Review Index Page 2015