Interavia 1/72 Sukhoi Su-1
| KIT #: | ? |
| PRICE: | $4.00 (started) |
| DECALS: | None |
| REVIEWER: | Scott Van Aken |
| NOTES: | Short run |
| HISTORY |
The Sukhoi Su-1 or I-330 (Russian: Сухой Су-1) was a prototype Soviet high-altitude fighter aircraft built at the beginning of World War II. An improved version, designated Su-3 (I-360), was also built and tested the following year. Neither version was mass-produced.
In 1939, Sukhoi was tasked with designing a high-altitude fighter, the
resulting Su-1 was a conventional monoplane
with a streamlined wooden semi-monocoque
fuselage, low-set all-metal wing made of
duralumin
an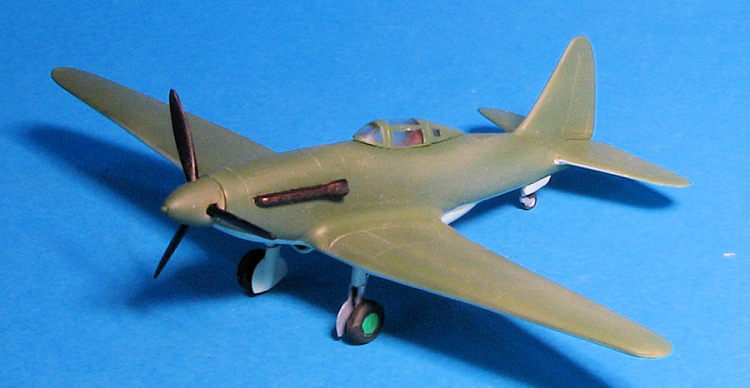 d un-pressurized
cockpit. The key feature of the aircraft was a pair of TK-2
turbochargers driven by exhaust gases from the Klimov
M-105P engine.
The prototype was completed at the Sukhoi plant in
Kharkov in May 1940, flying for the first time, on 15 June 1940, with A.P.
Chernyavsky at the controls. Testing continued until 3 August, when Chernavskii
mistakenly landed with the landing gear retracted. After the completion of
repairs in mid-September, testing resumed, but an in-flight engine failure on 2
October resulted in a dead-stick landing. Limited flight testing continued until
April 1941, with the Su-1 reaching a top speed of 641 km/h (345 kn, 400 mph) at
10,000 m (32,810 ft).
However, the turbochargers proved unreliable and without them the aircraft was
inferior in performance to the
Yakovlev Yak-1.
d un-pressurized
cockpit. The key feature of the aircraft was a pair of TK-2
turbochargers driven by exhaust gases from the Klimov
M-105P engine.
The prototype was completed at the Sukhoi plant in
Kharkov in May 1940, flying for the first time, on 15 June 1940, with A.P.
Chernyavsky at the controls. Testing continued until 3 August, when Chernavskii
mistakenly landed with the landing gear retracted. After the completion of
repairs in mid-September, testing resumed, but an in-flight engine failure on 2
October resulted in a dead-stick landing. Limited flight testing continued until
April 1941, with the Su-1 reaching a top speed of 641 km/h (345 kn, 400 mph) at
10,000 m (32,810 ft).
However, the turbochargers proved unreliable and without them the aircraft was
inferior in performance to the
Yakovlev Yak-1.
| THE KIT |
I am one of those people who is a sucker for the unusual. This kit qualifies as such as it represents a one-off prototype. The Soviets/Russians seemed to have done a lot of these sorts of planes, so they are a gold mine for the different.
This particular kit was bought on-line as already started, and so it was. The molding is what I'd call first generation short run. Not there are any resin parts, but the plastic is thick and there is little in the way of crisp detailing. Not surprising is that the lower portion of the wing was short shot. There is no cockpit, just a generic seat in which one plunks a pilot to cover the opening. That's it. No floor, control stick, instrument panel, etc.
 The holes for the prop shaft and the slots for the tailplane tabs are flashed
over and there is flash on quite a few of the parts. The wings are five pieces,
A lower section that covers about 2/3 span, upper halves and the remainder of
the lower wing that attaches there. The wing had already been assembled and the
lower wing sections had large gaps that you could drive a GAZ into. Main gear
wells have some detailing and are very shallow.
The holes for the prop shaft and the slots for the tailplane tabs are flashed
over and there is flash on quite a few of the parts. The wings are five pieces,
A lower section that covers about 2/3 span, upper halves and the remainder of
the lower wing that attaches there. The wing had already been assembled and the
lower wing sections had large gaps that you could drive a GAZ into. Main gear
wells have some detailing and are very shallow.
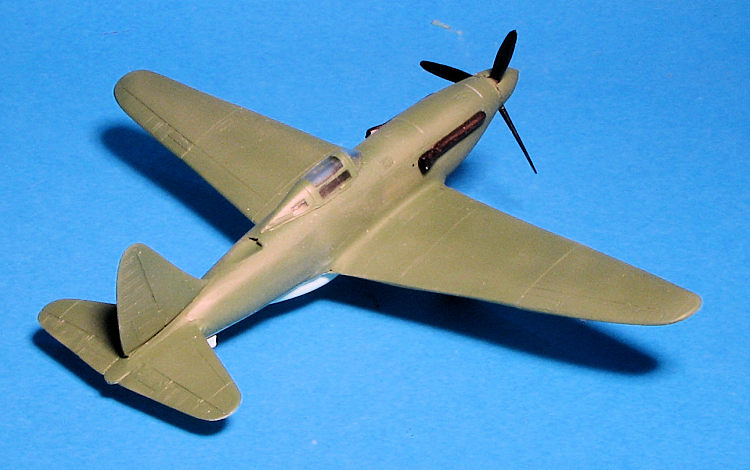
This is supposed to be a twin turbocharged airplane, however, the fuselage inserts for where the turbochargers would go are simply flat plates. You get two types of exhaust, one where the collector is smooth and one which has ridges on it. Box shows the smooth ones and the instructions show the other. It is quite probable that the one is for the Su-3, which Interavia also did. Main gear doors will have to be cut for a gear down presentation. The single piece canopy is very thick and rather cloudy, which is probably good thanks to the lack of interior.
Instructions are on two high quality newsprint sheets. One has an exploded view from the upper quarter and is identical on both sides. The secton has a lower view and provides generic color info. No decals and no markings were ever carried on this aircraft.
| CONSTRUCTION |
To start out, I did what I could to fix the wing. The huge
gaps between the sections took a long time to fill, sand, fill, sand, etc.
Finally they were done. In the meantime, I worked on getting the fuselage halves
to where they mated somewhat successfully. Again, lots of work was needed,
especially around the upper fuselage vent piece which was a bit too small. The
seat was simply glued in place as there is no interior and actually, the opening
is 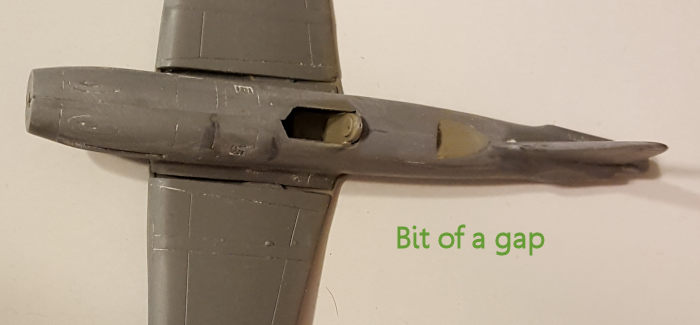 too
narrow if one fits the pilot. As the fuselage halves were not exactly the same
length, some fudging had to be done. I settled on getting the wing area as
close to even as I could.
too
narrow if one fits the pilot. As the fuselage halves were not exactly the same
length, some fudging had to be done. I settled on getting the wing area as
close to even as I could.
Installing the wing meant a lot more trimming as the fore/aft opening is too short for the wing. There were also considerable gaps between the wing root and wing, More than could be handled by a spreader bar, which I tried, but thanks to the thick plastic, this did nothing more than pop open seams. Eventually, a lot of 80 grit sandpaper was used on these areas after slivers of plastic car were inserted to fill the gaps. The lower radiator got the treatment as well as it was flat on the bottom and the back attachment area is curved. Tailplanes also got the treatment and after several weeks of screwing around, I had a fairly clean airframe. The tail wheel door assembly is a joke and those of you who want to spend the time should install a card tail gear well and gear doors.
The super thick and cloudy canopy was masked and glued atop the fuselage Thanks to the thickness, there is a gap all the way around, but I wasn't going to spend more time on this. I then built up the prop/spinner assembly and the fit is expectedly poor. There is no prop shaft so having the two shaft holes off register by about 3mm isn't an issue. I sanded that area flat.
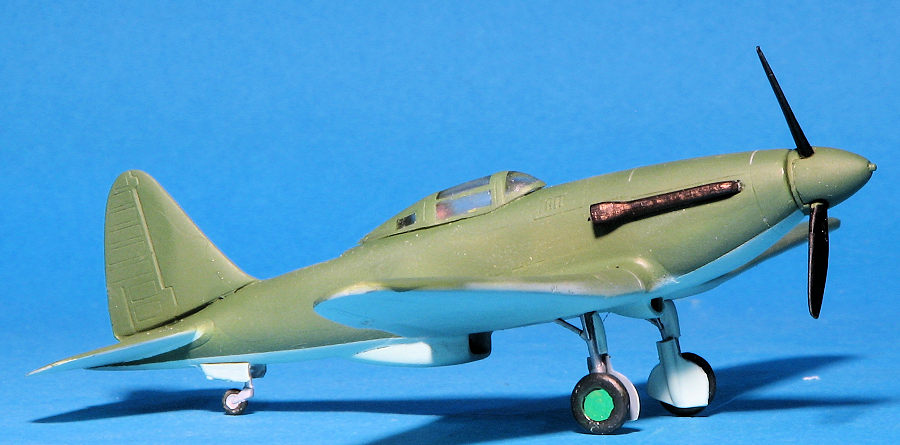
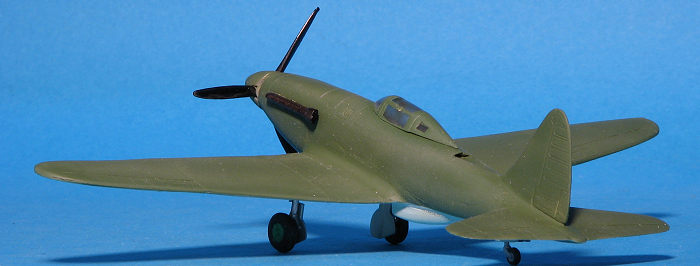
| COLORS & MARKINGS |
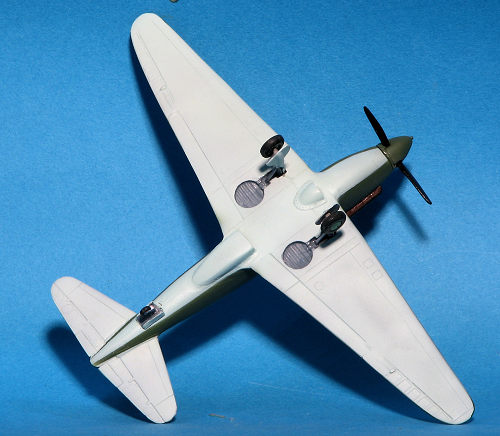 The plane is
basically Soviet green on the upper and a light blue-grey on the underside. All
the wheel wells and inside of gear doors was painted with the standard
dark grey primer. Wheels were painted green and gear legs aluminum.
The plane is
basically Soviet green on the upper and a light blue-grey on the underside. All
the wheel wells and inside of gear doors was painted with the standard
dark grey primer. Wheels were painted green and gear legs aluminum.
All the mounting holes for the gear need to be drilled out more and there isn't a mounting hole for the tail wheel so that has to be done. The landing gear are VERY fragile and I broke the retraction struts just staring at them intently. I think these bits may be resin as they sure act like it. One of the main gear legs had no axle so I drilled a hole in it and put in some stretched sprue. I used super glue on all the landing gear parts. Main gear doors need to be cut and since they are too long, the lower sections were sanded down a bit. Last thing were the exhaust. These are too long and too wide for the openings in the fuselage. I scraped the heck out of them and once they looked like they'd fit, I painted them with Vallejo's Tinny Tin. Once installed, I noticed one was longer than the other. The prop was glued on, the masking removed and that was it. There are no decals as the prototype had no markings.
| CONCLUSIONS |
 A glowing
recommendation this one is not getting. If you must have one of these aircraft,
look to the Amodel kit. This is one of those horrid kits that only masochists
will really want to buy new. I knew it would be work going into it, but did not
think it would be as much as it was. Not wanting to be defeated by styrene (and
whatever else the small parts were made from), I was determined to finish it. It
will now spend the rest of its existence on the shelf of shame.
A glowing
recommendation this one is not getting. If you must have one of these aircraft,
look to the Amodel kit. This is one of those horrid kits that only masochists
will really want to buy new. I knew it would be work going into it, but did not
think it would be as much as it was. Not wanting to be defeated by styrene (and
whatever else the small parts were made from), I was determined to finish it. It
will now spend the rest of its existence on the shelf of shame.
| REFERENCES |
https://en.wikipedia.org/wiki/Sukhoi_Su-1
1 December 2017 Copyright ModelingMadness.com. All
rights reserved. Thanks to
for the review kit. You can find this kit at your favorite hobby shop
or on-line retailer If you would like your product reviewed fairly and fairly quickly, please
contact
the editor or see other details in the
Note to
Contributors. Back to the Main Page
Back to the Review
Index Page
Back to the Previews Index Page