Eduard 1/48 Yak-3
| KIT #: | 8028 |
| PRICE: | Around $20.00 on sale |
| DECALS: | Four Options |
| REVIEWER: | Scott Van Aken |
| NOTES: | Profipak kit |
| HISTORY |
In 1943, Yakovlev designed Yak-1M which was a smaller and lighter version of Yak-1. A second Yak-1M prototype was constructed later that year, differing from the first aircraft in plywood instead of fabric covering of the rear fuselage, mastless radio antenna, reflector gunsight, and improved armor and engine cooling. The chief test pilot for the project Piotr Mikhailovich Stefanovskiy was so impressed with the new aircraft that he recommended that it should completely replace Yak-1 and Yak-7 with only Yak-9 retained in production for further work with the Klimov VK-107 engine. The new fighter, designated Yak-3 entered service in 1944, later than Yak-9 in spite of the lower designation number. A total of 4,848 aircraft were produced.
 Lighter and smaller than Yak-9 but powered by the same
engine, Yak-3 was a very agile dogfighter and a forgiving, easy to handle
aircraft loved by both rookie and veteran pilots. Early combat experience found
it to be superior to all Luftwaffe fighters at altitudes below 5,000 m (16,400
ft). It could roll with the Focke-Wulf Fw 190 and its turn was far superior; a
full circle in 18.6 seconds. The two biggest drawbacks of the aircraft were its
short range and the tendency of the glued-on plywood covering the top of the
wings to tear away under high-G loads. The pneumatic system for actuating
landing gear, flaps, and brakes, typical for all Yakovlev fighters of the time
was also less reliable than the hydraulic or electrical systems, but it was
preferred due to significant weight savings. The first 197 Yak-3 were armed with
a single 20 mm ShVAK cannon and one 12.7 mm UBS machine gun, with subsequent
aircraft receiving a second UBS for a weight of fire of 2.72 kg (6.0 lb) per
second using high-explosive ammunition.
Lighter and smaller than Yak-9 but powered by the same
engine, Yak-3 was a very agile dogfighter and a forgiving, easy to handle
aircraft loved by both rookie and veteran pilots. Early combat experience found
it to be superior to all Luftwaffe fighters at altitudes below 5,000 m (16,400
ft). It could roll with the Focke-Wulf Fw 190 and its turn was far superior; a
full circle in 18.6 seconds. The two biggest drawbacks of the aircraft were its
short range and the tendency of the glued-on plywood covering the top of the
wings to tear away under high-G loads. The pneumatic system for actuating
landing gear, flaps, and brakes, typical for all Yakovlev fighters of the time
was also less reliable than the hydraulic or electrical systems, but it was
preferred due to significant weight savings. The first 197 Yak-3 were armed with
a single 20 mm ShVAK cannon and one 12.7 mm UBS machine gun, with subsequent
aircraft receiving a second UBS for a weight of fire of 2.72 kg (6.0 lb) per
second using high-explosive ammunition.
The designation Yak-3 was also used for three other Yakovlev projects - a Yakovlev Yak-1 modification with all-metal wings and increased armament known as I-30, a proposed but never built heavy twin-engine fighter, and Yakovlev Yak-7A.
Since 1991, a number of Yak-3 have been newly manufactured by Yakovlev for the warbird market using the original plans and dies. These are powered by Allison V-1710 engines and have the designation Yak-3M. Several of these are airworthy today, mostly in the United States, but also in Germany and Australia. Others have been converted to "Yak-3" status from Yak-11 trainers (with the fitment of a Allison engine) for private owners, with these aircraft also being very popular worldwide.
| THE KIT |
 As this is
a Profipak kit, it not only has the usual two sprues of grey plastic and the
single clear sprue for the canopy bits, but it also includes a pair of resin
wheels, an etched fret and a canopy mask. This boxing also has a considerable
number of additional markings over the standard kit.
As this is
a Profipak kit, it not only has the usual two sprues of grey plastic and the
single clear sprue for the canopy bits, but it also includes a pair of resin
wheels, an etched fret and a canopy mask. This boxing also has a considerable
number of additional markings over the standard kit.
First off, I should mention that the molding of the parts is very good. Typical of Eduard, the rather soft plastic is free of flash and while there are the usual ejector towers that will need trimmed, my kit was free of the sink areas I've had on other Eduard kits. There are no bombs or rockets as the Yak-3 was nothing more than an interceptor so needed no under wing ordnance or even a drop tank. Thanks to the wooden construction, there is a dearth of panel lines to worry about; in all, a pretty simple kit.
The resin wheels are flattened and in terms of detail, not really that much better than the plastic ones. Only these are single piece so no worries over gluing the halves and then sanding/filling the seams. Etched material mostly enhances the cockpit, with other bits for the radiator grilles and some wheel well pieces.
| CONSTRUCTION |
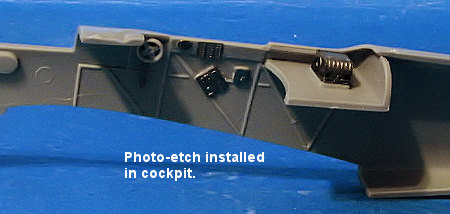 Naturally,
one does start with the cockpit as subassemblies are nearly non-existent.
Basically, this involves removing some of the detail from the side walls and
adding etched bits. I found the radio cover to be a bit unusual in that there
are no fold lines on the photo-etch for it. I ended up just gluing one side in
place and then pulling the cover over to the other side and let it bend as it
may. Seemed to work OK. Eduard did not provide any additional levers for the
consoles so I had to b
Naturally,
one does start with the cockpit as subassemblies are nearly non-existent.
Basically, this involves removing some of the detail from the side walls and
adding etched bits. I found the radio cover to be a bit unusual in that there
are no fold lines on the photo-etch for it. I ended up just gluing one side in
place and then pulling the cover over to the other side and let it bend as it
may. Seemed to work OK. Eduard did not provide any additional levers for the
consoles so I had to b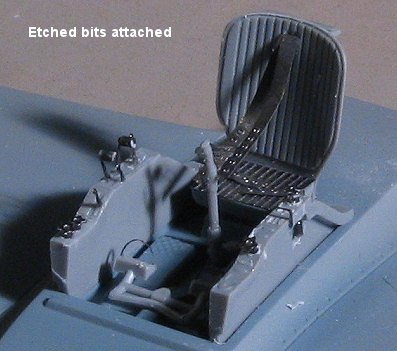 e
rather careful about installing them. Interestingly, there were some bits on the
fret that don't seem to have a place to go. It took me several days, doing a bit
at a time to get all the pieces attached to the cockpit and sidewalls. It was
only after they were glued in place that I painted the whole deal with Russian
Interior Grey using the excellent Colour Coats enamels.
e
rather careful about installing them. Interestingly, there were some bits on the
fret that don't seem to have a place to go. It took me several days, doing a bit
at a time to get all the pieces attached to the cockpit and sidewalls. It was
only after they were glued in place that I painted the whole deal with Russian
Interior Grey using the excellent Colour Coats enamels.
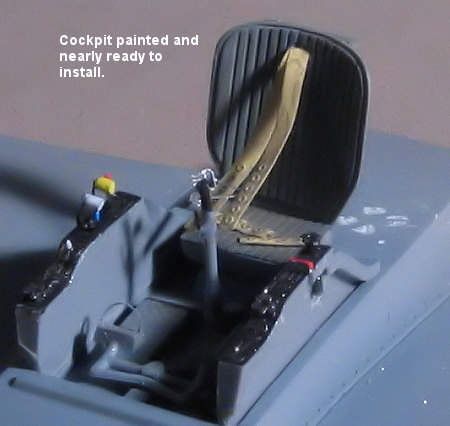 After
that had dried, I used Vallejo acrylics to paint all the detail colors as given
in the kit instructions. This added some interest to things and it was after
this part that I saw it was worth the effort to add in all that photo-etch.
There has been some discussion recently on the worth of this material. I have to
admit I'm still not all that good at using it, but I seem to get better with
every model that I use it on.
After
that had dried, I used Vallejo acrylics to paint all the detail colors as given
in the kit instructions. This added some interest to things and it was after
this part that I saw it was worth the effort to add in all that photo-etch.
There has been some discussion recently on the worth of this material. I have to
admit I'm still not all that good at using it, but I seem to get better with
every model that I use it on.
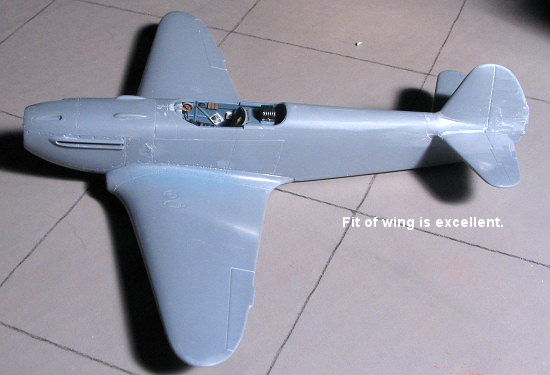
Meanwhile, I glued the wing halves together and then glued the fuselage halves. The engine cowling was attached at this time as well. It fit very well, but needed to be fiddled with to get the best fit. Some sanding took care of a bit of overhang once things had dried. Then I attached the tail planes to get them squared away so that there'd be a reference for the wing. Fit here was fair. I noticed that there was quite a gap at the top compared to the underside. This later had some filler applied.
I painted the instrument panel bits with
black and the wheel wells and inside gear doors with the Colourcoats Grey. The
photoetch instrument panel was then assembled after painting the backs of the
acetate pieces with white. I used clear paint to do this assembly. When I went
to attach the instrument panel. I noticed that I'd installed the side console
pieces on the wrong sides. Fortunately,
 the
parts were not difficult to remove and I put them in their proper place.
the
parts were not difficult to remove and I put them in their proper place.
To add some solidity to the p-e instrument panel, I
glued it to the front of the plastic part. Good thing too as it
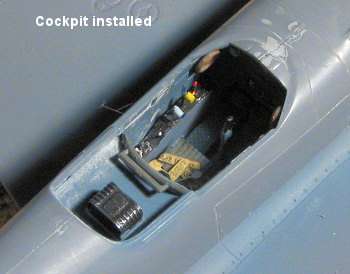 seems
the little legs on the p-e panel caused the panel to sit too high and would have
been crushed when trying to install the wing into the fuselage. I ended up
cutting off the lower appendages to the p-e instrument panel. I also had to use
a piece of plastic sprue as a spreader bar to get the wing/interior to even fit
into the fuselage. Fortunately, this worked great and provided an excellent
wing/fuselage join. Next, I installed the tail planes, which didn't fit
perfectly and needed some filler. The lower radiator housing had the two etched
screens installed. There is a bit of a see-through effect on this that you may
want to fix by installing a section of plastic card. I didn't and left it as it
was. Fit is quite good. The small rudder hinge pieces were glued on, the gun
sight bar placed in the cockpit and the cockpit covered with tape. I masked the
wheel wells and headed for the paint shop.
seems
the little legs on the p-e panel caused the panel to sit too high and would have
been crushed when trying to install the wing into the fuselage. I ended up
cutting off the lower appendages to the p-e instrument panel. I also had to use
a piece of plastic sprue as a spreader bar to get the wing/interior to even fit
into the fuselage. Fortunately, this worked great and provided an excellent
wing/fuselage join. Next, I installed the tail planes, which didn't fit
perfectly and needed some filler. The lower radiator housing had the two etched
screens installed. There is a bit of a see-through effect on this that you may
want to fix by installing a section of plastic card. I didn't and left it as it
was. Fit is quite good. The small rudder hinge pieces were glued on, the gun
sight bar placed in the cockpit and the cockpit covered with tape. I masked the
wheel wells and headed for the paint shop.
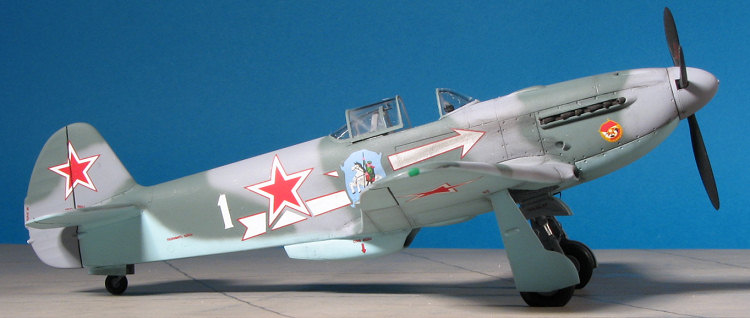
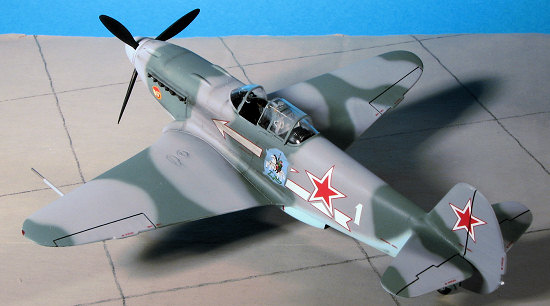
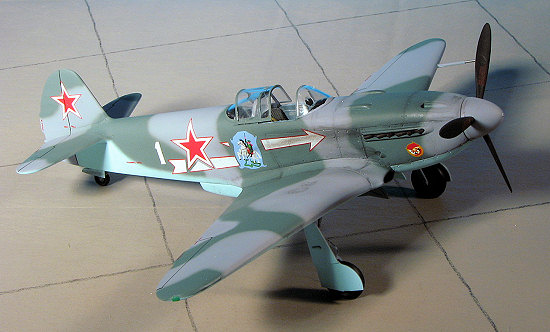
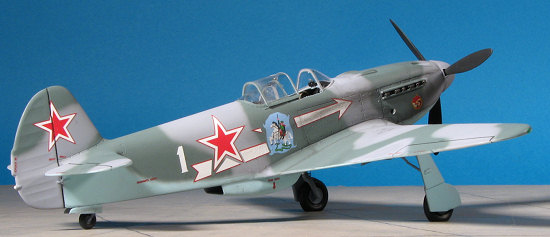
| COLORS & MARKINGS |
The kit instructions are as vague as a politician on the shade of paint to
use for the camo schemes, though several brands are recommended. I used Colourcoats
paints and for the under side used
the AMT-7 shade of light blue. This was mixed with lacquer thinner and sprayed
on. The gear door exteriors got the same treatment.
side used
the AMT-7 shade of light blue. This was mixed with lacquer thinner and sprayed
on. The gear door exteriors got the same treatment.
The kit then returned to the bench to have the canopy bits added on. The set included the 'outline' type of masks for the windscreen and backlight with a solid mask with a hole in it (for the rear view mirror) for the actual sliding canopy. These fit quite well and I filled in the front and rear bits with Tamiya tape. I actually like the Eduard masks with the thin strip as they are easy to apply. Really, for a canopy set as simple as on the Yak, just using tape and cutting it would have been just as good.
I glued the front and rear sections in place then tacked on the sliding portion. The upper surface was painted following the Eduard paint guide with AMT-11 and AMT-12 greys using again, the Colourcoats paint. Thanks to my Skybow AB-100 airbrush, doing the fine demarcation lines was a cinch.
| FINAL BITS |
With the kit painted, I returned to the work bench to
put on the landing gear. Tail wheel attachment hole needed increased in size
slightly. The main gear are not the easiest things to work with. First of all,
there is no positive locator. They butt glue into the ends of the well and it is
up to the builder to be sure the angle and all are correct. Secondly, the
attachment of the wheels is rather lame.
 Rather than have an actual axle to
thread the wheel on, there is a somewhat large nub on the bottom of the gear
that fits into a too-small indentation on the wheel. The other side of the wheel
has a nub that is supposed to fit into a too-shallow indentation on the gear
door. The gear door is crammed into the space next to the main gear leg and has
considerable wiggle room. I drilled out the indentations on both the wheel and
gear door to get a somewhat positive seat. Then I glued the gear door in place
and held the wheel on with a clamp. When that was done on both sides and the
gear door dried, I carefully set the model onto a flat surface to align the flat
spots on the resin wheels. Then I put a small drop of super glue on each wheel
to hold it in place. I should also mention that I wrapped the oleo with Bare
Metal Foil Chrome and attached the rather flimsy photo etch oleo scissors. Were
I to do this kit again, I'd use the plastic ones.
Rather than have an actual axle to
thread the wheel on, there is a somewhat large nub on the bottom of the gear
that fits into a too-small indentation on the wheel. The other side of the wheel
has a nub that is supposed to fit into a too-shallow indentation on the gear
door. The gear door is crammed into the space next to the main gear leg and has
considerable wiggle room. I drilled out the indentations on both the wheel and
gear door to get a somewhat positive seat. Then I glued the gear door in place
and held the wheel on with a clamp. When that was done on both sides and the
gear door dried, I carefully set the model onto a flat surface to align the flat
spots on the resin wheels. Then I put a small drop of super glue on each wheel
to hold it in place. I should also mention that I wrapped the oleo with Bare
Metal Foil Chrome and attached the rather flimsy photo etch oleo scissors. Were
I to do this kit again, I'd use the plastic ones.
Now for the stuff in the well. There is a detail plate
that fits into the back wall. A retraction strut reaches from the inside of the
gear door to this plate where it is butt glued in place. To that retraction
strut and to the base of the gear leg is glued the actuator piston. Not an easy
task and not one for the fumble fingered. There has to be an easier way! The extremely flimsy inner gear door p.e. bit was also glued in place after
much fussing. I found that if I got one of the gear door attachment pieces in
place, the rest were relatively easy. The exhaust was drilled out, painted
and glued in place.
way! The extremely flimsy inner gear door p.e. bit was also glued in place after
much fussing. I found that if I got one of the gear door attachment pieces in
place, the rest were relatively easy. The exhaust was drilled out, painted
and glued in place.
I made a pitot tube out of a couple of pieces of telescoping stainless steel tubing and glued that in. The kit was then returned to the bench to have any overspray attended to and to have a coat of clear gloss applied. I used up a considerable amount of Testors Metallizer Sealer on this as I was told it was better than Future. Well, in terms of application it is fool-proof. However, it smells really bad and takes about 6 coats to equal one of Future.
I then started applying the decals. I chose these markings as the others I wanted to do are already on review kits! Nothing worse than having three reviews of the same kit with the same markings! I was less than thrilled with the performance of the decals. Not only are they not nice and thin, but they did not want to snuggle down, even after applying Microscale setting solution. They also silvered. I eventually used Solvaset on them and they succumbed a bit more, but not completely. When pushed down into the few grooves, they cracked. I'm not sure what the deal is with them as previous Eduard decals I've used were done by Propagteam and worked very well. When dry, the entire kit was given a matte clear coat. I then did some post-shading with pastels, wiping as much of it off as I could. Some exhaust stains were added and then another coat of matte clear to hold things in.
The prop was assembled and attached at this stage. I
also removed the masking. During this time the clear armored glass had
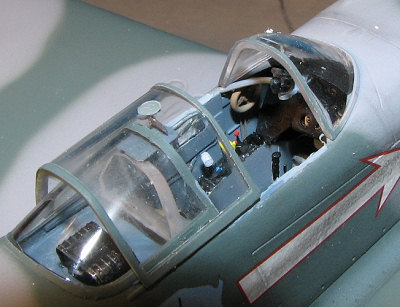 broken loose and that was
reinstalled. I glued on the inside rear view mirror, did a few bits of touch-up
painting (like the formation lights) and glued the canopy open with clear paint.
I didn't put it all the way back or I'd have knocked off the rear view mirror.
Not sure just how that worked on the real plane, but then I'm sure the Plexiglas
canopy wasn't 6 inches thick!
broken loose and that was
reinstalled. I glued on the inside rear view mirror, did a few bits of touch-up
painting (like the formation lights) and glued the canopy open with clear paint.
I didn't put it all the way back or I'd have knocked off the rear view mirror.
Not sure just how that worked on the real plane, but then I'm sure the Plexiglas
canopy wasn't 6 inches thick!
| CONCLUSIONS |
I'm quite pleased with the result and this pretty well
completes by basic WWII Yak fighters collection as it sits in with the Accurate
Miniatures Yak-1, ICM Yak-7 and ICM Yak-9. It was a pretty straight-forward
build and I do believe the photo-etch enhances the model. I was quite surprised
with the problems regarding the landing gear and the decals, but then, it is
always something, isn't it? I don't know if this has been reboxed as a 'weekend
special', but if it is, you owe it to yourself to grab one.
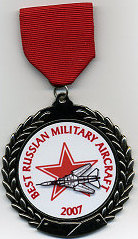
Late Note: this kit won best Russian Military Aircraft at the IPMS Roscoe Turner event in March 2007
February 2007
#1455 in a series
Y
ou can thank me for this one.If you would like your product reviewed fairly and fairly quickly, please contact the editor or see other details in the Note to Contributors.