
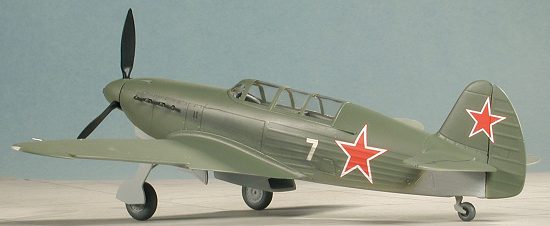
ICM 1/48 Yak-7 UTI
|
KIT # |
48034 |
|
PRICE: |
$12.98 |
|
DECALS: |
One aircraft |
|
REVIEWER: |
|
|
NOTES: |
|
HISTORY |
For a brief history and a look at what is in the box, visit this preview.
|
CONSTRUCTION |
One the bag is open, the first thing one notices is that this
thing is coated with some sort of sticky stuff. Basically, this is semi-dried
mold release material that needs to be removed. I washed the parts is warm,
soapy water and that seemed to get rid of most of it. The next
thing to do was to start with subassemblies. Well, this kit doesn't have much of
that stuff, so I basically glued the wings together and built up a basic engine
block. I have no plans on displaying the engine, but need a place on which to
glue the exhausts and the prop!
With those glued on and dry, I installed the forward
floor section in one side and mated the other fuselage half to make sure it all
fit. No worries on this one. The back section, however, was another story. The
seat back is way too broad to fit so it was trimmed quite a bit on the lower
sides to clear the side consoles. It was then also glued in place and allowed to
dry. Then the entire interior was painted a medium grey color (actually, I used
primer grey as it was pretty close to the ghost grey that the instructions
called for).
At this same time, I figured I'd go ahead and glue in the wing. Well, it was not
as easy as it appeared, the front of the wing requires some intense fiddling to
get properly seated. There are what appears to be extra bits of plastic on the
forward section. DO NOT REMOVE THEM. They are to fair in the oil cooler that
you'll install. In fact it is a good idea to install the lower fuselage oil
cooler at this time to make sure all fits. If you use a hot glue like Pro-Weld
or Weld-on, you can sort of melt things into place. However, I found that filler
was needed (as it is with ALL my models). I needed quite a bit at the back of
the wing and also at the upper roots. Now I'm sure that more careful modelers
than I can get these parts together without using filler, but it seems I'm
totally incapable of doing so :o( While the several applications
of filler were drying, I glued the rudder in place and the tail planes. These
fit well with no muss or fuss. The landing light and wing tip light covers were
glued in and sanded to match the surrounds. They'll be polished out later. The
ailerons are separate items and these were glued in place slightly askew to add
some interest. Some of you may want to cut and remount the control sticks to
show this slight deflection, but I didn't.
The next step was to add the control
stick to the back seat and also install the rear instrument panel and
cross-member. The instrument panel fits easily between the framework and the
short cross-member also fits well, though aligning both of them takes a bit of
fiddling. No problem with the rear control stick. With those parts installed,
the front gun sight was glued in place. This is a case of 'fits where it is
glued' sort of thing, for as with most of the kit, no exact placement guides are
provided. Installation of the canopy was next. The fit of the
canopy is really very good. Unfortunately, the windscreen is not good. The
framework around the panes on the windscreen are waaaay too thick,
looking more like a heavily armored 'screen. Since I'm building this one out of
the box, I left it as is, but you may well want to sand off all the framework on
the windscreen and rescribe it to something more like what is shown on the box
art. The canopy itself is very clear and allows unhampered views of the
interior. This was masked and then the kit was ready for painting. BTW, I broke
the tail wheel strut off during all this handling so that had to be glued back
in place. I also opened up the wing root intakes, though not as cleanly as I'd
have  Next, the interior needed to be
assembled. First thing was to attach the two framework pieces into the fuselage
interior. There is absolutely no guild marks of any kind so one really has to
guess at things and put them in as best as one can. While that was drying, I
installed the seats on the floor(s) and the rudder pedals. Man, the pedals are a
rather cheesy looking deal, but perhaps that is what they really look like. The
control column was installed on the front floor and into the mount that will
eventually fit in the back. Returning to the fuselage sides, the small side
consoles were glued in place. Again, no assistance of any kind in the way of
placement marks so one just has to look carefully at the instructions and take a
best guess.
Next, the interior needed to be
assembled. First thing was to attach the two framework pieces into the fuselage
interior. There is absolutely no guild marks of any kind so one really has to
guess at things and put them in as best as one can. While that was drying, I
installed the seats on the floor(s) and the rudder pedals. Man, the pedals are a
rather cheesy looking deal, but perhaps that is what they really look like. The
control column was installed on the front floor and into the mount that will
eventually fit in the back. Returning to the fuselage sides, the small side
consoles were glued in place. Again, no assistance of any kind in the way of
placement marks so one just has to look carefully at the instructions and take a
best guess. 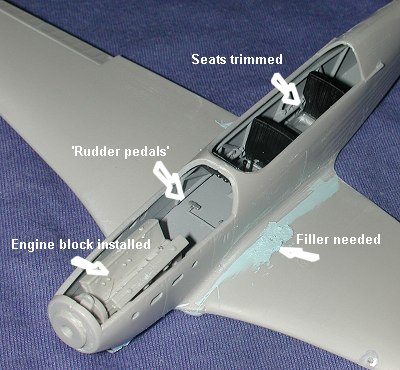 When that had all dried, the interior bits were
painted as per the instructions (mostly black and aluminum). Then the fuselage
halves were glued together. This was not much of a problem, but I did have to
trim the fuselage forward section to allow the corner of the floor to fit. The
halves were also warped due to the flat section where the wings go. As a result,
I glued the fuselage in stages. In the final stage (I worked from the back), the
engine block was glued in as well. Don't forget to glue in the tail wheel as it
is trapped between the fuselage halves. This led to problems later.
When that had all dried, the interior bits were
painted as per the instructions (mostly black and aluminum). Then the fuselage
halves were glued together. This was not much of a problem, but I did have to
trim the fuselage forward section to allow the corner of the floor to fit. The
halves were also warped due to the flat section where the wings go. As a result,
I glued the fuselage in stages. In the final stage (I worked from the back), the
engine block was glued in as well. Don't forget to glue in the tail wheel as it
is trapped between the fuselage halves. This led to problems later. Now on to
the upper engine cowling and the lower radiator. The upper cowling part was a
bit too large for the opening, however a touch of sanding and the use of a 'hot'
glue was enough to get it to stick in place with minimal problems. I did clamp
it while the glue dried just to make sure. The lower radiator fits in place well
despite having no indication of exactly where it goes. I just lined up the back
of it with the aft wing/fuselage join. There is a 'door' that also fits on the
bottom of the radiator.
Now on to
the upper engine cowling and the lower radiator. The upper cowling part was a
bit too large for the opening, however a touch of sanding and the use of a 'hot'
glue was enough to get it to stick in place with minimal problems. I did clamp
it while the glue dried just to make sure. The lower radiator fits in place well
despite having no indication of exactly where it goes. I just lined up the back
of it with the aft wing/fuselage join. There is a 'door' that also fits on the
bottom of the radiator.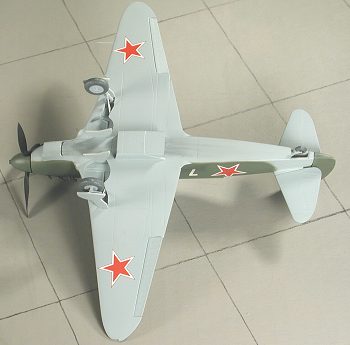 wished.
|
PAINT |
Russian planes are the epitome of easy to paint. You have your basic underside
light blue and then your basic upper green. Now the colors of these varied quite
a bit depending on what factory made the plane and when the plane was built. No
paint standards for Soviet WWII aircraft so being pedantic about it is an
exercise in futility. Aeromaster produced a line of Soviet WWII paints and I
used their enamels for this one. You can also get these colors from Testors and
Humbrol.
|
CONSTRUCTION CONTINUES |
With the paint firmly in place, the landing gear was installed.
The gear doors are to be glued on the struts before they are installed. No
problem, but the doors are a touch too wide for the slot. I trimmed mine a bit
before installation. The mounting pad is wide enough for a good join, though
exact alignment is an eye-ball arrangement. The smaller retraction struts have
(once again) no positive locators, so you need to glue them to where it looks OK
to you. The gear doors are butt joined to the lower fuselage.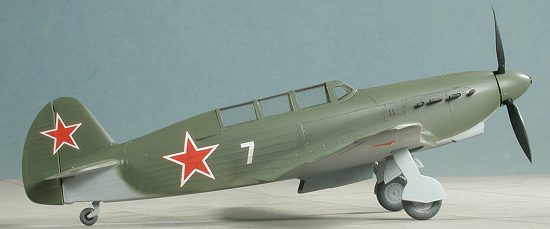
Last bits are to glue the tail wheel strut back on after breaking it yet another time (Sigh!), and the wing pitot tube. No radio mast on Russian trainers. The wheels were then glued in place. These were particularly difficult to paint. No real demarcation between wheel and tire makes it tough. The final bit was the prop and spinner. There is a small 'C' clamp that is to hold the prop on the shaft, however, the plastic is so soft that it broke trying to clip it on. The spinner was glued to the prop and the kit was ready for the gloss coat and decals.
|
DECALS & FINAL BITS |
ICM decals are notorious for not being that great. However, I decided to give
them a try once again. The areas that were to take decals were sprayed with
clear gloss acrylic (Future). When dry, the first decal was cut off the sheet
and applied. Much to my semi-disgust, but not to my surprise, the decals proved
to be brittle and the tips of the stars broke off. Not
 having much in the way of
Soviet decals sheets, I scrounged around until I found an old Superscale sheet
for the Mig-21. This sheet was then plundered for the required stars. The
fuselage number I couldn't find an acceptable replacement for so used the one on
the kit decal sheet. Unlike the stars, I didn't trim most of the clear surround
and so didn't have any problems with it falling apart. It is also a very small
decal.
having much in the way of
Soviet decals sheets, I scrounged around until I found an old Superscale sheet
for the Mig-21. This sheet was then plundered for the required stars. The
fuselage number I couldn't find an acceptable replacement for so used the one on
the kit decal sheet. Unlike the stars, I didn't trim most of the clear surround
and so didn't have any problems with it falling apart. It is also a very small
decal.
Once that was done and dry, the kit was sprayed with a matte clear acrylic to seal in the decals. Then the exhaust were glued in place. Each set of pipes was glued in individually. I test fit them while still attached to each other before gluing in the engine, but didn't see how they'd fit properly that way. They seemed to stick out too far. Anyway, it wasn't a difficult operation and once they were glued in, the masking was removed from the canopy. Then some pastels were applied for exhaust, a bit of touch-up painting was done and the control surface demarcation lines on the upper tail planes were done. Oddly, there is no hinge line at all on the underside; just a transition from wood to fabric covering. Very strange.
|
CONCLUSIONS |
This is a very satisfying kit. It doesn't have much in the way of fiddly stuff nor is it festooned with bits and pieces. Yes, the placement of many parts is non-existent, but that isn't much of a problem for most modelers. Also, this kit is not plagued with the poor quality control that basically ruined the reputation of the Spitfires and was also quite noticeable in the Mustang kits. Now if ICM can only have the same quality control level for its next new aircraft kit, we'll all be quite happy.
October 2002
Copyright ModelingMadness.com. All rights reserved.
If you would like your product reviewed fairly and quickly, please contact the editor or see other details in the Note to Contributors.