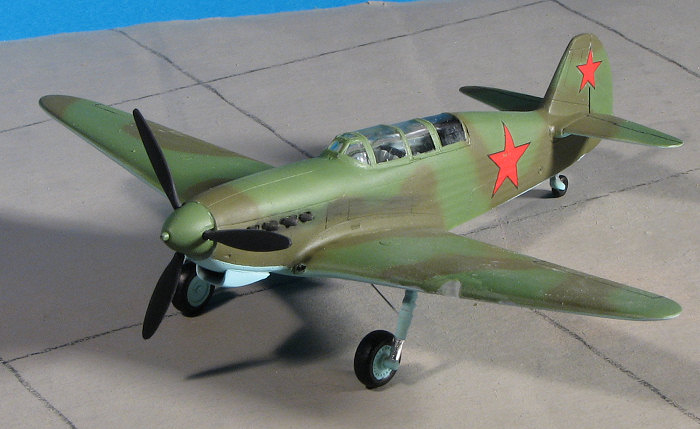
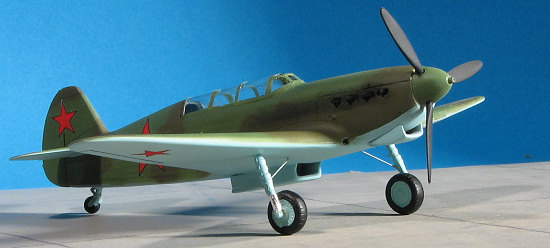
| KIT #: | 72019 |
| PRICE: | $ |
| DECALS: | Two Options. |
| REVIEWER: | Scott Van Aken |
| NOTES: | Short run with resin and etched metal and vacuform parts |
| HISTORY |
 Initially developed as a two seat trainer for the Yak-1
fighter series, the Yak-7 was quickly developed into a fighter in its own right.
Initial trials of the Yak-7 UTI (initially known as the UTI-26) began in mid
1940. As with the Yak-1, it was a composite of materials with wooden wings, fin
and rudder with a tube frame fuselage covered with fabric. Control surfaces were
also fabric covered. Armament was a single 12.7mm ShKaS machine gun mounted in
the upper cowling. Production of the Yak-7 UTI ran from mid to late 1941 with
186 aircraft built.
Initially developed as a two seat trainer for the Yak-1
fighter series, the Yak-7 was quickly developed into a fighter in its own right.
Initial trials of the Yak-7 UTI (initially known as the UTI-26) began in mid
1940. As with the Yak-1, it was a composite of materials with wooden wings, fin
and rudder with a tube frame fuselage covered with fabric. Control surfaces were
also fabric covered. Armament was a single 12.7mm ShKaS machine gun mounted in
the upper cowling. Production of the Yak-7 UTI ran from mid to late 1941 with
186 aircraft built.
An additional development of the Yak-7 UTI was the Yak-7V. It was a pilot conversion trainer and differed by having fixed landing gear and no armament. This aircraft was often used as a unit hack or to introduce new pilots to fighter type aircraft. Such were the excellent flying qualities of the Yak-7UTI and the Yak-7V that the design was developed into the full-fledged Yak-7 fighter. However, that is beyond the scope of this particular kit.
| THE KIT |
Valom has embarked on a series of Yak-7 kits and this one is the unarmed conversion trainer, the Yak-7v. The only other 1/72 injected Yak-7 I know of is the Dako kit. This is NOT that kit. There is one sprue of grey injected plastic, one of clear plastic with both a singe and double canopy set-up, a vacuformed double canopy, a small fret of etched brass, a bag of resin and a small decal sheet.
 Molding on the plastic parts is fairly good with nice
engraved detail. I also found the the rivet detail, what little there is, is
indented as well. If you recall many of the older Soviet magazines and soft
cover books that were around in the late 1980s, you'll recall that the plans
often included had every rivet on the plans. That is how the detailing is on
this kit. I don't find anything 'bad' about it; it is just a bit unexpected. The
fabric detail is nicely done without the exaggerated 'hills and valleys' one can
find in kits. All of the parts have rough edges typical of short run kits. I
also found that the bits like struts suffered from mold mis-alignment. Nothing
horrendous, but it is there and the builder will have to deal with it. It is
obvious from the 'extra' parts on the two injected sprues that these will be
common to all of the kits in the series.
Molding on the plastic parts is fairly good with nice
engraved detail. I also found the the rivet detail, what little there is, is
indented as well. If you recall many of the older Soviet magazines and soft
cover books that were around in the late 1980s, you'll recall that the plans
often included had every rivet on the plans. That is how the detailing is on
this kit. I don't find anything 'bad' about it; it is just a bit unexpected. The
fabric detail is nicely done without the exaggerated 'hills and valleys' one can
find in kits. All of the parts have rough edges typical of short run kits. I
also found that the bits like struts suffered from mold mis-alignment. Nothing
horrendous, but it is there and the builder will have to deal with it. It is
obvious from the 'extra' parts on the two injected sprues that these will be
common to all of the kits in the series.
The vacuformed canopy is nicely done and as the injected clear bits are a bit on the thick side, I'm sure that there are those who will be using it. The small etched fret includes belts, rudder pedals, cooler screens, instrument panels and landing gear oleo scissors. Resin is used for the skis, rear seat and control stick, side panels, tail gear, wheels and a few other bits.
Instructions are nicely done on high quality glossy paper. There are multiple color references on the back with 8 construction steps inside. Any additional bits of sprue needed are clearly shown as are those colors needed during construction. The center of the small booklet includes a full color painting and markings guide. In this case, both aircraft are in black/green over light blue. Aside from insignia, there are no other markings. Two types, a white and a black bordered star are provided. I'm sure that some research will turn up at least a tactical number. The decals are nicely printed with a somewhat large clear carrier that can be easily trimmed off.
| CONSTRUCTION |
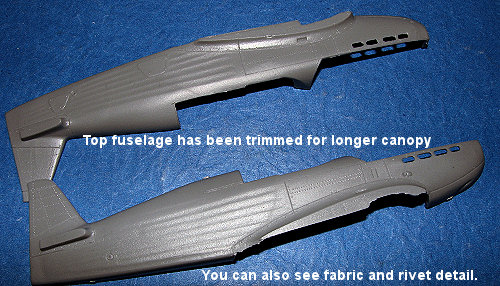
First thing I did was to take care of something that
Valom overlooked in their instructions. You see, the Yak-7v is a two seat
aircraft
 with
a longer transparency than the single seat fighter. Yet Valom's instructions do
not tell you to cut out the molded in rear section. What might have been better
is for Valom to have molded the fuselage halves as a two seat aircraft, provide
the longer transparency and just tell us to paint over the rear one. This is how
it was done on the real aircraft. Fortunately it is an easy job with just two
cuts needed to remove the additional piece.
with
a longer transparency than the single seat fighter. Yet Valom's instructions do
not tell you to cut out the molded in rear section. What might have been better
is for Valom to have molded the fuselage halves as a two seat aircraft, provide
the longer transparency and just tell us to paint over the rear one. This is how
it was done on the real aircraft. Fortunately it is an easy job with just two
cuts needed to remove the additional piece.
I then started work on the interior. There is a mixture
of materials in this. I should also point out that while the instructions show
the interior floor having attachment marks for the rear seat bits, the actual
plastic piece does not. Regardless, I removed and cleaned up the seats,
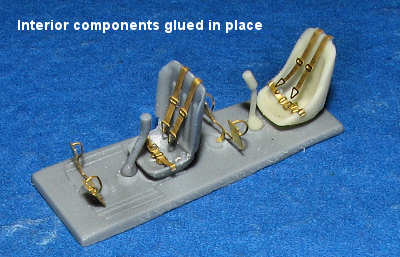 control
sticks (different for front and rear seats as are the seats), and the rudder
pedals. These fit surprisingly well. I also cut the harness bits and attached
them. As in all VALOM kits I have built, these are really too short and do not
allow for anything that does not appear on the seat face proper. What I mean is
that they should be longer so that they can wrap around to where they actually
attach on the floor or seat back or seat side.
control
sticks (different for front and rear seats as are the seats), and the rudder
pedals. These fit surprisingly well. I also cut the harness bits and attached
them. As in all VALOM kits I have built, these are really too short and do not
allow for anything that does not appear on the seat face proper. What I mean is
that they should be longer so that they can wrap around to where they actually
attach on the floor or seat back or seat side.
![]() In between fussing with the cockpit I glued the gear
doors closed. This aircraft had no retractable landing gear so the door openings
weren't there at all, just a section of sheet metal. As one would expect, the
kit doors do not fit. They are too large. Some quality time scraping and some
hot glue to help lubricate things got the doors into the openings. The seams
were filled (it took three applications of Mr.Surfacer after initial sanding)
and the area sanded smooth. Then holes were drilled in them so that the gear
legs would be able to fit. Be sure to drill them at a bit of an angle in order
to get the proper sit of things when you glue in the struts later on.
In between fussing with the cockpit I glued the gear
doors closed. This aircraft had no retractable landing gear so the door openings
weren't there at all, just a section of sheet metal. As one would expect, the
kit doors do not fit. They are too large. Some quality time scraping and some
hot glue to help lubricate things got the doors into the openings. The seams
were filled (it took three applications of Mr.Surfacer after initial sanding)
and the area sanded smooth. Then holes were drilled in them so that the gear
legs would be able to fit. Be sure to drill them at a bit of an angle in order
to get the proper sit of things when you glue in the struts later on.
 I then glued in the interior sidewalls. Test fitting
the interior showed that the seats were too wide (or something) as they
interfered with my ability to close up the fuselage halves. Now there are two
options. One is to thin the heck out of the interior sides to allow the needed
clearance. Option two is to cut bits from the side console pieces that were
jutting out and hitting the seats. As a lazy slob, I took option two. At this
time, I painted all the interior bits with Colourcoats Russian Interior Grey.
When that dried, I did a bit of detail painting and all the jazz to spruce up
the interior.
I then glued in the interior sidewalls. Test fitting
the interior showed that the seats were too wide (or something) as they
interfered with my ability to close up the fuselage halves. Now there are two
options. One is to thin the heck out of the interior sides to allow the needed
clearance. Option two is to cut bits from the side console pieces that were
jutting out and hitting the seats. As a lazy slob, I took option two. At this
time, I painted all the interior bits with Colourcoats Russian Interior Grey.
When that dried, I did a bit of detail painting and all the jazz to spruce up
the interior.
With all the interior bits painted, I glued the interior to the right side. Then I matched where it hit on the left and did some trimming to get the fuselage halves to match up. Fit is fair, and I'd be fibbing if I said I didn't need filler, which I did. I also had to trim the rear panel to fit into place. This basically meant cutting a couple of notches in it about half way down and then sipping it into place.
Then I gl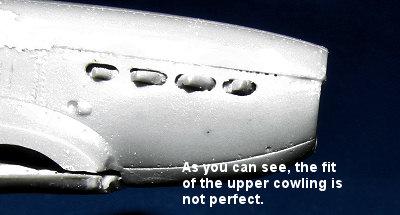 ued
on the horizontal stabilizers. The stab roots on the fuselage are much thicker
than the stabs themselves. I aligned mine to where the upper fit was the best
and just left things as they were. Back near the front, I glued in the exhaust,
after cleaning them up, and then the upper cowling, picking the one with no guns
as recommended in the instructions. This piece is oversize and so I glued it
with the forward end sticking over, which was later sanded back. Filler came in
useful once again.
ued
on the horizontal stabilizers. The stab roots on the fuselage are much thicker
than the stabs themselves. I aligned mine to where the upper fit was the best
and just left things as they were. Back near the front, I glued in the exhaust,
after cleaning them up, and then the upper cowling, picking the one with no guns
as recommended in the instructions. This piece is oversize and so I glued it
with the forward end sticking over, which was later sanded back. Filler came in
useful once again.
On the lower wing I glued the radiator, after first
gluing in the etched piece provided. This was too tall and needed to be trimmed
back a bit in order to get things to fit. The assembly was then glued to the
lower wing. At this time, I glued just the lower wing in place, figuring
that this would assist in getting a good upper wing fit. The fit of the lower
wing can only be called fair as much cutting had to be done to get it to fit
properly. This included removing the small inner wheel well sections that are
molded onto the lower wing. Fortunately, I was doing the version with fixed gear
or even more work would have had to have been done to get
 things to fit
properly. There was also a rather large step at the front wing/fuselage join
that needed filed down and filled. Once the lower wing was in place, I attached
the upper wing halves. While one wing went on without too much trouble, the
other was noticeably too short. This meant more filing down of the inside wing
root until I could get things to match up. I used the landing light opening as a
guide. When I started, it was off by about half of that, and when done it all
matched up.
things to fit
properly. There was also a rather large step at the front wing/fuselage join
that needed filed down and filled. Once the lower wing was in place, I attached
the upper wing halves. While one wing went on without too much trouble, the
other was noticeably too short. This meant more filing down of the inside wing
root until I could get things to match up. I used the landing light opening as a
guide. When I started, it was off by about half of that, and when done it all
matched up.
More filler on the roots and some sanding followed. I also had to open up the wing root intakes that were not present. These were initially opened with a drill bit and then I used a square file to slowly make the openings. Then I turned to the canopy. The kit provides both an injected canopy and one that is vacuformed. I first tried the injected one and it had a considerable gap in the front as the angle of the canopy and the cockpit opening are not the same. So then I went for the vacuformed one. This one I ended up getting too short so had no option but to use the injected one. This was first masked then I made a lip of putty into which I simply put the canopy. When all dried, I lifted off the canopy and cleaned up the interior surface of the filler with files and a hobby knife. Then it was painted and I cemented the canopy in place. Then I used more filler followed by white glue to smooth out the front area.
Next was the tail wheel. There is a partial blanking
plate that fits in most of the aft portion of the tail wheel well. This is about
1/3 too wide so it was trimmed and fit into place. Putty was applied and sanded
down. The area for the tail wheel was squared off and the
 side
mounting lugs were trimmed back until it fit into the hole. Thanks to the oleo
scissor, it won't fit as snugly as you'd like, but liberal application of glue
is holding it in place. The landing gear we
side
mounting lugs were trimmed back until it fit into the hole. Thanks to the oleo
scissor, it won't fit as snugly as you'd like, but liberal application of glue
is holding it in place. The landing gear we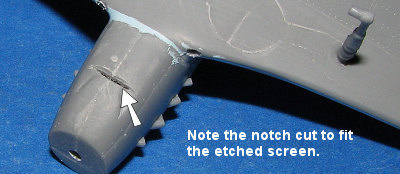 re
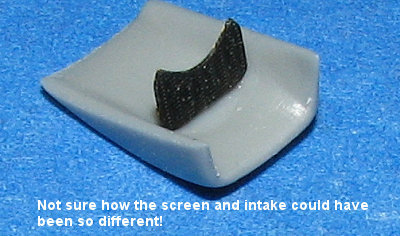
glued in at this time. At the front, there is an oil cooler. Into this goes an
etched grill piece. These items are obviously not meant for each other as the
grill is too skinny and too tall. Even trimming it down wasn't enough to get a
fit, so I ended up cutting a slit in the lower cowling so that the housing and
grille would fit. With this cut, fitting the lower oil cooler scoop was a piece
of cake.
re
glued in at this time. At the front, there is an oil cooler. Into this goes an
etched grill piece. These items are obviously not meant for each other as the
grill is too skinny and too tall. Even trimming it down wasn't enough to get a
fit, so I ended up cutting a slit in the lower cowling so that the housing and
grille would fit. With this cut, fitting the lower oil cooler scoop was a piece
of cake.
| COLORS & MARKINGS |
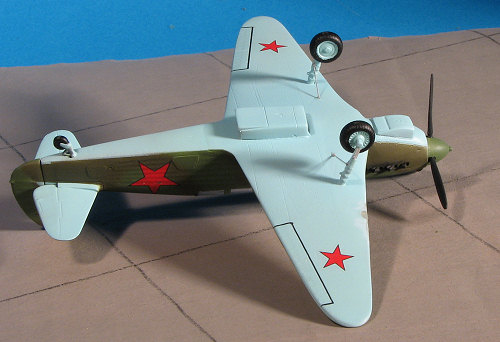 With everything masked and ready to
go, I headed for the paint shop. I used Colourcoats Russian colors on this one
with their AMT-4 green on the top side and AMT-7 for the lower blue. The
additional OD was standard Testors Modelmaster enamel. I used the excellent
Skybow AB-100 airbrush for the detail work, after thinning the paint to a
water-like consistency.
With everything masked and ready to
go, I headed for the paint shop. I used Colourcoats Russian colors on this one
with their AMT-4 green on the top side and AMT-7 for the lower blue. The
additional OD was standard Testors Modelmaster enamel. I used the excellent
Skybow AB-100 airbrush for the detail work, after thinning the paint to a
water-like consistency.
When that dried, sprayed on a clear gloss for the decals. When it came time to apply the decals. I wanted to use the white boarder ones, but a close inspection showed these to be off register. What's more, one of the markings had no border at all. Fortunately, I had the second option of black bordered stars. These are quite well done and very thin. In fact, I tore one of them moving it into place so be cautious when using them. The model was then sprayed with a clear matte.
| FINAL BITS |
I still had some pieces to attach. One was the prop.
This has a resin hub on which one glues the plastic blades and then inserts into
the spinner. This worked well, but when it came time to attach the spinner, it
was obvious that this was too small in comparison to the front of the cowling.
Nothing to do but suck it up and attach it where it looked best. My
recommendation would be to build up the nose with plastic card until it matches
the diameter of the spinner. Seems easier than enlarging the spinner! I also
glued on the wheels at this time. No problems here. These seem a bit o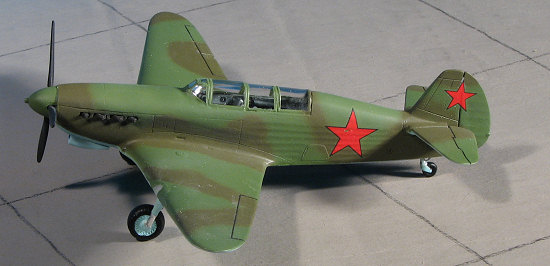 n the wide
side and perhaps they were in reality. I used small sections of wire for the
additional braces.
n the wide
side and perhaps they were in reality. I used small sections of wire for the
additional braces.
I then went to attach the landing light. No way was this going to fit as it wasn't tall enough to fill the space. Well, I already had the kit painted and decaled so my choices were limited. Since this wasn't going to be more than a shelf sitter, I looked for an alternative. Fortunately, the opening is the same diameter as the clear sprue, so I nipped a section of this and glued it in place. Sanding it down did damage to the surrounding paint, but by this time, I wasn't about to mask the light and carefully repaint the area so I just brush painted the colors, telling myself that I'd fit it later. The masking was removed from the canopy and some exhaust stain added.
| CONCLUSIONS |
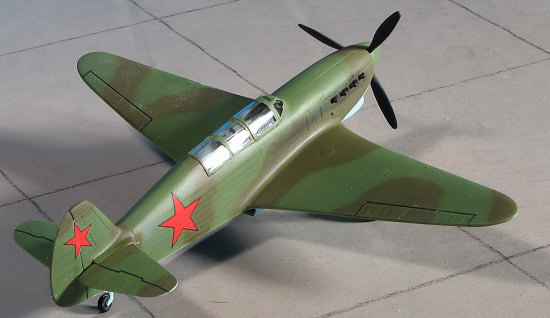
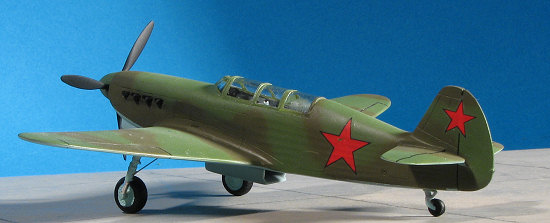
This was not the easiest build I've done. I found that Valom's earlier BT-1 to be a much nicer experience. All the bits are there, but I had trouble getting everything to fit as I'd have hoped. For this reason, I can only recommend this one to those who have experience handling fit problems. I don't discount that some of these problems may well have been just me, but I know that some were not. The end result is pleasing enough and for those of you with the skills, it will make a fine addition to your 1/72 Yak collection.
March 2007
Thanks to Valom for the review kit. Please visit them for more interesting subjects. I also thank www.wingsntreads.com for the Skybow airbrush.
If you would like your product reviewed fairly and fairly quicklynth, please contact the editor or see other details in the Note to Contributors.