Italeri 1/48 CR.42 LW
| KIT #: | 2640 |
| PRICE: | $45.00 MSRP (Subject to change) |
| DECALS: | Three options |
| REVIEWER: | Scott Van Aken |
| NOTES: | New Tool |
| HISTORY |
 Developed from the successful CR.32,
an aircraft that did so well in the Spanish Civil War, the CR. 42 was the
last new build biplane fighter from any of the major powers. Of mixed
construction, it had a metal tubular frame covered in fabric with the
forward section covered in sheet metal. It was also a commercial success
being ordered and used by Sweden, Belgium, and Hungary as well as the
Italian Air Force. Though obsolete when it first flew, the CR.42 continued
in production throughout the war with later versions being used by
Luftwaffe night fighter units.
Developed from the successful CR.32,
an aircraft that did so well in the Spanish Civil War, the CR. 42 was the
last new build biplane fighter from any of the major powers. Of mixed
construction, it had a metal tubular frame covered in fabric with the
forward section covered in sheet metal. It was also a commercial success
being ordered and used by Sweden, Belgium, and Hungary as well as the
Italian Air Force. Though obsolete when it first flew, the CR.42 continued
in production throughout the war with later versions being used by
Luftwaffe night fighter units.
| THE KIT |
Please visit the preview to see what comes in the box.
| CONSTRUCTION |
As I was building this kit out of the
box, I first looked over the instructions for some sub-assemblies. There
were a few so I started on those. This was basically the
 upper and lower wings, tail
planes, and the cockpit. I started with the wings. There are holes in the
lower wings to open up if you want to use the bomb racks. I didn't so left
them closed. Fit is quite good with minimal filler needed. The sprue
attachment points on the wings are wide (like Monogram kits provide from
time to time), but are thicker so care has to be used removing them. Those
attachment points are where I needed the filler.
upper and lower wings, tail
planes, and the cockpit. I started with the wings. There are holes in the
lower wings to open up if you want to use the bomb racks. I didn't so left
them closed. Fit is quite good with minimal filler needed. The sprue
attachment points on the wings are wide (like Monogram kits provide from
time to time), but are thicker so care has to be used removing them. Those
attachment points are where I needed the filler.
I then moved to the cockpit. This is fairly well done with the option for either an insert with raised detail or decals for instruments. First off, I glued on the seat and control stick. This was painted aluminum when dry along with the rudder pedals and a section of framework that is provided for the top. I used Alclad II for this. The rest of the interior is painted in a light grey. Apparently late war Italian aircraft used this instead of the green primer. I followed Italeri's instructions regarding this color and it turns out to be FS 36375. I had some Aeromaster acrylic in this shade already mixed up so used it.
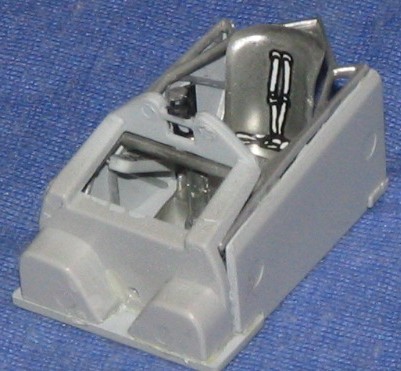 There is decent det
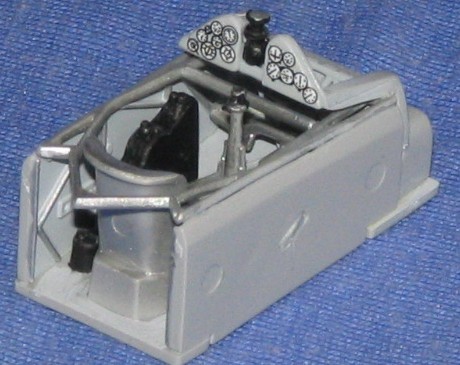 ail on the side
panels, but I'm sure there will be an aftermarket resin cockpit for this
kit in the near future. I painted some boxes black and the framework there
with Testors aluminum. I had painted the raised panel instrument inserts
and tried to fit the decals over them (as I do with Tamiya kits), but they
are not exact matches so just put the decals on the flat spots given. These
are black and white but offer decent detail and went on well. I used Solvaset to help them stick a bit better. There is also a decal for the
shoulder harness. It seems a bit short to me so I put it in place where it
looked the best. You may want to go the brass belts route for more detail.
ail on the side
panels, but I'm sure there will be an aftermarket resin cockpit for this
kit in the near future. I painted some boxes black and the framework there
with Testors aluminum. I had painted the raised panel instrument inserts
and tried to fit the decals over them (as I do with Tamiya kits), but they
are not exact matches so just put the decals on the flat spots given. These
are black and white but offer decent detail and went on well. I used Solvaset to help them stick a bit better. There is also a decal for the
shoulder harness. It seems a bit short to me so I put it in place where it
looked the best. You may want to go the brass belts route for more detail.
I then glued the rudder pedals to the instrument panel section and attached that to the base. The side panels were next, followed by the upper framework section. This all looks quite convincing and I suggest gluing all these at the same time so you can properly align things. Frankly, there is little to be seen once it is in the fuselage, but I know it is there.
 I glued the interior in place and the
tail wheel. No sense in painting this last part before installation as it
will be difficult to mask and only the bottom half of the wheel sticks out
of the housing. I glued the fuselage halves together. Be sure to properly
get the interior in place as once the halves are closed, you have no access
to it. There is a piece of head armor with a head rest that goes on once
the halves are together. This is too deep as it hits the top of the seat. I
cut some of the lower section off until it fit. It is almost as if I have
the interior too far back, even though I was pretty sure I had the interior
properly set in its alignment tray.
I glued the interior in place and the
tail wheel. No sense in painting this last part before installation as it
will be difficult to mask and only the bottom half of the wheel sticks out
of the housing. I glued the fuselage halves together. Be sure to properly
get the interior in place as once the halves are closed, you have no access
to it. There is a piece of head armor with a head rest that goes on once
the halves are together. This is too deep as it hits the top of the seat. I
cut some of the lower section off until it fit. It is almost as if I have
the interior too far back, even though I was pretty sure I had the interior
properly set in its alignment tray.
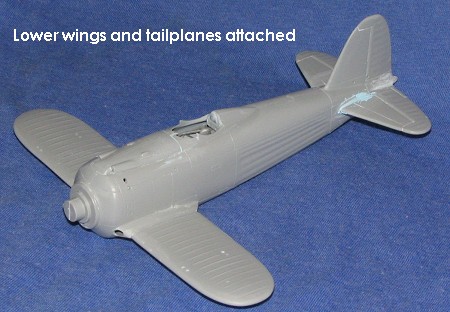 I then did the usual filler. Not much
needed though the bottom was where it was the worst. I should tell you that
the plastic is a bit soft so be careful when sanding not to over do it. I
then glued on the lower wings and the tail planes. The lower wings have
half of the wheel pants holes with the fuselage carrying the other half. I
used these to line things up. I must have over-sanded the rear of the wings
as they seem a bit short in the fore and aft measurement compared to the
wing root. The tail planes were glued in place. These turned out being
fatter at the root than the fuselage attachment point. Filler was used to
bring things up to specs.
I then did the usual filler. Not much
needed though the bottom was where it was the worst. I should tell you that
the plastic is a bit soft so be careful when sanding not to over do it. I
then glued on the lower wings and the tail planes. The lower wings have
half of the wheel pants holes with the fuselage carrying the other half. I
used these to line things up. I must have over-sanded the rear of the wings
as they seem a bit short in the fore and aft measurement compared to the
wing root. The tail planes were glued in place. These turned out being
fatter at the root than the fuselage attachment point. Filler was used to
bring things up to specs.
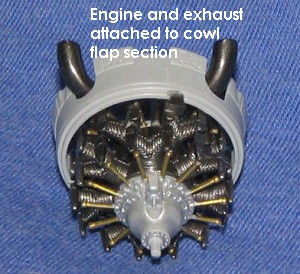 While all that was going on, I worked
on the engine. The front and rear sections glue together and these were
painted steel, using Alclad II. The front and rear pushrod sections were
cleaned up and the crankcase housing section painted aluminum, again with
Alclad II. I brush painted the pushrods with Testors Brass. These colors
were all called out in the instructions. The prop shaft was placed in the
crankcase housing section and the two pushrod pieces were glued in place.
So far, so good. There are attachment points on the aft cylinder row that
glues into the cowl flap section. Then , the exhaust collector, which
was painted Jet Exhaust using Alclad II, was cut in half as shown in the
directions and I tried to glue this onto the holes and flat spots on the
back of the cylinders. I was not totally successful in this and it turned
out to be a bit of a blessing in disguise. The engine side panels and cowl
front were then glued on. Fit is fairly good for these parts and guides are
provided to make sure you don't get them on wrong.
While all that was going on, I worked
on the engine. The front and rear sections glue together and these were
painted steel, using Alclad II. The front and rear pushrod sections were
cleaned up and the crankcase housing section painted aluminum, again with
Alclad II. I brush painted the pushrods with Testors Brass. These colors
were all called out in the instructions. The prop shaft was placed in the
crankcase housing section and the two pushrod pieces were glued in place.
So far, so good. There are attachment points on the aft cylinder row that
glues into the cowl flap section. Then , the exhaust collector, which
was painted Jet Exhaust using Alclad II, was cut in half as shown in the
directions and I tried to glue this onto the holes and flat spots on the
back of the cylinders. I was not totally successful in this and it turned
out to be a bit of a blessing in disguise. The engine side panels and cowl
front were then glued on. Fit is fairly good for these parts and guides are
provided to make sure you don't get them on wrong.
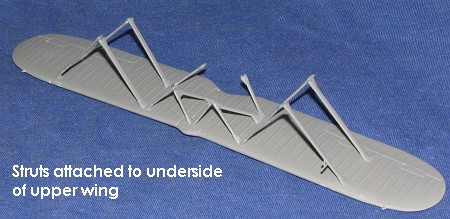 The engine construction took a while,
what with painting and such, so I decided that now was a good time to
tackle the struts. The instructions highly recommend gluing the struts to
the upper wing and then attaching to the lower when all are dry. Good idea.
I basically started from the inside and glued on all the struts, working my
way outboard. I did them in pairs so they would lean against each other
while drying. This will get them close. I did have problems with a couple
of struts breaking, but they glued back together just fine. I did this
while they were still on the sprues and gave them overnight to dry before
removing them and attaching them to the wing.
The engine construction took a while,
what with painting and such, so I decided that now was a good time to
tackle the struts. The instructions highly recommend gluing the struts to
the upper wing and then attaching to the lower when all are dry. Good idea.
I basically started from the inside and glued on all the struts, working my
way outboard. I did them in pairs so they would lean against each other
while drying. This will get them close. I did have problems with a couple
of struts breaking, but they glued back together just fine. I did this
while they were still on the sprues and gave them overnight to dry before
removing them and attaching them to the wing.
OK, so now, I have a relatively complete upper wing with braces and a relatively complete fuselage. Now is as good a time as any to think about painting this beast. It has a rather complex pattern, regardless of which scheme you choose. I filled the cockpit with tissue and went to start things off.
| COLORS & MARKINGS |
 Italeri offers a generic name and
Testors paint references for the colors. It calls for the underside to be
painted RLM 76 so I dutifully grabbed my Model Master RLM 76 and sprayed
away at the underside. Well, most of it as I left the section where the
intake fits free of paint. I knew I'd be going back over it at a later date
so no problem. That was left to dry and I then started looking for the
upper green. I'd have thought a nice Italian Olive Green II, but the
instructions called for FS 34079, a bit darker than the Olive Green II, so
that is what the upper surfaces got.
Italeri offers a generic name and
Testors paint references for the colors. It calls for the underside to be
painted RLM 76 so I dutifully grabbed my Model Master RLM 76 and sprayed
away at the underside. Well, most of it as I left the section where the
intake fits free of paint. I knew I'd be going back over it at a later date
so no problem. That was left to dry and I then started looking for the
upper green. I'd have thought a nice Italian Olive Green II, but the
instructions called for FS 34079, a bit darker than the Olive Green II, so
that is what the upper surfaces got.
Once that was dry (and there was the usual overspray onto the 76), it was time to figure out the other colors. I went first with the Italian Brown. Now I didn't have the paint that was called out, but I did have some Aeromaster Italian Brown acrylic. I don't like acrylics for mottling, but had no choice. It was tedious to say the least as the airbrush tip clogged repeatedly, but that was finally done. I left it to dry.
 By this time, the engine was dry and
ready for installation. I glued it to the front of the kit. After it had
dried, I noticed that it was pointing upward. Not good. I broke the glue
join and reattached it to where it looked better. In the process, I broke
loose the exhaust collector. Now this wasn't a disaster as test fitting the
flame damper exhaust showed a really bad fit. with the exhaust more
'flexible' the fit should improve. We'll see. I also glued on the sand
filter and housing. Fit on the fuselage was great; on the cowling it wasn't
and has gaps. Not sure if it is supposed to have these gaps or not, but
suspect not.
By this time, the engine was dry and
ready for installation. I glued it to the front of the kit. After it had
dried, I noticed that it was pointing upward. Not good. I broke the glue
join and reattached it to where it looked better. In the process, I broke
loose the exhaust collector. Now this wasn't a disaster as test fitting the
flame damper exhaust showed a really bad fit. with the exhaust more
'flexible' the fit should improve. We'll see. I also glued on the sand
filter and housing. Fit on the fuselage was great; on the cowling it wasn't
and has gaps. Not sure if it is supposed to have these gaps or not, but
suspect not.
While I was doing this, I also glued on the upper wing control actuators. I also glued on the one gun barrel that I had. The other was made from stretched sprue. At the back, I was able to piece together one rudder control actuator. On the other side, I had the horn, but had to stretch sprue for the part that had broken off and disappeared along with the other gun out of the bottom of the box during shipment.
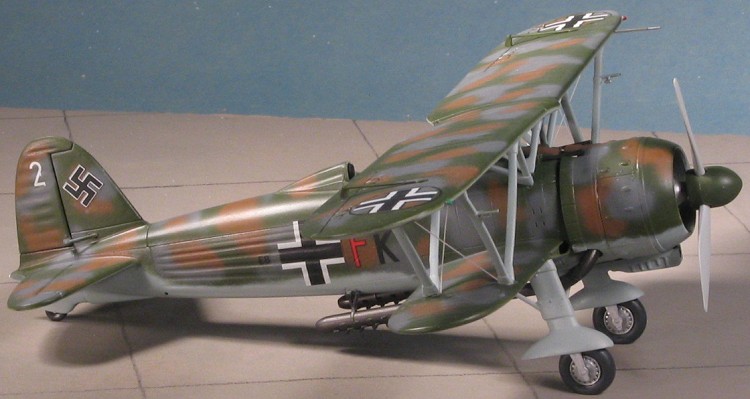
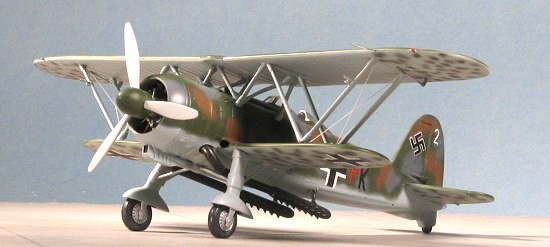
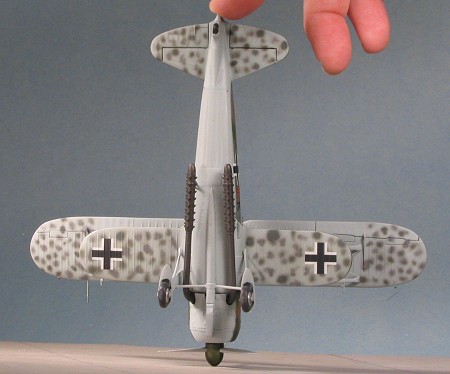
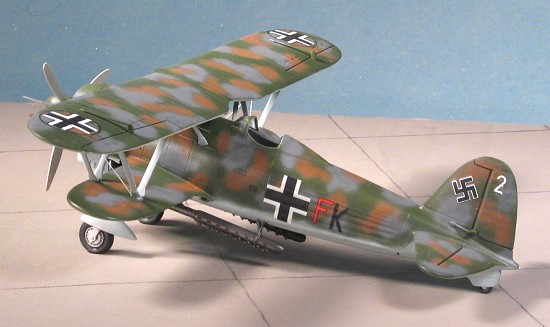
These parts all had to be painted dark green. When dry, I mixed up some RLM 75 and started spraying on more large mottles on the upper wings and fuselage. The underside of the wings and tail planes got small RLM 74 mottles. Overall, a very interesting paint scheme and one I can't recall seeing before. I then returned briefly to the work bench to attach the landing gear and pitot tube. I then went over the underside with RLM 76. Of course, I had to do some back and forth painting to make sure things didn't look too sloppy! With the painting complete, I sprayed on a coat of Testors Metallizer Sealer and it was time for decals.
Italeri decals are well printed and matte. I used Solvaset to help them snuggle down. It took a couple of applications as I got some rather large air bubbles under a few of them. When this happens, I simply puncture the bubble with a knife blade and reapply. Since the sheet comes without swastikas I had to use a set of aftermarket ones from an Xtradecal sheet. I have no photos of these planes so chose a swastika that seemed about the right size. Unfortunately, these were a bit off register.
| FINAL CONSTRUCTION |
 Now for the big question; how would
the upper wing fit? The answer is, well, with a bit of work. I was hoping
for an instant match-up with no problems. Didn't happen. I had to enlarge
some of the holes in the fuselage. I then cemented the center struts in
place and clamped them down. In truth, the most inward struts don't really
reach the holes. The center section is basically held in place by the N
struts. With that dry, I then attached the outer struts as best I could. I
had to clamp these as well and use super glue to get a good hold. The end
result is OK, but could be better. Were I to build this kit again, I think
I'd attach the struts at the same time as I glued on the upper wing. This
would allow for some fudge factor to come into play as far as the alignment
of things. The attachment points do allow for a bit of slop and by gluing
the struts to the upper wing first, you lose that slop.
Now for the big question; how would
the upper wing fit? The answer is, well, with a bit of work. I was hoping
for an instant match-up with no problems. Didn't happen. I had to enlarge
some of the holes in the fuselage. I then cemented the center struts in
place and clamped them down. In truth, the most inward struts don't really
reach the holes. The center section is basically held in place by the N
struts. With that dry, I then attached the outer struts as best I could. I
had to clamp these as well and use super glue to get a good hold. The end
result is OK, but could be better. Were I to build this kit again, I think
I'd attach the struts at the same time as I glued on the upper wing. This
would allow for some fudge factor to come into play as far as the alignment
of things. The attachment points do allow for a bit of slop and by gluing
the struts to the upper wing first, you lose that slop.
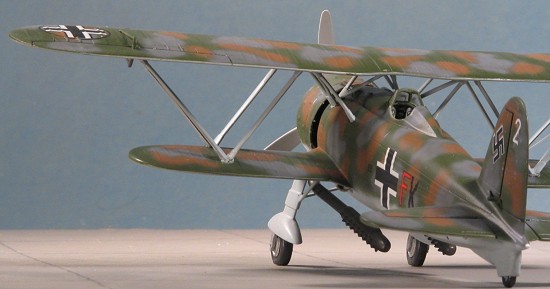
Once the wing was glued on, I glued on the main landing gear. Fit is pretty good here as well. I decided to install the wheels after the gear halves were joined and while I was able to get them in place with little trouble, it does distort the attachment struts a bit in the process. Next were the flame damper exhaust. Fit here wasn't bad, but again, it took some work. I had to cut on the exhaust to get the proper attachment angle and I don't think they are supposed to be hanging vertically, but that was how things worked out. This means that the aft attachment points are a bit difficult to get right. I then glued on the windscreen (still masked), the pitot tube and venturi. The instructions show this with the long part forward, which is incorrect as it should point aft.
 Next, the prop assembly was glued
onto the shaft. The prop was painted light grey (like the interior) on the
front and aluminum on the back. I used the full spinner and trapped the
prop between the halves. Fit is quite good and the prop actually turns,
though not freely.
Next, the prop assembly was glued
onto the shaft. The prop was painted light grey (like the interior) on the
front and aluminum on the back. I used the full spinner and trapped the
prop between the halves. Fit is quite good and the prop actually turns,
though not freely.
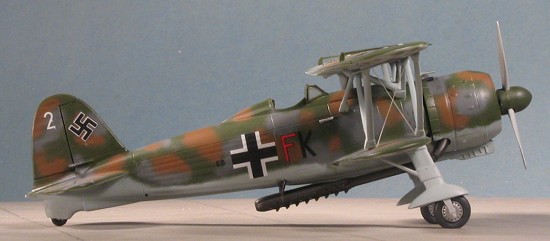
The model was then given a coat of matte clear to seal in the decals and cut down on the shine. A bit of touch up painting was done and the control surfaces outlined using a drafting pen. The last thing to do was to stretch some sprue for the outer wing rigging. This was attached using white glue (such as Elmer's) and tightened up with a match that had been blown out and the hot tip waved near the sprue. Only broke one in the process, which is good for me. The masking was taken off the windscreen and that was it.
| CONCLUSIONS |
I liked it. In the end it was not a difficult build, though the upper wing attachment does require some dexterity. The kit became a model in under a week, which for me, is lightning speed. This included the multi-colored camouflage scheme. General parts fit is good and the completed model looks everything like what it is supposed to be. It has a good level of detailing right from the box and those who want to add more to it in terms of finer detailing will be able to do so. I think that is really what most want from a kit. To have a good result from the box and the ability to make improvements if desired. I was pleased with the overall result and this is a kit I can recommend to those who want to tackle a biplane, but aren't sure if they want to deal with all that rigging.
May 2005
#1363 in a series
Copyright ModelingMadness.com. All rights reserved. No reproduction in part or in whole without express permission from the editor.
If you would like your product reviewed fairly and quickly, please contact the editor or see other details in the Note to Contributors.