Hasegawa 1/48 A6M3 type 22 Zero
|
KIT # |
09117 (JT 17) |
|
PRICE: |
$26.98 MSRP (Not in 2004 catalogues) |
|
DECALS: |
Three options |
|
REVIEWER: |
Scott Van Aken |
|
NOTES: |
|
HISTORY |
 more than a
thousand flight hours. As a result, he had no chance to participate
in air combat during the early years of the war as the vets hogged all
the good missions! Besides, Ito was a petty officer 2nd class and not an
officer so, as was so frequent amongst the Japanese enlisted ranks, he
rarely got any of the good deals. In fact, enlisted pilots were not only
generally mistreated by the officer corps, but often had to perform as
servants to officer pilots and do other menial labor.
more than a
thousand flight hours. As a result, he had no chance to participate
in air combat during the early years of the war as the vets hogged all
the good missions! Besides, Ito was a petty officer 2nd class and not an
officer so, as was so frequent amongst the Japanese enlisted ranks, he
rarely got any of the good deals. In fact, enlisted pilots were not only
generally mistreated by the officer corps, but often had to perform as
servants to officer pilots and do other menial labor.It wasn't until April of 1942 that he saw his first combat during a flight to Darwin, Australia where he shot down one Allied fighter. From then until August, he participated in a number of missions and his skills improved at an amazing rate. In September, the 3rd Air Group, was moved to the southeastern Pacific and Ito, under the tutelage of Lt. Aioi, went to Rabaul. By the time he returned to the southwestern areas, he had fought in some of the fiercest battles that were taking place over Guadalcanal and New Guinea.
His return saw him engaged in air defense over the Arafura Sea as well
as participating in attacks on Darwin from early 1943 until November of
that year. Thanks to two years of continuous combat, Ito had participated
in over thirty air battles, destroying thirty aircraft (seventeen shot
down, the others 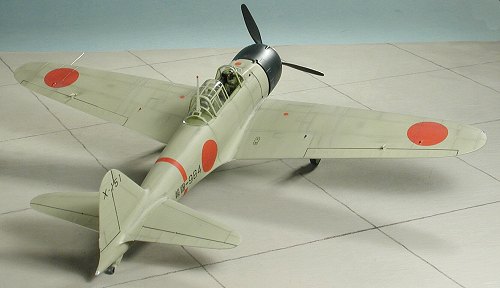 destroyed on the ground). This resulted in his receiving
special commendation. For those of you thinking 'big deal', it was. The
Japanese, unlike Allied militaries, did not toss medals and awards around
with great abandon. The Japanese are unit oriented and as a result,
individual feats were not considered as important as the success of the
unit. Most of the really successful Japanese aces did not keep track of
their individual scores, instead allocating victories to the unit. This
makes it difficult to track their progress and success. So getting a
personal award, such as a special commendation, was truly a major
accomplishment.
destroyed on the ground). This resulted in his receiving
special commendation. For those of you thinking 'big deal', it was. The
Japanese, unlike Allied militaries, did not toss medals and awards around
with great abandon. The Japanese are unit oriented and as a result,
individual feats were not considered as important as the success of the
unit. Most of the really successful Japanese aces did not keep track of
their individual scores, instead allocating victories to the unit. This
makes it difficult to track their progress and success. So getting a
personal award, such as a special commendation, was truly a major
accomplishment.
Upon his return to Japan, he served as an instructor in the Oita and Tsubkuba air groups, where he finished the war. After the war, he changed his name to Kato. This was typical of many successful Japanese military men, who wished to completely disassociate themselves from the Pacific War.
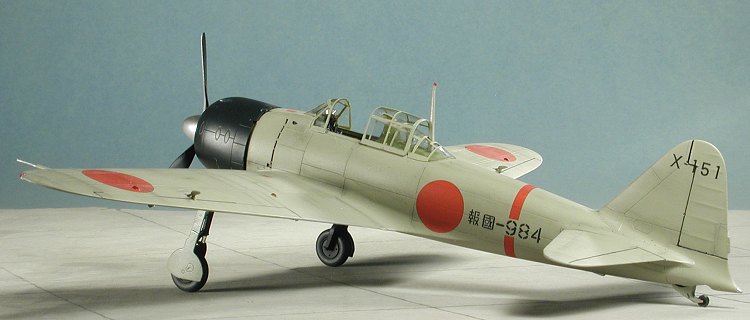
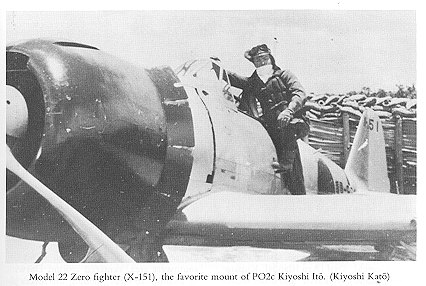
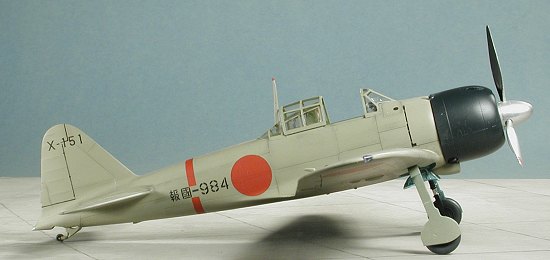
Ito's favorite aircraft of all the Zeros he flew in combat was X-151, an A6M3 type 22.
As a note on the name change, I received this e-mail:
|
THE KIT |
Please visit the preview to see what comes in the box.
|
CONSTRUCTION |
Not willing to defy logic, I started this one with the interior. Basically this means that I glued all the bits to the base that would be painted the same color, except for the instrument panel (so it would be easier to apply the decals). Then all the interior parts were painted Mitsubishi Interior Green using the excellent new ColourCoat paints. While that paint was drying, I assembled the wing halves, after first opening the holes in the lower wing for the cannon bulges. I also painted the engine parts with Alclad II Steel and the exhaust with Model Master Burnt Iron.
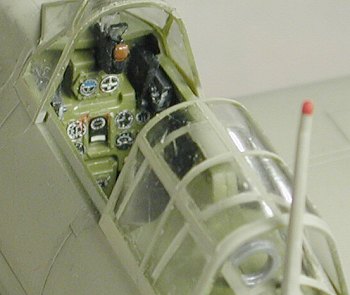 The next day, I put the decals on the various instruments. These were then hit
with some Solvaset when they were nearly dry, and they snuggled right
onto the instrument faces. Man, I love it when things like this work out!
Then I did a bit of detail painting as the instructions recommended. I
decided to add seat belts to this kit so used a set of Eduard IJN etched
belts. The IJNAF used a three belt system similar to what you use on your
car. The only reason they used any shoulder harness at all is because
they were tired of loosing teeth on the gunsight when they landed aboard
carriers. Their IJAAF compatriots used only a lap belt. These belts were
painted off white.
The next day, I put the decals on the various instruments. These were then hit
with some Solvaset when they were nearly dry, and they snuggled right
onto the instrument faces. Man, I love it when things like this work out!
Then I did a bit of detail painting as the instructions recommended. I
decided to add seat belts to this kit so used a set of Eduard IJN etched
belts. The IJNAF used a three belt system similar to what you use on your
car. The only reason they used any shoulder harness at all is because
they were tired of loosing teeth on the gunsight when they landed aboard
carriers. Their IJAAF compatriots used only a lap belt. These belts were
painted off white.
Meanwhile, I'd glued the fuselage halves together and put in the upper cowl insert. This then had any glitches filled and sanded smooth. The interior then had the guns installed on either side of the instrument panel and the panel itself glued in position. With all the interior bits dry, the side panels were glued in place and the interior glued in through the bottom of the fuselage. The fit is very snug with the interior almost clicking into place.
Next, the wing was glued in place along with the forward insert. This insert doesn't fit perfectly and so some filler and sanding is needed to get things to match up. The wing roots are great, but the lower wing/fuselage join is not a perfect match and needed filler as well. I'm sure that were I building with superglue, I would have been able to line up the aft part and hit it with accelerator, but I prefer to use cements as they give a stronger bond when cured.
 With the wing in place, the horizontal stabs were glued
in; no filler needed. I then assembled the engine after detail painting
the crankcase housing part and set it aside to later fit into the
cowling. The lower wing gun bulges were glued in at this time. I chose
not to install the drop tank so did not open those holes in the lower
wing. Zeros didn't always carry them and the plane just looks nicer
without it.
With the wing in place, the horizontal stabs were glued
in; no filler needed. I then assembled the engine after detail painting
the crankcase housing part and set it aside to later fit into the
cowling. The lower wing gun bulges were glued in at this time. I chose
not to install the drop tank so did not open those holes in the lower
wing. Zeros didn't always carry them and the plane just looks nicer
without it.
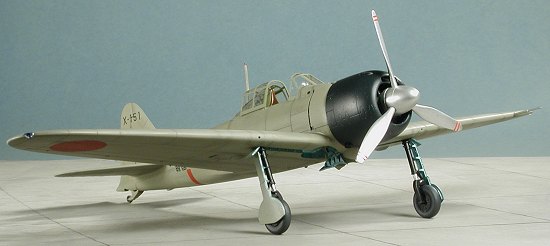
Returning to the interior, I masked it off and painted the area behind the seat with Mitsubishi Interior Green. Then I glued on the head rest (which was painted leather) and then the gunsight. The sight has its own little decal that was applied. Next, the canopy parts were cut from the sprue and masked. They were then taken and given a coat of Mitsubishi interior green so you would see the green color on the inside. When that was done, I glued the forward and aft canopy portions in place, masked off the open canopy, and was nearly ready to give it an overall paint.
Before heading to the paint shop, the aileron mass balances, pitot tube and tail wheel were glued in and left to dry.
|
COLORS AND MARKINGS |
I used Colourcoats Mitsubishi Green-Grey for the overall
color of the plane. The engine cowling was painted Cowling Blue-black,
another Colourcoats color. This paint is really very good, but is not for
the quick builder as it takes at least 12 hours between coats. Even using
lacquer thinner does not speed up the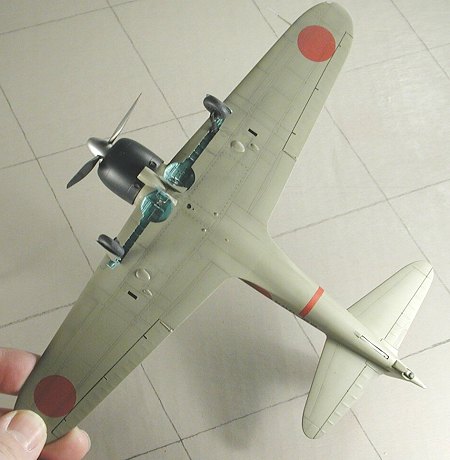 drying process. I was quite
surprised when I compared the Colourcoat Green-Grey with the color I
mixed for my type 21. They are extremely close to each other, so I must
have gotten something right! I painted prop blades, spinner and backing
plate with Alclad II polished aluminum, and then the back of the blades
were painted flat black.
drying process. I was quite
surprised when I compared the Colourcoat Green-Grey with the color I
mixed for my type 21. They are extremely close to each other, so I must
have gotten something right! I painted prop blades, spinner and backing
plate with Alclad II polished aluminum, and then the back of the blades
were painted flat black.
I then returned to the work bench and installed the main landing gear. The gear and wheels had been painted black with the gear oleos given a wrap of Bare Metal Foil chrome foil. The wheels were a very tight fit on the axles. Then the wheel wells were brush painted using Polly Scale Aotake. I prefer to brush paint these things later as it beats masking, takes less time, and the end result is pretty much the same. The landing gear legs were then glued in place. When dry, the gear doors were glued on. The upper portion of the doors does not meet the gear legs as it should. These parts need to be bent a bit so that contact can be made. Future clear acrylic was then sprayed on the parts of the airframe that would be receiving decals.
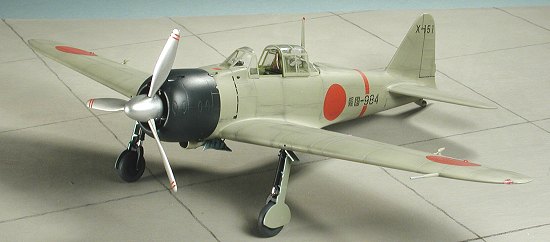
For this Zero, I used Aeromaster SP48-04, Eagles of the Rising Sun. This booklet and four sheets has a number of Japanese aces and included Ito's A6M3 type 22. It did not include hinomarus so those I got from Aeromaster 48-355. They are for a type 21, but are basically the same plane. I found the hinomarus to be a bit on the brittle side so if you are using a similar sheet, take care. Otherwise the decals fit fine and were given some dilute Solvaset so they'd snuggle down.
|
FINAL ASSEMBLY |
 With the
kit decaled, it was given a coating of matte acrylic clear to seal in the
decals and reduce the shine of some of them. Then the smaller gear doors
were glued in place and the pitot tube was drilled out. I also did this
to the cowl guns, but it turns out that they will be nearly invisible
when the cowling is glued on so save yourself the effort! I next outlined
all the control surfaces and filled in some of the vents using an
artist's pen. The cowling was glued in place with the engine installed in
it. I didn't chip away at the cowl as many do when the build Japanese
planes as Ito's aircraft seemed to be quite well maintained. You will
also note that the cowling in the photo is nearly glossy so I left my
cowl in the 'natural paint' and didn't dull it. The prop was assembled
and pushed into the engine. There is no hold-back for the prop so it can
easily spin or fall out.
With the
kit decaled, it was given a coating of matte acrylic clear to seal in the
decals and reduce the shine of some of them. Then the smaller gear doors
were glued in place and the pitot tube was drilled out. I also did this
to the cowl guns, but it turns out that they will be nearly invisible
when the cowling is glued on so save yourself the effort! I next outlined
all the control surfaces and filled in some of the vents using an
artist's pen. The cowling was glued in place with the engine installed in
it. I didn't chip away at the cowl as many do when the build Japanese
planes as Ito's aircraft seemed to be quite well maintained. You will
also note that the cowling in the photo is nearly glossy so I left my
cowl in the 'natural paint' and didn't dull it. The prop was assembled
and pushed into the engine. There is no hold-back for the prop so it can
easily spin or fall out.
 The
last step was to add on some panel line enhancement. Whenever I do this,
I prefer the post-shading method using pastels. Simply take an old brush
or use Micro-Brushes to put on a heavy coat of pastel dust, scrubbing it
into panel lines. Then, taking a clean rag, simply wipe off the excess,
moving from front to rear so that you can simulate air flow over the
aircraft. The more you wipe off, the more indistinct the lines become.
Good thing is that if you take off too much, simply add more. Many
people then seal this in, but I did not. It isn't required and I
rarely do this, but it does help to break up the monotony of a solid
color. It also only takes a short time to do this.
The
last step was to add on some panel line enhancement. Whenever I do this,
I prefer the post-shading method using pastels. Simply take an old brush
or use Micro-Brushes to put on a heavy coat of pastel dust, scrubbing it
into panel lines. Then, taking a clean rag, simply wipe off the excess,
moving from front to rear so that you can simulate air flow over the
aircraft. The more you wipe off, the more indistinct the lines become.
Good thing is that if you take off too much, simply add more. Many
people then seal this in, but I did not. It isn't required and I
rarely do this, but it does help to break up the monotony of a solid
color. It also only takes a short time to do this.
The last thing I added was the radio mast, which was easily inserted through a hole in the aft canopy after I'd removed all the masking.
|
CONCLUSIONS |
This is the third Hasegawa Zero I've done, having completed the type 21 and 32 previously. Still have a type 52 and perhaps some other sub-variants to do. All of these kits are very nicely done and assemble with minimal problems. They look great straight from the box, really only needing belts to improve things. You can always spend the loot on a resin cockpit and wheels, for that little bit extra, but most of us won't and will simply enjoy a nice kit.
January 2004
#1302 in a series
If you would like your product reviewed fairly and fairly quickly, please contact the editor or see other details in the Note to Contributors.