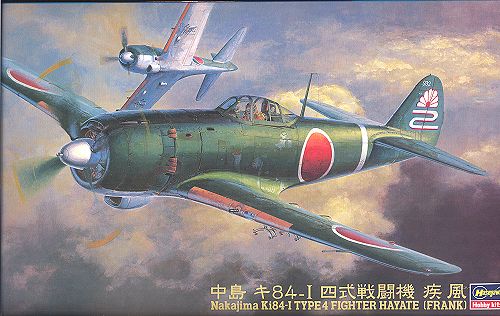
Hasegawa 1/48 Ki-84 'Frank'
|
KIT # |
JT 67 |
|
PRICE: |
$22.00 |
|
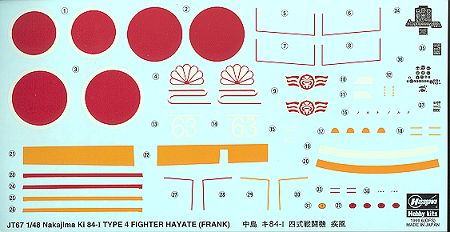
DECALS: |
Two versions: see writeup |
|
REVIEW BY: |
|
|
NOTES: |
|
|
HISTORY |
The Ki-84 was undoubtedly the finest Japanese Army fighter of the war. Based loosely on the Ki-44 interceptor, the Ki-84 had a bigger engine, more armor plating, greater firepower, and greater range. It was also a super aircraft to fly having regained the maneuverability lost in the Ki-44. Unfortunately, the aircraft was not put into full production until mid-1944, by which time quality control was a big problem. This was due to the bombing of factories by B-29s operating from China and later the Marianas islands. In addition, most of the skilled labor was in the army or otherwise in the field.
|
THE KIT |
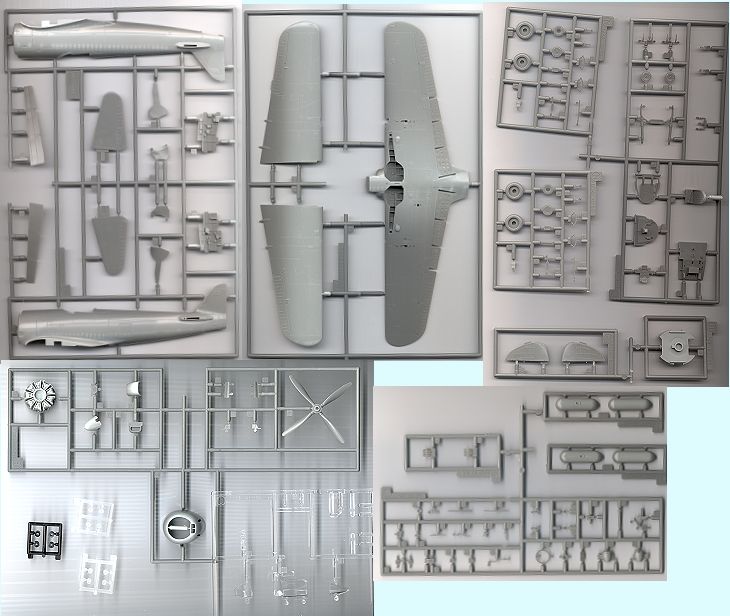
Upon opening the box, one is amazed by the number of parts in this kit, especially if one has looked at the previous Franks by Otaki and Tamiya. You basically get everything you would ever need. Three piece canopy, very detailed interior, and superb molding. Easily one of the neatest parts is that the landing gear is held in place by plastic bushings. That way they can be removed if need be. We'll have to see how this part holds up over time.
|
CONSTRUCTION |
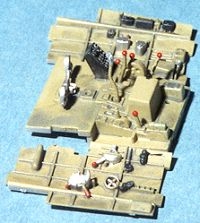
Not surprisingly, the kit starts with the cockpit. There are no less than 21 pieces to it, including every knob and lever that is in the real aircraft. The sidewall detail is superb. Any aftermarket cockpit set for this kit would be a real waste of money. The instructions tell one to paint it in Aotake blue, but I decided to use my friendly Aeromaster Nakajima Interior Green instead. Frankly (no pun intended), there is so little real hard information on Japanese interiors, that you could use just about anything that you desired to paint this with. There are no original Franks left to check. The one previously owned by the Air Museum was stripped and repainted decades ago and along with the old paint went any accurate color information.
 Once the cockpit was painted
Interior Green, the rest of the cockpit had details picked out in black,
aluminum or red. Then a wash of dirty thinner was applied. The instrument and
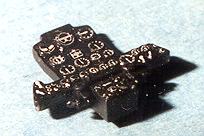
auxiliary panel had decals place on them. Hasegawa supplies two sets of decals
for this; one with a black background and one without. Very nice of them as I
needed the second set of decals for the auxiliary panel. They react quite
favorably to Champ setting solution and match up perfectly with the dials on the
raised panels behind them. Once the decals had dried, these cockpit parts were
drybrushed with Israeli AF light green.
Once the cockpit was painted
Interior Green, the rest of the cockpit had details picked out in black,
aluminum or red. Then a wash of dirty thinner was applied. The instrument and
auxiliary panel had decals place on them. Hasegawa supplies two sets of decals
for this; one with a black background and one without. Very nice of them as I
needed the second set of decals for the auxiliary panel. They react quite
favorably to Champ setting solution and match up perfectly with the dials on the
raised panels behind them. Once the decals had dried, these cockpit parts were
drybrushed with Israeli AF light green.
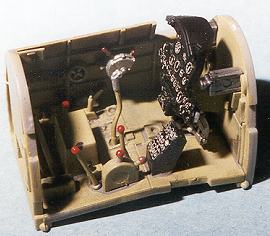 Now, on to completing
construction of the cockpit. If you recall, there are over 20 pieces to this
thing. The front section had the instrument panel, glare shield, and guns glued
to it. The back was installed along with two braces. The front and back sections
were then glued to the center section. Next the sidewalls were glued to the
center section and the entire assembly glued into the fuselage. Once that was in
place, the fuselage halves were glued together. There is another plastic insert
for the tail wheel. Just a note on these inserts; there are two different sizes.
I goofed up and used the wrong size in a couple of places in the wing. It will
be interesting to see how this affects the rest of the building process.
Now, on to completing
construction of the cockpit. If you recall, there are over 20 pieces to this
thing. The front section had the instrument panel, glare shield, and guns glued
to it. The back was installed along with two braces. The front and back sections
were then glued to the center section. Next the sidewalls were glued to the
center section and the entire assembly glued into the fuselage. Once that was in
place, the fuselage halves were glued together. There is another plastic insert
for the tail wheel. Just a note on these inserts; there are two different sizes.
I goofed up and used the wrong size in a couple of places in the wing. It will
be interesting to see how this affects the rest of the building process.
Speaking of the wing, the upper and lower sections were glued together (after inserting about 5 of those plastic inserts). Next the wing was glued to the fuselage, but only in the front and back. When dry, the side parts were glued on and the wings held up with tape to get the right dihedral and to close the gaps. Much to my chagrin, the next morning found one wing untaped with the result that the wings don't have exactly the same dihedral! Oh my!
 Having suffered my initial goof (there are bound to be more coming), I
puttied my mistakes and continued on. The next area was the tail section. The
rudder comes in two halves and each have large lower and small upper pins.
Naturally, I broke off both the small upper pins. Then I glued the completed
rudder at a bit of an angle to match the angled rudder pedals. The horizontal
stabilizers were a no-brainer as they are keyed to the fuselage and each other.
A perfect fit.
Having suffered my initial goof (there are bound to be more coming), I
puttied my mistakes and continued on. The next area was the tail section. The
rudder comes in two halves and each have large lower and small upper pins.
Naturally, I broke off both the small upper pins. Then I glued the completed
rudder at a bit of an angle to match the angled rudder pedals. The horizontal
stabilizers were a no-brainer as they are keyed to the fuselage and each other.
A perfect fit.
The next area for attention was the front of the kit. The oil cooler is a two part assembly that fits to the front of the lower wing. This is probably the worst fitting section and it needs some attention to get a really good fit. Once that was done, it was on to the engine. It was painted flat black and heavily drybrushed with steel to bring out detail. The front gearbox section was assembled and then painted old silver. It looked too shiny so was repainted aluminum. While this was drying, the aft cowl flap section had the exhaust glued to it. Be careful not to apply too much glue to this or it may seep up onto the exhaust. This section then had the base engine glued to it and was then glued to the firewall.
At this time, a number of components, including the fuel tanks, wheel wells, insides of gear doors, and landing gear were painted aluminum prior to continued construction.
|
PAINT & DECALS |
Naturally, I decided to do a non-kit scheme. However, the main colors were
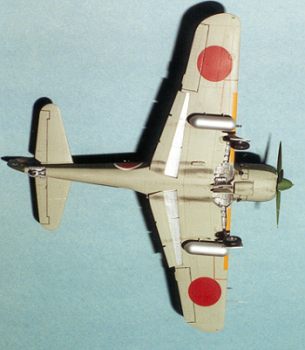
the same. Wheel wells and inside of flaps were aluminum. These were then filled
with tissue or taped over and the underside painted in Aeromaster IJA underside
grey acrylic. 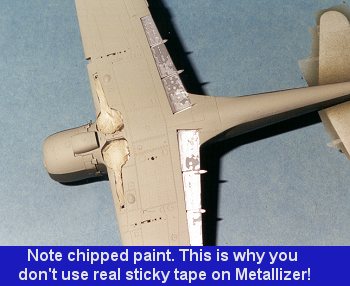 Then the grey was masked and the uppersurfaces painted Nakajimi
Army Green, also by Aeromaster. The tape was taken of the aluminum flap area and
so was much of the Metallizer! So, the wings were masked and the flap area again
sprayed aluminum. When that was dry the entire airframe was given a Future clear
gloss acrylic coat in preparation for decals.
Then the grey was masked and the uppersurfaces painted Nakajimi
Army Green, also by Aeromaster. The tape was taken of the aluminum flap area and
so was much of the Metallizer! So, the wings were masked and the flap area again
sprayed aluminum. When that was dry the entire airframe was given a Future clear
gloss acrylic coat in preparation for decals.
It was then that I discovered that I'd forgotten to install the head rest. In fact, I removed the mounting post for it when I cleaned up the fuselage (DUH!). After cleaning away the paint, the head rest was installed and the area repainted.
I had decided early to be lazy and use the Hasegawa kit leading edge orange decals. These fit very well. In fact, there is an area that goes over the landing light that is clear, so maybe it is a good idea to use this decal instead of the transparency provided!
While all this was drying, the landing gear was assembled as per kit instructions. I guess the wheels are not held in by anything more than friction as there is no way to glue them on the struts, there being plastic inserts there instead. A novel idea. Once these were properly assembled, they were plugged into place in the wheel wells (If you recall, there were plastic inserts place there as well). The oil cooler was assembled, painted, and also plugged in.
 It was at this time that I decided to start decaling the model. What I did
was to use all the Hasegawa kit markings for the common warnings. These worked
quite well. For some reason, at this time I completely lost interest in the kit
and it sat forlornly in its box for about three to four months. Once I got over
the doldrums, I built up the landing gear and plugged those in. The fit was
sloppy to say the least so I superglued them in place. Oddly, the left gear
broke off quite easily once I applied the accelerator to the superglue!
This part and the stub was drilled, a section of paper clip installed for
strength, and it was glued in again. Once more, when the accelerator was applied
the gear leg easily snapped off, this time above where the pin was inserted.
This is a very odd occurrence to say the least! The part was again superglued in
place but this time without the accelerator. It held very well for a short
period of time and then snapped off again. The same thing happened to the right
gear about a day later. I think it has something to do with the soft plastic
inserts and I do hope that Hasegawa doesn't use these for the landing gear
again.
The tail wheel was plugged in place and it seems properly secure.
It was at this time that I decided to start decaling the model. What I did
was to use all the Hasegawa kit markings for the common warnings. These worked
quite well. For some reason, at this time I completely lost interest in the kit
and it sat forlornly in its box for about three to four months. Once I got over
the doldrums, I built up the landing gear and plugged those in. The fit was
sloppy to say the least so I superglued them in place. Oddly, the left gear
broke off quite easily once I applied the accelerator to the superglue!
This part and the stub was drilled, a section of paper clip installed for
strength, and it was glued in again. Once more, when the accelerator was applied
the gear leg easily snapped off, this time above where the pin was inserted.
This is a very odd occurrence to say the least! The part was again superglued in
place but this time without the accelerator. It held very well for a short
period of time and then snapped off again. The same thing happened to the right
gear about a day later. I think it has something to do with the soft plastic
inserts and I do hope that Hasegawa doesn't use these for the landing gear
again.
The tail wheel was plugged in place and it seems properly secure.
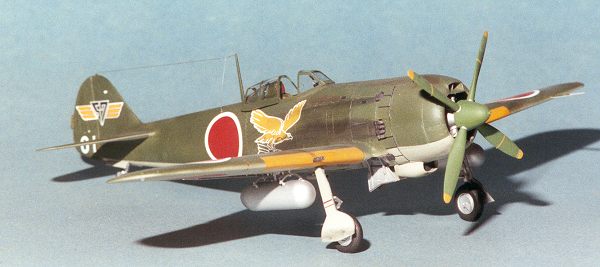
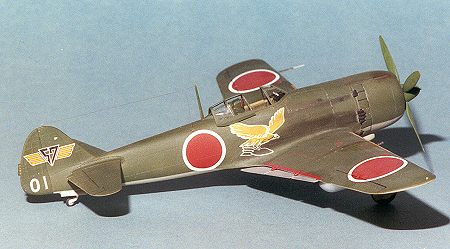
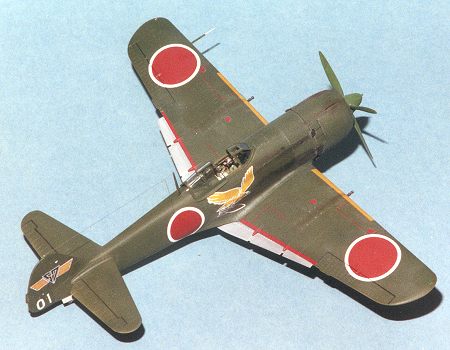
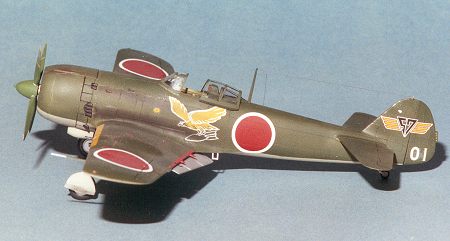
Now that it was on to using the Aeromaster decals from their Special Attack Squadrons sheet. While I used the scheme from the 57th squadron like with the Otaki kit, this one has a big, bold eagle with a bomb on the fuselage sides. The eagle and unit marking are two part decals with a white area put down first. Roundels from the sheet were also used, though the Hasegawa ones (which are brighter red) would probably have worked just fine.
|
CONSTRUCTION CONTINUES |
Now that the decals were on just fine, it was time to continue adding on bits and pieces. First the canopy pieces were masked, painted, and then glued onto the airframe with non-fogging superglue. My main canopy was slightly short shot so that caused a bit of problems when it came to cleaning things up. I had forgotten to put in the gunsight, so this was painted and carefully installed. The guns were painted flat black, the muzzles drilled out and then glued into the wing. Installing the drop tanks was a snap. After the mounting braces were glued in place the tanks were simply press-fit into their plastic plugs.
 There are clear wing and tail formation lights. I painted the mounting
locations the appropriate color and then attached the tiny lenses with
superglue. The tail lights were impossible to properly cut off the sprues and I
trashed them both rather badly. Needless to say, there are no tail lenses. Then
the flaps, pitot tube and foot step were glued in place. Lastly, the landing
light cover was glued in and the 'bits gluing' was done.
There are clear wing and tail formation lights. I painted the mounting
locations the appropriate color and then attached the tiny lenses with
superglue. The tail lights were impossible to properly cut off the sprues and I
trashed them both rather badly. Needless to say, there are no tail lenses. Then
the flaps, pitot tube and foot step were glued in place. Lastly, the landing
light cover was glued in and the 'bits gluing' was done.
Pastels were used for exhaust and gun smoke. A final coat of clear matte was painted on the aircraft and the masks were taken off the clear bits. Naturally, I broke off one of the landing gear again during all this handling. Last thing was the radio antenna which was made from the ever-popular stretched sprue.
|
CONCLUSIONS |
 Despite my problems, this is a very fine kit. Detail is superb and
construction is pretty straight-forward. The plug in parts worked pretty well,
but I would hope that Hasegawa does not use them for load bearing parts like
main landing gear again. Recommended to all but the tyro.
Despite my problems, this is a very fine kit. Detail is superb and
construction is pretty straight-forward. The plug in parts worked pretty well,
but I would hope that Hasegawa does not use them for load bearing parts like
main landing gear again. Recommended to all but the tyro.
|
REFERENCES |
Japanese Aircraft of the Pacific War, Rene J. Francillon
FAOW (Famous Aircraft Of the World) #19, New Series: Ki-84
Review copy courtesy of me and my wallet!! If any of you manufacturers or shop owners want to send products for review, please
contact me.