Hasegawa 1/32 Ki-43-II 'Hayabusa'
| KIT #: | S13 |
| PRICE: | 1300 yen when new |
| DECALS: | Four options |
| REVIEWER: | Scott Van Aken |
| NOTES: |
| HISTORY |
The Ki-43 was the most widely used Army fighter, and equipped 30 sentai FR,(flight regiment) and 12 chutais IS,(independent squadrons). The first unit equipped with the Ki 43-I was the 59th FR at Hankow Airfield, during June–August 1941 and began operational sorties over Hengyang on 29 October 1941. The second unit to re-equip with the new Aircraft was the 64th FR, from August to November 1941.
The first version,
Ki-43-I, entered service in 1941, the
Ki-43-II
in December 1942, the Ki-43-II-Kai in June
 1943, and the
Ki-43-IIIa in summer 1944. The aircraft fought in China, Burma, the Malay
Peninsula, New Guinea, the Philippines, South Pacific islands and the Japanese
home islands.
1943, and the
Ki-43-IIIa in summer 1944. The aircraft fought in China, Burma, the Malay
Peninsula, New Guinea, the Philippines, South Pacific islands and the Japanese
home islands.
Hayabusas were well liked in the JAAF because of the pleasant flight characteristics and excellent maneuverability, and almost all JAAF fighter aces claimed victories with Hayabusa in some part of their career. At the end of the war, most Hayabusa units received Ki-84 Hayate "Frank" fighters, but some units flew the Hayabusa to the end of the war. The top-scoring Hayabusa pilot was Sergeant Satoshi Anabuki with 39 confirmed victories, almost all scored with the Ki-43.
After the war, some captured examples served in limited numbers in the French Air Force in Indochina against Viet Minh rebels.
Ki-43s abandoned in the Netherlands East Indies were taken over by the newly declared Indonesian government and put into service during the fighting against Dutch forces
| THE KIT |
This is not a new kit with the initial release being 1969. However, despite the raised panel lines, the kit itself looks to be very good and the moldings are in super shape. I'm not sure just which boxing this is as there is no date on it or the instructions or decals. The box information is basically in Japanese as is the painting instructions, but the build instructions are all in English. I will guess early 1970s.
Looking through the instructions I noticed that this kit can either be built
as a Ki-43-IIa or Ki-43-IIb. The visual difference is that the a model has the
collector exhaust coming straight out of the side of the cowling, while the b
version has a longer exhaust pointed back as shown on the box art. As you many
have re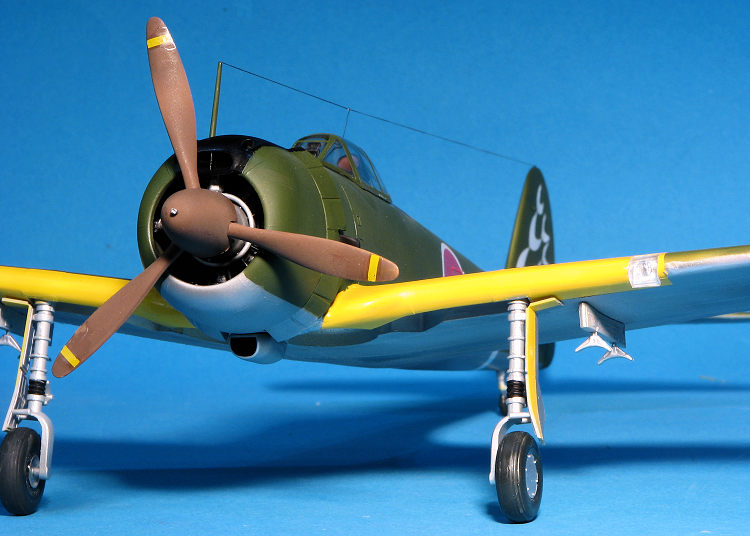 ad, the b version can carry drop tanks while both can carry bombs. Both
items are included in the kit.
ad, the b version can carry drop tanks while both can carry bombs. Both
items are included in the kit.
The kit comes with a relatively nice engine that has separate cylinders. Both banks are built up and the intake or exhaust piping is added before they are mated as are the pushrod assemblies. The Ki-43-IIa has a circular oil radiator that fits in the very front as on the earlier -I Hayabusa. Now would be a good time to mention that one has to cut the fuselage for the exhaust that you choose so you need to decide early in the build if you will be doing an a or b version.
A well done interior is provided with all the usual accoutrements and controls. The inside of the fuselage halves has some nice detail as well. In line with other large Hasegawa kits of this era, a pilot figure is included. The wings are already slotted for the racks so those will need to be filled if you don't want them on your model. Other model a and b differences are the lower cowling cooler intake and the size of the head rest. There is a separate windscreen and canopy so you can pose the canopy open if you wish.
The instructions are very well done with lots of detail drawings to help keep things properly aligned. All the color information is generic and Hasegawa calls for the interior to be either grey or malachite green. I suppose it was probably Nakajima interior green. There are markings for four aircraft. A full color placement guide is provided this showing a green camouflaged plane, an unpainted metal plane with the IJAAF and a tiger painted plane with the Manchurian AF. The fourth is the box art plane. The decals may still be usable, but I'd go with aftermarket for this one just to be sure. To my eye the colors on the kit sheet are too light/bright. No unit information is provided.
| CONSTRUCTION |
 Logically, I began with the cockpit. Considering the
kit's age, the detailing is quite good. I assembled most of the cockpit bits and
painted these with Aeromaster Nakajima cockpit green, which is a sort of
yellowish green. The seat was painted aluminum and I installed a set of Eduard
etched seat belts. While this was going on, I assembled the engine. This takes
time as the cylinders are separate and the block section they fit into is in two
halves. In the forward half, one installs the prop shaft followed by the gear
box, which has the front section of pushrods. On the back bank the pushrod piece
is trapped under the intake manifold section.
Logically, I began with the cockpit. Considering the
kit's age, the detailing is quite good. I assembled most of the cockpit bits and
painted these with Aeromaster Nakajima cockpit green, which is a sort of
yellowish green. The seat was painted aluminum and I installed a set of Eduard
etched seat belts. While this was going on, I assembled the engine. This takes
time as the cylinders are separate and the block section they fit into is in two
halves. In the forward half, one installs the prop shaft followed by the gear
box, which has the front section of pushrods. On the back bank the pushrod piece
is trapped under the intake manifold section.
The instrument panel was painted and dry brushed and I then attached the fuselage halves. I needed to fiddle around a bit with this to get it to fit snugly but it was soon done. While all that was going on, I assembled the wings. The pylon attachment slots are already opened you may as well resign yourself to using them. I found the upper lower wing attachment area on the rear underside to be quite poor. The reason for this is that the seam goes through the flap and the aileron, making clean up a real pain if you want to keep any of the aileron 'fabric' detail. I simply sanded it all away with the filler, though left the top untouched.
 Next the wing and fuselage were mated. There was a
step between the wing and wing root that took me a couple of weeks of filling
and sanding to reduce. Should I build another, I'll glue the upper wings to the
fuselage first then attach the lower wing. I also assembled, cleaned up and
attached the later, taller head rest and glued on the wing pylons.
Next the wing and fuselage were mated. There was a
step between the wing and wing root that took me a couple of weeks of filling
and sanding to reduce. Should I build another, I'll glue the upper wings to the
fuselage first then attach the lower wing. I also assembled, cleaned up and
attached the later, taller head rest and glued on the wing pylons.
One has to choose between 'early' and 'late' exhaust as both will require some cutting or trimming. I chose the latter and this meant cutting away a portion of a cowl flap. I attached the cowl flap piece to the back of the engine and then test the exhaust and the engine to the fuselage to be sure all fit well enough
I then filled the cockpit with tissue in preparation for painting.
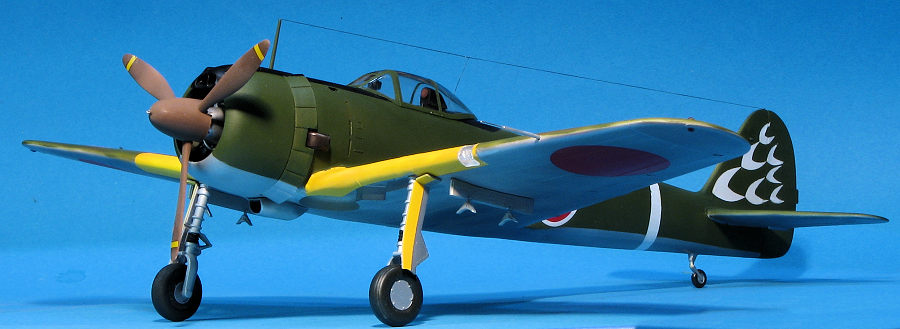
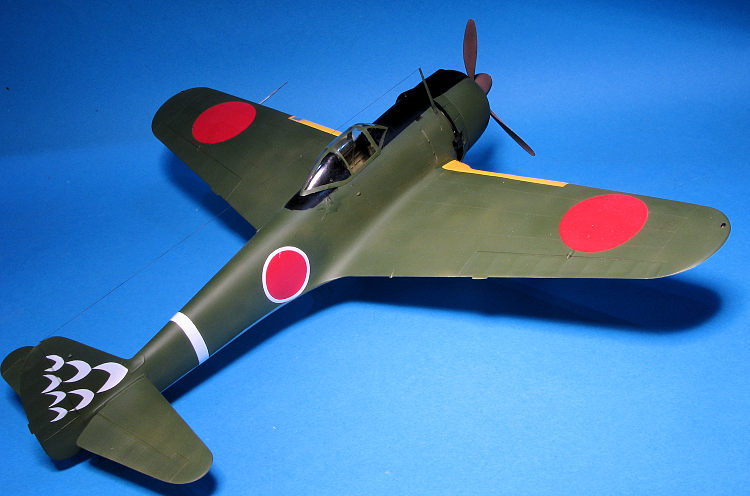
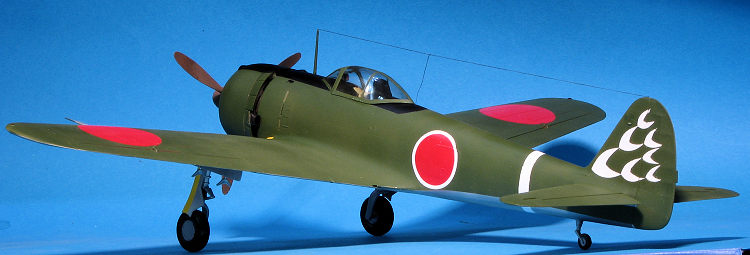
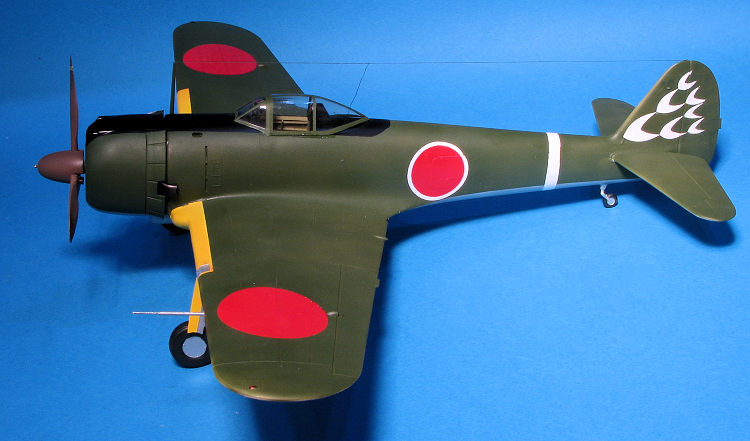
| COLORS & MARKINGS |
Since I feared that the kit decals wouldn't hold up
due to age, I went searching for a replacement. I found a set of Montex paint
masks for this plane and chose what is listed as the 248 Sentai markings. There
are two ways to use masks. One is to completely paint the airframe then apply
the masks and put additional mask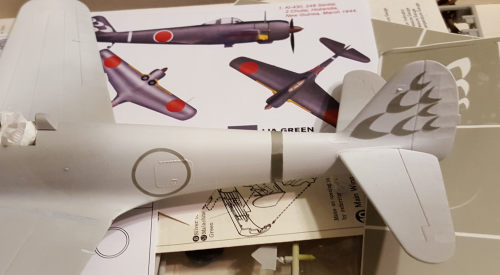 ing
around them and paint. The other is to build up the colors by painting the
appropriate colors first. With only two colors (red and white), I picked the
latter. First I painted most of the airframe in white. I then carefully picked
out the fuselage hinomaru outline, the fuselage band, and the rather intricate
tail markings. These were applied and buffed down as best I could.
ing
around them and paint. The other is to build up the colors by painting the
appropriate colors first. With only two colors (red and white), I picked the
latter. First I painted most of the airframe in white. I then carefully picked
out the fuselage hinomaru outline, the fuselage band, and the rather intricate
tail markings. These were applied and buffed down as best I could.
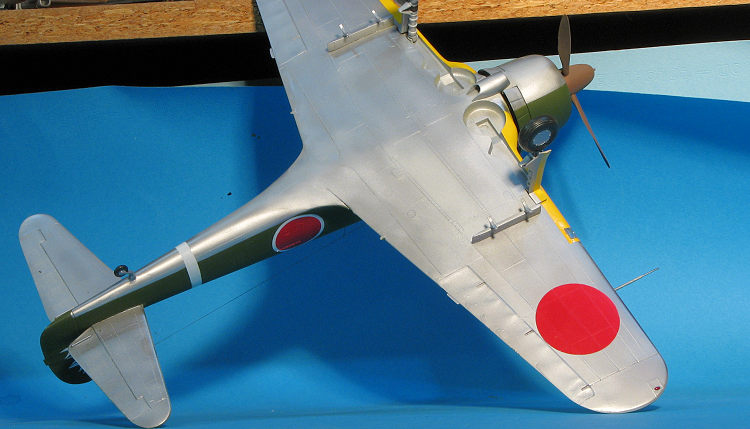
I then painted the wing leading edge ID section with yellow, masking over the areas that would take the wing insignia so there wouldn't be any overspray. Note that I held the main gear doors in place with Silly Putty so they would be properly painted during this time. The underside was painted with Alclad II matt aluminum. This was masked and the upper surface was sprayed with Aeromaster Nakajima Army Green. This is an acrylic and was apparently an unopened bottle. The green is a bit lighter than the darker green shown in the instructions, but I don't think it makes that much difference. One thing about this is that I had to use several light coats to try to keep the paint from flowing under the masks. Removing the masks once done will show how successful that was. I also had to paint the black anti-glare areas and fortunately, I had no issues with the Aeromaster paint pulling up when doing this. I then taped the engine cowling/engine assembly onto the front to be sure the various demarcation lines matched up. This took a bit more time.
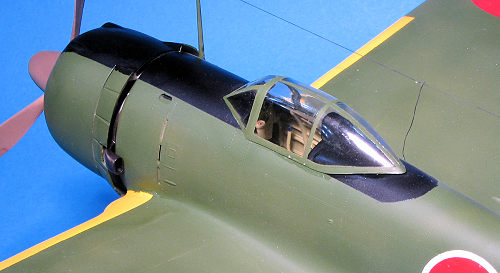
 I wanted to build this one with a closed canopy. The frames
are large enough and clear enough that you can see what's inside with no issues.
Prior to applying the canopy masks, I glued the windscreen and canopy section
together and made sure it fit the fuselage with no gaps. This was then masked
and painted in the Aeromaster green. While the canopy mask set came with wheel
and landing light cover masks, I did not use them. The prop assembly was painted
a dark brown shade that I had mixed ages ago using acrylics. The prop was the
only part of the kit that got decals. I used the stripes provided in the kit
decals and these were very delicate. Had I used the other kit markings, I'd have
had to clear coat them as they would have fallen apart. The masking was removed
from everything and I was happily surprised to see that there was little paint
bleed under. A tad bit on the canopy and tail markings, but thanks to using
acrylics, this was easy to scrape away for the most part.
I wanted to build this one with a closed canopy. The frames
are large enough and clear enough that you can see what's inside with no issues.
Prior to applying the canopy masks, I glued the windscreen and canopy section
together and made sure it fit the fuselage with no gaps. This was then masked
and painted in the Aeromaster green. While the canopy mask set came with wheel
and landing light cover masks, I did not use them. The prop assembly was painted
a dark brown shade that I had mixed ages ago using acrylics. The prop was the
only part of the kit that got decals. I used the stripes provided in the kit
decals and these were very delicate. Had I used the other kit markings, I'd have
had to clear coat them as they would have fallen apart. The masking was removed
from everything and I was happily surprised to see that there was little paint
bleed under. A tad bit on the canopy and tail markings, but thanks to using
acrylics, this was easy to scrape away for the most part.
| FINAL CONSTRUCTION |
 With the painting out of the way, it was time to add all the
smaller pieces and do the usual touch-up painting. I attached the exhaust
collector to the fuselage after a considerable amount of trimming of the
fuselage mounting area. Remove the alignment tab as it just causes issues. The
inside of the collector piece had to be thinned down as well to get it to fit.
The engine/cowling assembly proved to be a very loose fit so super glue was the
answer to getting it in place.
With the painting out of the way, it was time to add all the
smaller pieces and do the usual touch-up painting. I attached the exhaust
collector to the fuselage after a considerable amount of trimming of the
fuselage mounting area. Remove the alignment tab as it just causes issues. The
inside of the collector piece had to be thinned down as well to get it to fit.
The engine/cowling assembly proved to be a very loose fit so super glue was the
answer to getting it in place.
I had already glued the wheels to the main landing gear legs so installed those. Again, some trimming of the attachment points was needed to get a really good fit. I then scraped away at the landing light housing and painted the inside of it aluminum with a chrome light. Bomb/tank braces were also cleaned up and installed. In reality these parts are cast and should have mold seams, but most were removed any way. These are a relatively loose fit. Then the canopy was attached using clear gloss paint. The oil cooler was then painted and attached.
 Getting
closer to being done, the gear doors were bent as shown in the instructions and
glued into place. I also installed the pitot and radio mast. Some more touch up
was done including using a Sharpie for the wing and tail lights. As usual, I
totally hosed attaching the EZline antenna. Specifically where it goes into the
fuselage. One of these days I will learn to use stretched sprue or fine wire for
the lead-ins as those don't produce the mess that I made of it. Last item was to
push the prop in place and that took a bit of grunt.
Getting
closer to being done, the gear doors were bent as shown in the instructions and
glued into place. I also installed the pitot and radio mast. Some more touch up
was done including using a Sharpie for the wing and tail lights. As usual, I
totally hosed attaching the EZline antenna. Specifically where it goes into the
fuselage. One of these days I will learn to use stretched sprue or fine wire for
the lead-ins as those don't produce the mess that I made of it. Last item was to
push the prop in place and that took a bit of grunt.
| CONCLUSIONS |
As much as I'd like Hasegawa to produce a new tool
Oscar as it did for the Zero, I'm not sure when that would take place. The Oscar
was built in significant numbers and served pretty much everywhere the Japan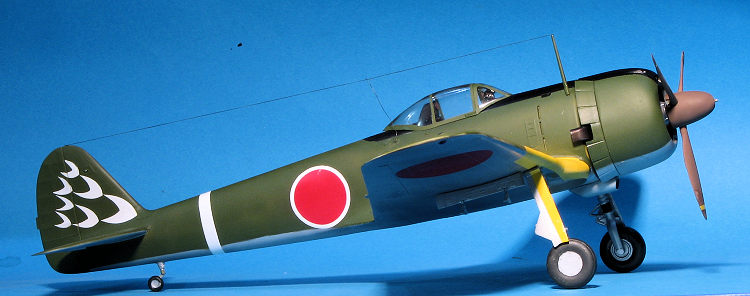 ese
fought. This kit isn't bad, but very much shows its near 50 years of age. Fit is
a bit dodgy in places, but it does have pretty much everything you'd need to
make a good model for your shelf. The paint masks were the real reason this was
built and I'm generally pretty pleased with how that aspect of things evolved.
I'm definitely going to go this route again when I do a 1/72 WWII fighter and
this time, will try the 'paint everything then apply masks' method to see if it
is any easier.
ese
fought. This kit isn't bad, but very much shows its near 50 years of age. Fit is
a bit dodgy in places, but it does have pretty much everything you'd need to
make a good model for your shelf. The paint masks were the real reason this was
built and I'm generally pretty pleased with how that aspect of things evolved.
I'm definitely going to go this route again when I do a 1/72 WWII fighter and
this time, will try the 'paint everything then apply masks' method to see if it
is any easier.
These kits can be found for a very reasonable price as things go and they do build into a nice model, so give one a go if you have the inclination..
| REFERENCES |
https://en.wikipedia.org/wiki/Nakajima_Ki-43
22 December 2017 Copyright ModelingMadness.com.
All rights reserved If you would like your product reviewed fairly and
fairly quickly, please
contact
the editor or see other details in the
Note to
Contributors.