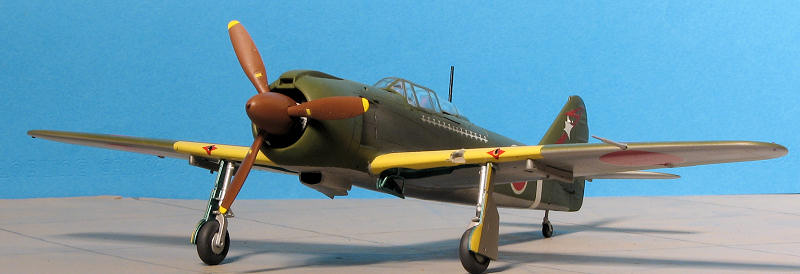
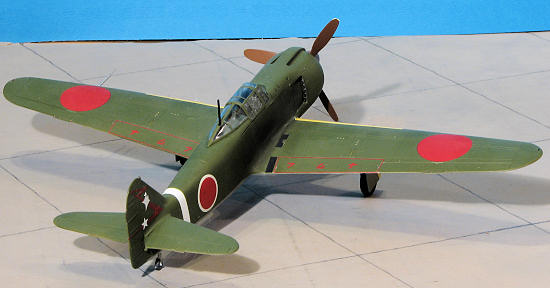
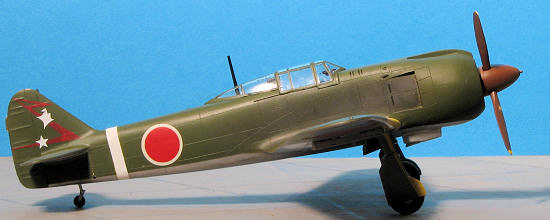
Hasegawa 1/48 Ki-100 otsu 'Akeno Flight School'
| KIT #: | 09765 |
| PRICE: | $20.00 as a 'used' kit |
| DECALS: | Two options |
| REVIEWER: | Scott Van Aken |
| NOTES: | 2007 limited boxing |
| HISTORY |
The kit instructions start off my saying something about the 'highly
successful Ki-61'. Well not as highly successful as it could have been. Aside
for a nearly non-existent parts supply chain that often grounded perfectly good
planes for want of a gasket or
 spark plugs, the Ki-61's reverse engineered
DB.601 was not the most reliable engine around.
spark plugs, the Ki-61's reverse engineered
DB.601 was not the most reliable engine around.
When the plane was fully functional, it was very good, but so bad was the engine situation, that by mid 1944 there were scores of completed airframes awaiting power plants. Then, someone got the idea of using a bomber engine. These were 14 cylinder twin row radials that required a major redesign of the nose to properly fit. However, necessity is the mother of invention and in a remarkably short time, the Ki-100 came into being.
Imagine the surprise when it was discovered that this 1500 hp radial completely transformed the plane into an agile and fast aircraft. They couldn't be converted or built fast enough. Unfortunately for the Japanese, the plane only first flew in Feb of 1945, not enough time to get all that many of them into unit service before the war ended 6 months later.
| THE KIT |
It will come as a surprise to no one that half of this kit's sprues are for the Ki-61. Just like the real plane, Hasegawa has added those pieces that will make it into a Ki-100. This is basically new fuselage halves and the engine section. the wings, landing gear, interior, canopy, and tailplanes are all standard Ki-61. And this is good as the Hasegawa 1/48 Ki-61 is a beauty of an aircraft. Were I not such a lethargic builder, I'd have done a ton of these.
So, let me take another look a things. Seven sprues of which one is
clear and offers both canopy types. The detailing is finely engraved and crisply
executed. There are the usual ejector pin marks on the gear legs, wheels, inside
of gear doors and so on. None impossible to fix, but we wish they weren't there
to start. Nicely done cockpit with raised detailing on the instrument panel and
a decal if you wish to g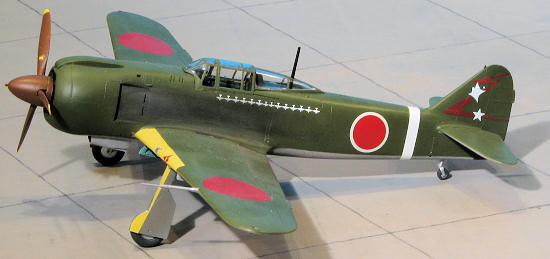 o that route. Nicely done is the sidewall and the rest
of the cockpit parts, needing only a shoulder harness to make for a perfectly
acceptable cockpit. One of these days, kit makers will start including this item
in all their kits.
o that route. Nicely done is the sidewall and the rest
of the cockpit parts, needing only a shoulder harness to make for a perfectly
acceptable cockpit. One of these days, kit makers will start including this item
in all their kits.
Probably the area that will cause any difficulty will be the lower fuselage section that fits over the lower wing. I have heard that care needs to be taken to get a good fit. Nothing fancy under the wings, just a pair of pylons and drop tanks. These could easily be left off and would make for a much cleaner looking aircraft.
Instructions are par for Hasegawa and have the usual Gunze paint references. Decals are well printed and the colors look right. The sheet includes the yellow wing ID bands, but I'd recommend painting this area instead. Wing walk markings are also included along with the usual insignia and unique markings. Both options are Kawasaki Dark Green over unpainted metal. The lower side of the fabric control surfaces should probably be a grey green color but are shown in the instructions as aluminum. The first option is that of the box art; Major Yohei Hinoki's plane of the Akeno Training Division. This plane has a lot of color in terms of both fuselage and upper wing bands. the other is a more mundane looking plane from the 111th Flight Regiment with only an aluminum tipped spinner and red fin tip to add color.
| CONSTRUCTION |
Starting with the cockpit, I assembled all the bits that would be the same
color. An inquiry was made in the forum as to a good substitute for Kawasaki
interior brown. RLM 79 was the unanimous response so, grabbing some old
Aeromaster enamels, I duly painted the interior, inside of the gear doors and
the gear wells with this paint. It was also the color recommended by the
 aftermarket decal sheet. More gluing and the interior bits were detailed
and ready to install. Then a later posting indicated that the lone surviving
Ki-100, a 'bubbletop' version as is this kit was extant in the UK and
refurbished in original colors. Not a brown, but a green. Recalling that I have
a copy of Japanese Interior Colors, by Monogram Books, I went to the book and
sure enough, lots of nice color photos.
aftermarket decal sheet. More gluing and the interior bits were detailed
and ready to install. Then a later posting indicated that the lone surviving
Ki-100, a 'bubbletop' version as is this kit was extant in the UK and
refurbished in original colors. Not a brown, but a green. Recalling that I have
a copy of Japanese Interior Colors, by Monogram Books, I went to the book and
sure enough, lots of nice color photos.
This also showed that the cockpit used by Hasegawa is VERY basic and also inaccurate in several respects. Those concerned enough by this lack of accuracy may well want to invest in an aftermarket set, assuming that set is also correct. Anyway, I broke out a dark green and repainted. Then, following the book as a guide, the various bits were repainted and detailed. A set of Eduard IJA seat belts was installed and the interior, along with a few other items were trapped between the fuselage halves. As a note to all, be careful on the installation of the gun barrel assembly as it is easy to get it off center.
 During this process, the engine needs to be installed. This small assembly
was painted dark aluminum with a lighter aluminum crankcase cover and treated to
a black wash. Fuselage fit is pretty good, though my fuselage halves were
slightly warped. Even taping them while the cement dried wasn't enough to get
rid of all the seams and so several rounds of filler were done. The upper
cowling piece is not a super good fit, so keep the filler handy.
During this process, the engine needs to be installed. This small assembly
was painted dark aluminum with a lighter aluminum crankcase cover and treated to
a black wash. Fuselage fit is pretty good, though my fuselage halves were
slightly warped. Even taping them while the cement dried wasn't enough to get
rid of all the seams and so several rounds of filler were done. The upper
cowling piece is not a super good fit, so keep the filler handy.
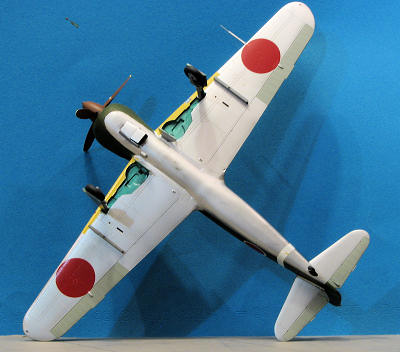
While all that was going on, I cemented the wings together after opening the holes for the wing pylons. Once the wing was dry and seams filled, I test fit it on the already glued fuselage. I found that on the Ki-100, the fuselage is a tad too wide for the wings so needs trimmed down a bit at the roots for a good fit.. With that in place, the fillet section was attached over the wing center section. This does not fit well so filler and sanding are required to smooth things out. The oil cooler exhaust door and the tail planes were then glued in place while some touch-up painting was done around the cockpit area prior to installation of the already masked canopy. As a note, I found the canopy to have quite a bit of flash on it, something rather unusual for Hasegawa.
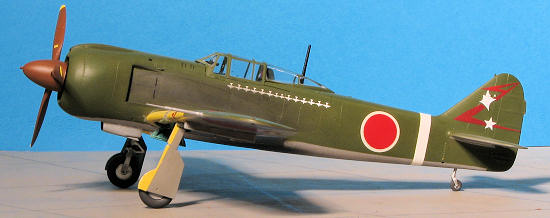
| COLORS & MARKINGS |
For this build, I used
Lifelike sheet 48-005 on the
244 Sentai. The instructions go into a lot of detail on why they thought the
specific aircraft was marked as shown, but give little in the way of overall
painting information. For instance, they don't specify whether or not the
underside was light grey or unpainted metal, something I found rather odd.
Figuring that most Japanese planes of this type would be unpainted metal on the
underside, that is what I went with and used Alclad II Aluminum for this
 purpose
after first painting the underside control surfaces with standard green-grey.
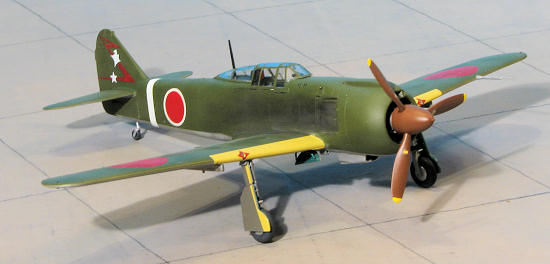
The upper surfaces were painted with Kawasaki Army Green using an old bottle of Aeromaster Acrylic paint that I had.
purpose
after first painting the underside control surfaces with standard green-grey.
The upper surfaces were painted with Kawasaki Army Green using an old bottle of Aeromaster Acrylic paint that I had.
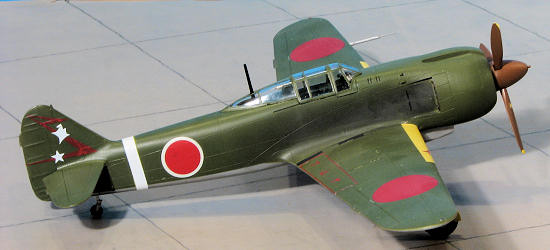
The kit then had the main gear installed and was given a coat of Future to prepare it for the decals. For the myriad of data markings and insignia, as well as the yellow wing ID bands, I used kit decals. These are quite thin to the point of being easy to tear and the yellow is not quite fully opaque, but they went on without too much trouble and reacted well to Microsol. The Lifelike decals I used were not really as good as I'd hoped. Though I only used markings for the fuselage band, kill markings and the tail markings, I found the decals to be even more prone to tearing and chipping than the kit decals. In addition, I completely missed that the yellow tail band needed to have a white band applied first and the yellow shows a lot of the underside color.
Life Like does not have decal numbers pointing to
various places on the airframe in the profiles as you find on most other decal
sheets. Instead, it lists the unique markings at the end of the individual
aircraft description. Having been once fooled, I looked for a similar white
backing decal for the tail markings. The instructions did not list one and what
was there was obviously for another aircraft. The red tail marking immediately
broke into sections for both sides and when finally put in place, also showed a
lot of the u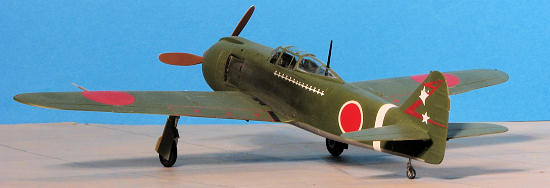 nderlying color, just like the fuselage band. Eventually, I used the
white band atop the yellow one as all the other options had white bands and I
figured this one may well have also since there was no complete image of the
plane available. There may have been extenuating circumstances such as the
decals getting overly hot in transit or storage, but based on my experiences
with Life Like decals, I really cannot recommend them. I do, however, recommend
that Life Like under print all of its red and yellow markings with white as do
most other decal makers. This should take care of the transparency issue.
A coat of Polly Scale matte clear was then sprayed on.
nderlying color, just like the fuselage band. Eventually, I used the
white band atop the yellow one as all the other options had white bands and I
figured this one may well have also since there was no complete image of the
plane available. There may have been extenuating circumstances such as the
decals getting overly hot in transit or storage, but based on my experiences
with Life Like decals, I really cannot recommend them. I do, however, recommend
that Life Like under print all of its red and yellow markings with white as do
most other decal makers. This should take care of the transparency issue.
A coat of Polly Scale matte clear was then sprayed on.
| FINAL CONSTRUCTION |
 Back on the
bench and after a short hiatus, the wheels were glued on the main gear and the
gear doors were all glued in place. The inner doors and mount need careful
construction as they are not as straight-forward as they might appear. I found
that the inner door actuator pieces fit better when they were swapped as the tab
that fits into the gear well seems better angled when done so.
Back on the
bench and after a short hiatus, the wheels were glued on the main gear and the
gear doors were all glued in place. The inner doors and mount need careful
construction as they are not as straight-forward as they might appear. I found
that the inner door actuator pieces fit better when they were swapped as the tab
that fits into the gear well seems better angled when done so.
Other bits like the radio mast, pitot tube, landing light cover and prop were also cemented on as were the wing pylons. No tanks, though those might be added on at a later time. The exhaust stains were applied using a Tamiya weathering set. The masking was taken from the clear bits, the prop pushed in place and the kit had become a model.
| CONCLUSIONS |
 I had
forgotten that I'd built the 'razorback' version of
this kit several years ago, but it is still nice to add this variant to the
collection. It would have been nice had the fit of the canopy and lower wing
fairing been better as these areas detracted somewhat from the build. And of
course, had I been smart, I'd have used the kit decals as the Life Like ones did
not work out well at all. Still, if you find this one around (and it has been a
while since last reissued), it is well worth the effort.
I had
forgotten that I'd built the 'razorback' version of
this kit several years ago, but it is still nice to add this variant to the
collection. It would have been nice had the fit of the canopy and lower wing
fairing been better as these areas detracted somewhat from the build. And of
course, had I been smart, I'd have used the kit decals as the Life Like ones did
not work out well at all. Still, if you find this one around (and it has been a
while since last reissued), it is well worth the effort.
March 2011
Thanks to me for this one, and that includes the aftermarket decals.
If you would like your product reviewed fairly and quickly, please contact me or see other details in the Note to Contributors.