| KIT #: | FB 3 |
| PRICE: | $25.00 SRP back in 2000 when it was new |
| DECALS: | Six options |
| REVIEWER: | Scott Van Aken |
| NOTES: | 2000 boxing |
| HISTORY |
The Nakajima Ki-43 Hayabusa (隼, "Peregrine Falcon") was a single-engine land-based tactical fighter used by the Imperial Japanese Army Air Force in World War II. The Army designation was "Army Type 1 Fighter" (一式戦闘機); the Allied reporting name was "Oscar", but it was often called the "Army Zero" by American pilots for its side-view resemblance to the Mitsubishi A6M Zero that was flown by the Japanese Navy, using essentially the same radial engine as the Army's Oscar, and with the Oscar having much less framing for its all-around vision canopy than the Zero used.
 Like the Mitsubishi-produced A6M Zero, the radial-engined
Ki-43 was light and easy to fly and became legendary for its combat performance
in East Asia in the early years of the war. It could outmaneuver any opponent,
but did not have armor or self-sealing tanks, and its armament was poor until
its final version, which was produced as late as 1945. Allied pilots often
reported that the nimble Ki-43s were difficult targets but burned easily or
broke apart with few hits. In spite of its drawbacks, the Ki-43 shot down more
Allied aircraft than any other Japanese fighter and almost all the JAAF's aces
achieved most of their kills in it.
Like the Mitsubishi-produced A6M Zero, the radial-engined
Ki-43 was light and easy to fly and became legendary for its combat performance
in East Asia in the early years of the war. It could outmaneuver any opponent,
but did not have armor or self-sealing tanks, and its armament was poor until
its final version, which was produced as late as 1945. Allied pilots often
reported that the nimble Ki-43s were difficult targets but burned easily or
broke apart with few hits. In spite of its drawbacks, the Ki-43 shot down more
Allied aircraft than any other Japanese fighter and almost all the JAAF's aces
achieved most of their kills in it.
The final version of the Ki-43 was the Ki-43-III which utilized the more powerful Nakajima Army Type 1 Ha-115-II engine. Maximum speed increased to 358 mph. This variant was produced until the end of the war, though it did not see the widespread use of the earlier versions and did not offer much additional in the way of pilot protection or heavier armament, though the nose guns were increased to 12.7mm and a version with 20mm cannon was being developed, but never reached production.
Total production amounted to 5,919 aircraft. Many of these were used during the last months of the war for kamikaze missions against the American fleet.
| THE KIT |
 I previously built and previewed
their Ki-43-II several years back so you can find that in the archives. For
those who want a quick look, Fine Molds' kits of this time were a bit of a
mixture of Otaki and Hasegawa. The detailing is engraved, though without all
the rivet detail of the Otaki kit.
I previously built and previewed
their Ki-43-II several years back so you can find that in the archives. For
those who want a quick look, Fine Molds' kits of this time were a bit of a
mixture of Otaki and Hasegawa. The detailing is engraved, though without all
the rivet detail of the Otaki kit.
The interior has a floor, seat stick and instrument panel assembly. The rudder pedals and sidewall detail are molded into the floor and fuselage interiors respectively. The seat bottom has the parachute pack molded into it, unlike Hasegawa's empty seat. The instrument panels are both a single piece along with its mounting frame where Hasegawa has more realistic separate panels and backing. I should add that Fine Molds includes a standing pilot figure.
The engine on the Fine Molds kit is a simple forward face with a gearbox on the front through which the prop shaft extends. The cowling is mostly molded onto the fuselage halves with separate cooling gills, upper section and forward cowling piece. The ejector exhaust are separate pieces, with three sections per side.
Wings are a full lower section with two upper halves, pretty standard stuff. One needs to open the holes for the wing pylons and a center oil cooler. Single piece stabs slot into the tail. Landing gear has a separate inner hub for the wheels and separate oleo scissors. The landing gear covers are two piece on each side. For the wing pylons you have separate anti-sway brackets to hold the cylindrical fuel tanks. Topping the cockpit is a separate windscreen and canopy, so you can pose the canopy open.
 Instructions are in Japanese with only
minimal English. This is not an impediment to building the kit. Color
information for the various boxes in the interior is also included. There
are six sets of markings included, all of them in an olive drab upper color
with unpainted metal undersides. I think that Hasegawa got the underside
color wrong unless they have unearthed some research info in the intervening
years. Despite the unpainted undersides, the control surfaces will need to
be in the standard primer for fabric, which is the grey-green shade.
Instructions are in Japanese with only
minimal English. This is not an impediment to building the kit. Color
information for the various boxes in the interior is also included. There
are six sets of markings included, all of them in an olive drab upper color
with unpainted metal undersides. I think that Hasegawa got the underside
color wrong unless they have unearthed some research info in the intervening
years. Despite the unpainted undersides, the control surfaces will need to
be in the standard primer for fabric, which is the grey-green shade.
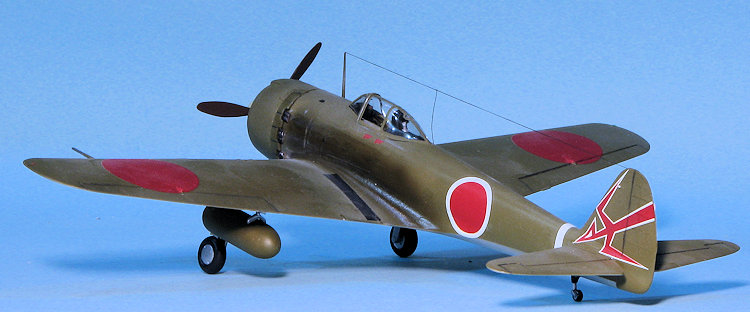
THe plane has markings for the 64th Hiko Sentai in China during May 1945, the 33rd Hiko Sentai in Sumatra during October 1944, the 204th Hiko Sentai on Formosa in the Summer of 1945, the 48th Hiko Sentai in China during August 1945, the 39th Kyoiku Hikotai in Japan during 1945 and the 65th Hiko Sentail also in Japan during August 1945. The decals are nicely done and includes an instrument panel decal.
| CONSTRUCTION |
When I got in the Hasegawa kit of this variant, I decided it would be a good time to build the Fine Molds kit I've had in my stash for well over a decade. Not only would it give me the opportunity to compare the two, but this kit offers a lot of marking options and I could easily use one of those on the Hasegawa kit.
I started with the interior, using the remnants of my Aeromaster Nakajima Interior Green to paint the various inside bits. I used a brush for this as I enjoy brush painting when it is complex forms like this or won't make all that much of a difference. This green is a yellow green so one could use Italian Interior Green as a substitute by adding a touch of yellow to it. I then added the instrument panel decal.
 Meanwhile, I decided to test fit the wings. Good thing as I
found that using the provided alignment pins would cause the parts to be ill
fitting. Those were removed and the wings cemented. I checked the fuselage and
found a few of those that needed to go, mostly in the back. I then finished
painting all the parts of the cockpit, assembled things and gave it a brown
wash. Actually, you cannot see much of the cockpit as the opening is small, so
any major detailing will go unnoticed. As a note, you can install the cockpit
once the fuselage halves are together as the cockpit fits under the placement
lugs. While on this track, I also painted and washed the engine, installing it
with the cockpit and closing up the fuselage halves. When installing the cowling
parts, you'll notice that the fit is not very good. Nothing that filler and
sanding cannot fix, but something that will take a bit more time.
Meanwhile, I decided to test fit the wings. Good thing as I
found that using the provided alignment pins would cause the parts to be ill
fitting. Those were removed and the wings cemented. I checked the fuselage and
found a few of those that needed to go, mostly in the back. I then finished
painting all the parts of the cockpit, assembled things and gave it a brown
wash. Actually, you cannot see much of the cockpit as the opening is small, so
any major detailing will go unnoticed. As a note, you can install the cockpit
once the fuselage halves are together as the cockpit fits under the placement
lugs. While on this track, I also painted and washed the engine, installing it
with the cockpit and closing up the fuselage halves. When installing the cowling
parts, you'll notice that the fit is not very good. Nothing that filler and
sanding cannot fix, but something that will take a bit more time.
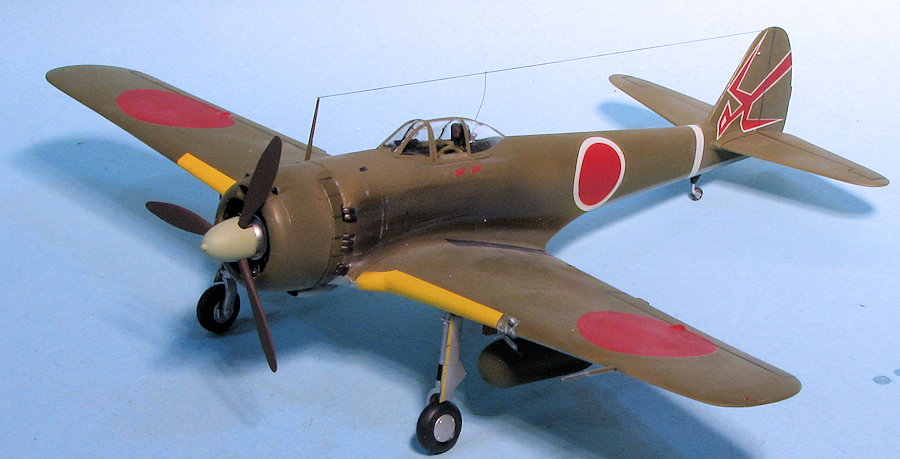
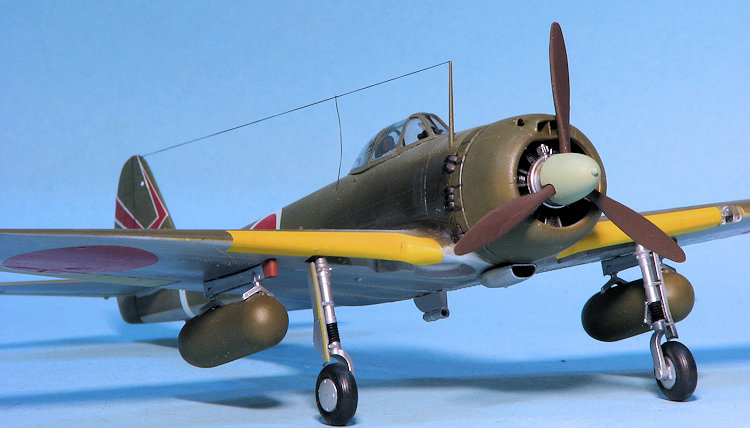
Back at the wings, once they were together and the edged dealt with, the leading edges were given a coat of white and then a coat of yellow. I've done this after the wings were attached and it just seems like this would be the easiest time to paint this. Fine Molds does not tempt one with decals for this feature, and I feel that is for the best. Once the yellow had dried, I masked the wings.
| COLORS & MARKINGS |
With the fuselage halves together, I installed the tail
planes. I needed to slightly trim back the tailplane roots as they stuck out
beyond the stabs. This was done before gluing on the stabs as it made the job
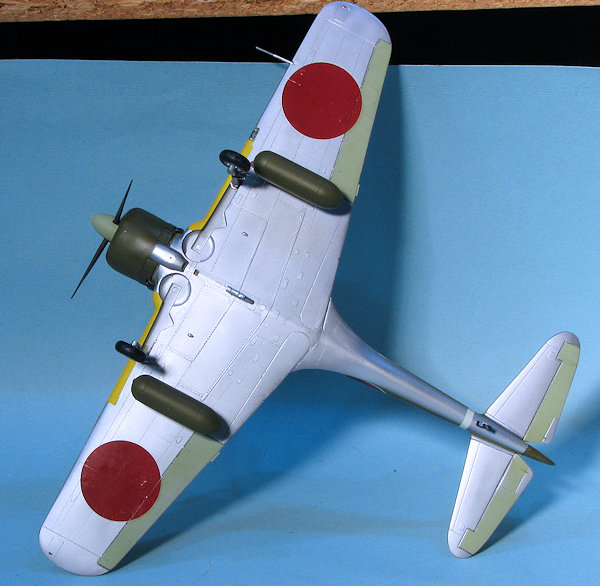
easier. Meanwhile, I prepainted the wings, using olive drab for the upper
surface, aluminum for the underside and IJAAF green-grey for the underside
ailerons. I also painted the underside of the elevators with this shade. I also
remembered to paint the elevator trim tabs with aluminum as these were metal. A
 basic spray of the aluminum on the underside and OD on the upper surface of the
fuselage was done before I fit the wing.
basic spray of the aluminum on the underside and OD on the upper surface of the
fuselage was done before I fit the wing.
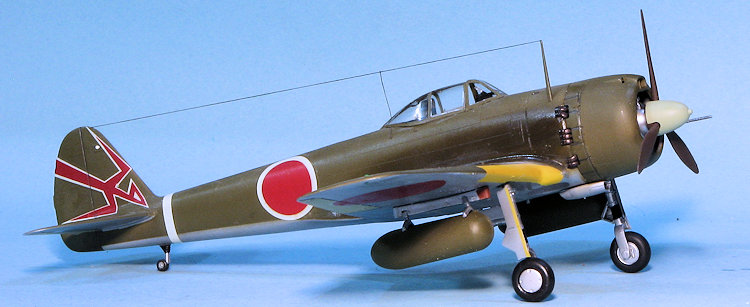
The wing required some trimming on the fuselage to get into place and even then the fit is not all that good. I ended up having to use filler on just about all the areas where the wing attaches to the fuselage. The gun sight and other external cockpit bits were glued on, then the windscreen and canopy were masked and glued on. I then masked off the lower aluminum and painted on the rest of the olive drab. This included the drop tanks, which apparently could be OD, aluminum, primer grey-green, primer brown or even a yellow. It seems the tanks were pretty much universal and could fit any IJAAF fighter.
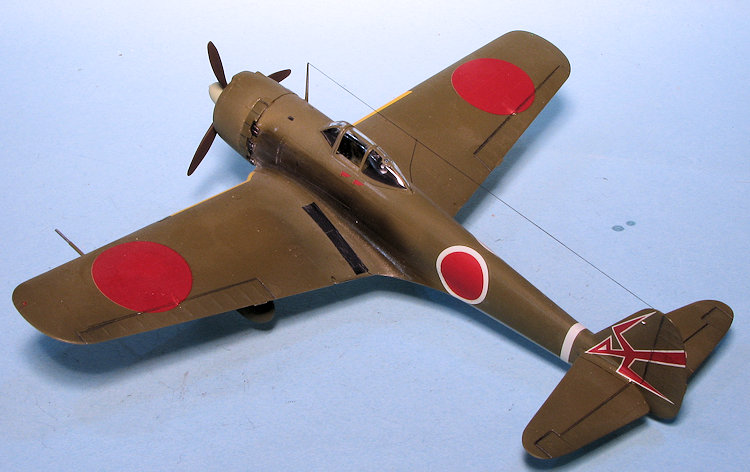
I then attached the main gear legs and started applying decals once I gloss coated the upper surfaces. I used the kit decals and chose an interesting looking tail marking from 39th Hikotai, based in Japan during 1945. The decals took forever to come free from the backing, but once they did, they performed superbly. I used Mr. Mark Softer to get them to snuggle down and had no issues at all.
 During all
this, I dropped the kit and not only broke one of the landing gear, but lost the
oleo scissors to it. I used wire to replair the landing gear and a section of
decal paper to make a new oleo scissor. The ejector exhaust were then glued on
and I found I had to move a few of them around to get the cowl flap section to
fit. The lower intake was glued on as was the radio mast and the tail wheel.
Wheels are keyed so they only fit on the proper side, which I like.
During all
this, I dropped the kit and not only broke one of the landing gear, but lost the
oleo scissors to it. I used wire to replair the landing gear and a section of
decal paper to make a new oleo scissor. The ejector exhaust were then glued on
and I found I had to move a few of them around to get the cowl flap section to
fit. The lower intake was glued on as was the radio mast and the tail wheel.
Wheels are keyed so they only fit on the proper side, which I like.
A coat of matte clear was then sprayed on the upper surfaces. The holes for the wing pylons had to be opened up even more, requiring a #55 drill bit to make them large enough. Once the pylons were installed, I returned to the paint booth to dirty up the sides with Tamiya Smoke. I made it pretty dirty as late war planes were suffering from rather poor fuel quality as much as plagued the Germans. I then outlined the control surfaces with a pencil, painted the formation lights, added the gear doors, attached the drop tanks, removed the masking from the clear bits and the engine, attached some EZ-line for the radio antenna and attached the prop.
| CONCLUSIONS |
It was nice to have built a kit I've had in my stash for many years. It was also nice to add this variant to my growling 1/48 Ki-43 collection and while OD may not be everyone's favorite scheme, it is something a bit different from the usual squiggly lines on bare metal that most (including myself) like to paint. The kit is not a slam together and does need to have the parts test fit before assembly. It is typical of Fine Molds initial releases and so the adjustment is to be expected. One thing for sure, it makes into a very nice model that you'll be glad to have on your shelves.
| REFERENCES |
https://en.wikipedia.org/wiki/Nakajima_Ki-43
January 2016
Copyright ModelingMadness.com. All rights reserved. No reproduction in part or in whole without express permission from the editor.
If you would like your product reviewed fairly and fairly quickly, please
contact the editor or see other details in the
Note to
Contributors.